Wondering how to sell your eCommerce products with Facebook ads? Looking for an easy-to-follow Facebook ad funnel you can adapt to your business?
In this article, you'll find a step-by-step guide for creating a complete Facebook ad funnel that works.
#1: Set Up Your eCommerce Site With Facebook
Before diving into how to set up a funnel that brings in sales, make sure your eCommerce site is integrated with Facebook.
First, ensure the Facebook pixel is installed on your website. This will allow you to generate your most valuable audiences, optimize campaigns for conversions, and gather analytics from website visitors.
Additionally, set up your product catalog with Facebook so you can leverage dynamic product ads for bottom-of-funnel campaigns.
Finally, set up and test conversion tracking so you'll know exactly which ads are bringing you the most dollars and which are underperforming.
Conversion tracking is simple to set up with most eCommerce platforms. Simply copy and paste your Facebook pixel ID into Shopify, WooCommerce, or your platform of choice. Check out this article for more on integrating Shopify with Facebook.
#2: Set Up and Populate Your Facebook Ad Targeting Audiences
Once your eCommerce site is set up with Facebook, create custom audiences to target. You want to build custom audiences based on your email list, engagement with your business, and website visitors.
These are the people you want to target at the middle and bottom of the funnel because they're already engaging with your business, browsing your website, and looking at your products. These audiences will be your money-makers.
To create a custom audience, go to the Audiences dashboard in Facebook Ads Manager or Business Manager. Then click Create Audience and select Custom Audience from the drop-down menu.
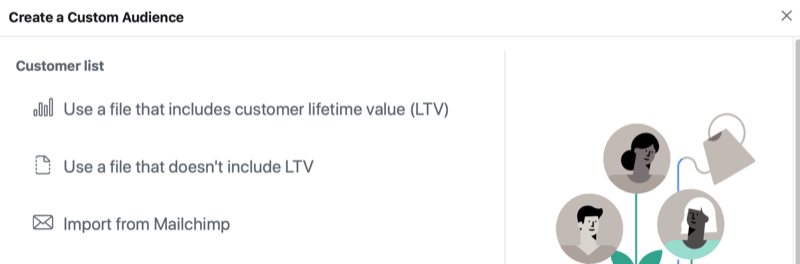
Next, you'll see the different sources you can choose from to create your custom audience.
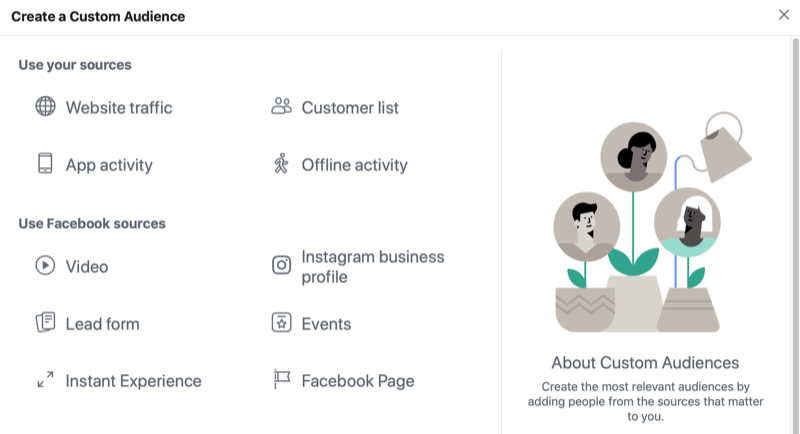
For your Facebook ad campaign funnel, you'll want to create custom audiences based on these sources: Website Traffic, Customer List, Instagram Business Profile, and Facebook Page.
Get World-Class Marketing Training — All Year Long!
Are you facing doubt, uncertainty, or overwhelm? The Social Media Marketing Society can help.
Each month, you’ll receive training from trusted marketing experts, covering everything from AI to organic social marketing. When you join, you’ll also get immediate access to:
- A library of 100+ marketing trainings
- A community of like-minded marketers
- Monthly online community meetups
- Relevant news and trends updates
Custom Audience of Email Subscribers and Purchasers
To create a custom audience of email subscribers, select Customer List as the source. Then upload your email list (downloaded from your email marketing platform) and follow the prompts to create your audience.
Now repeat this process to upload your past purchasers list (downloaded from your eCommerce platform) to create another custom audience.
Pro Tip: Create custom audiences for various lengths of time. I recommend 180-, 90-, 60-, 30-, and 7-day periods.
Custom Audience of Past Purchasers
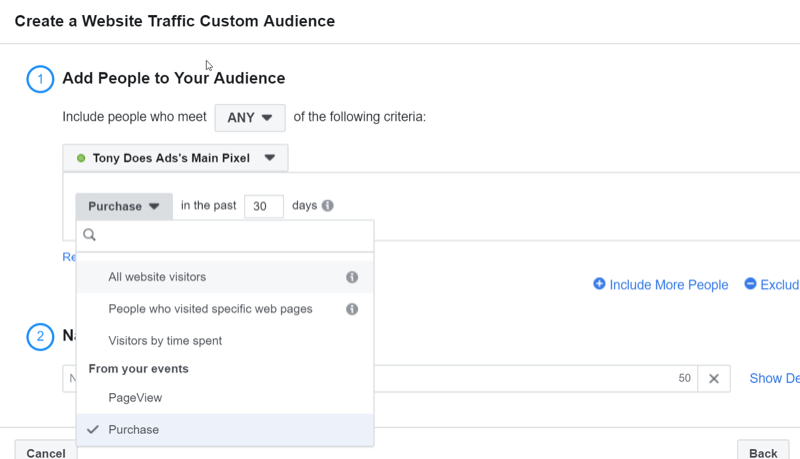
To create a custom audience of past purchasers, select Website Traffic as the source.
In the audience creation window, choose your pixel and select the Facebook pixel conversion event for Purchase. After you enter a descriptive name for the audience, click Create Audience.
Facebook Page Custom Audience
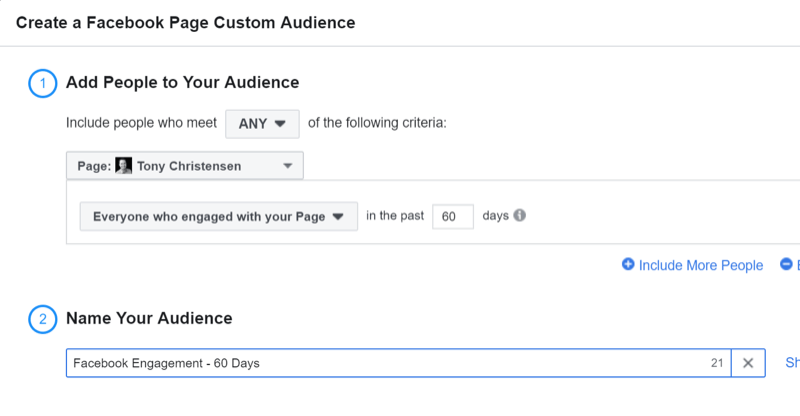
To create your Facebook page engagement custom audience, select Facebook Page as the source.
In the audience creation window, choose your Facebook page and the Everyone Who Engaged With Your Page option. Type in a descriptive name for your audience (such as Facebook Engagement – 60 Days) so you know instantly what it is. Then click Create Audience.
Instagram Business Profile Custom Audience
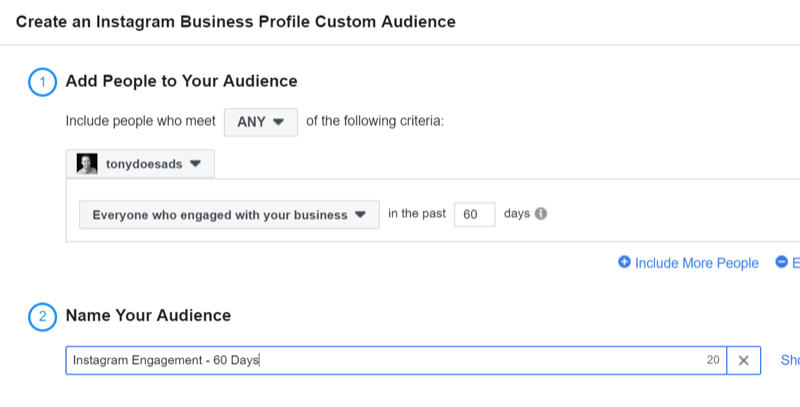
Also create a custom audience based on engagement with your Instagram business profile.
In the audience creation window, select your Instagram business page and choose Everyone Who Engaged With Your Business. After you add a descriptive name for this audience, click Create Audience.
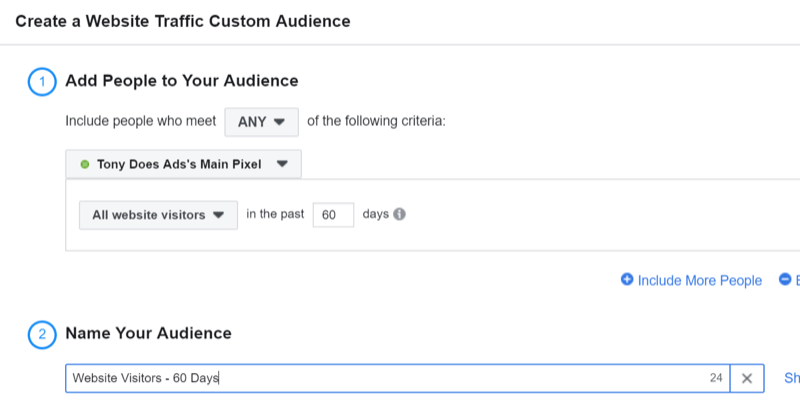
Custom Audience of Website Visitors
Now select Website Traffic to create a custom audience based on your website visitors.
You'll want to create website custom audiences based on different time lengths so you can properly leverage remarketing. Test different periods of time to find out which audiences perform best for your business.
In general, the shorter the time frame of a custom audience, the higher the audience's recollection of your business and products.
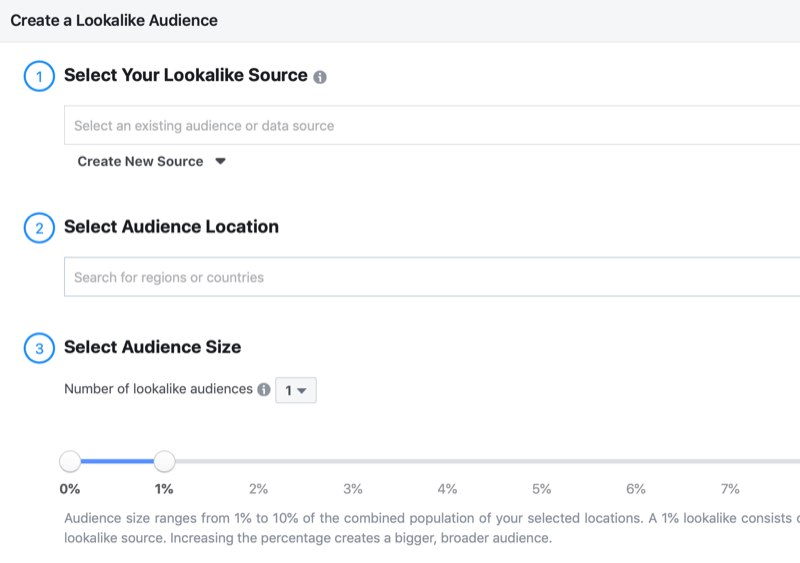
Lookalike Audience of Past Purchasers
Finally, create a 1% lookalike audience of your past purchasers.
In the lookalike audience creation window, select your lookalike source (the past purchasers list you already uploaded) and your audience's location. Then click Create Audience.
Note: If you don't have many purchasers yet, use your email list. If you don't have an email list, you'll have to do interest-based targeting at the top of your funnel.
#3: Establish Product Awareness With a Top-of-Funnel Facebook Campaign
Now that you've created your audiences, let's dive into the overall strategy of your Facebook advertising funnel. In a nutshell, here's what you want to happen at each stage:
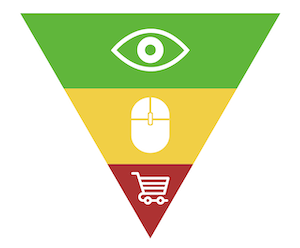
- Top of funnel—Create content that gets people's eyes on your brand and products.
- Middle of funnel—Remarket to people who showed an interest in your brand at the top of the funnel. You want to get these people to view the products on your website.
- Bottom of funnel—After people have engaged with your brand and viewed your products, it's time to get them to purchase. This happens at the bottom of your funnel.
We'll start with the top-of-funnel campaign.
New advertisers often go wrong by pushing to sell their products to people who have never heard of their business and products (cold audiences). Instead of being a pushy salesperson, you want to warm up your target audiences by providing content that grabs their attention and speaks to them.
You also want to build social proof with top-of-funnel campaigns.
Videos work well for this stage of the funnel, but keep in mind that the audiences you're targeting are complete strangers. You want your content to keep their attention so avoid long introductions and don't use the same shot for longer than 3 seconds. Instead, start the video with people talking or movement, add video overlays, and leverage jump cuts and b-roll.
For this example, assume you're spending $10,000 or more a month on advertising. If your monthly spend is lower, you'll likely want to run a Video Views or Engagement campaign for your top-of-funnel videos.
Create a New Campaign
To get started, create a new Facebook campaign and choose the Conversions campaign objective.
Facebook optimizes based on the campaign objective you choose. With the Conversions objective, Facebook will show your ads to people who are most likely to convert. Likewise, if you choose Video Views, your ads will be shown to people who are more likely to watch videos on the platform.
Next, enter a name for your campaign that makes it easy to identify which stage of the funnel it corresponds with.
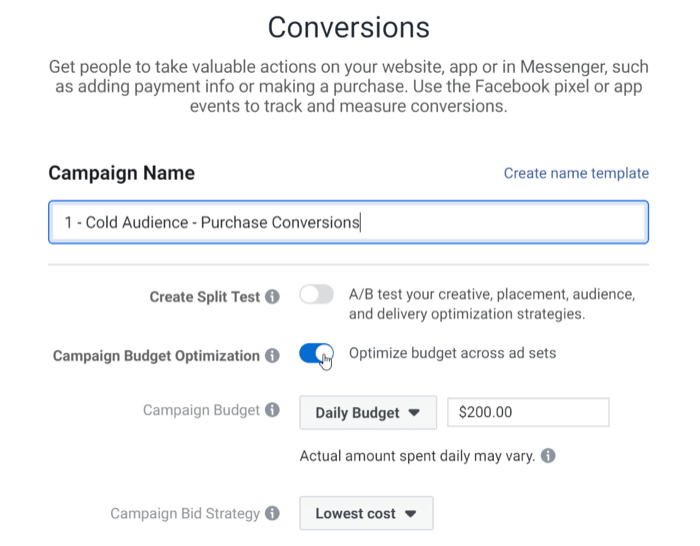
Pro Tip: I recommend starting the campaign name with ‘1' for top of funnel, ‘2' for middle of funnel, and ‘3' for bottom of funnel. Later, if you decide to report on different sections of your funnel, these names will make it easy to filter the data based on whether the name starts with a 1, 2, or 3.
Next, choose the Campaign Budget Optimization option and set your budget. If you don't currently have engagement on your Facebook page and Instagram account, you'll want to use a bigger portion of your budget for the top of the funnel. Then slowly move your budget down the funnel when you have more engagement and website visitors.
Finally, click Continue to create the campaign.
Set Up the Facebook Ad Set
At the Ad Set level, enter a name for your ad set and select Purchase in the Conversion section.
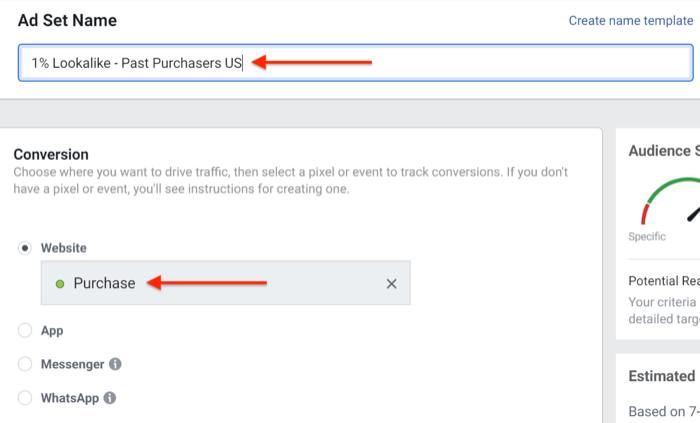
In the Audiences section, select your 1% lookalike audience of past purchasers. Also choose the location of your target audience.
Under Placements, select Automatic Placements to let Facebook optimize placements based on results.
Finally, click Continue to create your ad set.
Discover Proven Marketing Strategies and Tips
Want to go even deeper with your marketing? Check out the Social Media Marketing Podcast! Publishing weekly since 2012, the Social Media Marketing Podcast helps you navigate the constantly changing marketing jungle, with expert interviews from marketing pros.
But don’t let the name fool you. This show is about a lot more than just social media marketing. With over 600 episodes and millions of downloads each year, this show has been a trusted source for marketers for well over a decade.
Design Your Facebook Ad Creative
At the Ad level, name your first ad and upload your video.
For the primary text of the ad, speak to your target audience in their words. Reference why people love your products and why consumers should choose yours over your competitors'. Don't push to sell; instead, get your targeted audience interested and curious about your products.
If you can, interview your existing customers and use their responses in your ad copy. This will help your ads resonate better with your intended audience.
End your primary text with a subtle call to action that says, “Learn More: [Your Website URL].” Adding your website URL to the ad copy with the Facebook News Feed placement will help increase your ad click-throughs.
Note: Links won't be clickable with the Instagram Feed placement so you may want to separate Instagram placement ads out.
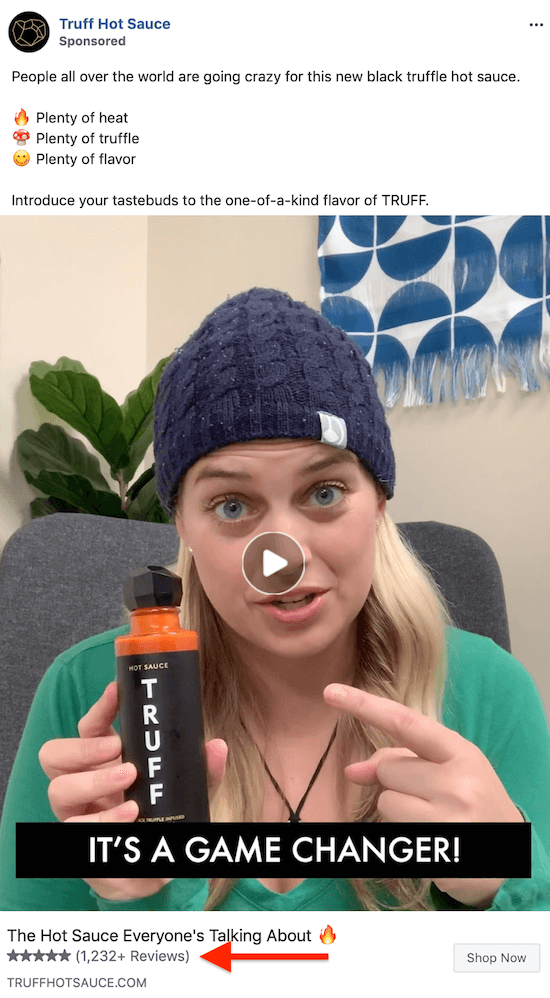
For the ad's headline, write something that grabs your ideal customer's attention.
Pro Tip: Include social proof with gold star emojis and the number of 5-star reviews your business has received. Notice the social proof added to the description of this ad from Truff Hot Sauce.
Next, add your website URL and select Learn More as your call to action.
Then click Confirm to publish your ad.
#4: Encourage Product Consideration With a Middle-of-Funnel Facebook Campaign
Now that you're raising awareness of your brand and products, you're ready to create the middle-of-funnel campaign. In this stage of your funnel, you want to get targeted customers to click to your website to view your products.
When you set up your middle-of-funnel campaign in Ads Manager, use images and video that display your products in the best possible light. Make sure any people pictured are smiling and happy (a subtle technique that can have a big impact on sales).
If you have multiple versions of products, create a collage of two photos to show more products to people scrolling by.
Pro Tip: Adding subtle contrast and clarity to your images can help make your ad creative pop more than other images and video it competes with.
Create a New Facebook Campaign
When you create your middle-of-funnel campaign, select the Conversions campaign objective and name your campaign (to illustrate, “2 – Purchase – [Product Set Name]”).
Set your budget based on the amount of engagement you have. The more Facebook/Instagram engagers and website visitors you have, the higher your budget can be in the middle of your funnel.
When you're done, click Continue.
Set Up the Facebook Ad Set
At the Ad Set level, select Purchase in the Conversion section.
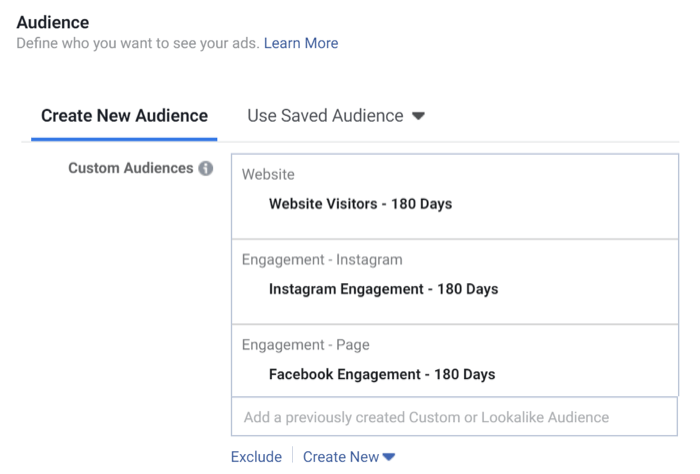
For your ad targeting, select these engagement audiences:
- 180-day Facebook page engagers
- 180-day Instagram business profile engagers
- 180-day website visitors
Depending on the products you're selling, you may want to exclude purchasers from the middle of your funnel. If your customers typically only buy once from you, exclude purchasers here.
Next, add the location of the targeted audience. Choose Automatic Placements to let Facebook optimize placements based on results.
Design Your Facebook Ad Creative
At the Ad level, start by naming your ad. Then upload your videos and/or images.
For your primary text, address your ideal client by asking a question they can answer “yes” to, helping hook them into reading more of your copy. Explain how your product solves customer pain points.
End your primary text with a stronger call to action that says, “Shop Now: [Your Website URL]”.
Next, write a headline that grabs your ideal customer's attention. Then add your website URL and select Shop Now as your call to action.
Finally, click Confirm to publish the ad.
#5: Sell Your Products With a Bottom-of-Funnel Facebook Campaign
Once people are viewing your products, it's time to start closing sales with a bottom-of-funnel campaign.
With your product catalog synced with Facebook, you can run dynamic product ads. These are powerful ads that can show customers the exact products they viewed on your website.
Create a New Facebook Campaign
Start by creating a new Facebook campaign with Catalog Sales as your campaign objective. Then type a name for your bottom-of-funnel campaign (“3 – DPA,” for example).
From the Catalog drop-down menu, select the appropriate product catalog.
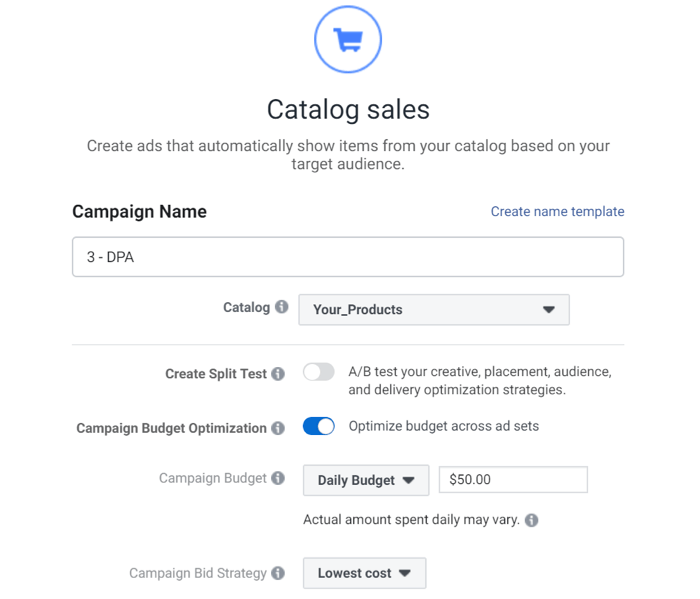
Allot a smaller percentage of your budget for this campaign. This is the smallest audience you'll target because people are getting filtered down at each stage of the funnel.
Click Continue to create the campaign.
Set Up the Facebook Ad Set
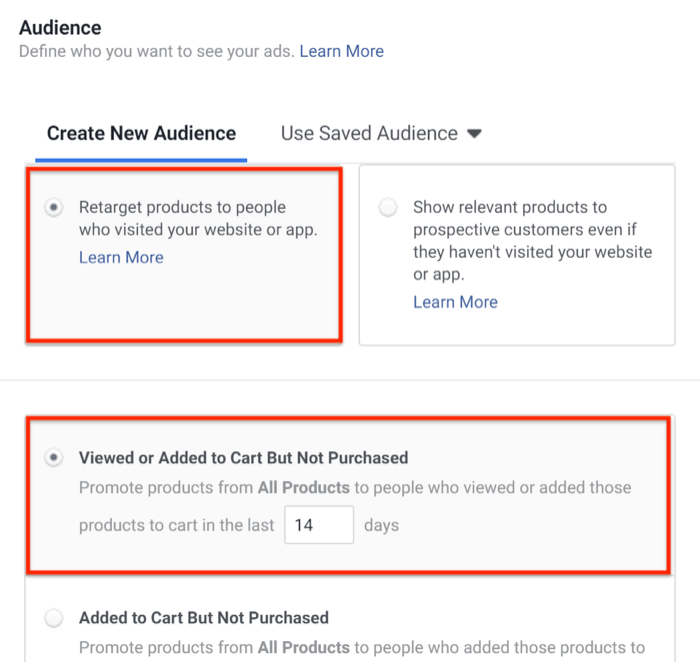
To set up the ad set, select All Products or the specific product set you want to promote.
In the Audience section, select the Retarget Products to People Who Visited Your Website or App option.
Next, select the Viewed or Added to Cart But Not Purchased option and enter 14 in the Days field (you'll want to test this number based on how many website visitors you have).
Set Optimization for Ad Delivery to Value. Choose Purchase for the event type.
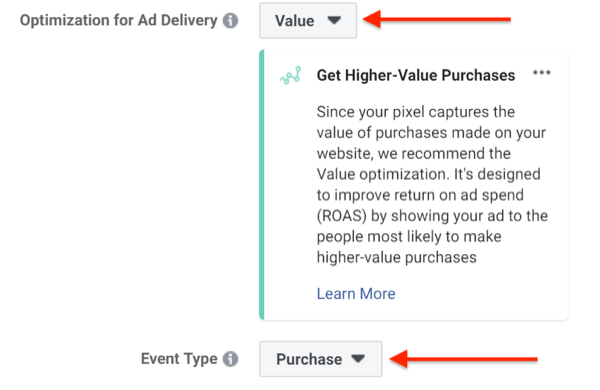
Under Placements, choose Automatic Placements to let Facebook optimize placements based on results.
Finally, click Continue to create your ad set.
Design Your Facebook Ad Creative
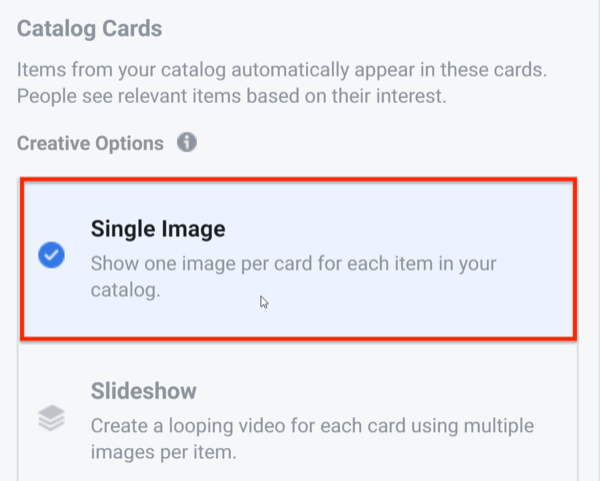
At the Ad level, select the Carousel ad format. In the Ad Creative section, choose Multiple Products under Catalog Options.
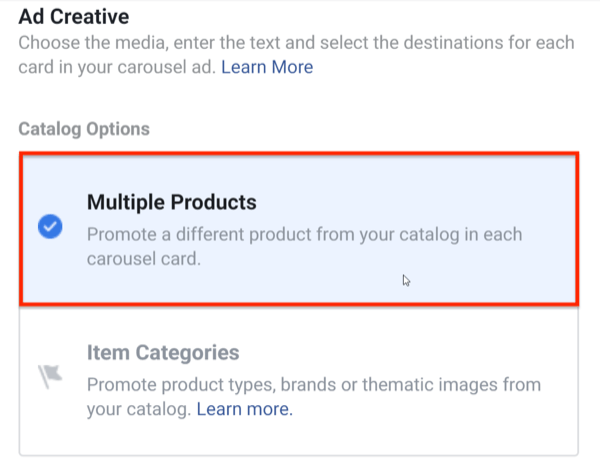
Next, select Single Image for your creative option.
For the primary text of the ad, invite customers to come back and complete their purchase. Under See More Display Link, add your website URL.
Select Shop Now as your call to action. Then click Review and publish the ad.
#6: Create Remarketing Campaigns for Product Launches and Repeat Orders
While your entire funnel is now complete, don't forget about the people who have already purchased from you. These are your best customers.
To re-engage these past purchasers, create another middle-of-funnel campaign.
Target Past Purchasers With a Product Launch Campaign
When you have new items to launch (whether a new version of a product, new color, or brand-new item), announce it in a conversion campaign to past purchasers.
Create a new middle-of-funnel campaign that targets 60-day purchasers. Test various images and videos to see what performs best.
After you know what works, duplicate those ads to the middle-of-funnel 180-day engagement audience.
This is a great way to build social proof for new products. Show the release to past purchasers first. Then duplicate the top-performing ads and target your 180-day engagement audience of people who haven't converted yet.
Target People When Their Product Is About to Run Out
Create another middle-of-funnel campaign that targets people right when their product is about to run out. Remind them to come back to your site to reorder the product.
For instance, if you sell a package of coffee beans that lasts about 30 days, create a conversion purchase campaign that targets a 45-day purchaser audience and excludes a 25-day purchaser audience.
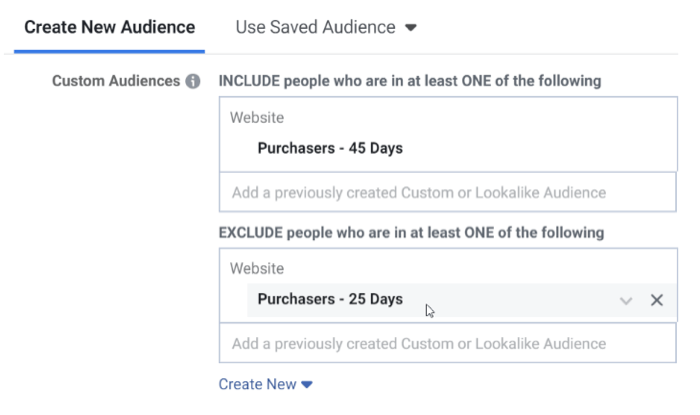
This campaign will hit people with a reminder to reorder their favorite coffee beans at the right time. You could create a similar campaign to target one-time purchasers, encouraging them to subscribe to your product monthly.
Conclusion
This is a Facebook ad campaign funnel structure that will work for most advertisers. I suggest you test different variations of targeting, remarketing time, copy, creative, campaign objectives, and the number of ads you sequence to people in a funnel.
Focus on what works after the learning phase is done for each ad and then optimize the campaigns, ad sets, and ads that perform best. You can do this by duplicating the ad sets and ads that are performing well. Then create variations and test again.
Continue to duplicate and optimize to determine what messaging best resonates with your ideal customer.
Remember that customers will get tired of seeing the same ad repeatedly, so be sure to create new content often to keep your audience engaged and happy. Always be testing.
What do you think? Will you use this Facebook ad funnel structure? Where does your funnel need the most improvement? Share your thoughts in the comments below.
More articles on Facebook ads:
- Discover six Facebook ad mistakes that marketers make and how to avoid them.
- Learn how to edit your Facebook ad placements to deliver the best results.
- Explore five free Facebook tools to help you improve Facebook ad performance.
Attention Agency Owners, Brand Marketers, and Consultants
Introducing the Marketing Agency Show–our newest podcast designed to explore the struggles of agency marketers.
Join show host and agency owner, Brooke Sellas, as she interviews agency marketers and digs deep into their biggest challenges. Explore topics like navigating rough economic times, leveraging AI, service diversification, client acquisition, and much more.
Just pull up your favorite podcast app, search for Marketing Agency Show and start listening. Or click the button below for more information.