 Do you want to improve the ROI of your Facebook ads and Instagram campaigns?
Wondering how to reach specialized audiences with Facebook ad targeting?
In this article, you’ll learn how to create six refined target audiences for your Facebook and Instagram campaigns.
How to Create Target Audiences in the Facebook Ads Manager
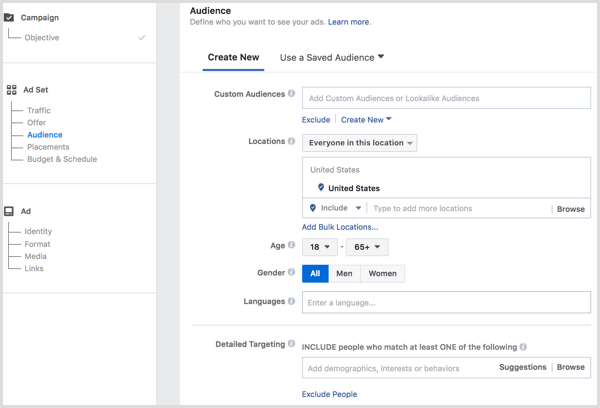
There are two ways to create target audiences for your Facebook and Instagram ad campaigns in the updated Ads Manager. You can create audiences on the fly as you set up ad campaigns in the Audience section of the ad set.
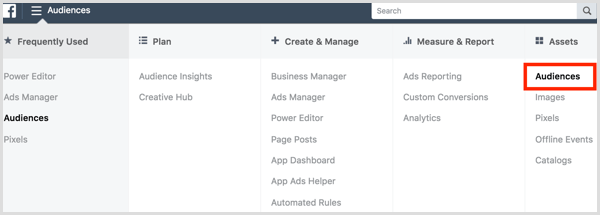
You can also create audiences by going to the Audiences page of the Ads Manager. If you use Business Manager, you’ll find the Audiences page in the same location.
Certain audiences (such as those created from your website visitors and customer email list) will take longer to process than others, so it’s a good idea to create them in advance of when you need them for your campaign. This will give Facebook enough time to create the audience so it’s ready when you launch your campaign.
Here’s how to get started creating custom, saved, and lookalike audiences.
#1: Create a Saved Audience of Your Ideal Customer Demographics
Do you know the demographics of your top customers? If so, you can use that information to create a saved audience to use in your Facebook and Instagram campaigns to reach people who are likely to buy your products or services.
To create a saved audience for the first time, click the Create a Saved Audience button on the Audiences page.
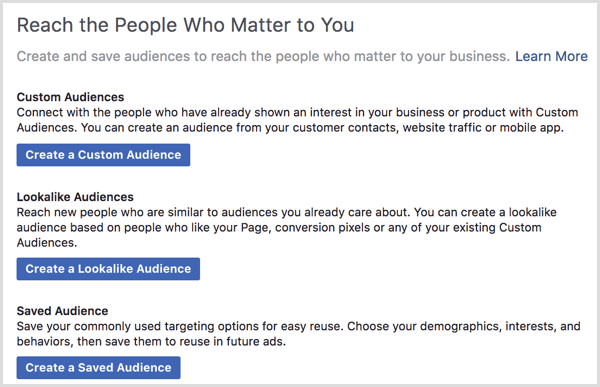
If you’ve created audiences in the past, click Create Audience and select Saved Audience from the drop-down menu.
Get World-Class Marketing Training — All Year Long!
Are you facing doubt, uncertainty, or overwhelm? The Social Media Marketing Society can help.
Each month, you’ll receive training from trusted marketing experts, covering everything from AI to organic social marketing. When you join, you’ll also get immediate access to:
- A library of 100+ marketing trainings
- A community of like-minded marketers
- Monthly online community meetups
- Relevant news and trends updates

On the following page, you’ll see the familiar Facebook Ads Manager audience setup options. Define your audience based on location, age, gender, demographics, interests, and behaviors. As you make changes, your potential reach will adjust accordingly. When you’re finished, click Create Audience.
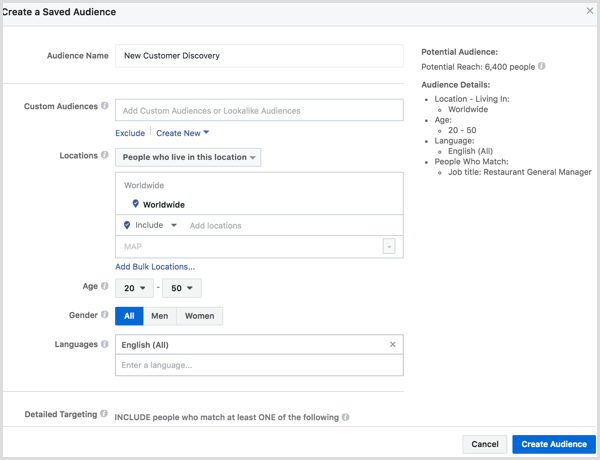
This saved audience will now appear on your Audiences page.

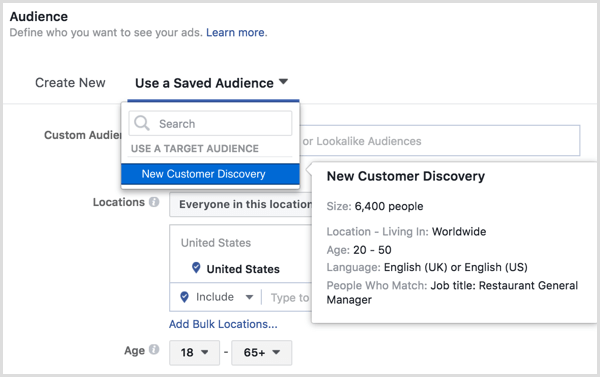
When you set up audience targeting for a new Instagram or Facebook campaign, you’ll find the saved audience under the Use a Saved Audience tab.
#2: Set Up a Saved Audience of Hyper-Local Users
Facebook offers several options for targeting local audiences. When you create a new saved audience, you set up local targeting in the Locations section.
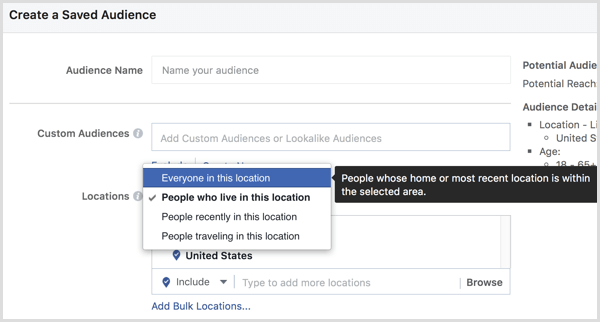
First, choose one of the four options from the Locations drop-down list. You can target everyone in a particular location, people who live in a particular location, people who were recently in a particular location, or people who traveled to the location but live elsewhere. These options are based on the locations in users’ Facebook and Instagram profiles, and the locations of their mobile devices.
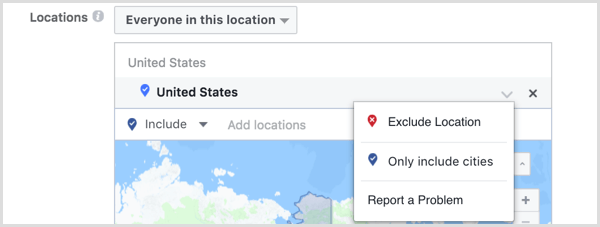
Next, you can add specific countries (up to 25), states, provinces, cities (up to 250), congressional districts, and zip codes (up to 2,500). With certain locations, you have the option to include or exclude the location, include only cities of certain populations (100,000 to 3+ million), or delete the location (hover over it and click on the down arrow or X next to the location name).
If your business has a list of specific countries, states, cities, postal codes, addresses, and Designated Market Area (DMA) names or codes, click Add Bulk Locations and upload your list of locations to target.
Not looking for a hyper-local audience? Select Worldwide to target cities with populations of 500,000 to 3+ million. You can also target specific regions with free trade areas, countries where people can access Android apps, and emerging markets.
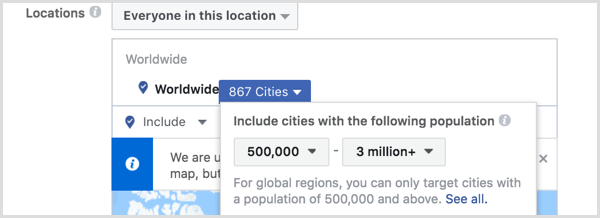
When you’re finished adding locations and additional demographic details, click Create Audience. This saved audience is now available to use in your ad campaigns.
#3: Create Custom Audiences From Your Email List
With custom audiences, you can create audiences using your customers’ email addresses or phone numbers. You can then use these audiences to target ads to current customers or exclude those audiences to target ads to people who haven’t purchased from you yet.
If this is the first time you’ve created an audience, click the Create a Custom Audience button on the Audiences page. If you’ve created audiences in the past, click Create Audience and select Custom Audience from the drop-down menu.

On the next page, choose Customer File to use your customer list to create this audience.
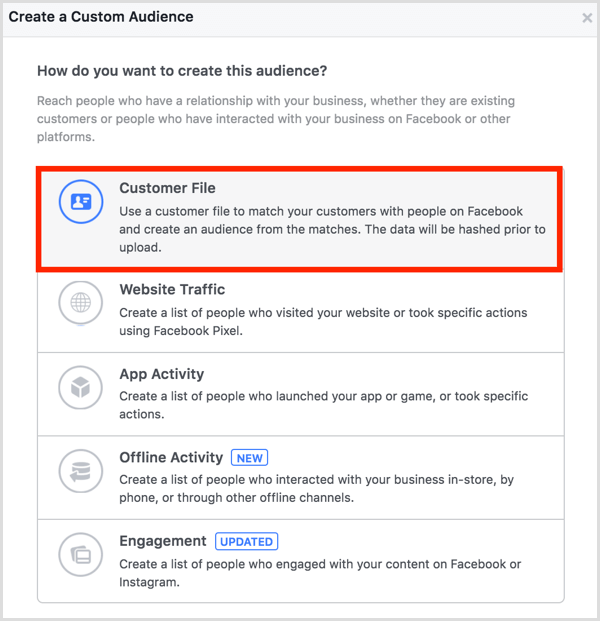
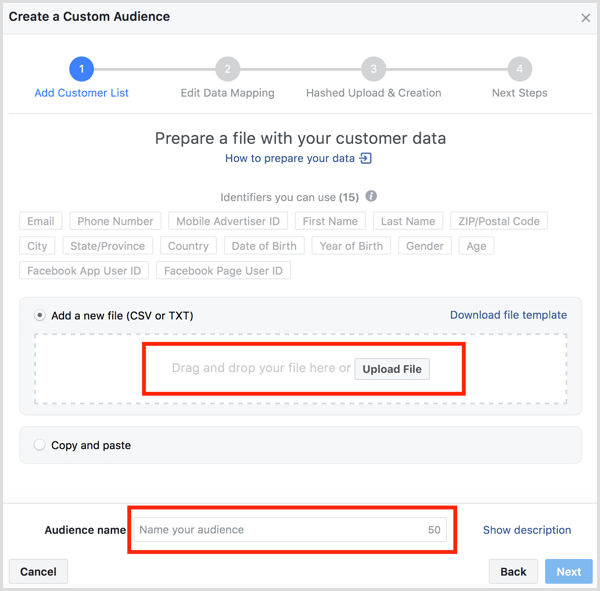
Now you’re ready to upload or copy and paste data from your customer list.
Facebook offers best practices on how to format your customer data for use with ads. You’ll also find an example file of information you can include in your customer data. Facebook will use these identifiers (particularly the email and phone number) to match your customer data with Facebook and Instagram users.

Once you’ve uploaded your customer data, agree to Facebook’s custom audience terms and name your audience. Then click Next to map the data to Facebook’s identifiers.
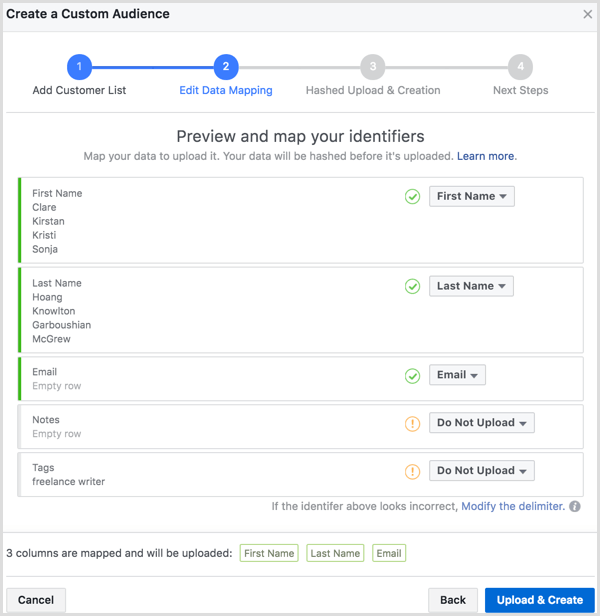
Next, you see a preview of how Facebook has classified your data. After you review the data, click Upload & Create.
You’ll then see the progress of your customer data upload. After all rows of data have been uploaded, you get a confirmation that Facebook Ads Manager is processing your data.
You can check the status of your new custom audience on your Audiences page.

Depending on the platform you use for your customer data, you may want to further narrow your customer data to create highly specific custom audiences, such as:
- First-time customers
- Customers who have purchased more or less than a specific dollar amount of products or services
- Customers who have purchased specific products or services
- Customers who have or haven’t made a purchase within a certain timeframe
Remember that custom audiences must match at least 1,000 Facebook and Instagram users to be eligible to use in ads.
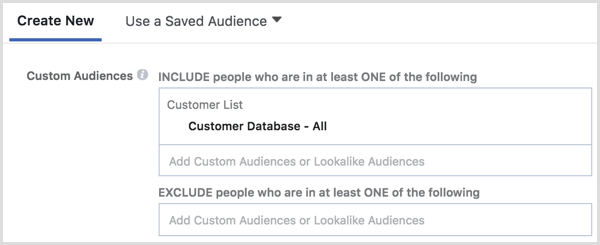
You can now use your custom audience when you create a new ad campaign, including or excluding it in your audience targeting.

Discover Proven Marketing Strategies and Tips
Want to go even deeper with your marketing? Check out the Social Media Marketing Podcast! Publishing weekly since 2012, the Social Media Marketing Podcast helps you navigate the constantly changing marketing jungle, with expert interviews from marketing pros.
But don’t let the name fool you. This show is about a lot more than just social media marketing. With over 600 episodes and millions of downloads each year, this show has been a trusted source for marketers for well over a decade.
#4: Remarket to Visitors Who Take Specific Actions on Your Website
Using the Facebook pixel and events, you can remarket to visitors who have completed specific actions on your website.
Set Up the Pixel
To get started, you need to create a Facebook pixel for your website. In the Ads Manager, select Pixels under the Assets column.
![]()
Next, click the green Set Up Pixel or Create a Pixel button to set up your pixel. This is where you get the code that needs to be added to your website so you can track Facebook and Instagram users who visit your website.
To create events around specific actions on your website, select the Manually Install the Code Yourself option.
![]()
The first section shows you where to add your pixel code on your website.
In the second section, you can choose optional Advanced Matching or copy the main pixel code you need to add to your website.
![]()
When you click Next, you get the option to track specific events with the pixel.
Toggle a particular event to get instructions on how to configure and set up the tracking code for that event. You can add the tracking code to specific pages that website visitors land on when the event is completed (Track Event on Page Load) or add the tracking code to specific elements on a page that are triggered when the event is completed (Track Event on Inline Action).
![]()
Add Event Tracking to an Existing Pixel
If you already have the pixel and want to add event tracking, click the Details button next to your pixel.
![]()
On the following screen, click the Set Up button.
![]()
This allows you to select the Manually Install the Code Yourself option, taking you to your pixel code and the area where you can set up your events.
Create a Custom Audience Based on the Pixel
Once you’ve set up your pixel and event tracking, you can use it to create a custom audience. To get started, click the Create Custom Audience button above your pixel or choose Create Audience > Custom Audience on your Audience page.
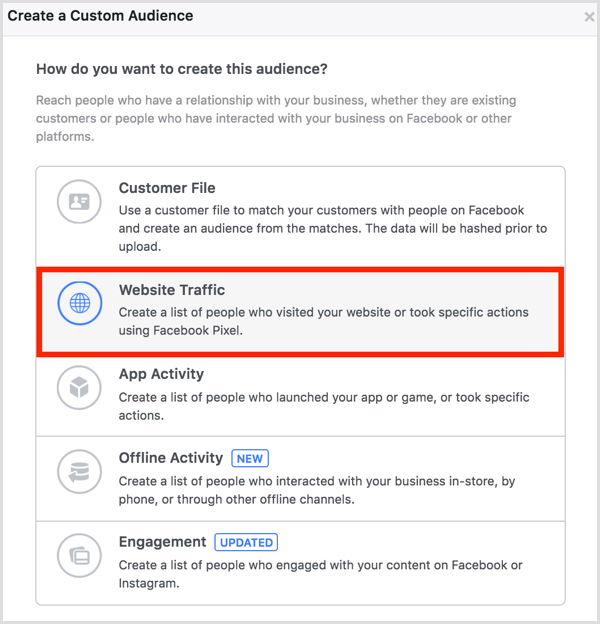
On the following page, choose Website Traffic.
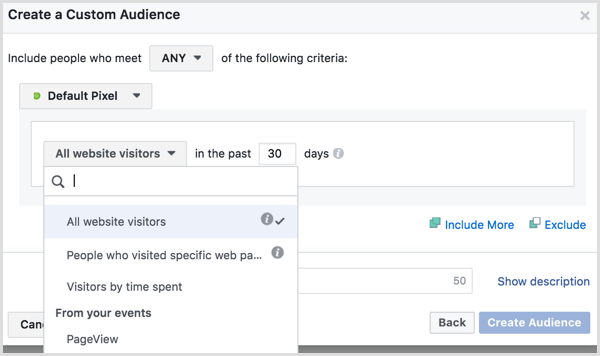
Now you define your custom audience based on website activity. You can include or exclude any or all website visitors who meet the criteria of having visited specific pages, spent a certain amount of time on your website, or completed events you’re tracking with the pixel for a period of up to 180 days.
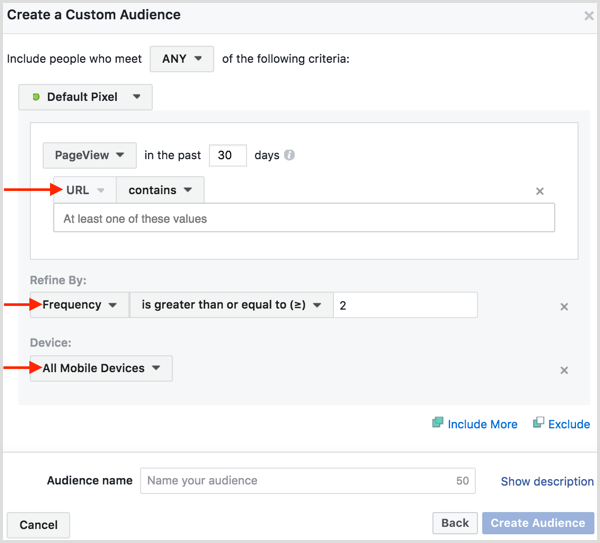
For website visitors who have visited specific pages or completed specific events, you can optionally refine your audience by URL, frequency, and device. After you configure and name your custom audience, click Create Audience.
When you receive enough traffic to your website that matches your custom audience criteria, it’s ready for use with your ad campaigns. You can view the status of your custom audience on your Audience page.

#5: Reconnect With People Who Engaged With Your Business on Facebook and/or Instagram
In addition to custom audiences based on your customer list and website traffic, you can create custom audiences to target people who have engaged with your business on Facebook and Instagram.
To get started, go to the Audiences page and choose Create Audience > Custom Audience.
On the following page, select Engagement.
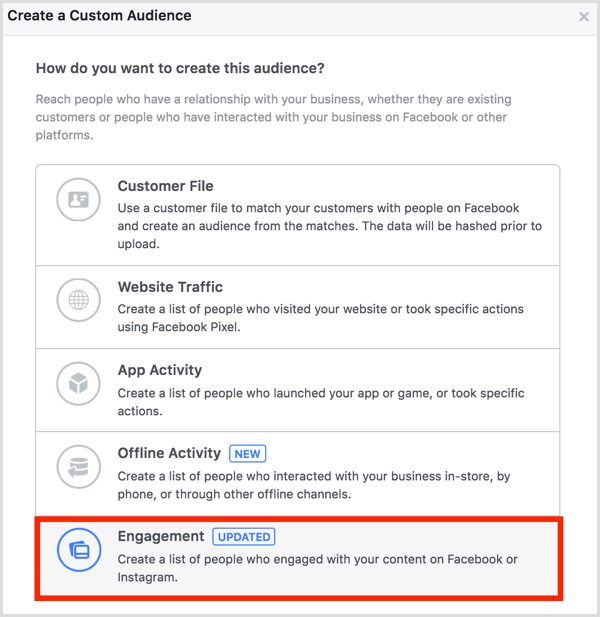
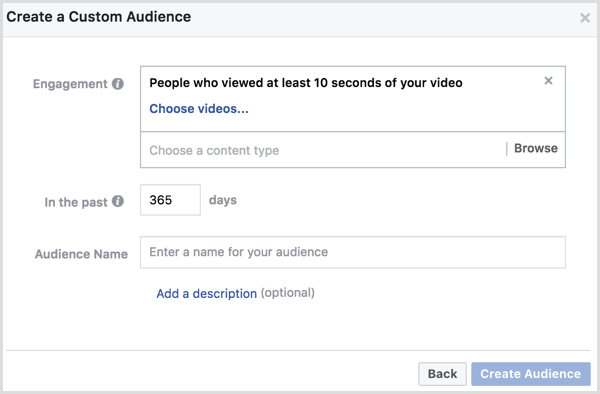
Next, select the type of engagement you want to use to build your custom audience. Here’s a rundown of your options:
Select Video to target audiences that have watched videos on your Facebook page, Instagram business profile, or other ad campaigns. You can narrow your audience by the length of time they watched a video. Choose one or more videos to include in your custom audience.
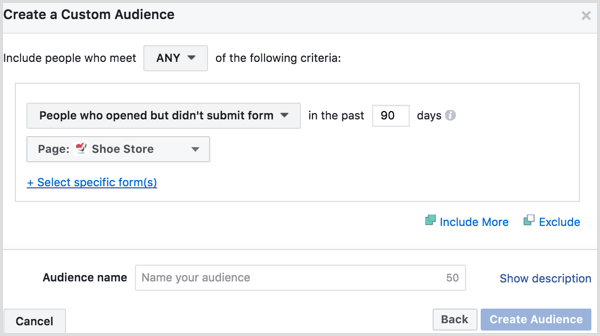
Choose Lead Form to target audiences that have engaged with a lead generation form. You can narrow your audience by anyone who opened a form, opened a form but didn’t submit it, or opened a form and did submit it. Choose one or more lead generation forms for your custom audience.
Opt for Fullscreen Experience if you want to target audiences that have engaged with full-screen canvas ads you’ve created. You can narrow your audience by anyone who opened a canvas or clicked a link in your canvas. Choose one or more canvas ads for your custom audience.
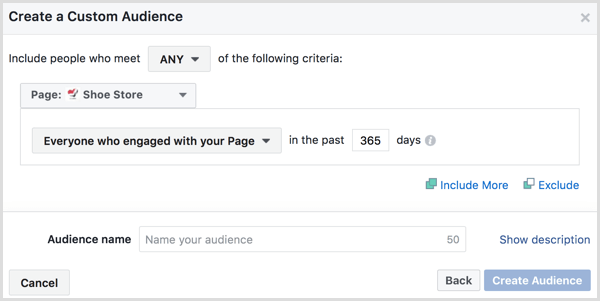
Select Facebook Page to target audiences that have engaged with your page. You can narrow your audience to anyone who engaged with your page, visited your page, engaged with a post or ad from your page, clicked a call-to-action button on your page, sent your page a message, or saved a post from your page. Choose one or more pages for your custom audience.
Select Instagram Business Profile to target audiences that have engaged with your Instagram business account. You can narrow your audience to anyone who visited your business profile, engaged with a post or ad from your business profile, sent your business profile a message, or saved a post or ad from your page. Choose one or more business profiles for your custom audience.
Choose Event to target audiences that have engaged with events from your Facebook page. You can narrow your audience by anyone who responded “Going” or ‘Interested” in an event. Choose one or more events for your custom audience.
Once you’ve saved it, you can include or exclude the custom audience in your audience targeting when creating a new campaign.
#6: Define Lookalike Audiences to Reach New People Who Are Most Likely to Convert
Once you’ve created some valuable custom audiences, you can set up lookalike audiences that are similar to those audiences to reach people who are most likely to complete your ad campaign objective.
To create a lookalike audience, go to your Audiences page and choose Create Audience > Lookalike Audience.

On the following page, select a custom audience or Facebook page to base your lookalike audience on. This lets you create lookalike audiences similar to custom audiences of your customers, people who have visited your website, and people who have engaged with your Facebook page or Instagram business profile.
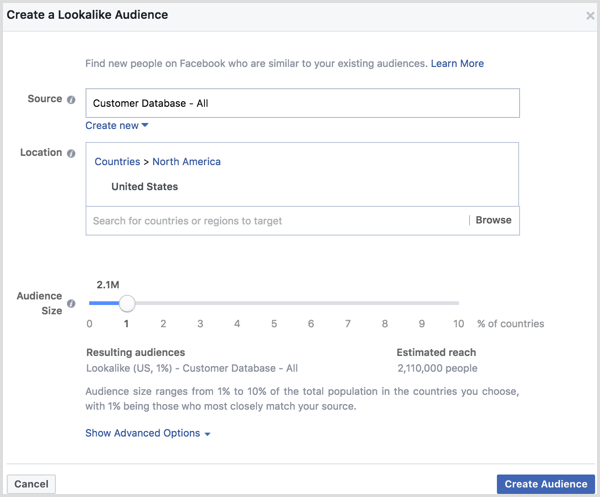
You can use lookalike audiences to target ads with similar objectives to potential new customers, website visitors, and people who engage with content from your Facebook page and business profile.
When you’re finished filling in the details for your audience, click Create Audience. Facebook will then process your lookalike audience. You can check the status of this new audience on your Audience page.
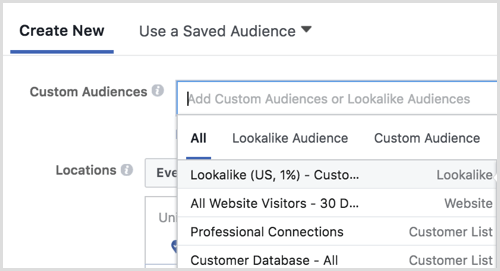
In your ad campaigns, you can include or exclude your lookalike audience in the Custom Audiences section of your targeting.
Conclusion
As you can see, Facebook Ads Manager allows you to create highly targeted audiences for your Facebook and Instagram ad campaigns.
What do you think? Which audiences have you found most useful to your business? Please share your thoughts in the comments below.
Attention Agency Owners, Brand Marketers, and Consultants

Introducing the Marketing Agency Show–our newest podcast designed to explore the struggles of agency marketers.
Join show host and agency owner, Brooke Sellas, as she interviews agency marketers and digs deep into their biggest challenges. Explore topics like navigating rough economic times, leveraging AI, service diversification, client acquisition, and much more.
Just pull up your favorite podcast app, search for Marketing Agency Show and start listening. Or click the button below for more information.

