Want to live-stream on Facebook? Wondering how to go live without third-party tools?
In this article, you'll discover how to set up a live stream with Facebook Live Producer. You'll learn how to activate valuable features that improve engagement and live-stream management, and find out how to customize the thumbnail for your Facebook live video.
To learn how to go live via Facebook Live Producer, read the article below for an easy-to-follow walkthrough or watch the video below. To learn how to go live via the Facebook mobile app, watch the video at the end of this article.
#1: Get Your Tech Ready
Before you go live on Facebook, make sure that all of your technology is fully functional because the last thing you want to do is plan this big event and realize that you can't go live.
Facebook Live Producer, Facebook's built-in live-streaming studio, only works with select browsers. I recommend using Firefox or Chrome. You also want to minimize distractions as much as possible. This means closing tabs you don't need and disconnecting any apps that might be trying to use the internet such as Google Drive and Dropbox. Also mute your notifications so you can focus on your show.
One mistake that beginner live-streamers tend to make is they don't check their internet upload speed. To have a successful broadcast, you need to have an upload speed of at least 5 Mbps. To run a test to find out your internet upload speed, go to Speedtest.net. If possible, it's best to have a hardwired connection.
#2: Create Your Facebook Live Video Post in Facebook Live Producer
To go live on Facebook on desktop without a third-party app, you use Facebook Live Producer. You can get there directly by going to facebook.com/live/producer. Or from your Facebook business page, click the Live button.
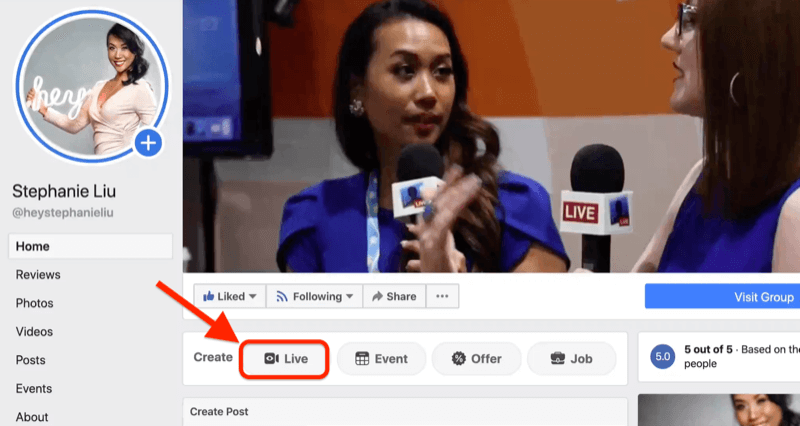
Once Facebook Live Producer opens, you'll see a Go Live Now option that allows you to start live-streaming. But before you do that, you need to set up your live stream.
In the image below, you can see that I'm set up to go live on my business page. You can change that to your personal profile or Facebook group by clicking the drop-down menu. A caveat for going live in your group is that some features won't be available such as trimming your live video.
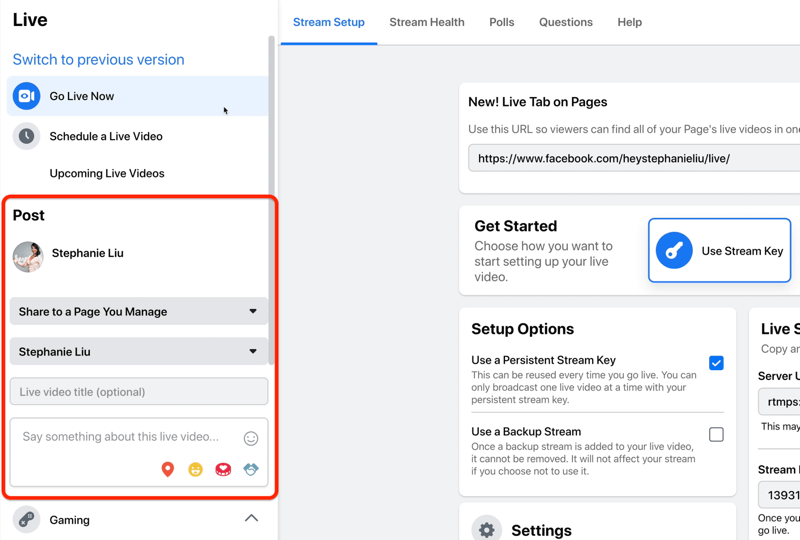
The next step is to add a title for your live video. Tell people what your show is about so they'll know why they should tune in. Write something that will capture their attention.
Below the title, add a description. Descriptions are important. Remember you're competing against all of the other content in the news feed so focus on the best part of your live stream.
Get World-Class Marketing Training — All Year Long!
Are you facing doubt, uncertainty, or overwhelm? The Social Media Marketing Society can help.
Each month, you’ll receive training from trusted marketing experts, covering everything from AI to organic social marketing. When you join, you’ll also get immediate access to:
- A library of 100+ marketing trainings
- A community of like-minded marketers
- Monthly online community meetups
- Relevant news and trends updates
At the bottom of the description box, you'll find a few additional options to include in your post. From left to right, these icons are:
- Check In: Check in to let people know where you're going to be live-streaming from. Is it from some exotic place or a fun conference?
- Feeling/Activity: Tell people you're super-excited about your broadcast.
- Raise Money: If you're raising money for an organization, give people an opportunity to participate and donate to your cause.
- Tag Sponsor: Tag a sponsor or brand you're working with.
Below the description, you'll see a section for gaming. If you're not gaming, you can skip that.
Next, choose your video thumbnail if you have an image you want to use. It should be 1200 x 675 pixels. If you don't have an image, you can fix this after your broadcast, as I describe later in this article.
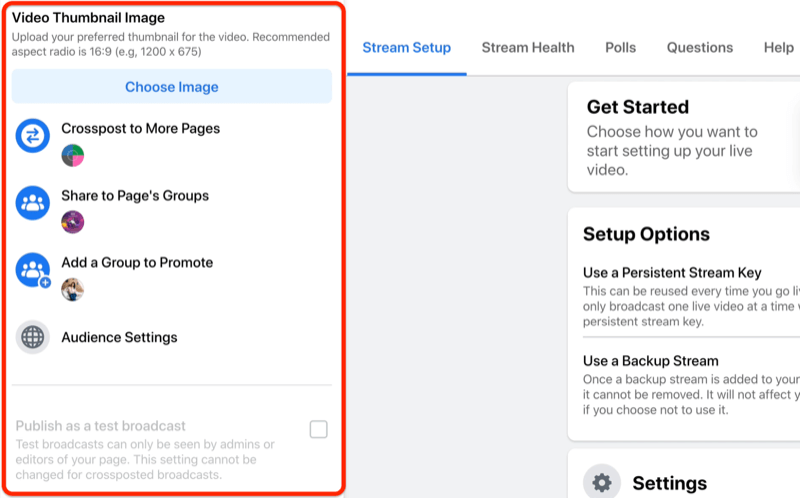
The Crosspost to More Pages feature is something that not many people know about. It lets you go live on your page and another brand's page. Simply click the Crosspost to More Pages option and a window will pop up with all of the different pages you could go live to simultaneously at no extra cost.
If you're an admin of a Facebook group, you can choose which groups you want to go live to. That means you could go live on your page and have your broadcast automatically shared to your Facebook groups.
One thing to note is that if you crosspost your broadcast and share it to a group, the comments from your viewers in those destinations won't appear on your main business page.
If you're interested in growing your Facebook group, you'll definitely love the Add a Group to Promote feature. This lets you choose which group you want to promote as a call to action (CTA). That way, when you're live-streaming, Facebook will automatically promote that group.
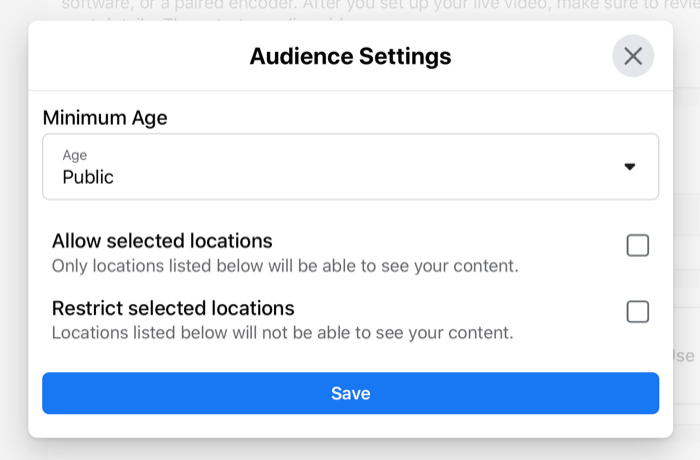
Now let's get into audience settings. What this means is that if you want to limit the reach of your broadcast, you can tell Facebook you only want people in a certain age range or geographic location to watch your video. But from a live human perspective, you want to get in front of as many people as possible so I recommend that you don't add any restrictions.
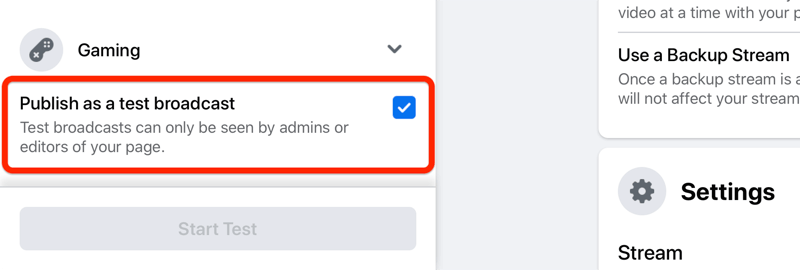
Pro Tip: When it comes to live-streaming, it's always good to test, which is the purpose of the Publish as a Test Broadcast feature. When you select this checkbox, you'll have a test broadcast that no one else can see so you can make sure your audio and video are working perfectly.
#3: Set Up Your Live Stream in Facebook Live Producer
Now let's move to the Stream Setup tab on the right side of the page. This is where you'll find a direct link to your Facebook live broadcast. If you need to promote your show, this is the link that you'll use. It will be www.facebook.com/yourpage/live.
To start your live video, you can choose from three options: Use Stream Key, Use Camera, or Use Paired Encoder. The stream key and pair encoder options both require you to use a third-party platform so forget about them for the purposes of this article. Instead, select the option to use a camera. This will allow you to use your built-in camera or an external camera like a webcam or a DSLR (which I like to use).
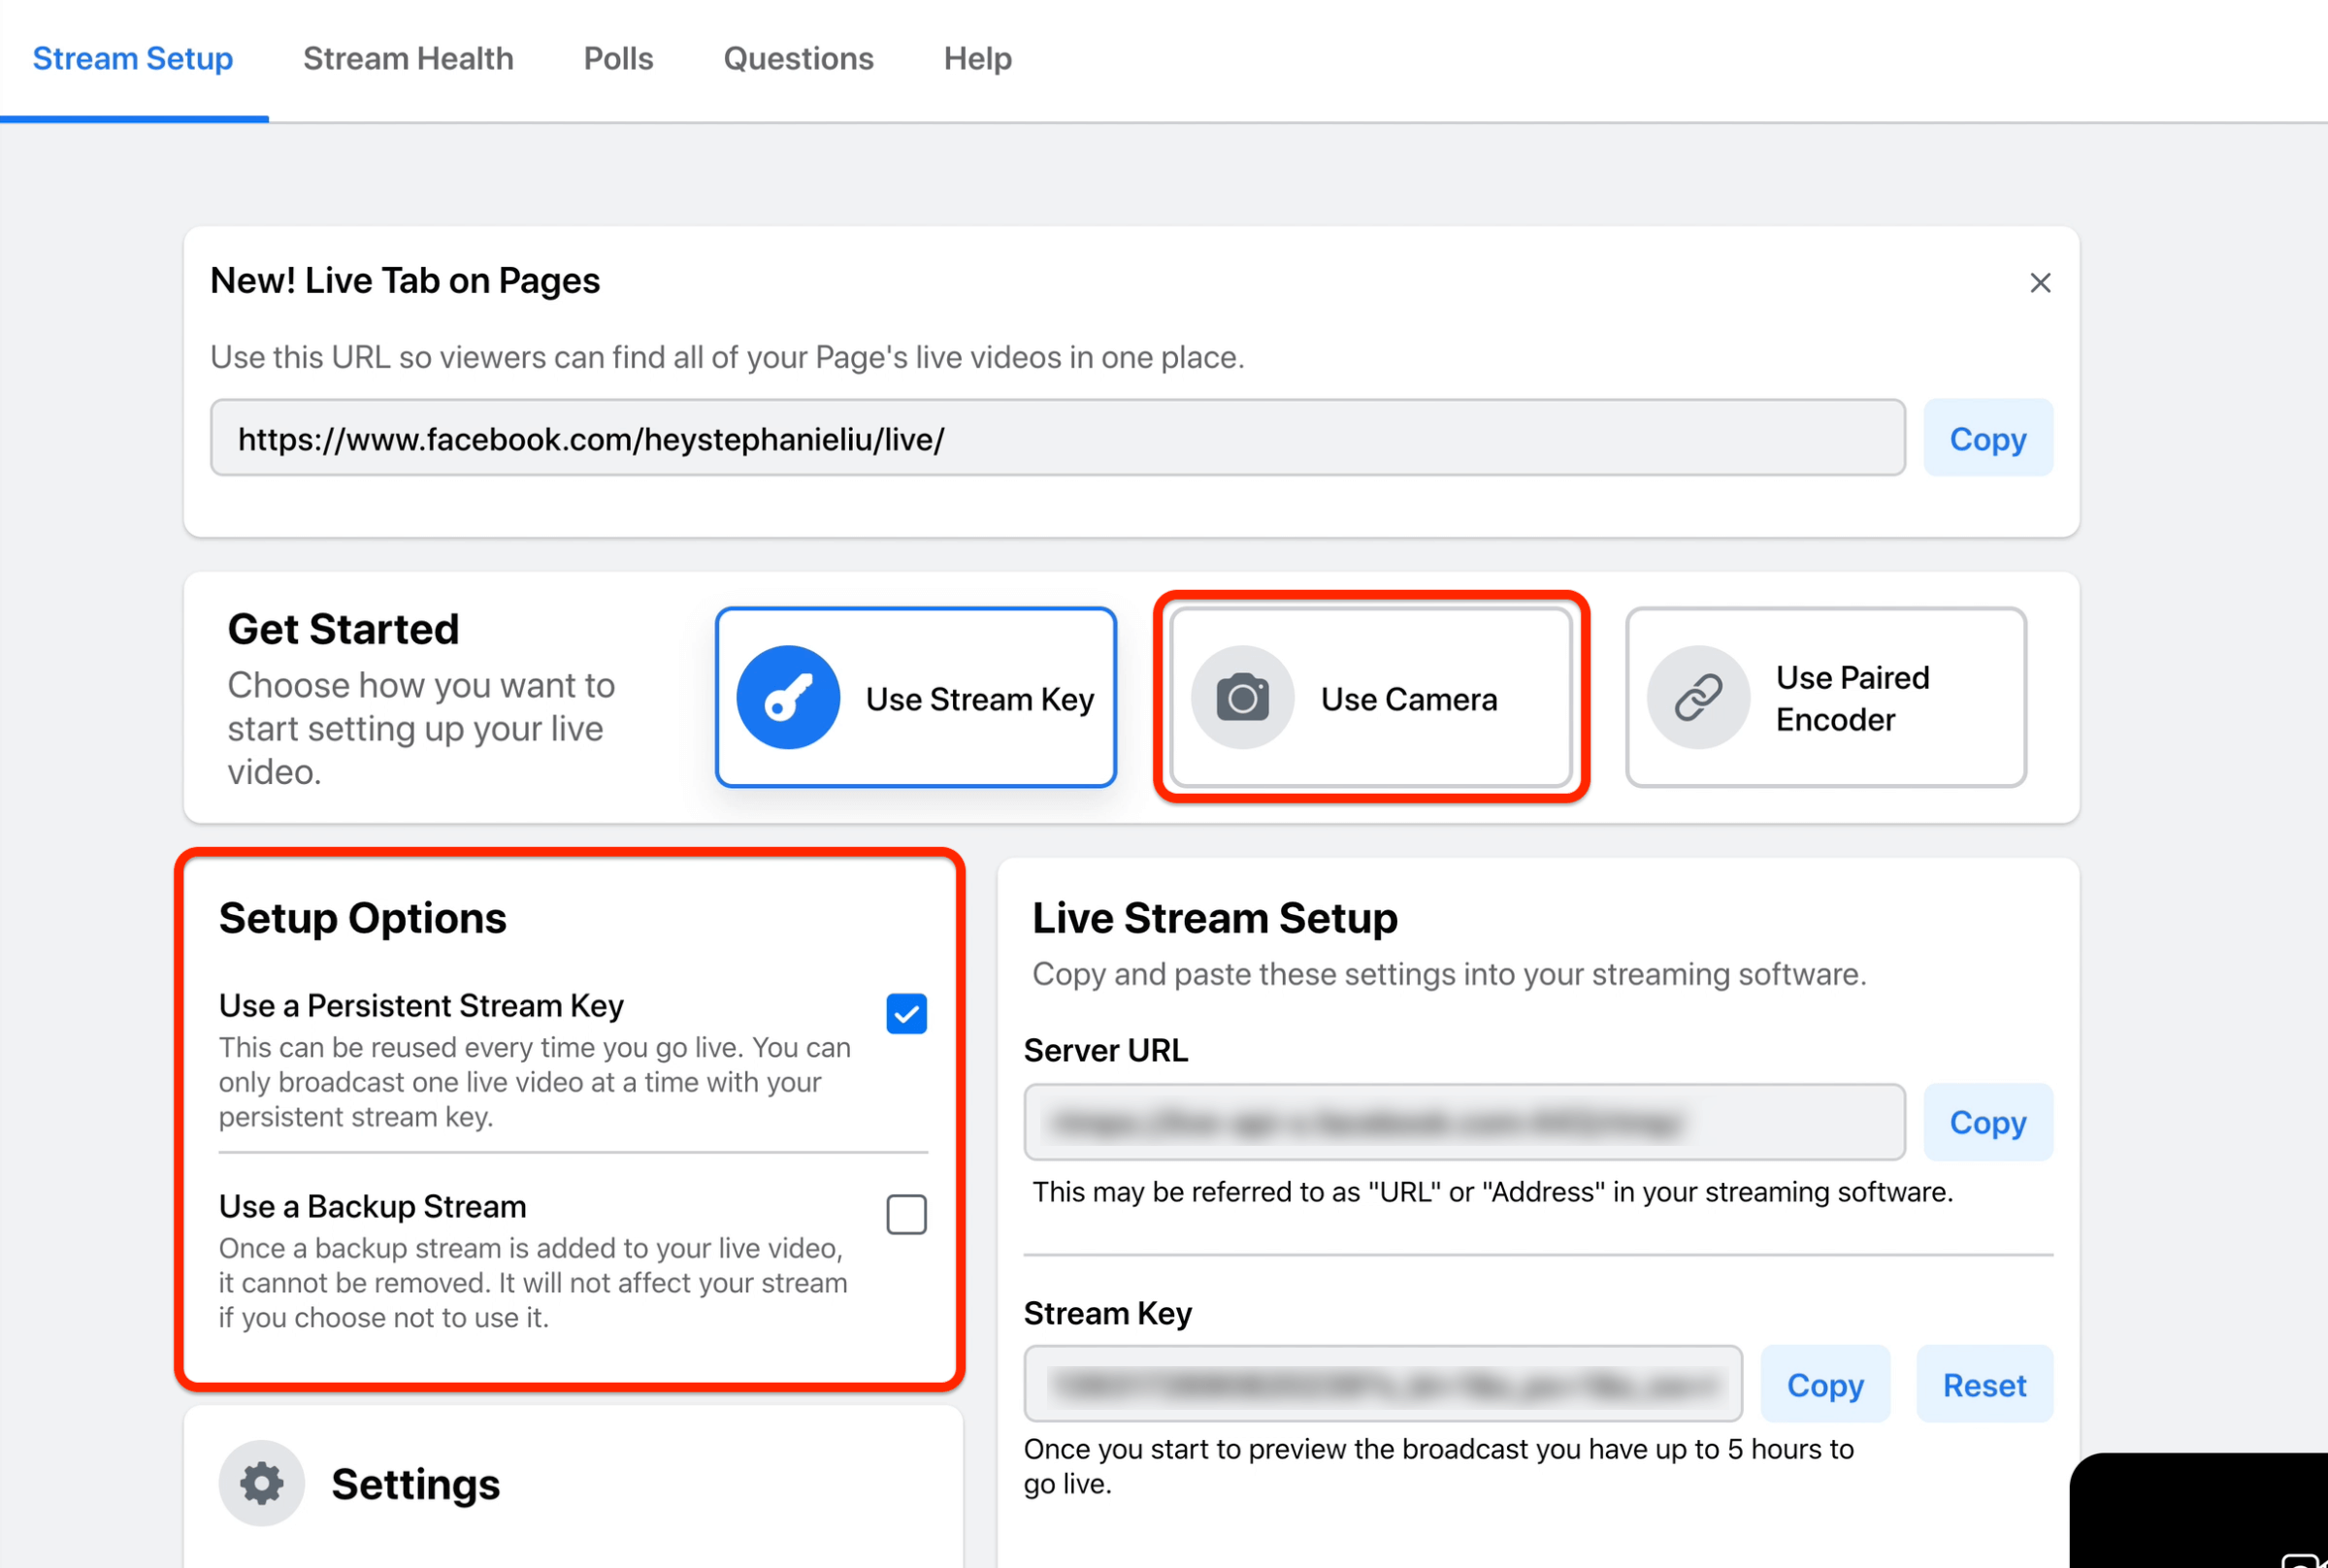
When it comes to Setup Options, I always select Use a Persistent Stream Key. There's no reason for me to change that. The second option is to use a backup stream. I don't need that because I know that Facebook will always have a recording for me that I can download in the future.
Manage Live Broadcast Settings
Now we'll look at the options in the Settings section.
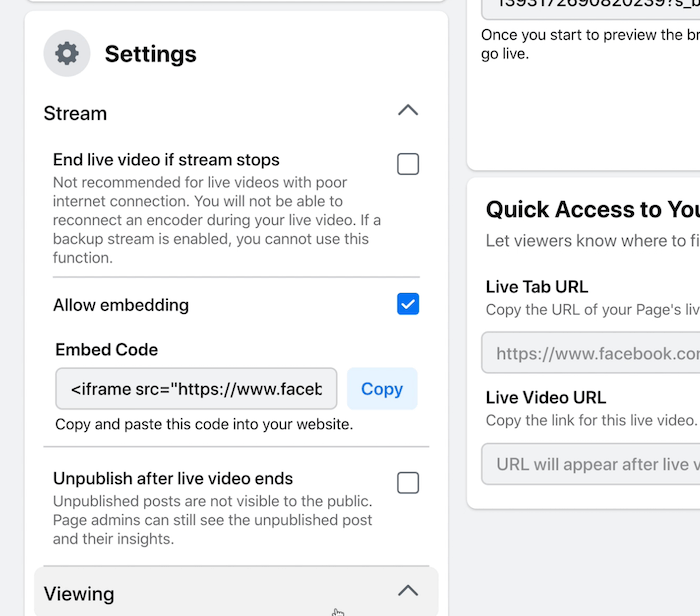
If you have a bad internet connection, I would say don't do a live shoot—but sometimes you might have to. Go into the Stream settings and uncheck the End Live Video if Stream Stops box. Otherwise, if you experience poor internet connectivity during your broadcast, Facebook will kick you off and end your broadcast. You don't want that to happen.
If you want people to join your live broadcast outside of Facebook, it's easy to do. Simply copy and paste the embed code to share on your website. Even if people can't watch live, they can still watch the replay.
Another feature that you might want to take advantage of is to unpublish your video as soon as your live broadcast ends. This could help you create a fear of missing out (FOMO) effect. Whenever I'm live-streaming, I tend to leave this unchecked because I do want people to tune into the replay.
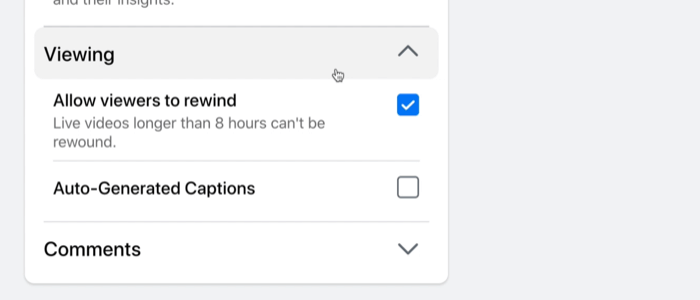
Under Viewing, you'll find another underutilized feature: allowing viewers to rewind the live video broadcast as you're live-streaming. This gives viewers the chance to catch up to what you're sharing online.
The next setting will let Facebook auto-generate captions for you. This works well if the speaker enunciates because Facebook's artificial intelligence will be able to give you a transcript. However, if you're in a noisy environment, you might want to leave this option unchecked to avoid issues.
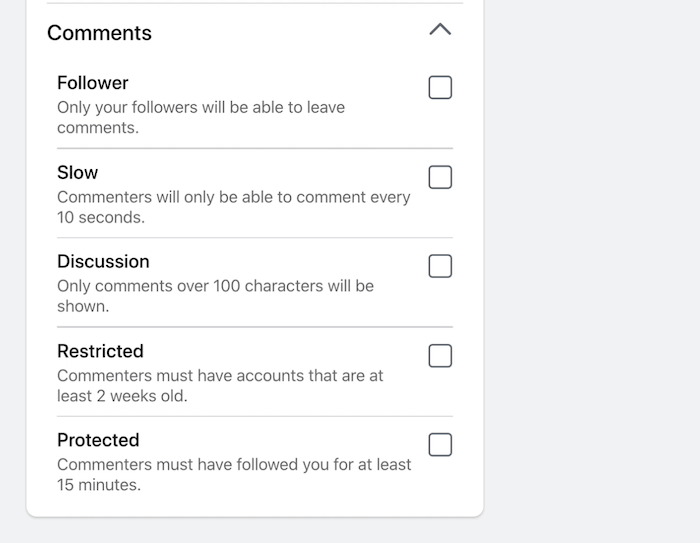
The Comments section lets you make changes to how comments appear in your live broadcast. I don't use any of these settings; however, if your brand page tends to get a lot of trolls, these options might be helpful. Here's what they do:
- Follower: Only followers of your brand page are allowed to comment.
- Slow: When viewers are watching, they can only comment every 10 seconds.
- Discussion: Only viewer comments that are more than 100 characters will be displayed. This can help you have a more engaging conversation, but if someone just wants to say hi, that comment won't even appear on the screen.
These last two settings help you deter any spammers or trolls from commenting on your broadcast.
- Restricted: Any Facebook user with an account that's less than 2 weeks old won't be able to comment on your broadcast.
- Protected: With this setting, commenters must have followed your page for at least 15 minutes. If they haven't followed your page, they won't be able to leave a comment.

Discover Proven Marketing Strategies and Tips
Want to go even deeper with your marketing? Check out the Social Media Marketing Podcast! Publishing weekly since 2012, the Social Media Marketing Podcast helps you navigate the constantly changing marketing jungle, with expert interviews from marketing pros.
But don’t let the name fool you. This show is about a lot more than just social media marketing. With over 600 episodes and millions of downloads each year, this show has been a trusted source for marketers for well over a decade.
Create Polls and Questions
If you want to drive engagement for your Facebook Live show, polls are a fun way to do it. On this tab, type a poll question and include the answers that you want your viewers to vote on.
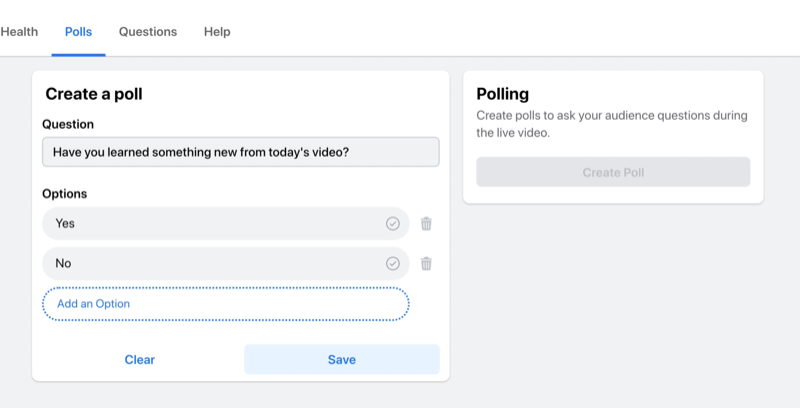
Once you've created your poll and saved it, you'll be able to control when it appears on-screen during your broadcast.
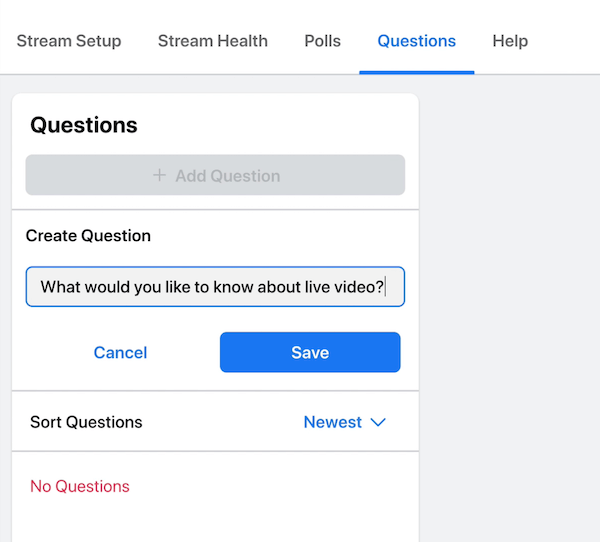
Another way to engage your audience is to post a question. Your question will pop up on the screen and viewers can leave their answers in the comments.
Select Your Mic Source and Camera
The last step before you start live-streaming is to select your camera and microphone. Sometimes when you connect your built-in camera for the first time, your browser may ask you for permission to give your browser access to your camera. Once you've granted that permission, you won't have to worry about that again.
If you're using an external camera or microphone, you can choose your preferred device from the drop-down menus below. In this case, I'm going to use the built-in webcam and an external microphone.
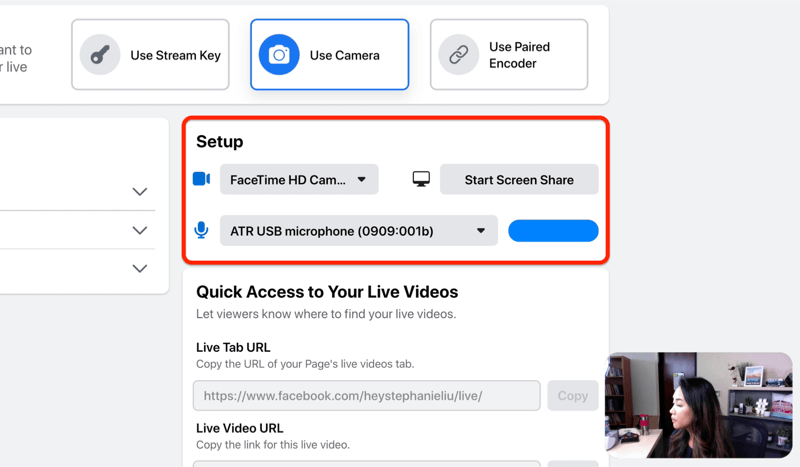
You'll also notice a button that allows you to screen-share. A word of caution, though: If you choose to screen-share, you can't switch back to your camera. Either you go live with your camera or live to screen-share.
Pro Tip: When you go live, wear headphones. The reason for this is the sound that comes out of your desktop might feed into your microphone.
Once you have everything set up, you're ready to click Go Live to start your broadcast.
#4: Go Live and Manage Your Facebook Live Broadcast
Once you go live on Facebook, the comments from viewers who tuned in will appear along the left side of the screen.
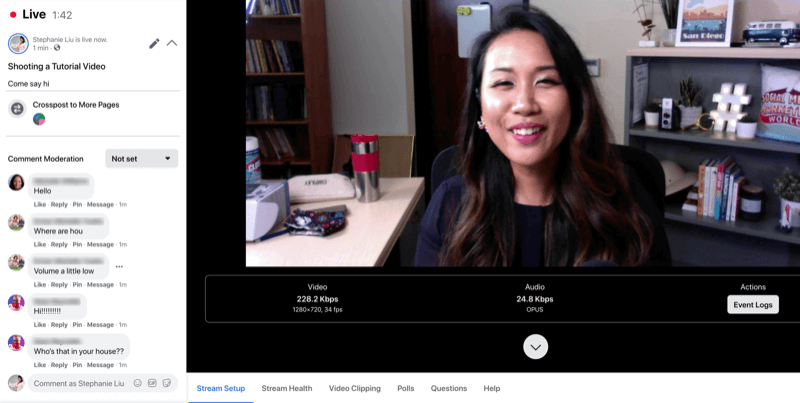
If you scroll down the page, you can see the stream setup, including the settings you chose earlier and your camera and external microphone.
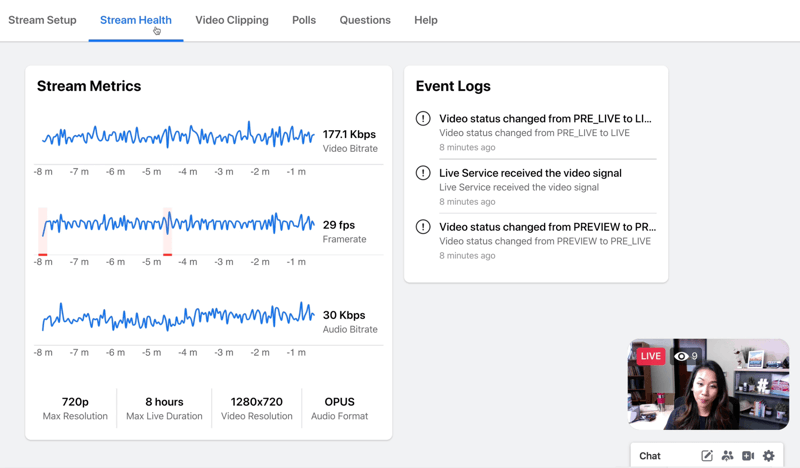
Click on the Stream Health tab to see the performance of your stream, including the video bit rate, frame rate, and audio bit rate.
Display a Poll
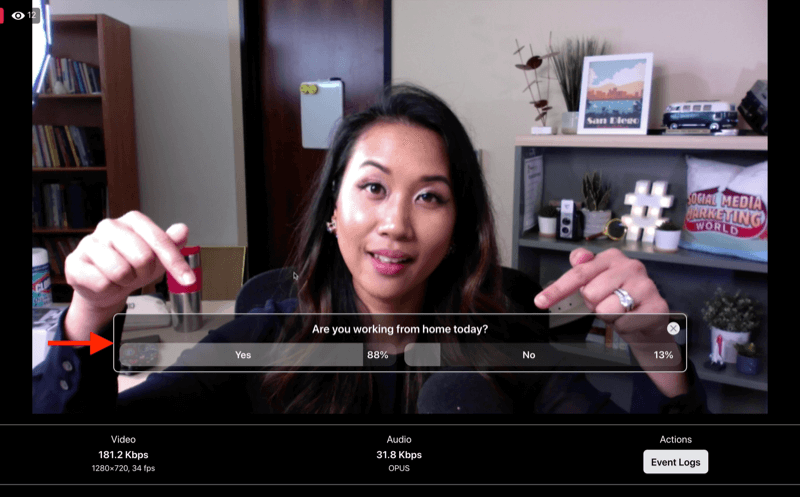
When you're ready to show your poll on the screen, go to the Polls tab and click Publish Poll. Once people start voting, click the Show Results in the Video button to share the results with them.
Show a Question
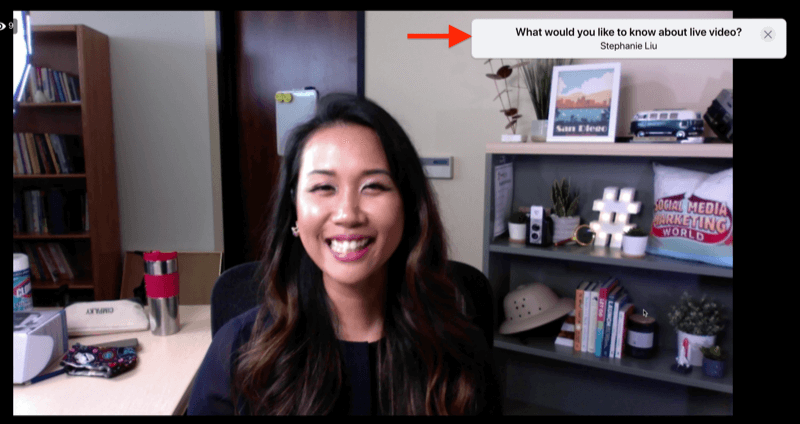
If you created a question earlier, go to the Questions tab and click Open Card to display it on the screen. When you publish your question, your viewers might not see it right away so give them a few seconds to catch up.
Create a Clip
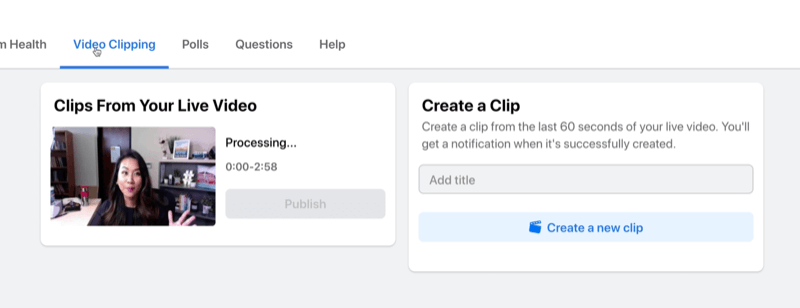
You'll find a cool feature on the Video Clipping tab. It lets you clip a short segment from your live broadcast. Simply type in a title and click Create New Clip. Now you have a clip you can share on social media to tease your video.
Pin and Reply to a Comment
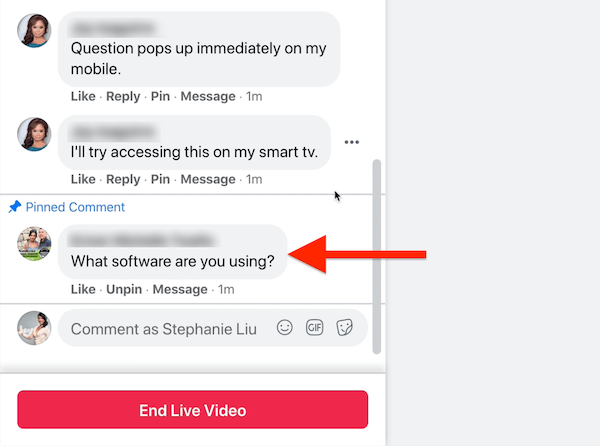
If you want to pin a comment during your broadcast, click on Pin below the comment and it will be pinned to the very bottom of the live stream.
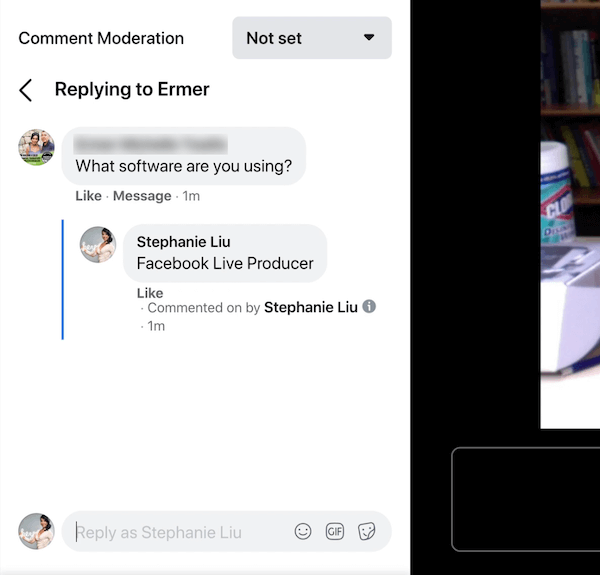
One of the nice things about live-streaming from your desktop is that you can reply to comments. This is why it's super helpful to be prepared for your show if you want to promote a link. Have it ready to copy and paste from your clipboard.
#5: End Your Facebook Live Broadcast
To end your Facebook live broadcast, simply click the red End Live Video button. After you click this button, there's always a delay so hold your pose or smile just 3 seconds longer and then the live video will end.
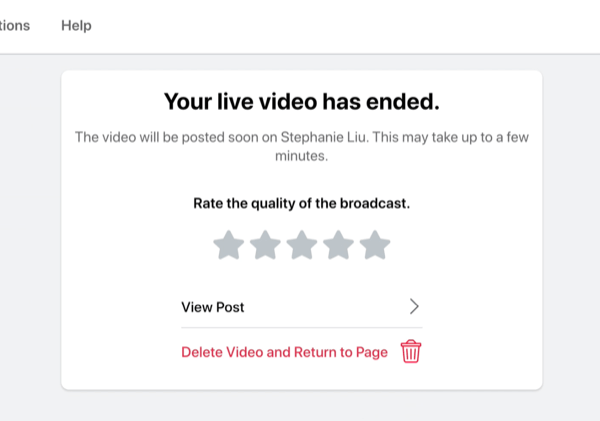
Once your live video has ended, you can rate how the live stream went and give Facebook feedback. If you want, you can delete the live stream from here or view the post to make the edits you need to optimize your replay.
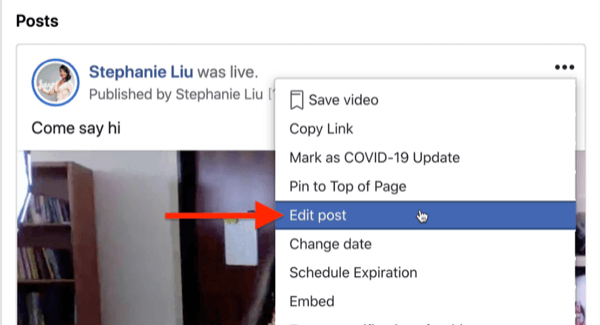
Now I'm going to show you how to change the thumbnail image that Facebook selected for you. To do this, open your post and click the three-dots icon at the top right. Then click on See More Options and then Edit Post.
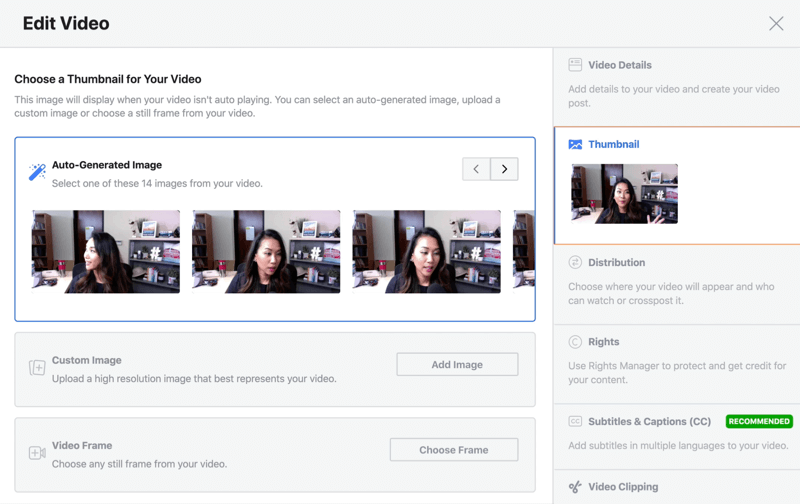
Now you'll see your thumbnail in the Edit Video window. This is your opportunity to choose the thumbnail you like best.
Click on the thumbnail on the right to get a group of auto-generated thumbnails to choose from.
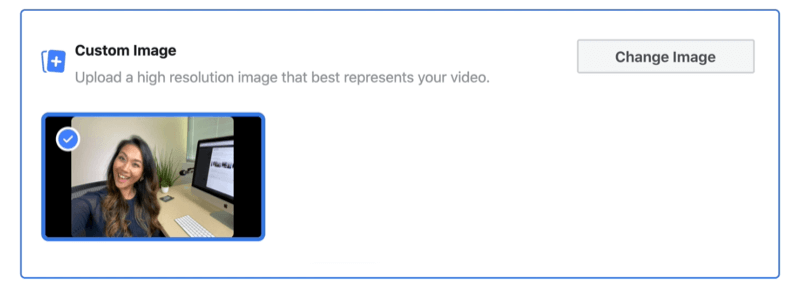
Pro Tip: Facebook sometimes chooses the most embarrassing image, even in the auto-generated frames. So what I like to do is take a selfie on my phone and use that image as the thumbnail for the video.
Go Live on Facebook From Your Mobile Device
If you're on the go and away from the office, you can broadcast Facebook Live video from your mobile phone with either the regular Facebook app or the Facebook Pages app. To learn how to go live on Facebook on mobile, read the easy-to-follow walkthrough below or watch this video:
When you're on your Facebook business page, tap on Publish. From there, tap on Add to Your Post and then select Live Video from the pop-up menu. On the next screen, you can add a description, check into a location, tag a friend, or add a feeling to get your viewers excited about your live stream.
If you need better lighting for your live video, tap on the lightning icon. If you want to have some fun, tap on the wand icon to unlock the camera effects on your phone. From here, you can change your background, add a frame, or even use filters to have fun with your fans.
By default, when you go live on your smartphone, Facebook will automatically broadcast your show in portrait mode. If you want to change to landscape mode, you have to turn your phone to landscape mode before you hit the Go Live button.
Now that you have everything set up, it's time to go live. Just tap on the live-streaming icon. When you start live-streaming, you'll notice that the comments appear in the lower-left corner of the screen.
- To hide the comments on your screen, swipe to the right. To bring them back, swipe to the left.
- If you want to engage with viewers, simply tap on a comment to like it or tap on Reply to comment back.
Go Live With a Friend on Mobile
It's easy to bring a guest into your Facebook live broadcast. Note that this feature only works on mobile and your guest has to join via their personal profile. To invite someone to join your broadcast, simply tap on Bring Them on Camera below their username and then tap Add. To remove a guest from your live stream, just tap on the X.
When you're done with your live stream, simply tap on the Finish button. Once your live broadcast has ended, you can download the video to your smartphone, delete the post, or keep it public on your page.
Conclusion
Facebook Live video is one of the best ways to keep your brand top of mind with your audience and you don't need third-party software to do it.
If you want to go live on desktop, Facebook Live Producer makes it easy to set up your live video post and choose your live-stream settings. It also lets you access valuable features that improve engagement, including polls and questions, and manage your live stream.
If you're on the go, you can go live on your mobile device by using Facebook's native app. You'll get access to a feature that improves lighting and camera effects that let you change your background, frame your broadcast, or use filters. You can even use the bring-a-friend feature to add a guest to your live video.
What do you think? Which of these Facebook Live features will you try in your next broadcast? Share your thoughts in the comments below.
More articles on Facebook Live:
- Explore how to use Facebook Live to quickly create content.
- Learn how to get more engagement with Facebook Live video.
- Discover an eight-step plan to use Facebook Live in your marketing.
Attention Agency Owners, Brand Marketers, and Consultants

Introducing the Marketing Agency Show–our newest podcast designed to explore the struggles of agency marketers.
Join show host and agency owner, Brooke Sellas, as she interviews agency marketers and digs deep into their biggest challenges. Explore topics like navigating rough economic times, leveraging AI, service diversification, client acquisition, and much more.
Just pull up your favorite podcast app, search for Marketing Agency Show and start listening. Or click the button below for more information.

