Ever wish you could post to Instagram directly from your desktop instead of your mobile device? Did you know Instagram is rolling out this functionality?
In this article, you'll learn how to schedule and publish posts to Instagram via your desktop without any third-party apps.
How to Access Creator Studio for Instagram
Instagram still hasn't enabled posting directly from Instagram.com, but the new Creator Studio does offer the option to post and schedule both Instagram feed posts and IGTV videos.
To get to Creator Studio, go to http://facebook.com/creatorstudio.
You'll automatically be logged into the accounts and pages you're connected to with your Facebook account.

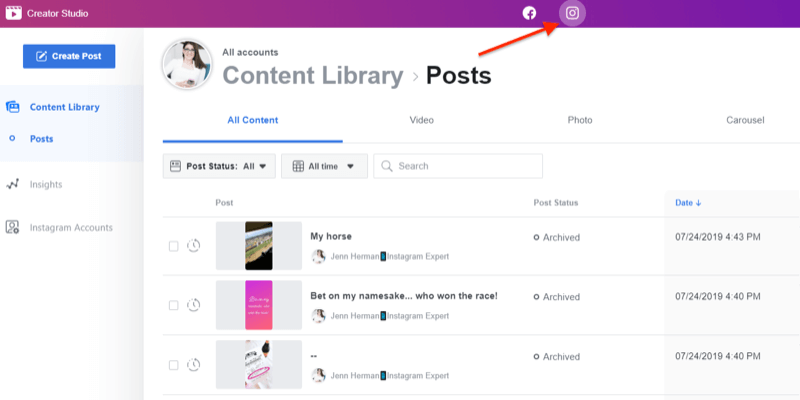
If your Instagram account is connected already, you'll see the Facebook and Instagram icons at the top of the browser window. If your Instagram account isn't yet connected, select the option to connect it.
This screen is one of multiple in the rotating display on the home page. Another screen announces the introduction of posting to Instagram and IGTV with a Try It Now action button that will also take you to the Instagram connection option.

Once connected, click on the Instagram icon at the top of the page to view your Instagram account content and insights.
If you have the option to post via Creator Studio, you'll see a large blue Create Post button in the top-left corner of the screen. Clicking that button reveals two options: Instagram Feed or IGTV. Select the option you want and continue with the prompts to upload your post.
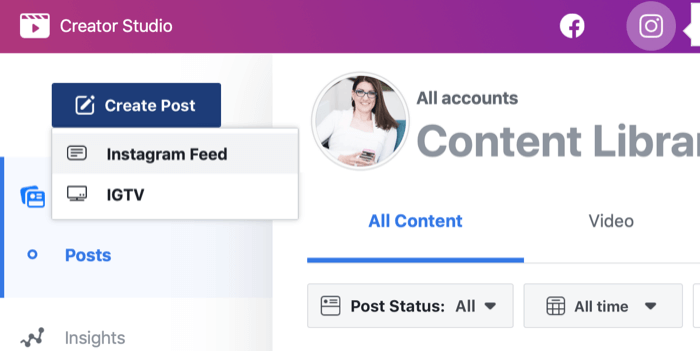
As of this writing, Creator Studio allows you to create Instagram feed posts (with one or multiple photos and/or videos) and IGTV video posts. There isn't currently an option for Stories.
Get World-Class Marketing Training — All Year Long!
Are you facing doubt, uncertainty, or overwhelm? The Social Media Marketing Society can help.
Each month, you’ll receive training from trusted marketing experts, covering everything from AI to organic social marketing. When you join, you’ll also get immediate access to:
- A library of 100+ marketing trainings
- A community of like-minded marketers
- Monthly online community meetups
- Relevant news and trends updates
#1: How to Post to the Instagram Feed From Desktop
To post to the Instagram feed from Creator Studio, click the Create a Post button and select the Instagram Feed option.
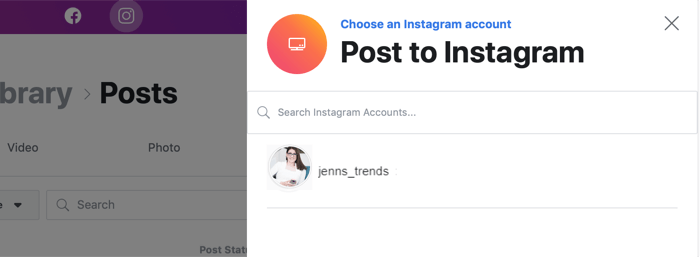
A pop-out window will appear on the right side of the page asking you to select the Instagram account to use. If you have just one account, only that account will be listed for you to click on. If you have multiple Instagram accounts, click the one you want to use.
The window then expands to allow you to create your Instagram post. You can write your caption, add a location, upload your content (photos or videos), and simultaneously post to your associated Facebook account.
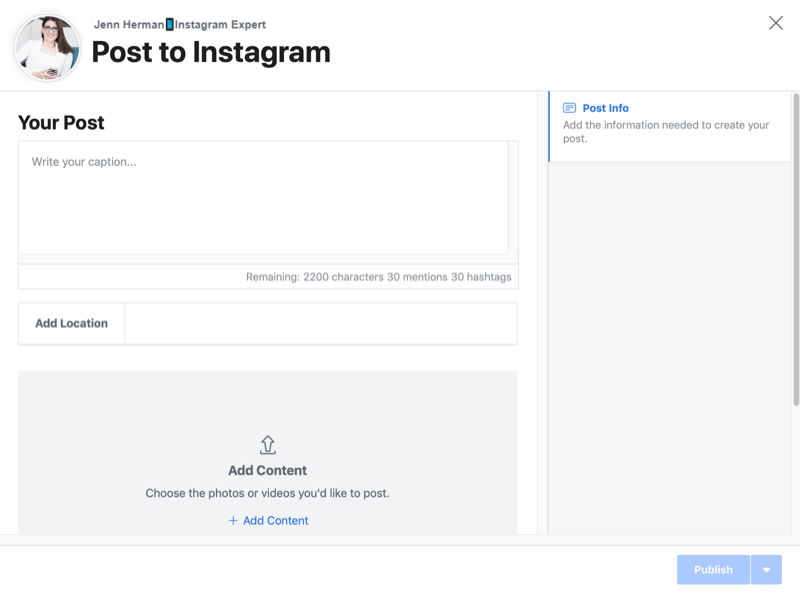
Write your caption as you want it to appear on Instagram, including any spacing and formatting you want. Remember that the same formatting rules apply to captions in Creator Studio as they do on Instagram:
- There can't be any spaces after the last character of a paragraph. To avoid this, backspace to the last character.
- You can't use multiple special characters at the end of a paragraph. End with a single punctuation mark, not a series of punctuation marks (like OMG!!!!).
- Don't use an emoji as the last character of a paragraph (assuming you have an emoji keyboard on your computer).
Include your Instagram hashtags in the caption. There's no option to create a comment on the post with the posting tool so if you want to include hashtags at the time of posting, you need to include them in the caption.
As you begin typing your caption and adding @mentions and hashtags, the counter beneath the caption box keeps a running tally of how many of each feature you have remaining. This makes it easy to see how many characters, @mentions, and hashtags you still have available.

You don't have to include a caption to publish your post to Instagram. It's better to have one, though!
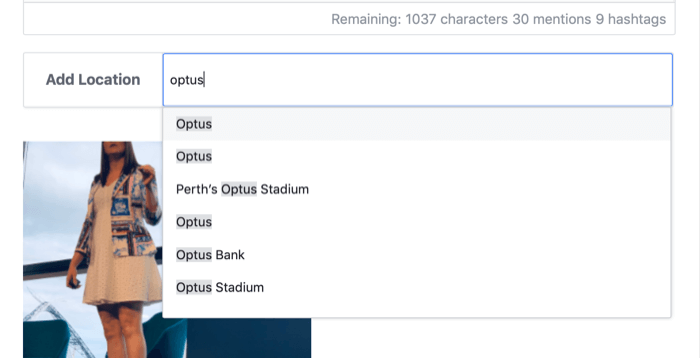
To add a location, begin typing the name of the location and recommendations will appear for you to choose from.
To upload your visual content, click the Add Content option below the Add Location box. Then choose whether to upload content from your computer or Facebook page.
You can upload up to 10 photos and videos into one carousel post using this upload option.
If you select one file from your computer or Facebook page, you can't add another file via the upload option. You can, however, select multiple files to upload at the same time by selecting more than one file from your file window.
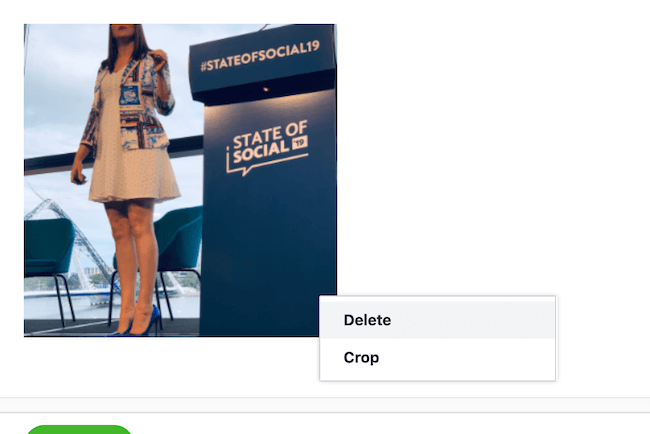
The files you upload will default to a square crop. You can edit the placement of the image in the square or change the orientation to landscape or portrait mode. To do this, tap the three-dot button below the image and select Crop from the pop-up menu.
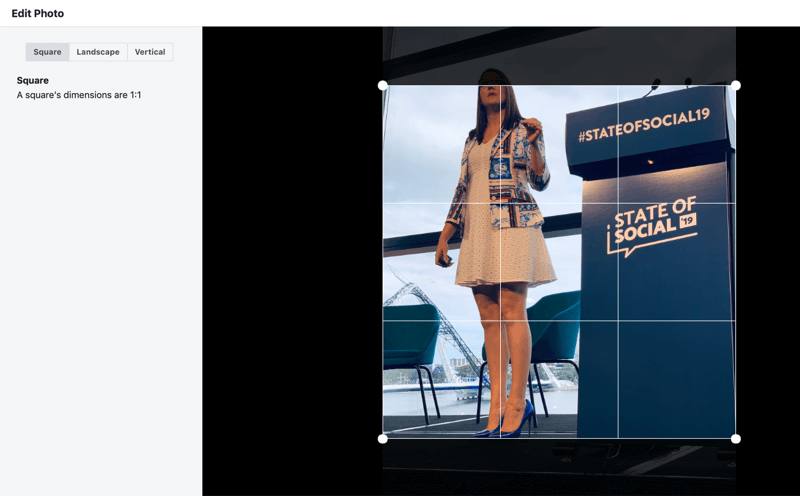
From the Edit Photo window, drag the image or resize it within the photo grid. You can also select the Landscape or Vertical option on the left to change the size of the image; crop and drag accordingly to fit the space. The size and dimensions of landscape and vertical images are the same as they are for a regular Instagram upload. Click Save when you're done formatting the image.
Video files must be between 3 seconds and 60 seconds in length and remain in 4:5 or 16:9 formats. As your file is uploading, you'll see a progress bubble in the bottom-left corner of the screen. It will turn green when the video file is fully uploaded and ready to publish.

Discover Proven Marketing Strategies and Tips
Want to go even deeper with your marketing? Check out the Social Media Marketing Podcast! Publishing weekly since 2012, the Social Media Marketing Podcast helps you navigate the constantly changing marketing jungle, with expert interviews from marketing pros.
But don’t let the name fool you. This show is about a lot more than just social media marketing. With over 600 episodes and millions of downloads each year, this show has been a trusted source for marketers for well over a decade.
There are no editing options for videos. Clicking on the three-dot button of a video file only allows you to delete the file. So make sure your video is formatted exactly as you want it to appear on Instagram before uploading it.
Once you've uploaded a content file, the Publish button in the bottom-right corner of the screen turns bright blue, allowing you to upload your post to Instagram. This button won't be actionable until you've uploaded a content file as photo or video.
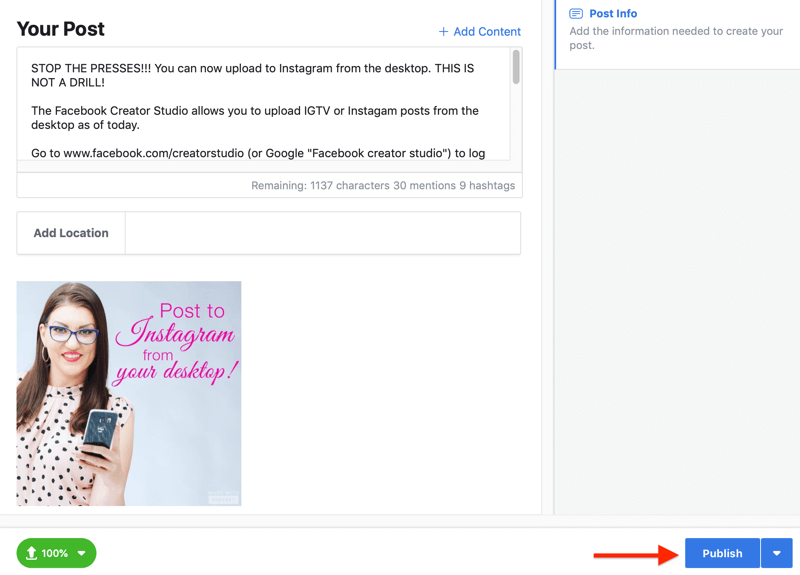
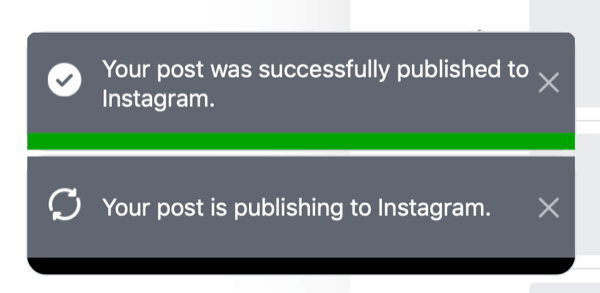
If you click Publish, your post will upload to Instagram immediately. Progress messages will appear in the bottom-left corner of the page to let you know your post is uploading and has uploaded successfully.
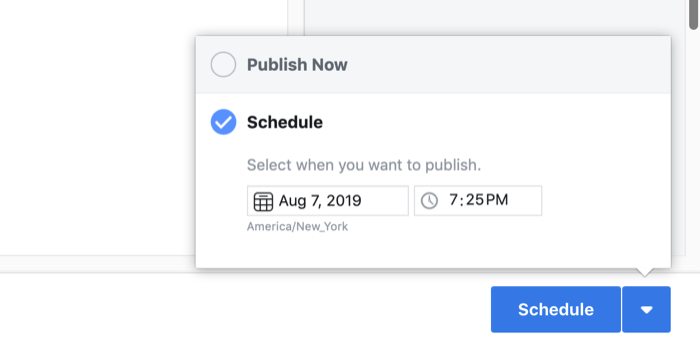
Next to the Publish button, you'll notice a drop-down arrow button. Clicking on it will reveal the option to schedule a post. Click the Schedule option and select the date and time you want your post to publish to Instagram. Then click Schedule to upload your content for posting at the time you selected.
After scheduling your post, you'll see it in your Creator Studio Content Library as a scheduled post.
Warning: Once you've posted or scheduled an Instagram post via Creator Studio, you can't edit the post from Creator Studio. You need to go to the live post on Instagram on a mobile device to edit the text on the post itself.

#2: How to Post IGTV Videos From Desktop
Posting and scheduling IGTV videos works in much the same way as the steps outlined above for posting a regular Instagram feed post.
Start by clicking on Create Post and choosing the IGTV option from the menu. Select the Instagram account you want to use from the menu screen. The window will expand with the fields necessary to upload an IGTV video.
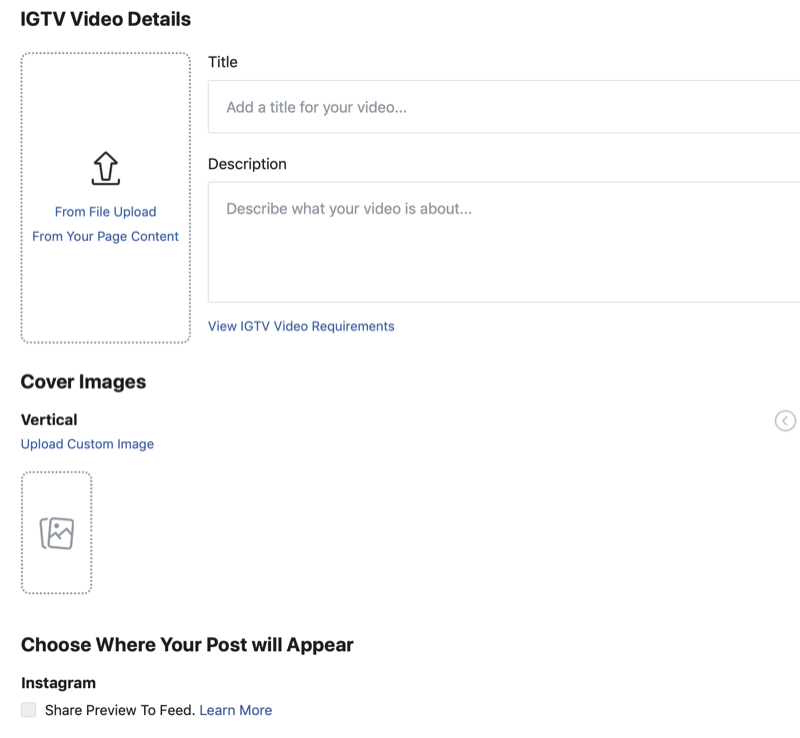
To upload your video content, click From File Upload and select files from your computer. You can also click on From Your Page Content and select files from your Facebook page.
After you select a file, it will populate into the upload screen. If you selected the wrong video or want to upload a different one, click Select New Video beneath the video preview to replace it. As the video uploads, you'll notice the status bubble in the bottom-left corner tracking the progress. When the video is uploaded and ready, the status bubble turns green.
Add the title of your video and write in a description for it. Your video won't upload unless you include a title.
And remember, your description can include hashtags and any URL of your choice! You can make your description easier to read with spacing and formatting.
Next, choose a cover image for the video. You can scroll through the list of cover image thumbnails that populate automatically and pick one that works best for you. Or click on Upload Custom Image to select a file from your computer to use as your IGTV cover image.
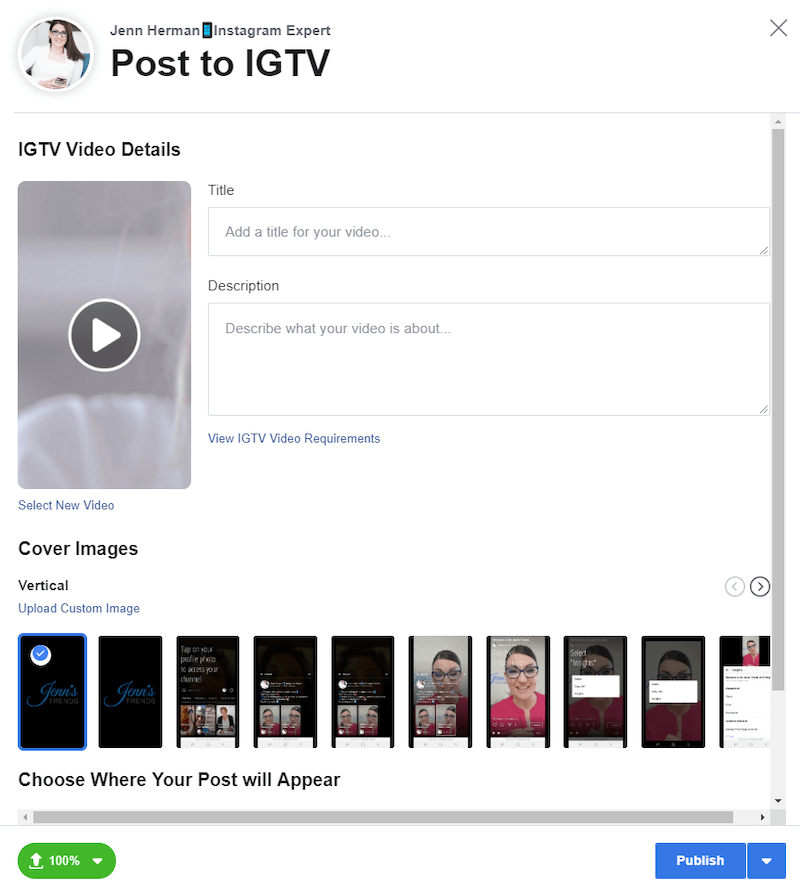
If you attempt to upload a video or cover image that doesn't meet the IGTV requirements, an error message alerts you and recommends you review the IGTV video requirements.
Before you publish your post, check the options for placement of your IGTV video. If your video is over 1 minute in length, you have the option to display the first minute preview in your Instagram feed. This box is automatically checked on the upload screen but you can uncheck it if you don't want a preview to appear on your feed.
You can also choose to share the post to your Facebook page if you wish.
Similarly to a regular feed upload, you have the option to publish your IGTV video immediately by clicking the Publish button. If you prefer to schedule your IGTV video for a later time or date, click the arrow next to the Publish button and select the option to schedule the post.
Choose the date and time and then click Schedule to upload the post.
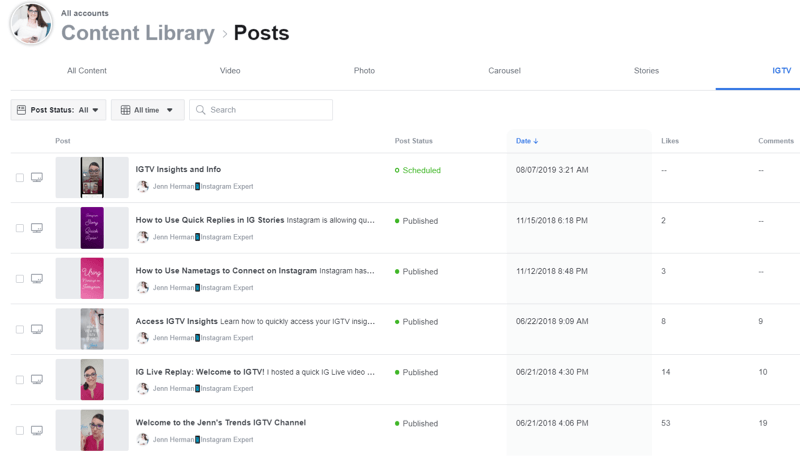
Your published or scheduled IGTV post will appear in your Creator Studio Content Library. It appears on the All Content home screen of Creator Studio and is also on the IGTV tab in your Content Library (on the right-hand side).
The content defaults to Post Status: All, where you'll see all of your IGTV videos. The newly posted video or upcoming scheduled post will appear in this list. It may take a minute or two to populate so don't worry if it doesn't show up immediately.
Conclusion
With all of the tools available to create and upload Instagram content, you may wonder what the advantage is to using Creator Studio for posting to Instagram. There are other scheduling tools and dashboard management software that allow you to post from your desktop to Instagram. And while Creator Studio can't replace the robust functionality of most of these third-party tools, for many marketers, this tool is going to be easier to use, and it's free!
It's also nice to have a tool that's designed specifically for Instagram (and Facebook) and doesn't rely on third-party API access that can be changed or revoked at any time.
Creator Studio is also the only tool currently available to schedule IGTV videos. If you're a frequent content creator for IGTV, this tool will help you with your content strategy.
The posting option for Creator Studio is rolling out now and many people have access to it, although not everyone does. You may see a Coming Soon notice or you may simply not have the Create Post button. You'll have to be patient and wait until you're granted access.
What do you think? Have you posted to Instagram or IGTV yet using Creator Studio? Are you going to give it a try after reading this? Please share your thoughts or tips in the comments below.
More articles on Instagram marketing:
- Learn how to plan, create, and optimize Instagram content for your business.
- Discover four ways to showcase and promote your products on Instagram.
- Find eight distinct ways to share links on your Instagram profile and posts.
Attention Agency Owners, Brand Marketers, and Consultants

Introducing the Marketing Agency Show–our newest podcast designed to explore the struggles of agency marketers.
Join show host and agency owner, Brooke Sellas, as she interviews agency marketers and digs deep into their biggest challenges. Explore topics like navigating rough economic times, leveraging AI, service diversification, client acquisition, and much more.
Just pull up your favorite podcast app, search for Marketing Agency Show and start listening. Or click the button below for more information.

