Wondering how iOS 14 and other pixel-blockers will impact your Facebook marketing? Did you know that the Facebook Conversions API can help?
In this article, you'll discover how to set up the Facebook Conversions API so you can more accurately measure your Facebook and Instagram marketing activities.
What Is the Facebook Conversions API?
Editorial Note: This article was published prior to the rollout of iOS 14 privacy update. Now that the update has been released, portions of the text have been edited to more accurately reflect the role of Facebook Conversions API in campaign measurement.
You may have noticed recently that Facebook has been sending up alarms about the upcoming iOS 14 changes and how they'll impact your ads. Here's the gist of what's going on.
With iOS 14, Apple is making it much harder for apps and websites on Apple devices to track user behavior. Apple is doing a few things to make this happen, including giving iOS 14 users the ability to turn off tracking at the device level and putting limitations on event tracking, regardless of a user's settings.
These changes will go into effect in a few months. The exact date hasn't been announced at the time of this writing, but it's very important to make adjustments now so you're ready when it happens.

When these tracking changes go into full effect, apps and websites on Apple devices may be blocked from sending the conversion event information (purchases, leads, add to carts, etc.) that businesses usually track in Ads Manager.
Considering how much Facebook ads traffic comes from mobile devices and how much of that mobile traffic comes specifically from Apple devices, this tracking change could severely limit your ability to measure the results of your Facebook ads.
It's not just the iOS 14 update, though. Increased user controls from privacy laws like the EU's GDPR and California's Privacy Rights Act, as well as rising usage of ad-blocking software, have already been limiting Facebook's ability to track events.
So a change was coming, but the iOS 14 update sped up Facebook's timeline.
Conversions API (or CAPI as it's sometimes called) is a new name but not a new way of tracking, even for Facebook. The old name was Server-Side Events, which better explains what's going on. With the Conversions API, the website's server (as opposed to the browser) tracks the user as they visit your website. The server notes what actions the user takes (add to cart, purchase, lead) and then the server sends the information back to Facebook.
Christopher Penn of Trust Insights explains, “The reason you use the Conversions API is that you increasingly don't trust browser-side tracking. If I'm on my iPhone and I'm in Safari, because of the way Apple implements privacy, a whole lot less data is being transmitted. If I'm in Chrome and I've got AdBlock cranked all the way to the max, your Facebook pixel is not going to fire at all. It will be locked out. And so, you will have conversions, but Facebook won't know about it. Having a second way of tracking conversions is becoming more and more important.”
Get World-Class Marketing Training — All Year Long!
Are you facing doubt, uncertainty, or overwhelm? The Social Media Marketing Society can help.
Each month, you’ll receive training from trusted marketing experts, covering everything from AI to organic social marketing. When you join, you’ll also get immediate access to:
- A library of 100+ marketing trainings
- A community of like-minded marketers
- Monthly online community meetups
- Relevant news and trends updates
Facebook's Conversions API is your best backup.
How Does the Conversions API Work?
Most businesses have the Facebook pixel installed directly on their website or indirectly through Google Tag Manager. When a user loads your website, the pixel fires at the browser level. With each page the user visits and action the user completes (add to cart, purchase, lead, etc.), the browser sends an update back to Facebook. Facebook then tells you in Ads Manager how many purchases, leads, add to carts, and so on your ad generated.
With the Conversions API, when a user clicks on a Facebook ad and lands on your website, Facebook will send a unique ID for that user to the server. The server will track the user via this ID as they visit different pages on your website and note if they complete a purchase, opt for a lead magnet, add a product to their shopping cart, and other actions. The server will then send a message back to Facebook saying what action this user ID completed.
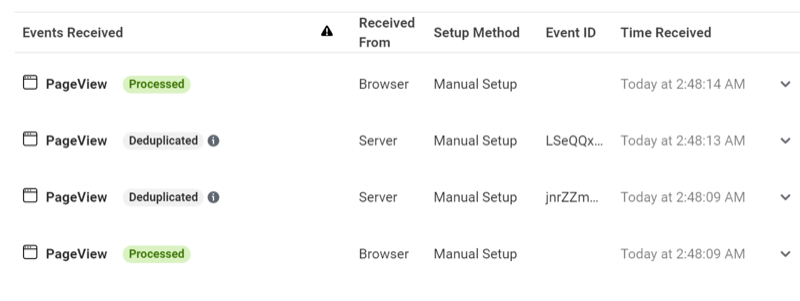
At least for the time being, both browser and server events will continue to fire. When Facebook receives the server event, it checks to see if it also has a corresponding browser event. If the browser event is blocked—say because Apple blocked the browser-level tracking—Facebook can use the server event instead. If Facebook has both events, it will “deduplicate” the events and use just the browser event. (Deduplicate is a fancy way of saying it doesn't count the redundant event.)
Several changes also affect how conversion events work. Facebook has stopped using the 28-day attribution window and is now only using the 7-day click or 1-day view attribution windows. That means you may see a reduction in the number of conversions from what you had before, if you often had conversions happening more than 7 days after someone clicked on your ad.
Facebook is also switching over to aggregated events. The Aggregated Event Measurement is a protocol that will allow you to measure conversion events in alignment with the iOS 14 restrictions. However, you'll be limited to eight events, the events will be prioritized, and Facebook will only record the highest-priority event per transaction. So if you have initiate checkout, add to cart, and purchase set up, only the action you identified as the highest priority will be recorded.
How to Set Up the Conversions API for Website Events
There are different setup procedures for websites and applications. This article focuses on the website setup. If you run ads optimizing for app events, you'll need to follow the steps for app setup.
Resource Center
In Ads Manager, Facebook has added a new Resource Center tab to get you started with the setup process. The Resource Center links to several articles about the upcoming changes and the Conversions API (CAPI). It also has information specific to your ad account so you can tell if you've missed any steps in the CAPI setup process.

#1: Verify Your Domain
If you run Facebook ads optimized for website events, the first thing you want to do is confirm your domain is verified.
To do this, you'll need to go to Domains. In Business Manager, open Business Settings, select Brand Safety in the left-hand menu, and then select Domains.
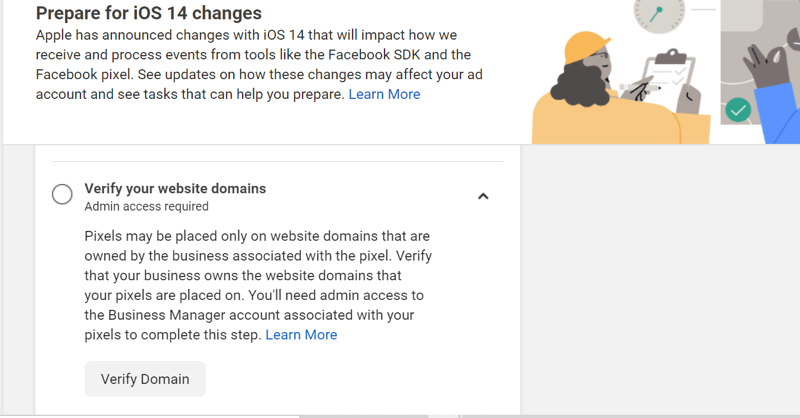
Alternatively, if you have the prompt in the Resource Center to verify your domain, click the Verify Domain button (pictured below) and it'll take you straight to Domains.
If you have a verified domain, it'll appear in the main window with a green dot. You can skip to the next section of this article: “Step #2: Set Up the Conversions API.”
If you already started the process but didn't complete it, you'll see your domain with a red dot.
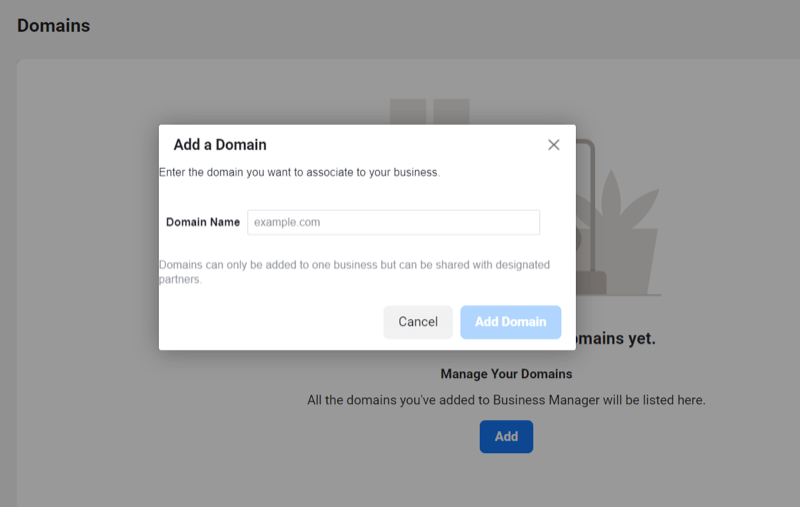
If you don't have a verified domain, you'll see the message “<Your business> doesn't have any domains yet.” Click Add and then type in your domain name and click Add Domain. If the domain doesn't appear in the main box after clicking Add Domain, refresh the page.
Now choose your preferred method to verify your domain. Facebook gives you three options: DNS Verification, HTML File Upload, and Meta-tag Verification.
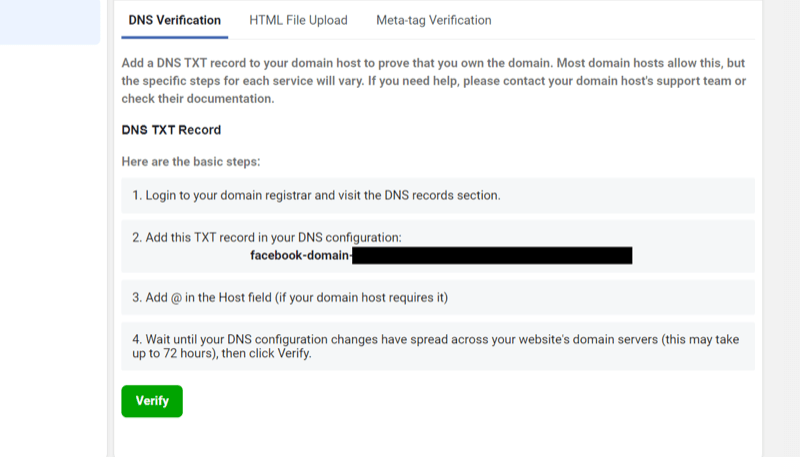
Follow the instructions for the method you chose to finish verifying your domain. When your domain is successfully verified, you'll see it listed with a green dot.

#2: Set Up the Conversions API for WordPress
How you set up the Conversions API depends on what platform your website is on. The eCommerce platforms have, for the most part, been proactive about creating integrations for Facebook's Conversions API. Some, like WooCommerce, have established partner integrations with Facebook. Others, like Shopify, have their own setup procedure.
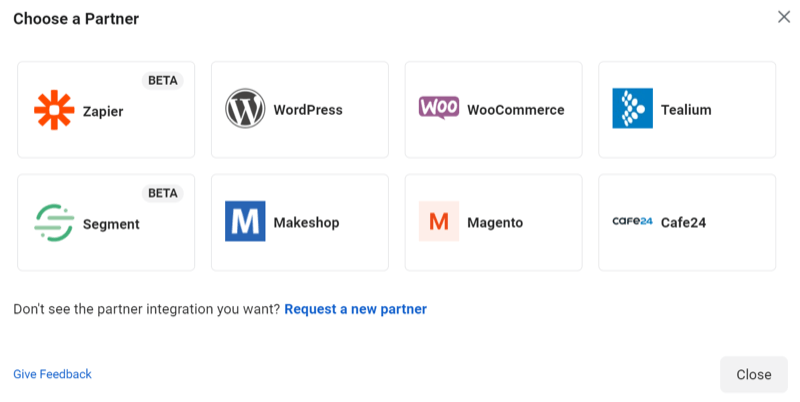
If your website platform isn't listed, do a quick Google Search to see if it has a native integration. If it isn't a partner and doesn't have a native integration, the Zapier solution may be your best bet.
There are two ways to set up the Conversions API on your WordPress site: using the WordPress partner integration or a free plugin like PixelYourSite. PixelYourSite is a more user-friendly experience so we'll start with that setup. (Other WordPress tracking plugins have Conversions API integrations as well. If you use a different plugin for pixel installation, see if they have a CAPI configuration first.)

Discover Proven Marketing Strategies and Tips
Want to go even deeper with your marketing? Check out the Social Media Marketing Podcast! Publishing weekly since 2012, the Social Media Marketing Podcast helps you navigate the constantly changing marketing jungle, with expert interviews from marketing pros.
But don’t let the name fool you. This show is about a lot more than just social media marketing. With over 600 episodes and millions of downloads each year, this show has been a trusted source for marketers for well over a decade.
Use PixelYourSite to Set Up the Conversions API for WordPress
To set up the Conversions API using PixelYourSite, first you'll need to install and activate the PixelYourSite plugin. In your WordPress dashboard, select Plugins in the left-hand menu. Then click Add New.
Search for PixelYourSite in the search bar. You want the plugin titled “PixelYourSite–Your smart PIXEL (TAG) Manager.” Click Install Now, and when it finishes loading, click Activate.
![]()
When the plugin is activated, it'll appear in the left-hand menu in WordPress. Select the plugin and go to the plugin dashboard.
![]()
Next, go into Facebook Events Manager and copy your Facebook pixel ID. Then paste it into the Facebook Pixel ID field in the PixelYourSite dashboard (see completed image below).
Now go back into Facebook Events Manager. Under Settings, scroll down to Conversions API and click Generate Access Token.
![]()
Copy the access token.
![]()
Paste the access token into the API Token field in the PixelYourSite dashboard and check the box “Send Events Directly From Your Web Server to Facebook through the Conversions API.”
![]()
Now you need to test your setup. Go back into Facebook Events Manager and go to the Test Events tab. Copy the test code under Test Server Events.
![]()
Next, go back into the PixelYourSite dashboard and paste the test code in the “test_event_code” field. Scroll to the bottom and click Save Settings.
![]()
To run the test, open a page of your website in a different tab.
To see if the test fired correctly, go back into the Test Events tab in Events Manager. (You may need to refresh the page if it's still open from the previous steps.) If the test fired successfully, the Test Your Events window will show the events received and “Receiving activity” with a green dot.
If the browser event fired as well, you'll see the browser event as processed and the server event as “Deduplicated.”
If only the server event fired, you'll see just the Server event processed.
![]()
If the test fired correctly, go back into the PixelYourSite dashboard and delete the test code. Click Save Settings when you're finished.
Now that you've set up your Conversions API successfully, you can skip forward to the next section of this article: “#3: Use the Event Setup Tool to Set Up Event Tracking.”
Use Partner Integration to Set Up the Conversions API for WordPress
To set up the Conversions API using the WordPress partner integration, go into Facebook Events Manager and click on the Settings tab. Scroll down to Conversions API and click Choose a Partner.
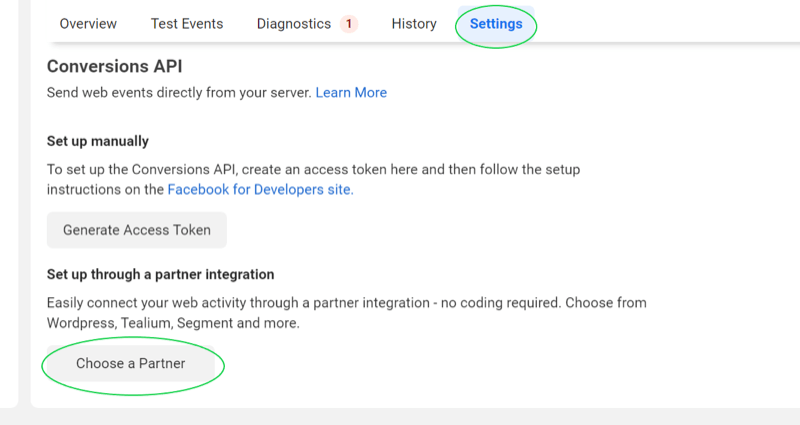
Select WordPress.
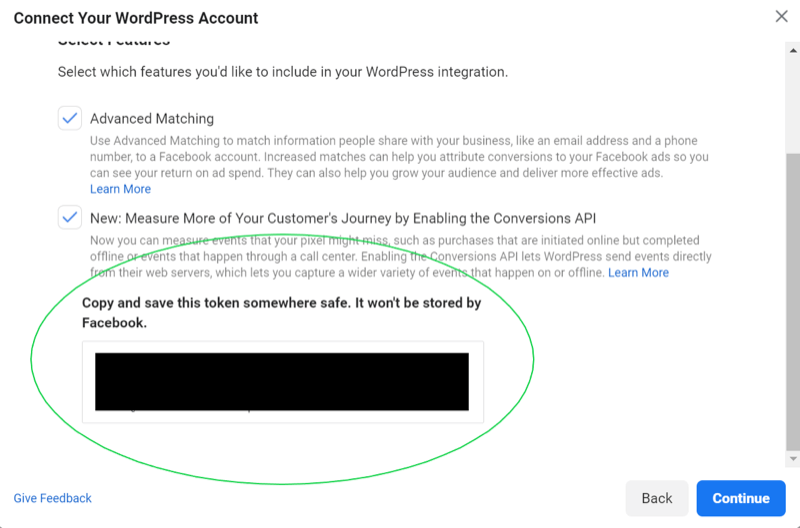
On the next page, check both boxes and click Create Access Token.
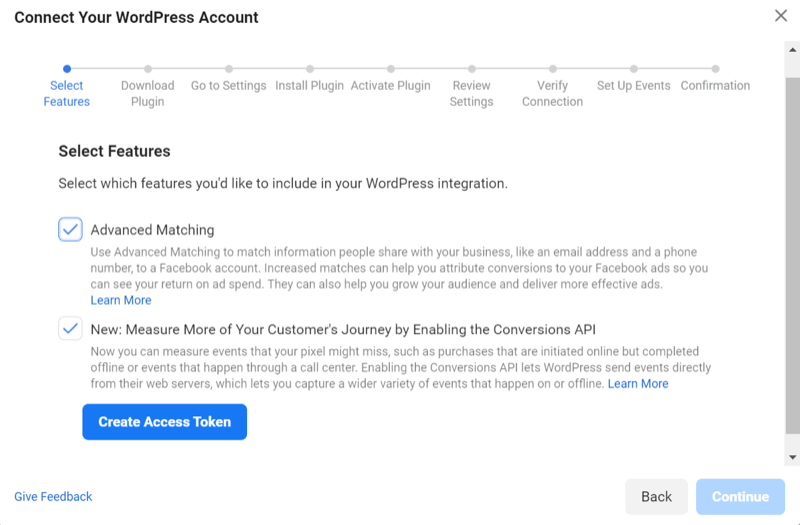
Copy the access token and paste it somewhere for safekeeping. You'll need this later. Click Continue.
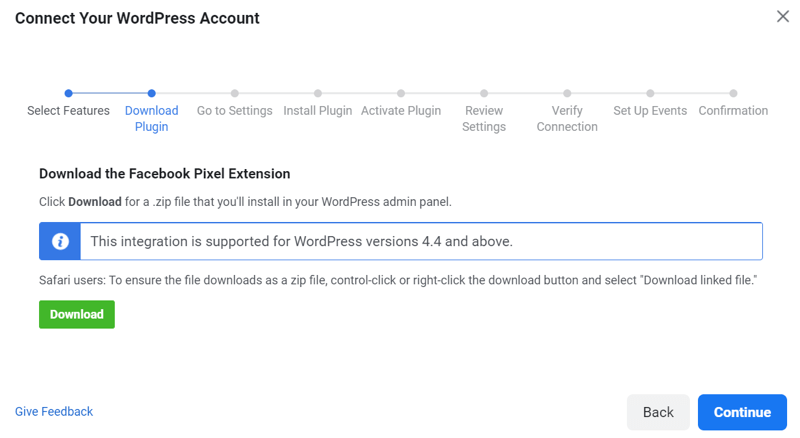
Click Download to download the Facebook Pixel WordPress plugin.
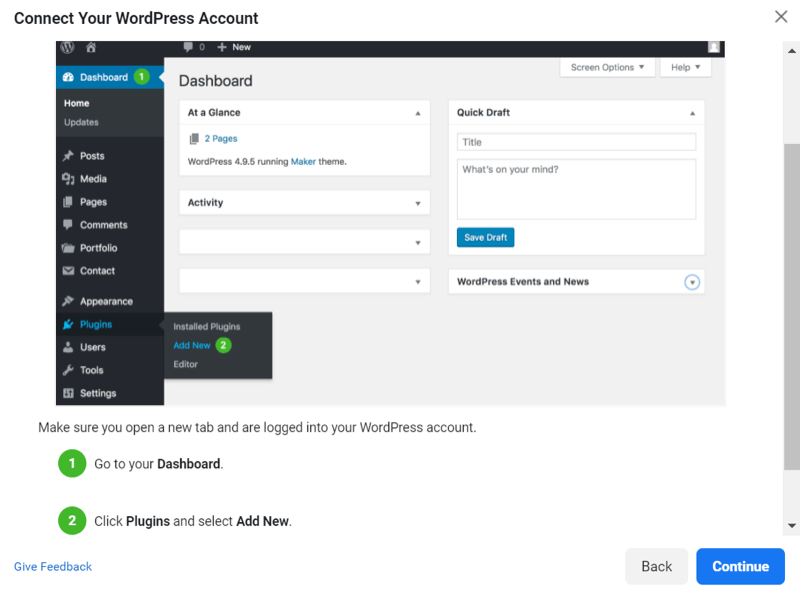
Go into your WordPress dashboard and select Plugins and Add New from the left-hand menu.
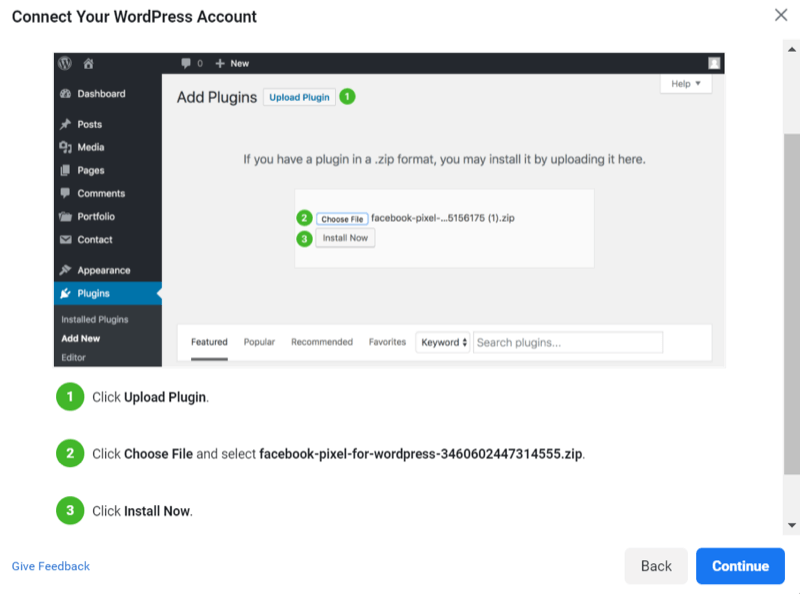
Select Upload Plugin. Choose the file you downloaded earlier and click Install Now.
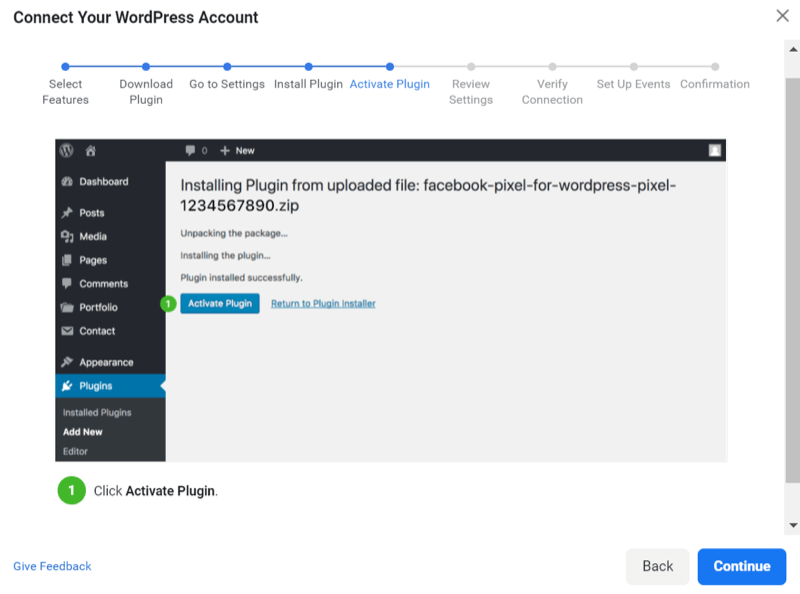
Click Activate Plugin.
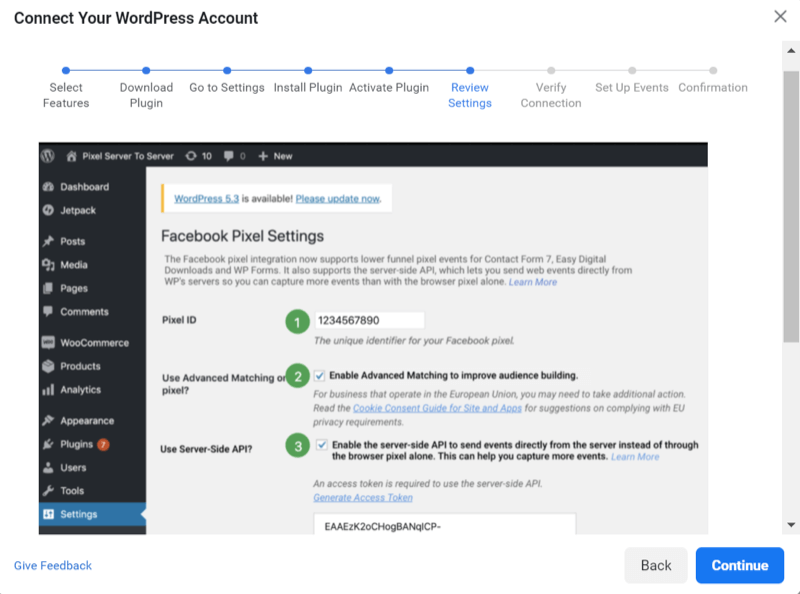
Go into Events Manager and copy your pixel ID. Paste it into the Pixel ID field. Check the boxes for “Enable Advanced Matching” and “Enable the Server-Side API to Send Events…” Then copy the Access Code you created and paste it into the access token box. Click Save Changes.
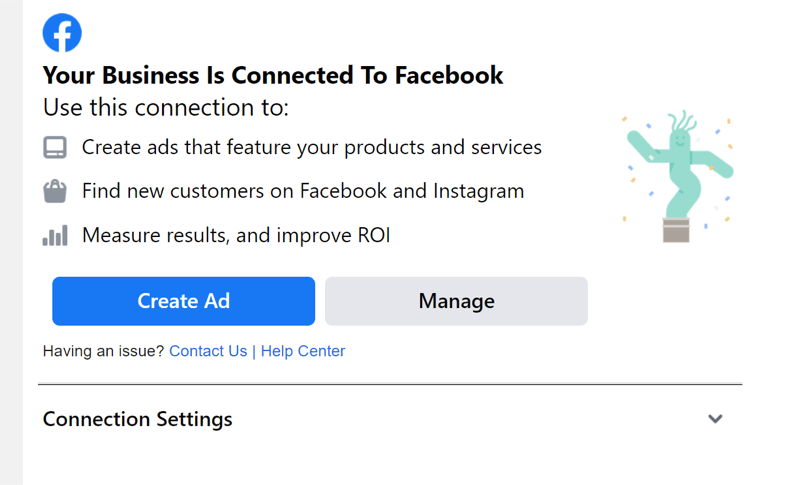
Update the plugin. Facebook has been releasing frequent updates to the partner integration plugin so make sure you're in the most recent version. If the plugin is set up correctly, it should look like this:
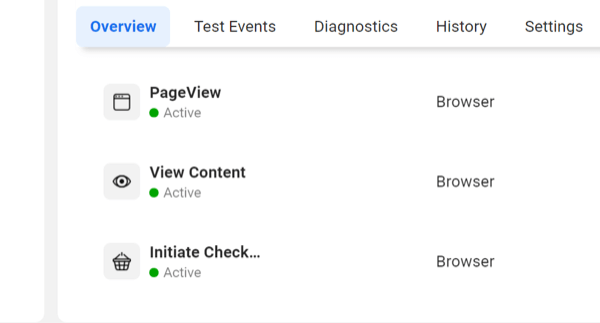
Test your Conversions API setup by opening your website in a new tab. Go back into Events Manager to the Overview tab. If your setup is correct, you'll see events labeled “Active” with a green dot. This may take a few minutes to update.
#3: Use the Event Setup Tool to Set Up Event Tracking
If your events are already set up, you can skip ahead to the next section of this article: “#4: Configure Your Aggregated Event Measurement.” If you do need to set up events, though, you have some choices.
If you're still in the WordPress Partner Integration setup wizard from the previous section, you can click Continue to go to “Set Up Events.” Enter your website URL and click Open Website.
![]()
Otherwise, you can go into Events Manager, open the Settings tab, scroll down to Event Setup, and click Open Event Setup Tool.
![]()
You can then use the Event Setup Tool to create the events you need to track on your website.
![]()
#4: Configure Your Aggregated Event Measurement
The aggregated event measurement is fairly straightforward to configure. Facebook allows you to configure the events that have already been firing on your site.
To configure your Aggregated Event Measurement, go to Events Manager. Click on the Overview tab and select Aggregated Event Measurement. Then click Configure Web Events.

On the next screen, you'll see all of your verified domains. Click on the domain for which you want to configure the event and click Edit Events. (Note: In some circumstances, you can configure events even if the domain isn't verified but verification is still recommended. You can read more here).
The events that Facebook has recorded in the past will be listed from highest to lowest priority.
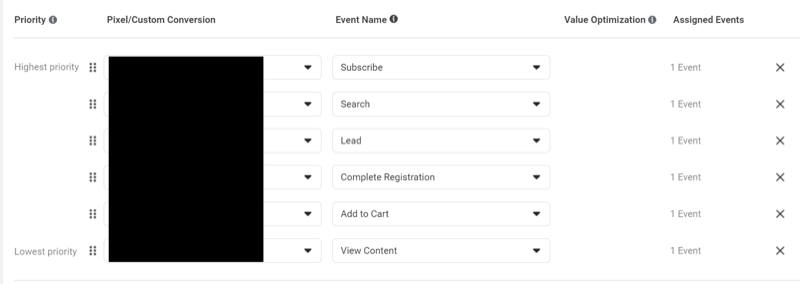
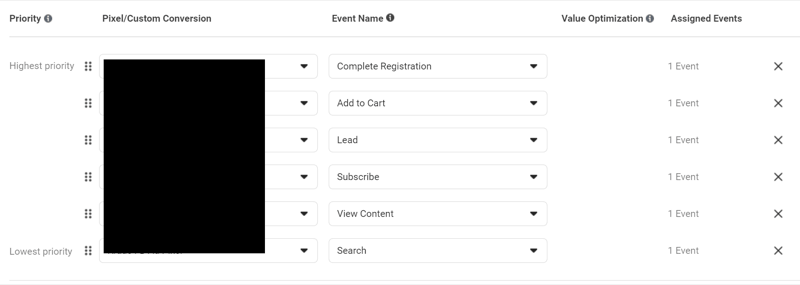
You can drag and drop the events to reorder them based on the order of your funnel if Facebook's order isn't correct. If you have a purchase event, you'll have the option to turn on Value Optimization. You need to turn this on to send a value with your purchase event.
Conclusion
Facebook's Conversions API may be different from the traditional pixel setup, and anytime we have to learn new technology, it can be frustrating. Things are changing quite quickly with this rollout. Not every platform has a partner integration or native configuration at this moment but I predict that the other platforms will soon catch up. In the meantime, Zapier is your friend.
The Conversions API will allow you to have accurate reporting even with changes like the iOS 14 update and ad-blocking software. It's important that you set this up now so when the full iOS 14 changes go into effect, you don't lose any of your conversion data.
What do you think? Will you set up the Conversions API for your business? Share your thoughts in the comments below.
More articles on Facebook ads:
- Learn how to identify Facebook ads you should stop spending money on.
- Explore common Facebook ad mistakes and learn how to fix them.
- Discover how to develop Facebook audiences for cold, warm, and hot prospect targeting.
Attention Agency Owners, Brand Marketers, and Consultants

Introducing the Marketing Agency Show–our newest podcast designed to explore the struggles of agency marketers.
Join show host and agency owner, Brooke Sellas, as she interviews agency marketers and digs deep into their biggest challenges. Explore topics like navigating rough economic times, leveraging AI, service diversification, client acquisition, and much more.
Just pull up your favorite podcast app, search for Marketing Agency Show and start listening. Or click the button below for more information.

