Wondering how to easily install Facebook features on your website without editing the code?
In this article, you'll discover easy ways to install the Facebook pixel, the Facebook Messenger customer chat plugin, alerts for Facebook comments, and Facebook standard events with Google Tag Manager.
Install Google Tag Manager on Your Website
Google Tag Manager is a powerful, free tool that will enhance your marketing analytics. From this one central platform, you can track a variety of actions on your website (page views, clicks, etc.) and share that data with platforms like Facebook or Google Analytics. Google Tag Manager is a valuable listening tool for digital marketers, but it's also useful for social media marketers.
Many social media marketers don't have access to their business's site—perhaps it's hosted on a blog that won't allow you to modify the CSS or it's with a developer who charges you to make changes. Facebook is aware that sometimes you can't install their code, or may be using a more complex CMS on a website and don't want to fiddle with it. So they've made sure several of their features integrate with software like Google Tag Manager.
To use Google Tag Manager, go to the home page and sign up for an account. If you already have an existing Google account, you can use it to sign in.
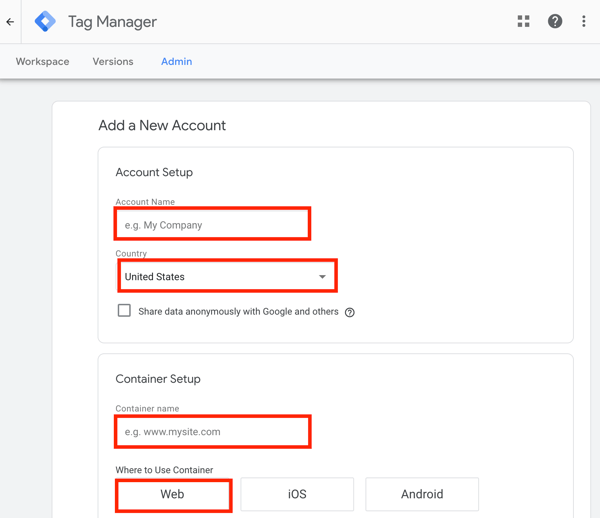
Once you're logged in, either link your account to an existing Google Tag Manager account for your blog or site or add a new account.
If you're creating a new account, type in your company name, choose your country, and enter your web address to create a container. When you're done, click Create and accept the terms of service.
Next, you'll see the container snippet you need to add to your website so Google Tag Manager will work.
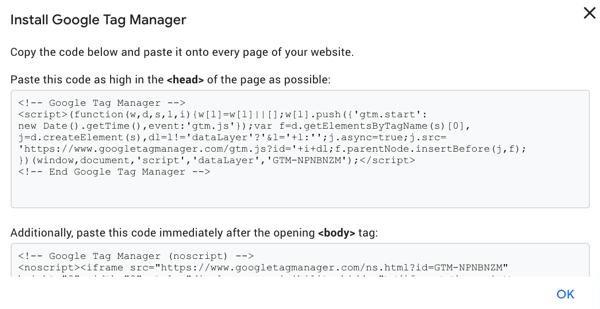
Note: If you're using Google Tag Manager for analytics on your website and pushing data to Google Analytics, make sure you embed only your Google Tag Manager ID into your website for analytics. Using both Google Analytics and Google Tag Manager IDs in your website code will result in duplicate information, double-tracking activity on your website. To avoid this, remove your Google Analytics Universal Tracking ID and replace it with Google Tag Manager.
Once you've added the container snippet to your blog or website, you're ready to add new tags that help integrate Facebook with your site.
#1: Set Up the Facebook Pixel
Once installed, the Facebook pixel gives you powerful insights into how visitors from Facebook interact with your site. The pixel is an incredibly useful and free tool for marketers.
![]()
Which AI Moves Actually Matter?
That's what every marketer is wrestling with now. New AI strategies, new tools, new takes every week — but no clarity. Most marketers and business owners are trying to figure out AI alone.The AI Business Society is your trusted guide. Get expert-led training you can put to work immediately. Plus a community of marketers sharing what's actually working.
I'M READY FOR REAL AI RESULTSTo install the Facebook pixel with Google Tag Manager, open Facebook Ads Manager and navigate to Events Manager > Pixels.
![]()
Then click +Add New Data Source and follow the prompts to install the pixel. When you see the screen below, click Connect a Partner Platform.
![]()
Then select Google Tag Manager.
![]()
In the window that appears, click Continue and then sign in to connect your Tag Manager account with Facebook.
![]()
When you're finished, navigate to Google Tag Manager and you'll see a tag that's named after your Facebook pixel ID number.
![]()
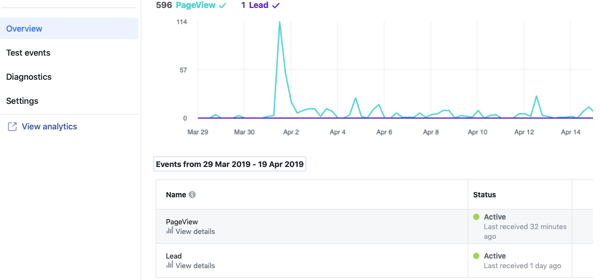
Now head back to Facebook and open Events Manager. You should see a message that your pixel is active.
The Facebook pixel is a gateway to powerful omnichannel analytics called event source groups, which allows you to complete your analytics overview so you can attribute conversions to your social efforts.
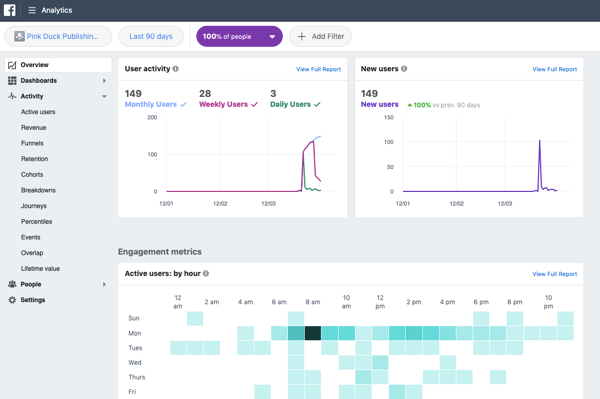
If you have Facebook Business Manager, head to your Facebook Analytics and use event source groups to drill down into user behavior on your website and interaction with your Facebook pages and apps.
#2: Install the Facebook Customer Chat Plugin
Offering a live chat feature on your blog or website can improve customer support and increase conversions. However, installing a live chat plugin may sound like a daunting task. Fortunately, there's a simple solution: the Facebook Customer Chat plugin.
This plugin allows you to link your live chat to Facebook so users don't have to sign into yet another piece of software. Plus, most people are familiar with how Facebook works and can understand how to use the chat feature.
Because Facebook freely makes your own chat plugin code available, you can use Google Tag Manager to install it. This is handy if you don't have access to your CSS or have a developer able to install it on your site. Installing the plugin this way is also easier than installing it manually, especially if you aren't confident working with CSS.
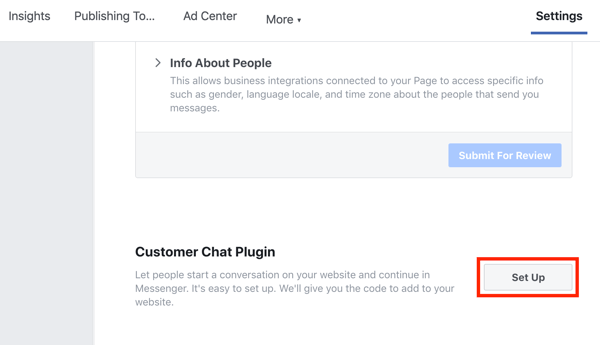
To find your code, navigate to your Facebook page and click Settings.
On the left, click the Messenger Platform tab and then on the right, scroll down until you see Customer Chat Plugin. Click the Set Up button.
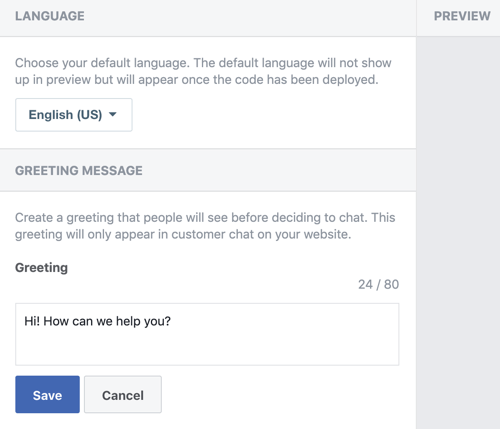
In the pop-up window, select your preferred language and type in the welcome greeting you'd like users to see when they click on the chat icon.
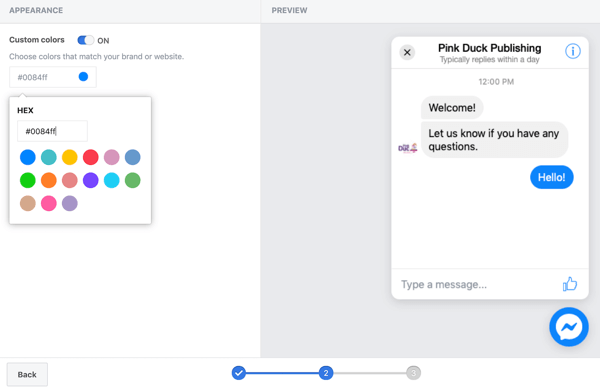
On the next screen, you can select custom colors for your chat plugin.
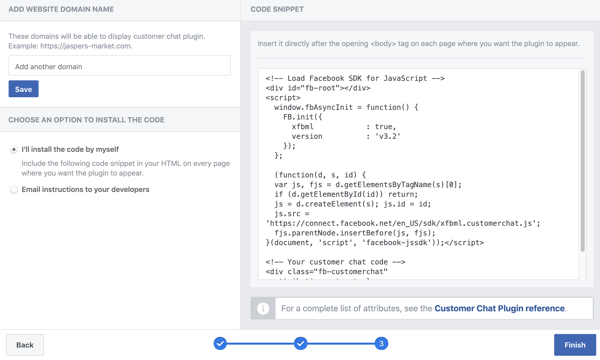
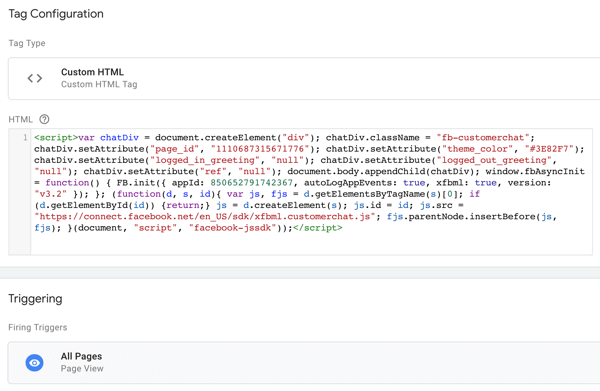
When you reach step 3, you'll see the <div> tag you need to add to your website. However, Google Tag Manager can't use this embed code. Instead, you need to change the HTML code into a script, as we'll discuss below. Click Finish to close out of the Facebook Customer Chat setup process.
Now you need to change the HTML code into a script that you can use in Google Tag Manager. You can either do this manually or by using a third-party tool.
Modify the Embed Code With a Third-Party Tool
If you prefer to use a third-party tool, try something like Rocketbots. It will take your embed code and turn it into a script that Google Tag Manager can use. The free Rocketbots plan offers 1,000 messages a month, which is great for smaller businesses.

Once you have the code, simply paste it into a custom HTML tag in Google Tag Manager. Your trigger should be views of all pages if you want to use it on all pages of your site.
Modify the Embed Code Manually
If you prefer to convert the HTML code into a script manually, start by gathering the following information:
- Your Facebook page ID (go to the About tab on your page and scroll down to page ID)
- The hex code for the color to use in your chat
- The welcome messages you'd like to display to users who are logged in and users who are logged out
Then insert this information into lines 4–8 in the code provided in this article by Simo Ahava.
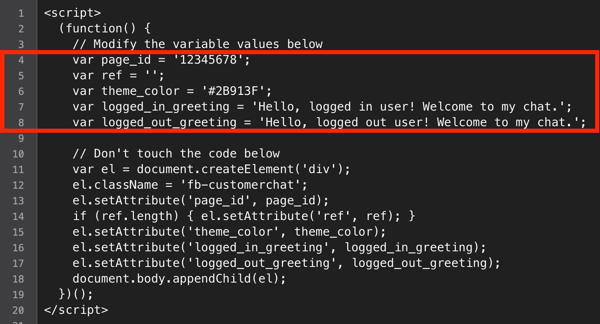
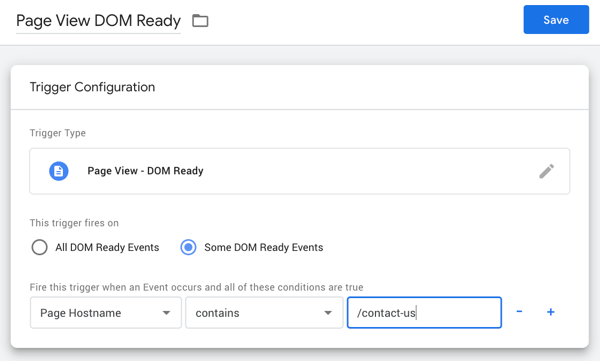
Once you've modified the code, create a new Custom HTML tag in Google Tag Manager and paste the code into it. For the trigger type, select Page View–DOM Ready. Also decide on which pages you want to use the trigger:
- Use the tag on all pages: Select All DOM Ready Events.
- Use the tag on select pages: Choose Some DOM Ready Events and type in the URL path you want the chat to show for (for example, ‘/contact-us').
When you're done, click Save.
#3: Create Alerts for Facebook Comments on Your Website
This is an exciting use of Google Tag Manager that helps you complete the circle when it comes to analytics and tracking if you use Facebook comments on your blog.
3 Days of World-Class Training—Zero Travel!

Couldn't make it to Social Media Marketing World and AI Business World this year? Get all of the great content at a fraction of the price with a Virtual ticket.
That’s full access to recordings of every keynote, workshop, and session—the ones people travel thousands of miles to see. Don't wait. Get your Virtual ticket and enjoy actionable content that you can watch anytime, anywhere.
Installing the Facebook comments plugin on your site is typically easy to do, but tracking those comments and using the information for anything meaningful is more difficult. In most cases, your blog won't notify you when users leave Facebook comments on your site, which can be frustrating. Because comments are all about social interaction with potential customers and brand champions, it's important to be able to stay on top of them.
Google Tag Manager can make this process a lot easier, pushing comments through to your Facebook Analytics data. You can even make comments data show up in Google Analytics as social interactions, if that's your analytics tool of choice.
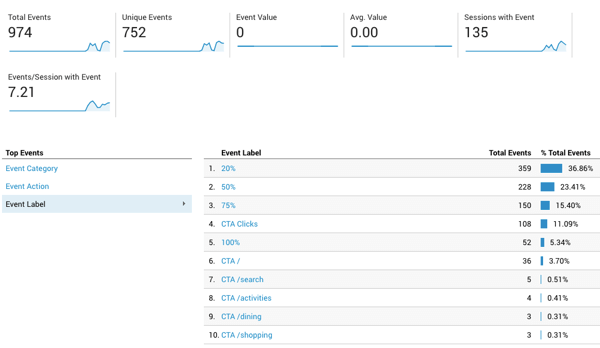
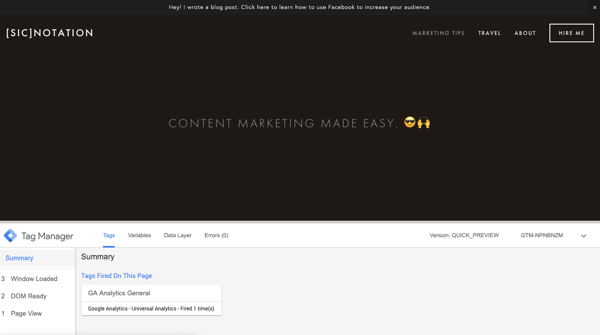
When you track Facebook comments through Google Tag Manager and push them to Google Analytics, they'll show up as events (as shown below) in Google Analytics. In Google Tag Manager, you can define how your events are labeled so you can track them.
Before getting into the steps for tracking Facebook comments, it's important to understand that Google Tag Manager has a host of predefined events that it can listen for on your blog. When it finds an event, it can use the event to trigger a tag.
Although in Google Tag Manager you can set up custom tags for whatever you need, when it comes to Facebook comments, try using form elements to set up your trigger. Google Tag Manager looks at the comments box as a form field, which means you can often use the Form Submission variable. This is handy because it requires less coding.
To track comments on your website, and eventually Facebook comments, you'll set up a tag that tracks all forms and then modify the configuration.
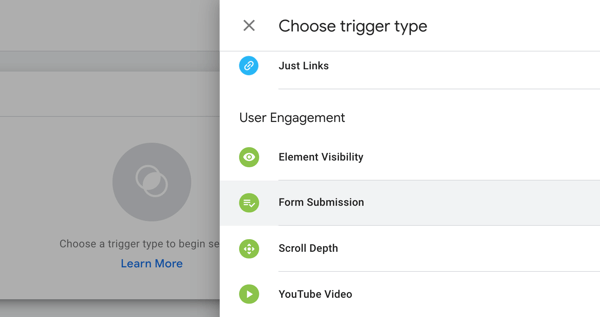
Start by creating a trigger for form submissions. In your workspace, go to Triggers and click New. For the trigger type, select Form Submission.
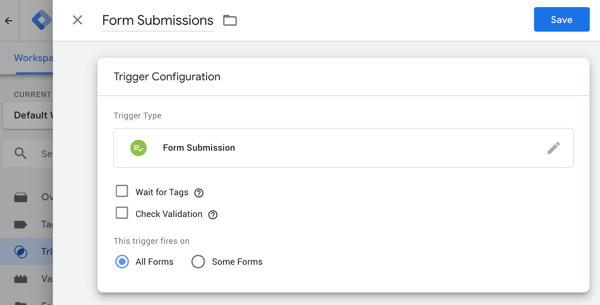
Next, type in “Form Submissions” for the trigger name. Leave the Wait for Tags option unchecked and set the trigger to fire on All Forms (all pages). Then click Save.
Next, create a Google Analytics–Universal Analytics tag with the track type Event.
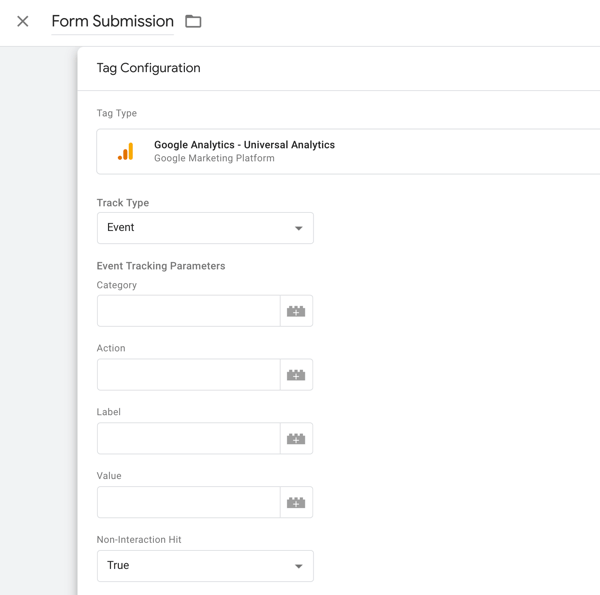
In the tag, you'll want to give the event a category, action, and label. These will be used by analytics software to identify what's happening as an event, so be descriptive. Tags with a non-interaction hit that's False will influence session durations and bounce rates. When in doubt, set this to True for tags so it doesn't mess with bounce rates.
Next, select the trigger you just made. Now you're tracking all submissions on all forms on your blog. You have a tag telling Google Tag Manager where to find data (from analytics) and what to call it, and a trigger telling it when to fire (when people submit any form).
Because each site is unique, comment areas on blogs may have different CSS. This means you're going to use the trigger you just created to find your Facebook comments and what uniquely identifies them, and then create a trigger that's unique to these kinds of comments.
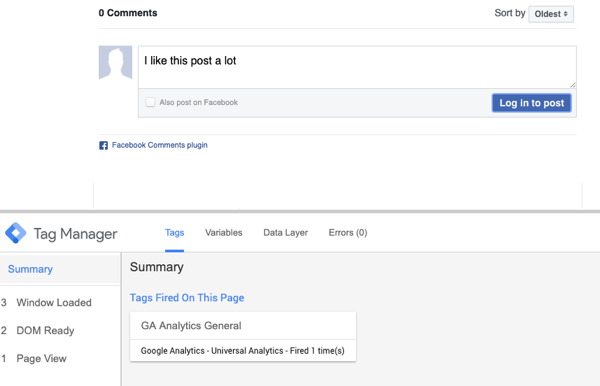
To test your tag, click Preview at the top of the page and open a new window to view your blog (and comments). You'll see a console at the bottom of the screen because Google Tag Manager is in preview mode (as long as your privacy settings aren't blocking it). This console is visible only to you.
Navigate to your blog comments and type in a new comment to test what happens when you use your Facebook Comments feature.
Take a look at the Summary section on the left side of the console. If “gtm.formSubmit” appears as an event in the list that has DOM Ready, Window Loaded, and so on after you submit your comment, this will be a simple setup.
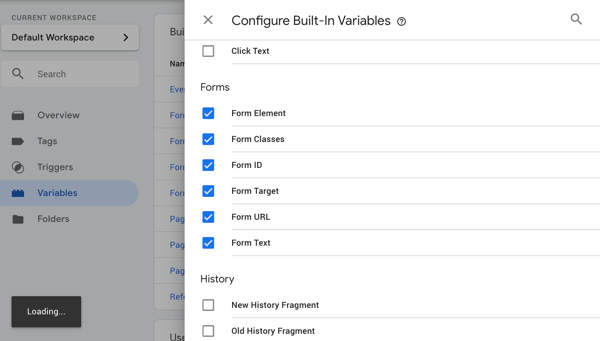
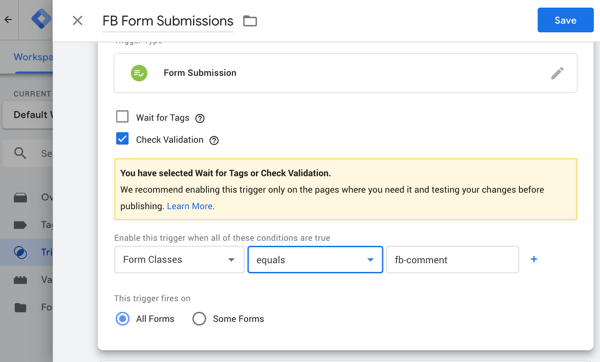
Next, click the Variables tab within your event. You'll use a variable to identify the Facebook comment box in Google Tag Manager. Look for a form variable that's unique to this comment box. Your unique identifier might be Form Classes or Form ID.
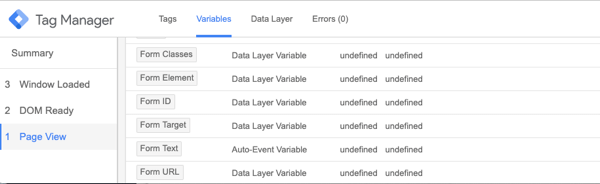
The next step is to edit your trigger using the information you've gathered by looking at the Variables tab in the console. What you choose as the unique identifier is up to you, but often Form Class or Form ID can be useful.
So far, the tag and trigger you've set up are telling Google Tag Manager to search every page on your site. If you want it to search only pages on your blog, you can set the rule to Page URL contains /blog, for instance, as shown here.
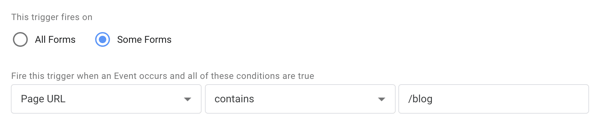
Select the Check Validation check box and write your unique identifier for Facebook comments (to visualize this, Form Classes equals fb-comment).
Save your changes and then enter Preview mode to check whether the trigger is firing and the tag is working. If the tag is working, when you submit a comment, the tag that fired (when working) will show up in the Summary section at the bottom of the page. If it works, publish your changes.
If gtm.formSubmit never appears as an event when you're previewing the All Forms submission tag, this means Google Tag Manager's form auto-event listener can't work in your comment box. Things are a bit trickier in this case, but this article on tracking comments with Google Tag Manager can help, especially if you're using apex comment boxes or more customized solutions.
#4: Measure Conversions From Facebook Traffic
Setting up conversion information in Google Tag Manager is pretty straightforward. At a minimum, you'll need to already have a trigger that's your Facebook pixel ID. Then you can set up conversion tracking from Google Tag Manager that will push through to Facebook in Events Manager.
You'll be able to see certain conversion events there, such as when somebody adds an item to their cart or makes a purchase. These will show up in your dashboard along with the usual set of events that your Facebook pixel already tracks (like PageView), and they'll be visible as events in your pixel. These conversions from Facebook can also push through to Google Analytics using goals.
For this to work, you'll need to make a few minor adjustments in Google Tag Manager to track what Facebook calls standard events, which are important events on your blog or website. These can include:
- View content
- Search
- Add to cart
- Add to wishlist
- Initiate checkout
- Add payment info
- Make purchase
- Lead
- Complete registration
Some of these events are more important than others depending on your business type. For an eCommerce site, for example, all of these events are crucial for reducing abandoned carts and leading customers down the sales funnel.
Tracking these standard events requires a separate piece of code in a different tag. For each event you want to track, you need to add a little bit of code. To illustrate, to track a lead, type in the following code and replace NAME, CATEGORY, and VALUE with your information:
`__abENT__lt;script__abENT__gt;;
fbq(__abENT__apos;track__abENT__apos;, __abENT__apos;Lead__abENT__apos;, {
content_name: __abENT__apos;NAME__abENT__apos;,
content_category: __abENT__apos;CATEGORY__abENT__apos;,
value: 30,
currency: __abENT__apos;USD__abENT__apos;
});
__abENT__lt;__abENT__#8260;script__abENT__gt;;`
Note: You don't need a content_name, category, or value. These are just placeholders you can use if you need them.
If you want to track only generic data, a basic event code will work, as shown below:
`__abENT__lt;script__abENT__gt;;
fbq(__abENT__apos;track__abENT__apos;, __abENT__apos;Lead__abENT__apos;);
__abENT__lt;__abENT__#8260;script__abENT__gt;;`
To create this tag in Google Tag Manager, create a new custom HTML tag and paste in your code. You'll also need to decide if you'd like this to trigger on all pages or on a specific type.
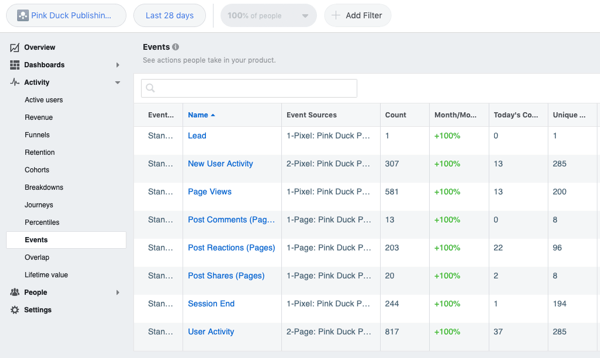
Name the tag after the event you want to track and click Save. Now wait about 24 hours and this conversion data should appear in your Facebook Events Manager and Analytics (if you have events source groups set up) under Events and Revenue.
Pro Tip: Make sure your general Facebook pixel trigger always fires first. You can do this by setting it as a higher-priority tag.
Conclusion
Installing Facebook tools through Google Tag Manager can be helpful if you don't have access to the code for your blog or website. Plus, it can also supercharge your analytics!
What do you think? Which of these Facebook features will you install with Google Tag Manager? Share your thoughts in the comments below.
More articles on Google Tag Manager:
- Learn how to use Google Tag Manager to add social media pixels and tracking scripts to your blog or website.
- Find out how to create advanced Facebook custom audiences using Google Tag Manager.
- Explore Google Tag Manager and the future of analytics.

Curious About How to Use AI?
Our newest show, AI Explored, might be just what you're looking for. It's for marketers, creators, and entrepreneurs who want to understand how to use AI in their business.
It's hosted by Michael Stelzner and explores this exciting new frontier in easy-to-understand terms.
Pull up your favorite podcast app and search for AI Explored. Or click the button below for more information.
