Do you use the Facebook pixel? Want an easier way to assign Facebook event tracking to specific URLs on your website?
In this article, you'll learn how to set up Facebook event tracking with the Facebook Event Setup Tool for Web.
What Is the Facebook Event Setup Tool?
Previously, setting up Facebook pixel events required you to add the pixel event code manually to individual web pages. Now Facebook has streamlined the setup of pixel events with the Facebook Event Setup Tool for Web. This tool allows you to set up events without needing to add the code. Note that you need to install the base pixel code first if you haven't already done so.
This new codeless setup allows you to add specific actions (like button clicks) and URL or page load triggers for event codes to your website.
![]()
#1: Install Facebook Pixel Events
The Facebook pixel is a powerful tool for pushing data from your website or landing pages to Facebook. The data it gathers helps you learn more about how your customers are interacting with your site so you can improve your ad sequences and funnels.
The Facebook pixel comes in two parts: the base code and event code.
The base code contains the unique ID of your Facebook pixel and which account it belongs to, and lets you track when a page is viewed. (Note: This will show up as three events when checking your pixel: page view, general event, and microdata.) After you set up this part of the pixel, Facebook starts collecting data from your site.
The second part of the pixel allows you to track specific customer actions on your website such as when a button is clicked or when a page loads. These insights reveal how customers move through your website so you can make funnels and ads based on their actions.
You can add the Facebook base code to your site manually or have a Facebook event partner set up the code. (This may also set up your event code too, depending on the platform and settings.) After you install the pixel base, you can use the Event Setup Tool to add events to your website. To access this tool, open Ads Manager and select Pixels under Events Manager.
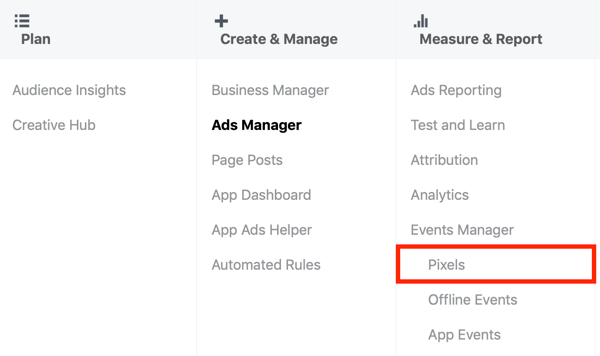
On the Facebook pixel page in Events Manager, select your pixel and click the Settings tab. Under Event Setup, click Go to Event Setup Tool.
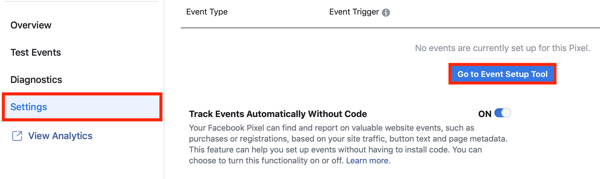
After you select the Event Setup Tool, enter the URL for the page on which you want to install the pixel event (https://yoursite.com/checkout, for example) and then click Open Website.
Which AI Moves Actually Matter?
That's what every marketer is wrestling with now. New AI strategies, new tools, new takes every week — but no clarity. Most marketers and business owners are trying to figure out AI alone.The AI Business Society is your trusted guide. Get expert-led training you can put to work immediately. Plus a community of marketers sharing what's actually working.
I'M READY FOR REAL AI RESULTS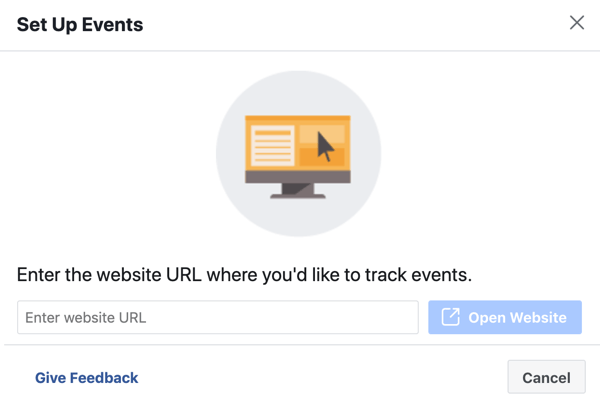
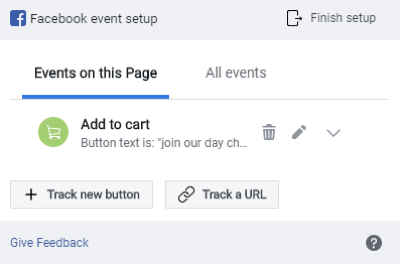
You'll then see the Facebook Event Setup pop-up window, prompting you to select the event you want to measure. The trigger for this event will be the customer landing on this page and allowing it to load.
To install an event on this page, you have two options: Track New Button or Track a URL.
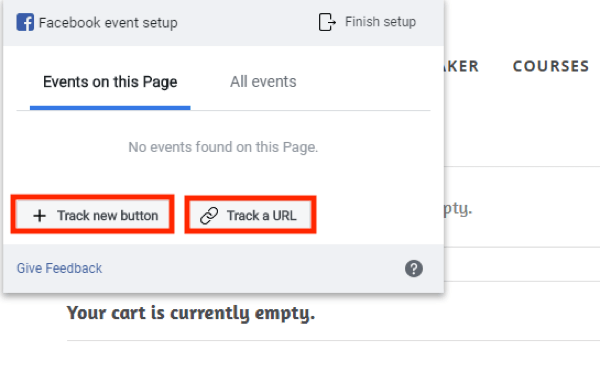
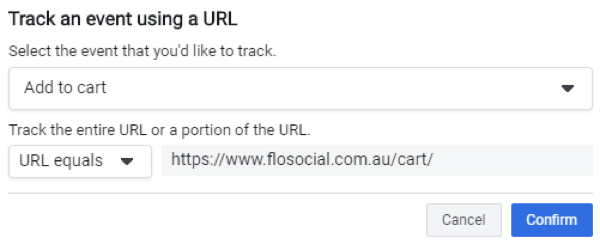
Track an Event Using a URL
If you want to choose which pixel event to fire when the page loads, click Track a URL. From the drop-down menu, select the event you want to track (Add to Cart or Initiate Checkout, for example). Then click Confirm.
Track an Event With a Button Click
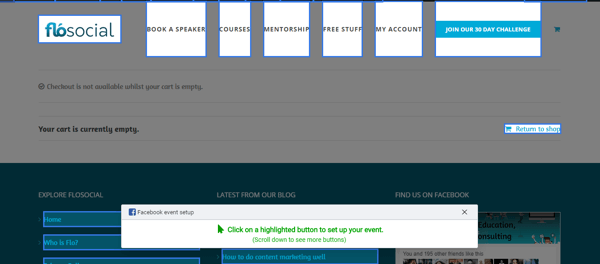
If you want to trigger the event from a specific action (like a button click), click Track New Button. Facebook will then open your web page, highlighting all of the clickable button options. Click one of the highlighted buttons to set up your event.
After you select a button, choose which event you want to associate with clicking the button. Then click Confirm.
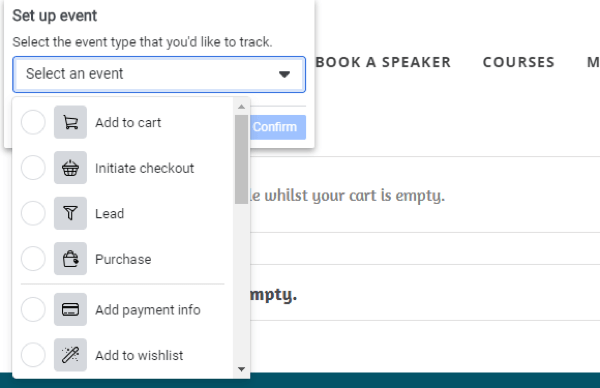
Once you've selected the event type to track, you'll see it in the Facebook Event Setup window.
Review Your Pixel Events
After you've added all of the event codes you want to track, click Finish Setup. Then confirm your actions and click Finish.
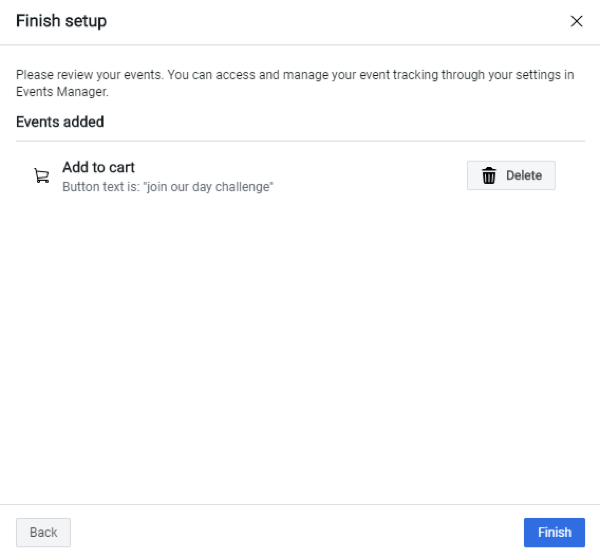
In the pop-up box that opens, you see an “Event Setup Complete” message and the option to check that your pixel events are set up properly.
Create Your Own Facebook Custom Conversions
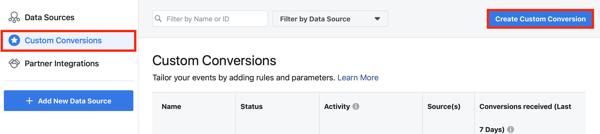
If none of the standard event codes match the information you want to track, you can create a custom conversion. To do this, navigate to your Facebook pixel page in Events Manager and click the Custom Conversions tab on the left. In the upper-right corner of the page, click Create Custom Conversion.
Next, enter the URL of the page on which you want the custom conversion to fire and type in a name for the event.
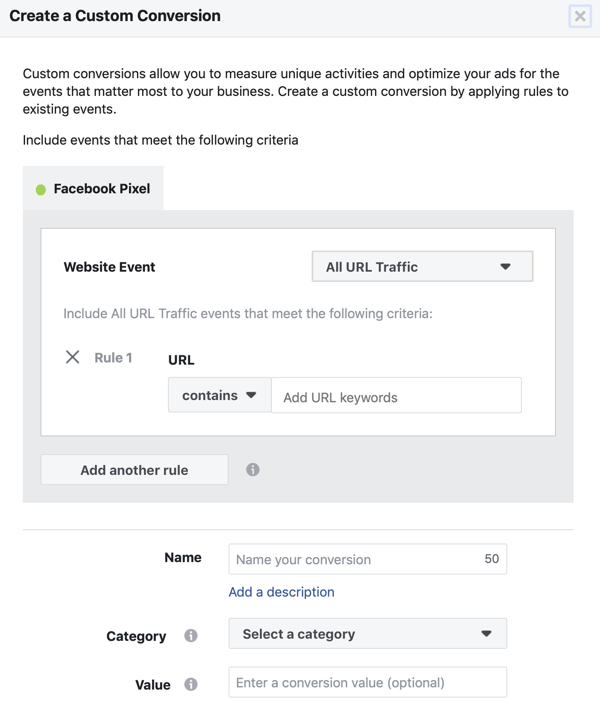
You also have the option to enter a value to track a number, product, or value associated with the event. When you're done, click Create.
#2: Test the Firing of Your Facebook Pixel Events
After you've set up a pixel event, you need to test whether it's receiving and sending information correctly. Here are two tools that can help you do that.
Facebook Pixel Helper
The Facebook Pixel Helper is a free Chrome extension that allows you to read pixels that load on your site or other sites. This helpful tool will scan every site you visit and give you a summary of the pixels that are available on that page.
After you install the extension, navigate to the page on which you installed the event code. Then click the Pixel Helper icon on the Chrome toolbar to see details about the events you're tracking on that page.
![]()
Events Manager Diagnostics
On the Facebook pixel page in Events Manager, click the Diagnostics tab to get detailed insights about how your pixel is firing. Here, you'll find recommendations for updates or info that your pixel may be missing. If everything is set up correctly and the information is successfully being passed between Facebook and your website, Facebook displays an “all good” notice.
![]()
If you see errors or warnings about your pixel, check out these tips to troubleshoot the firing of your pixel event.
#3: Create Website Custom Audiences From Facebook Pixel Event Data
Once your pixel events are set up, what can you do with the pixel data? One use is to create a custom audience of website visitors and then deliver messaging based on their online behavior.
To create a custom audience, open Ads Manager and navigate to Audiences. From the Create Audience drop-down list, select Custom Audience.
In the Create a Custom Audience window, select Website Traffic as the source for this audience.
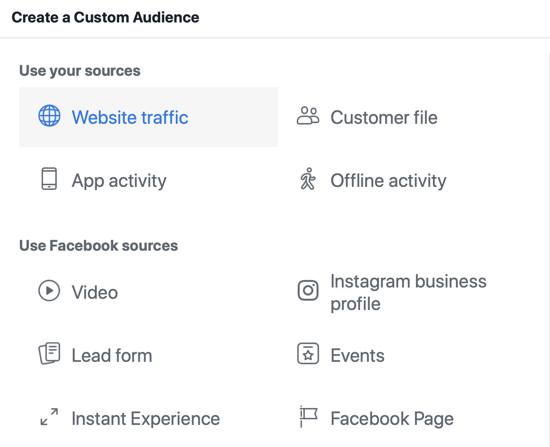
In the next window, you'll see a number of options for refining this audience.
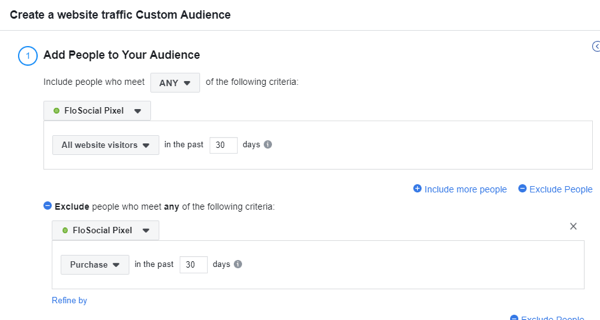
If you want to include everyone who has visited your site but hasn't made a purchase, you need to add exclusion criteria. Select All Website Visitors as the visitor type and then click the Exclude People link. For the exclusion criterion, select Purchase and type in the number of days you want people to remain in this audience after meeting your criterion.
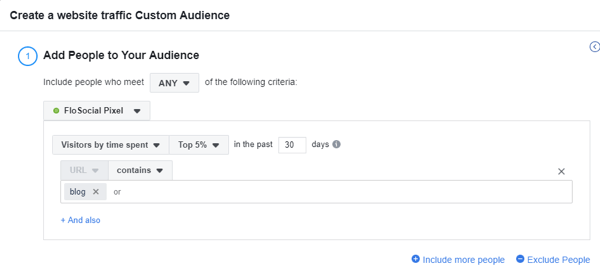
Another option is to create audiences of people who spend the most time on your site by percentile (25%, 10%, or 5%) or spend more time on certain pages.
3 Days of World-Class Training—Zero Travel!

Couldn't make it to Social Media Marketing World and AI Business World this year? Get all of the great content at a fraction of the price with a Virtual ticket.
That’s full access to recordings of every keynote, workshop, and session—the ones people travel thousands of miles to see. Don't wait. Get your Virtual ticket and enjoy actionable content that you can watch anytime, anywhere.
To include the top 5% of visitors who spend the most time on your blog—your most engaged readers—select Visitors by Time Spent and 5%. Then add a rule that the URL must contain “blog”.
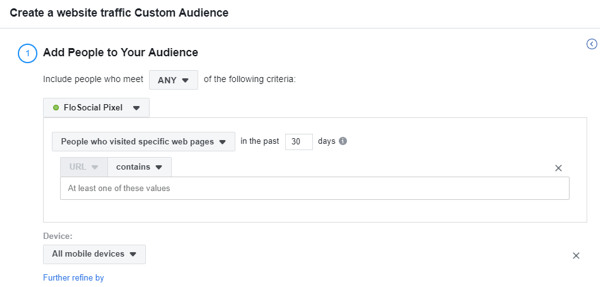
If you want to find everyone who visited a certain page from mobile, add the page to track and a rule to filter by device.
Keep in mind that custom audiences are dynamic. They're continuously populated with new website visitors who fit the criteria you've defined. Note that it can take up to 24 hours to update.
#4: Combine Pixel Event Data With Your Facebook Product Catalog to Improve Facebook Ads
If you sell products or services online, you can create a Facebook product catalog of your assets and attach the pixel for better tracking and ad options for follow-ups and cross-selling.
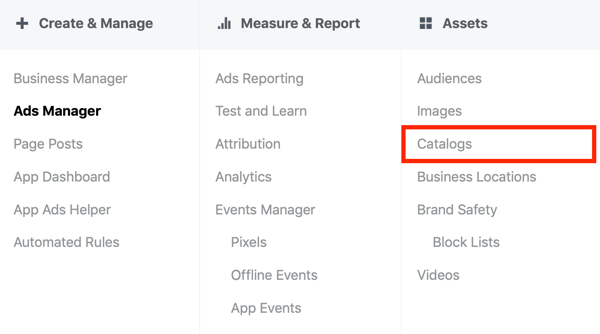
To create a Facebook product catalog, open Facebook Ads Manager and select Catalogs under Assets.
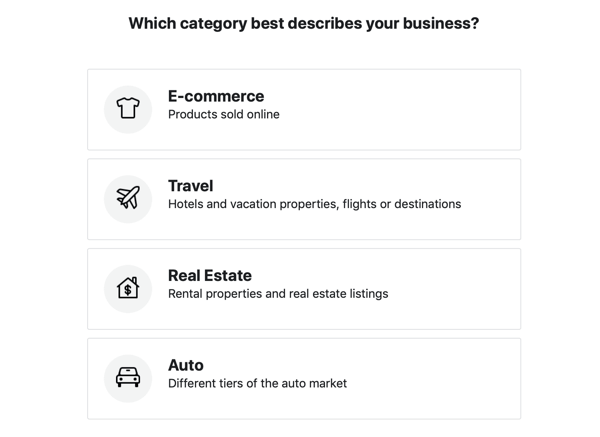
In Catalog Manager, click Create Catalog and select your industry.
In the catalog configuration window, choose how you want to populate your catalog. If you want to upload products yourself, choose Upload Product Info.
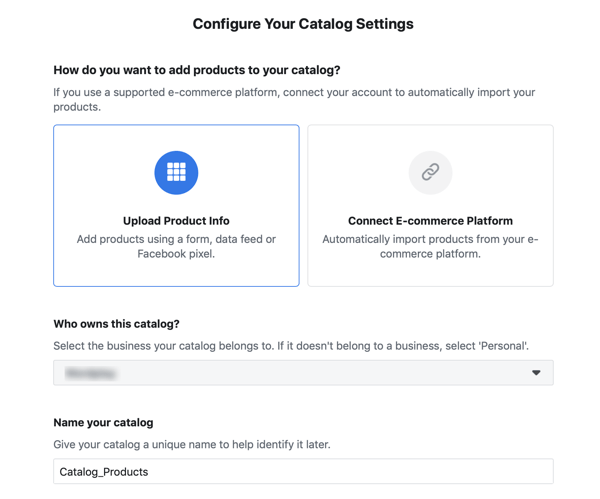
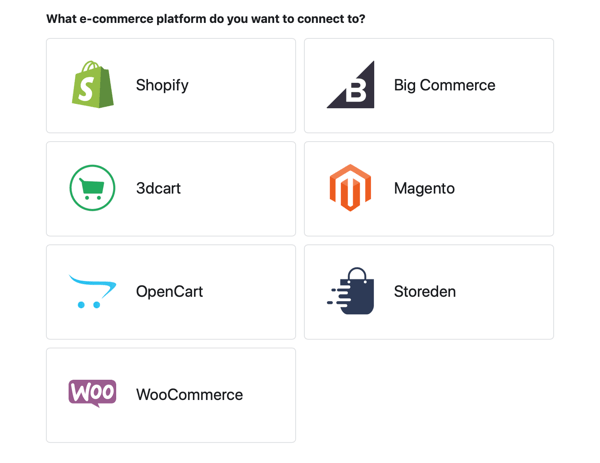
If you prefer to import your products from one of Facebook's eCommerce platform partners (Shopify, WooCommerce, etc.), select Connect E-Commerce Platform. These platforms know how to format and feed information to Facebook to create your product catalog.
Next, select your business from the drop-down list and type in a catalog name. Then click Create. If you opted for an eCommerce platform partner, click Finish Setup and follow the prompts.
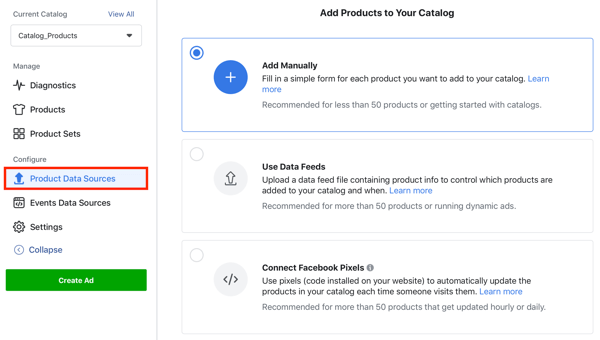
Upload Your Products
If you're uploading your products yourself, open your new catalog and click the Product Data Sources tab. Then click Add Products.

Now choose one of these options to add items to your Facebook catalog:
- Add Manually: Fill out a form for each product you want to add to your catalog.
- Use Data Feeds: Upload a specially formatted CSV data feed file with your product information.
- Connect Facebook Pixels: Use pixels on your website to keep your product catalog updated. You'll need to add specific code about each product to each pixel. This process is more complex, and using the manual option or a partner integration is far easier.
Connect the Facebook Pixel to Your Facebook Catalog
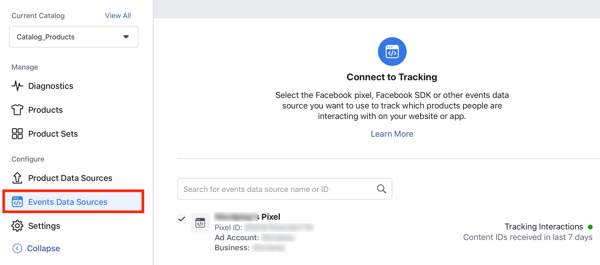
Once you've created your catalog, connect your pixel to it to collect more information about how website visitors interact with your products and shop on your site.
To connect your pixel, open your Facebook catalog and click the Events Data Sources tab. Then select your pixel and click Done.
Connecting your pixel to your products online lets you unlock two powerful ad types for better online sales and more accurate reporting: conversion ads and dynamic product ads.
Conversion Ads
If you select the Conversions campaign objective, Facebook will optimize your ad delivery to the people in your audience who are likely to perform a specific type of conversion behavior (such as making a purchase or completing a registration) based on feedback from your pixel. Conversion ads also allow you to see a direct cost per conversion event, making reporting and forecasting ROI more accurate.
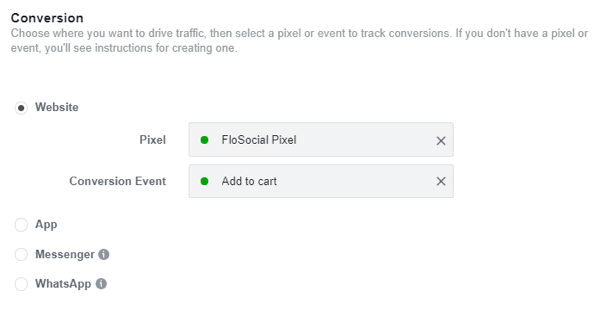
When you set up your campaign, select the Website option button in the Conversion section and choose your pixel and conversion event.
Conversion ads need a minimum of 50 conversions within 7 days to fully optimize. Otherwise, ad delivery may be slower or less effective until Facebook has been able to collect this information from your pixel.
Dynamic Product Ads
If you have a Facebook product catalog and a pixel connected to it, you can run dynamic product ads. This ad type is the ultimate follow-up, upsell, and cross-sell ad, and can help boost sales and conversion rates.
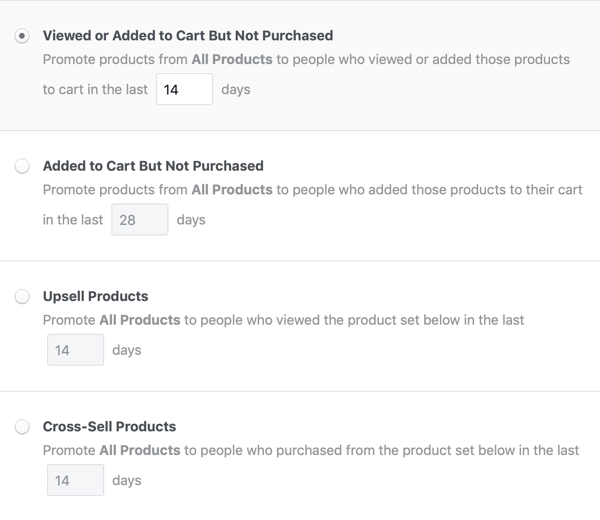
Dynamic product ads are triggered by a customer action on your website, such as viewing a certain product or purchasing a particular item. Based on the product info collected by the pixel, Facebook identifies which product or product category people have interacted with and serves them ads based on this behavior. The ads themselves can show a product they viewed or a range of similar products.
For instance, if a customer browses the shoe section of your online store but doesn't purchase anything, you can trigger ads that show a particular shoe or a range of products. Or if a customer adds products to their cart but doesn't make a purchase, show an ad that encourages them to complete their purchase or offer a coupon code to entice them to complete the transaction.
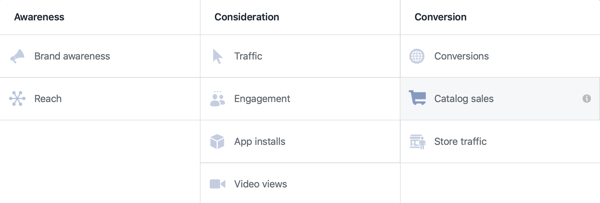
To create a dynamic product ad, select Catalog Sales as your campaign objective.
Then select the product catalog you want to use.
At the ad level, choose whether you want to show customers a range or category of products or to cross-sell or upsell specific products.
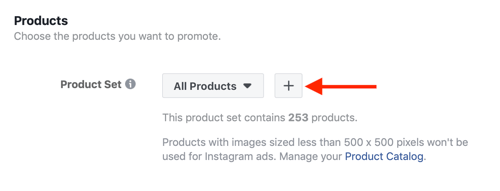
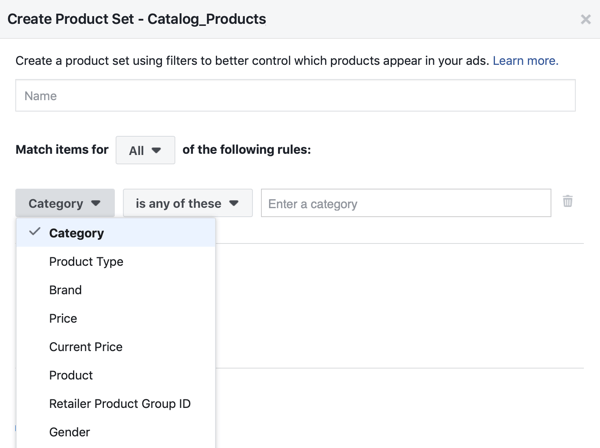
If you want to show certain products or product groups, click the + button and use filters to define which products will appear in your ads.
Below the Audience section, choose the conditions (triggers) under which the dynamic product ads will show.
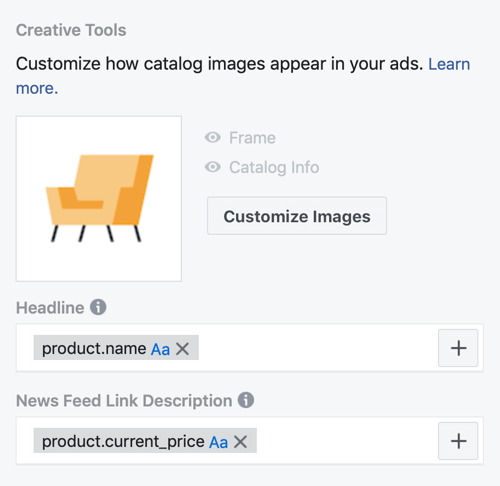
For the ad creative, you can display slide shows, carousels, catalog ads, or single products. If you don't want Facebook to populate the information and images from your product catalog, you can customize the images and text.
#5: Analyze Your Pixel Data
The Facebook pixel page in Events Manager shows all of your pixel data. Click the Data Sources tab to see an overview of all info received and details from any partner integrations (Shopify, WooCommerce, etc.) and any custom conversions you've created.
![]()
The pixel overview shows up to the last 30 days of information, so if you're running reports on a pixel event received at certain times, it's best to report on this data at the same time each month to collect the most accurate info. When creating a custom audience, the pixel can trace back to 180 days of site info and use that to build custom audiences.
Conclusion
The Facebook pixel is a powerful tool for understanding your audiences and how they interact with your website. With the Facebook Event Setup Tool, you can add events to your website based on actions and URL or page load triggers without having to install code. The insights you gain from the pixel will help you get closer to your customers and serve the right information and ads at the right time.
What do you think? Will codeless installation of Facebook event pixels encourage you to add them to your website? Share your thoughts and questions in the comments below.
More articles on Facebook ads:
- Discover four ways to generate clicks, leads, and conversions using Facebook ads.
- Learn how to create an effective Facebook ad retargeting funnel.
- Find out how to create customized reports in Facebook Ads Manager.

Curious About How to Use AI?
Our newest show, AI Explored, might be just what you're looking for. It's for marketers, creators, and entrepreneurs who want to understand how to use AI in their business.
It's hosted by Michael Stelzner and explores this exciting new frontier in easy-to-understand terms.
Pull up your favorite podcast app and search for AI Explored. Or click the button below for more information.
