 Are you using the Facebook conversion pixel?
Wondering how to transition from your old conversion pixel to the new pixel?
Facebook's new “one-pixel solution” makes it easier for marketers to monitor and measure conversions from Facebook users.
In this article you'll discover how to install the new Facebook pixel, track conversions and view the cost per conversion in your Facebook ad reports.
What Does the New Pixel Change?
Each ad account now has only one pixel code associated with it. You can install this new Facebook pixel on multiple websites and then track those sites separately, but you always use the same code.
Previously you could share website conversion pixels with other Facebook Ads accounts so that multiple people could track those conversions with an ad. You can still share a pixel but only through the Business Manager.
You're able to add a maximum of 20 custom conversions to your account, but you cannot delete them (as of this writing). So choose which custom conversions you want to track carefully (more on this later).
You can place the standard event codes on an unlimited number of web pages, so if you have lots of different conversions to track, you may want to focus on using the standard event codes (again, more on this later).
The old conversion tracking pixels will continue to work until mid-2016 if you have some installed on your site. But it's a good idea to move everything to the new pixel and delete the old code since the new pixel code loads three times faster, according to Facebook.
#1: Install the New Pixel
The first thing you need to do is to install the new pixel on your website. This is the easy part if you've used the Facebook pixel in the past. First, navigate to the Ads Manager and then follow these steps:
Click Tools and select Pixels from the drop-down menu.
On the Facebook Pixel page, click Actions and select View Pixel Code from the drop–down menu.
In the pop-up box that appears, copy the pixel code that is in the top box. At the moment, don't worry about the conversion tracking event codes.
Which AI Moves Actually Matter?
That's what every marketer is wrestling with now. New AI strategies, new tools, new takes every week — but no clarity. Most marketers and business owners are trying to figure out AI alone.The AI Business Society is your trusted guide. Get expert-led training you can put to work immediately. Plus a community of marketers sharing what's actually working.
I'M READY FOR REAL AI RESULTSNext, go to your website and paste the code in between the main head tags. Some WordPress sites have themes that make this easier (a Header Script area), or you may have to go to the header.php file and edit that. It's typically under Appearance > Themes > Editor > Header.php. Get a webmaster to help you if you don't know where to find this.
You'll know that your code is working if you start to see some traffic recorded in the Total Traffic area after you've visited the site where the pixel is installed.
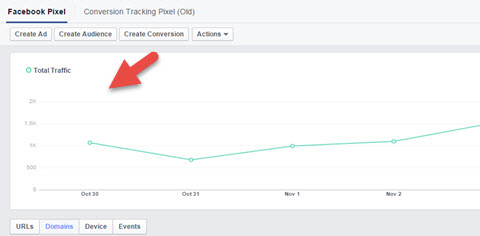
If you aren't showing any traffic, use the Facebook Pixel Helper Chrome extension to troubleshoot the problem.
#2: Choose a Conversion Tracking Method
The next thing you need to do is to set up the way you'll track conversions. By conversions, I mean specific events that happen on your website, such as someone opting into your newsletter or giveaway, purchasing something from your website or registering for an event or webinar.
You'll be tracking these things from specific Facebook ads only. The pixel doesn't track from individual Facebook posts. But the benefit is that you'll know exactly which ad is converting the best for you.
To be able to track conversions you need to have two things in place:
- Install your Facebook pixel on your website (done in Step 1).
- Have a thank–you page on your website where someone lands after the event.
So, for example, if you have people signing up for a webinar with a webinar service like Go to Webinar, you need to redirect them to a page on your website when they're finished signing up, where the pixel is installed. That way Facebook knows the action has been completed, and it can attribute that registration to that exact ad.
You can't track Facebook ad conversions on other people's websites (such as Amazon) because those sites are not under your control and you can't put the pixel on their site.
With the new Facebook pixel, you have two ways you can track conversions: standard events and custom conversions.
The standard event method involves adding an extra bit of code to the base code. You add the standard event code only on the pages where you‘re tracking a specific event (a thank-you page, for example).
You use a URL rule for the custom conversion method; it doesn't require any extra code added to thank-you pages. But you're limited to creating 20 custom conversions. This method is ideal if you don't have many events to track and don't want the extra hassle of adding the standard event code to your website.
You'll need to implement one of these two methods to track conversions.
Standard Event Method
This method is simple to implement if you have easy access to the website. You can also add as many standard events to pages on your site for tracking as you want (unlike the custom conversion method).
On the pages that you want to track and optimize your ads, add a line of code to the base code of the Facebook pixel you‘ve already installed, right after the Page View standard event that‘s currently in the code. Notice how it will be tracking page views on every page of your site already, due to the fact that your pixel is on every page.
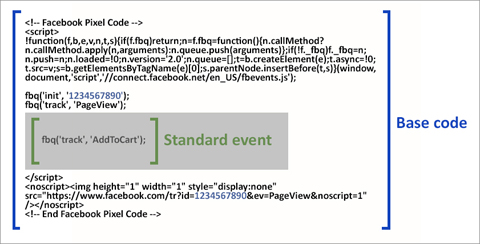
Note that the text in blue (1234567890) will be replaced with your own pixel number when you follow the process in Step 1. To be clear, the standard event code is not in brackets; the image is highlighting where the standard event code goes.
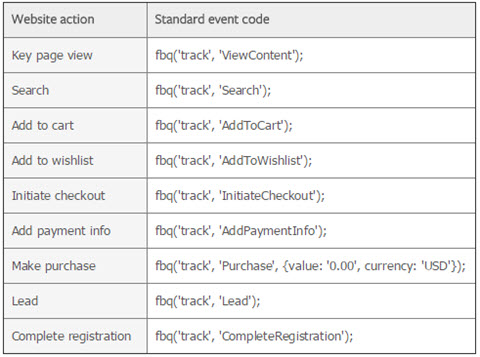
Here's a list of the nine standard event codes that Facebook has:
Once you've installed the extra bit of code to your pixel on that page, you're done with this step. Note that you can use a combination of standard events and custom conversions in the way you do your tracking.
3 Days of World-Class Training—Zero Travel!

Couldn't make it to Social Media Marketing World and AI Business World this year? Get all of the great content at a fraction of the price with a Virtual ticket.
That’s full access to recordings of every keynote, workshop, and session—the ones people travel thousands of miles to see. Don't wait. Get your Virtual ticket and enjoy actionable content that you can watch anytime, anywhere.
If you've installed the old conversion tracking pixels on these same thank-you pages, it's a good idea to remove those pixels unless you're still using them. Too much code will slow down your site.
Custom Conversion Method
The other way to track Facebook conversions from an ad is to use a custom conversion rule. Custom conversions allow you to track and optimize for conversions without adding any extra code to your site.
To create a custom conversion, follow these steps from your Ads Manager:
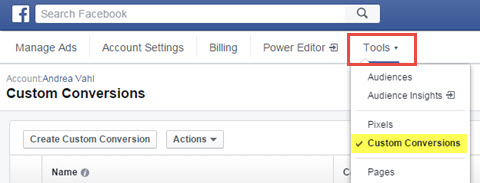
Click Tools and select Custom Conversions from the drop-down menu.
Click the Create Custom Conversion button.
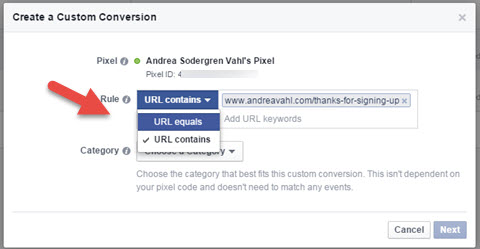
In the pop-up box that appears, add the rule you want to track. If you're matching a particular page exactly, enter that web address and select the URL Equals option. (Make sure you include the www or https:// as needed). If you want to track across several types of pages, you could select URL Contains and /thankyou.php as an example if you have several thank-you pages that have that phrase in them.
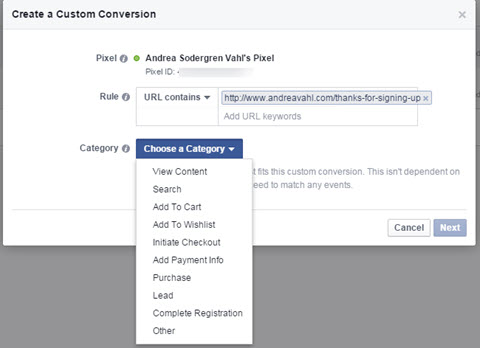
Now select a category for your custom conversion and click Next.
Give your custom conversion a name and description (optional). Make the name descriptive so you know exactly what the conversion represents.
Next, add a conversion value if applicable (optional).
Finally, click Create to finish the process.

Now you can use the custom conversion in ads, and you'll also see the traffic to the pages specified in those custom URL rules on your Custom Conversions page.
#3: Create a Website Conversion Ad
Now that you have your conversion method defined and your pixel installed, you're ready to track your conversions!
Click the Create Ad button in the upper-right corner on the Ads Manager to get started. Then follow these steps:
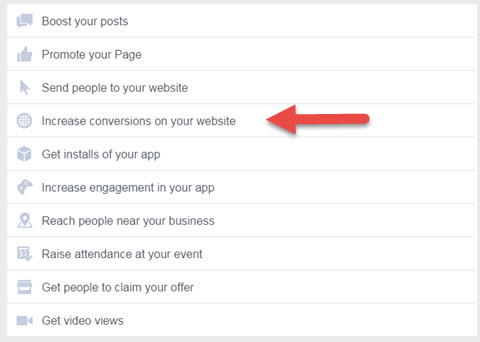
Choose the Increase Conversions on Your Website option.
Then enter the URL of the website address where you'll send the ad traffic.
Next, you're prompted to choose the conversion. What's confusing is that all of the different conversion tracking types are listed together. But they don't appear until after you've set them up.
In this example you can see all three types of conversions listed: the custom conversion, tracking using standard events and the previous conversion tracking pixel.
From here, you set up your ad exactly the same way you‘ve done in the past: Select your targeting in your ad set and set up the creative part of your ad (image and text) at the ad level.
Once you're done configuring your ad set and ad the way you want them, click Place Order to start running your ad.
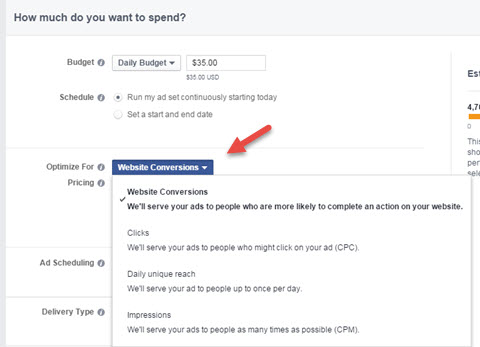
One thing to note is that your ad will automatically be set up to optimize for website conversions at the ad set level. You can always change that bidding method, but your conversions will still be tracked.
#4: View the Conversions and Cost per Conversion in Facebook Ad Reports
After your ad has been approved and started running, the last step is to view the reports so that you know when your ads are registering a conversion and how much each conversion is costing you.
Facebook sometimes gets the columns right in the Ads Manager area according to what you're advertising, but the best way to make sure you're looking at the right stats is to customize your columns. Go to the Columns area and select Customize Columns from the drop–down menu.
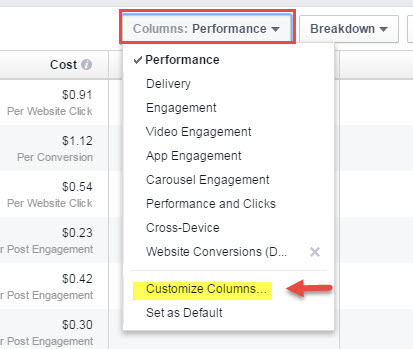
Now you'll see a pop–up box with all of the different stats you can select. Choose the stats you want to see, and then, most importantly, scroll down to the Websites section in the center column (or select Websites in the left column to jump there).
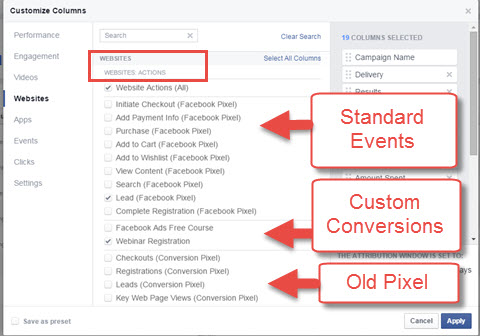
You can see that the different options you can select are from the three types of conversions available: Standard Events, Custom Conversions and Old Conversion Tracking Pixels. Select the ones that you want to have in your report.
Also, make sure you scroll down to the Websites: Cost Per Action section below that, and select the same pixels you chose so you‘ll see how much each conversion costs you from each ad. Now you'll be able to make the right choices about which ad is converting at the best price for you.
When you're done selecting your columns, click Apply in the lower–right corner, and your report will appear with the correct columns.
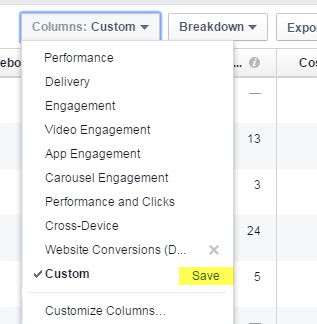
For easier viewing in the future, save your report by clicking Save next to the custom configuration you just created. You can make it the default view after you save it.
Final Thoughts
So there you have it! Once you've gone through this process once, you should be able to skip right to Step 3 and only do Step 3 for any new ads (unless you have a new conversion that hasn't been created before).
The audiences and tracking start after you install the pixel code. So install the code as soon as possible if you want to target people who have visited your website.
When you track conversions from your Facebook ads, you'll see a much clearer benefit to using ads for leads and sales. You can also improve your ad strategy to decrease your cost per conversion by split testing your ads and optimizing your budget to focus on the ads that are actually working for you.
What do you think? Have you tried the new Facebook pixel yet? What is your experience with using Facebook ads to drive conversions? Share your thoughts in the comments below!

Curious About How to Use AI?
Our newest show, AI Explored, might be just what you're looking for. It's for marketers, creators, and entrepreneurs who want to understand how to use AI in their business.
It's hosted by Michael Stelzner and explores this exciting new frontier in easy-to-understand terms.
Pull up your favorite podcast app and search for AI Explored. Or click the button below for more information.
