Want to give your Instagram stories a creative edge? Looking for hidden features to try out?
In this article, you'll discover eight Instagram Stories power tips including how to save your Stories effects for quick access, add multiple photos, add a custom GIF, and more.
To learn how to make the most of the brush tool, the text tool, and fonts, read the text below for an easy-to-follow walkthrough or watch this video:
#1: Add a Halo to an Object or Person in Your Instagram Stories
Drawing a halo around an object or person in your Instagram story is a creative way to highlight something special in your image and make it stand out.
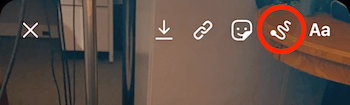
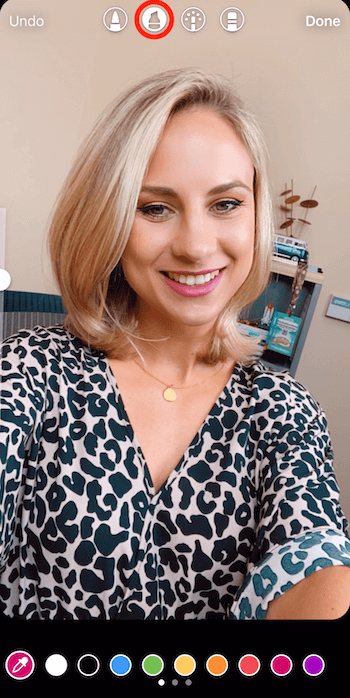
To create this effect, tap the brush tool icon (the squiggly line) at the top of the screen.
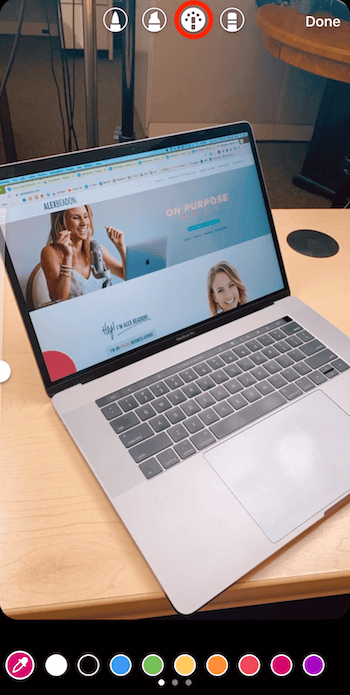
Then select the neon tool, which is circled below. At the bottom of the screen, tap to choose any color you like.
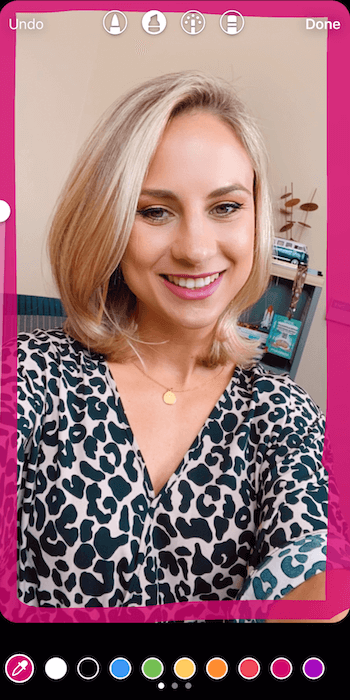
Now draw a circle around the object to which you want to add a halo effect. Make sure you start drawing from the spot that you'll be erasing to create the halo.
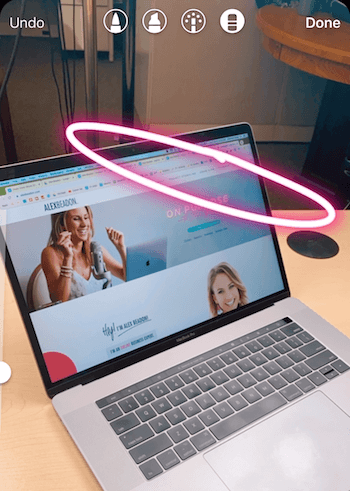
Now select the eraser tool, which is at the far right. On the left side of the screen, drag the slider down to make the tool smaller. Then drag your finger on the screen to delete the area around the object so it looks like the object is wearing a halo.

#2: Add Sequenced Text That Reveals With Each Tap on Your Instagram Stories
In this tip, I'm going to show you a fun way to allow people to tap through your stories and add text as they tap.
Which AI Moves Actually Matter?
That's what every marketer is wrestling with now. New AI strategies, new tools, new takes every week — but no clarity. Most marketers and business owners are trying to figure out AI alone.The AI Business Society is your trusted guide. Get expert-led training you can put to work immediately. Plus a community of marketers sharing what's actually working.
I'M READY FOR REAL AI RESULTSTo create sequenced text, you need to start with the last image in the sequence. To visualize this, suppose you used the text tool to add the names of the people in this image so everyone will know who they are. Along with everyone's first name, you also included their job title.

Once you have your final image, you'll create multiple versions of it that show different amounts of text on the screen. In this case, you'll need to create four versions of the image so you can show the names and titles of each person on-screen in sequence, starting with a ‘clean' image that doesn't include any of the names or titles.

You create these images by working backward. First, design the final image in your sequence and then tap the arrow icon at the top of the screen to save it. Make sure you wait until you see “Saved” on the screen. If you do anything else before that or close the app, it may not have been saved.
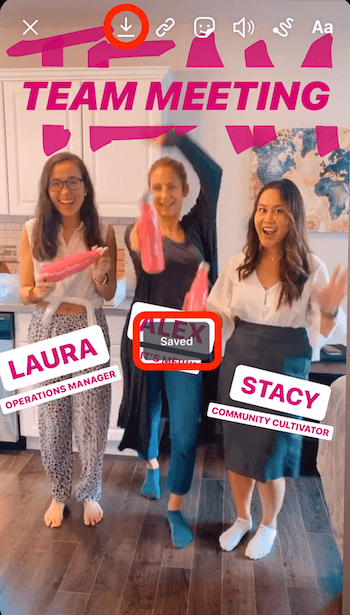
Pro Tip: After you save each image in your sequence, don't touch the screen. I can't tell you how many times I've accidentally touched something and moved it. It's important for all of the elements in the image to remain in the same position to achieve the desired effect of your sequenced text.
Next, create the version that will appear immediately before the final image. To do this, delete the text that will pop up last in the sequence. In this case, “Stacy” and “Community Cultivator” will appear last so drag that text to the trash icon at the bottom of the screen. Then save the image.

To create the next image, drag “Alex” and “It's Me!!!!!” to the trashcan icon. Then save it again.
Finally, delete “Operations Manager” and “Laura” and save it again.
Now that you have the first image in the sequence (without any names or titles on it), you can go ahead and upload it to your story.
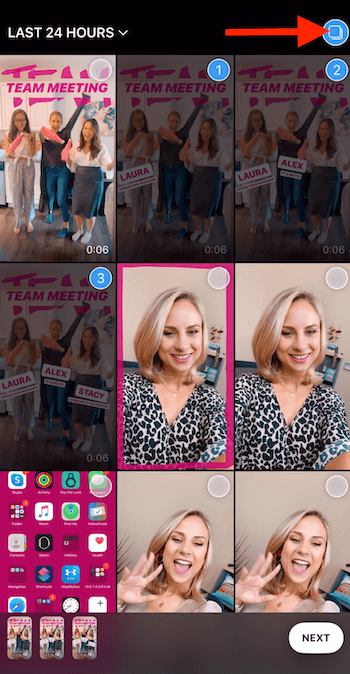
From here, open your Stories camera and swipe up to open your camera roll. Tap the icon at the top right that looks like a bunch of squares within a circle. This will allow you to upload multiple stories at the same time.
It's important that you upload the sequenced images in the right order. For this example, select the one that says “Laura,” then the one that says “Laura” and “Alex,” and then the one that says “Laura,” “Alex,” and “Stacy.” When you're done, tap Next at the bottom of the screen.
Now tap Share to Story and then Done to post all of the remaining images in sequence to your story.
#3: Customize Font Size and Color for Your Instagram Stories
Now I'm going to walk you through the font section of Instagram Stories so you know how to use text overlays more effectively in your content.
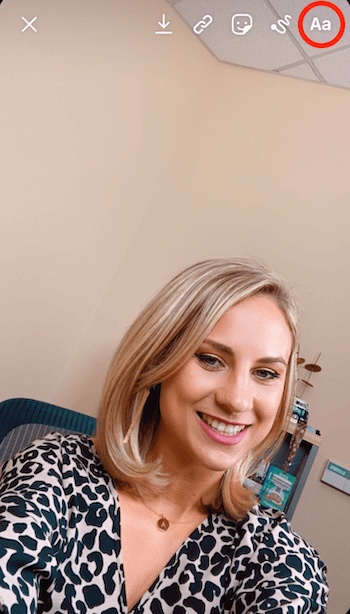
Start by taking a photo. In this example, I took a selfie and left some space at the top for text.
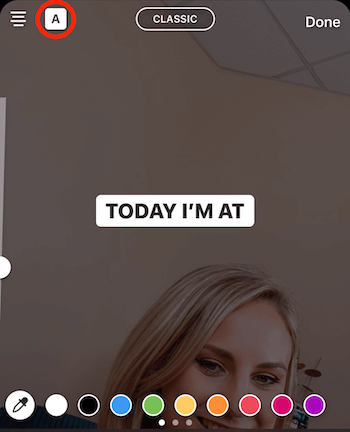
Next, tap the Aa icon at the top of the screen to open the text tool.
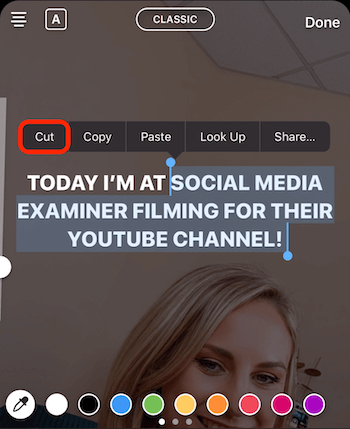
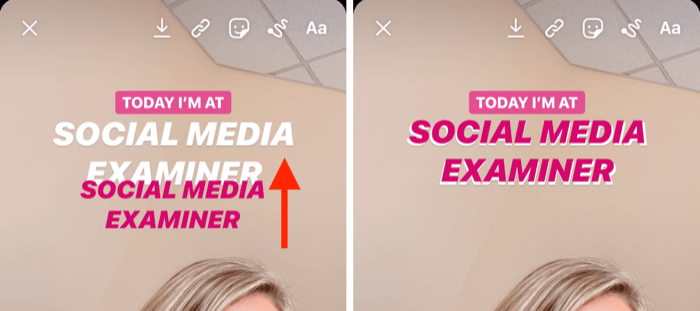
Type in several lines of text to use on your image. For this example, I typed in “Today I'm at Social Media Examiner filming for their YouTube channel!”
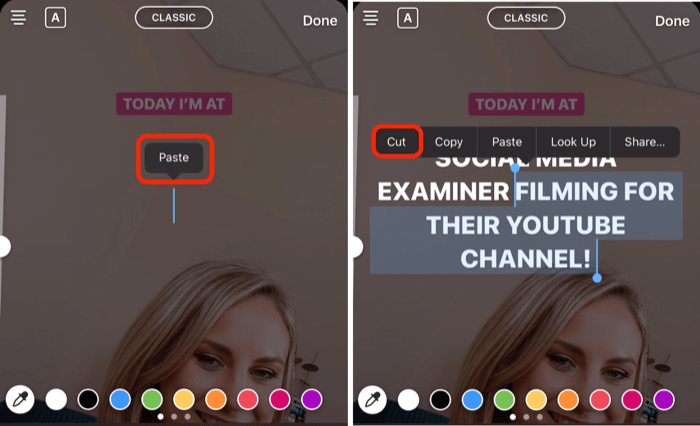
Next, you're going to cut your text up into multiple segments and format each one separately. Select the section of text you want to take out (“Social Media Examiner filming for their YouTube channel!”) and tap Cut in the pop-up menu.
From here, you can style your text in a variety of ways:
- Drag the text to reposition it on the image.
- Pinch the text to make it smaller.
- Select the text and tap the A icon to add a background to the text, as shown below. If you tap the icon again, the background will be more transparent.
- Tap the multiple-line icon at the top left of the screen to change the justification of the text.
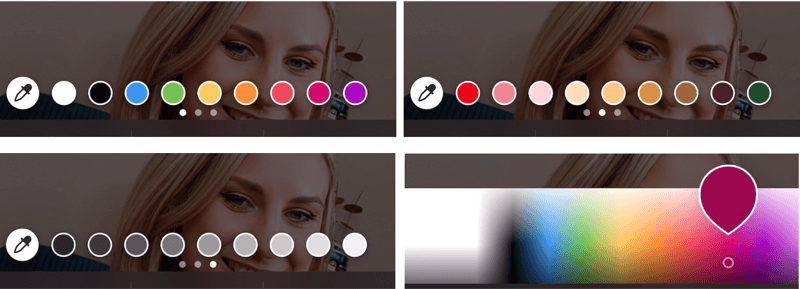
- Select a color for the text at the bottom of the screen. Not many people know this, but you can swipe through the colors to get even more color options. And if you tap and hold on any color, you'll see a gradient of colors to choose from.
Once you've formatted the first section of text, you want to paste the text you previously cut. To do this, tap the text tool again, tap the cursor, and select Paste. And again, select the text you don't want (“filming for their YouTube channel!”) and tap Cut.
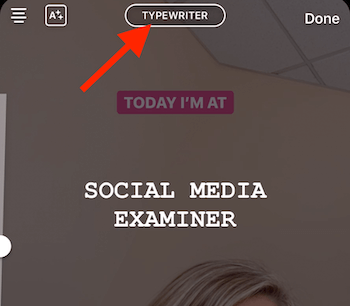
If you tap the icon at the top center of the screen, you can change the font. I recommend that you try to stick to the same fonts in your stories to make your brand content more recognizable.
You can also layer text to create an outline effect. Simply type the same text again, style it, and then drag it on top of the original text.
When you're happy with this segment of text, paste the next segment of text (“filming for their YouTube channel!) on your image. Choose a font style and color, and position it on the screen.
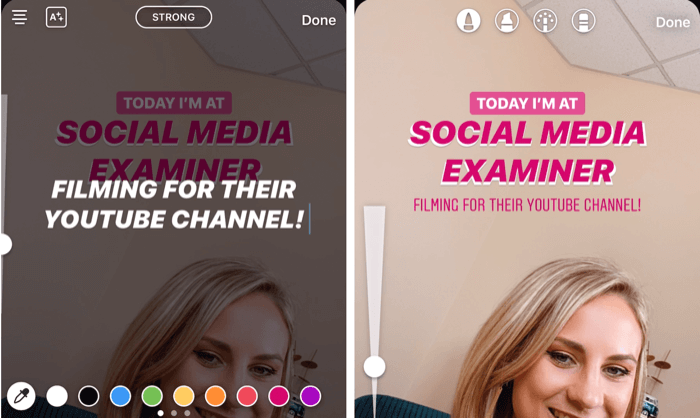
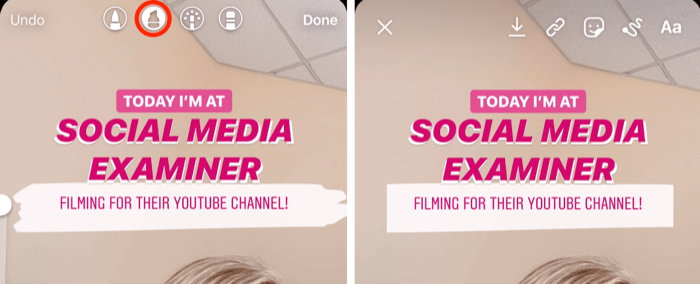
Another trick to make your text stand out is to draw a white background around it. To do this, select the highlight tool (circled below) and bring the slider all the way up to make it larger. Then draw over your text. If you want to clean up along the edges, tap the eraser tool, drag the slider to about 50%, and draw on parts of the background you want to remove.
Design a Creative Headline
Adding a creative headline to the top of your story is a great way to catch your audience's attention.
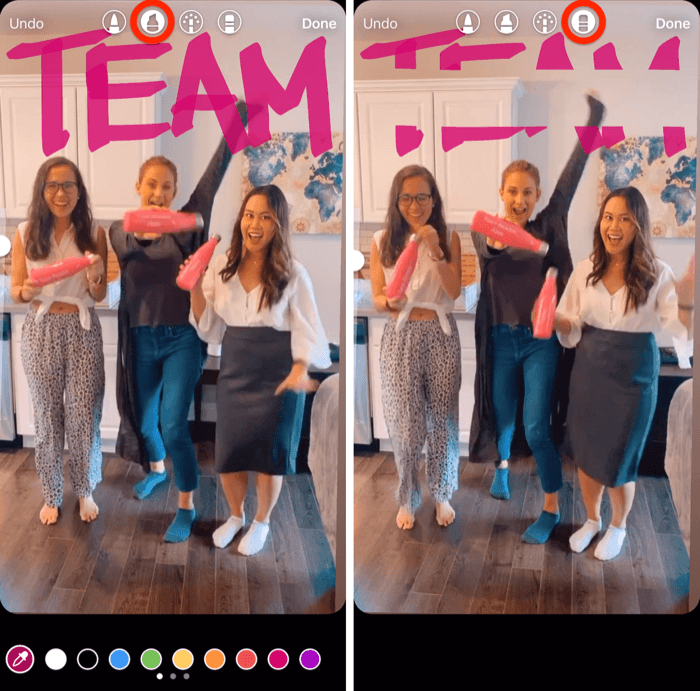
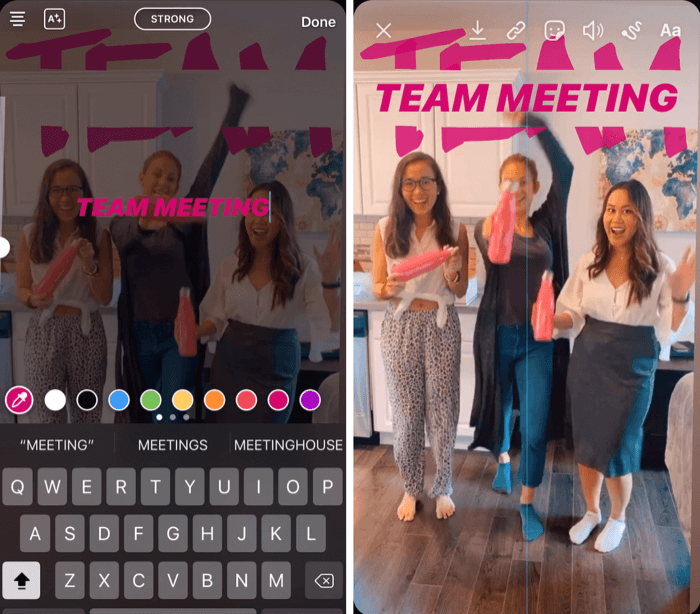
For this hack, open your brush tools, select the highlight tool, and draw a word that will be part of your headline. In the example below, I drew the word “Team.” Be sure to make it big.
Next, select the eraser tool and drag the slider all the way up. Then draw on the screen to erase the middle part of the word. When you're finished, tap Done to escape from the brush tool.
Now tap the Aa icon to open the text tool and type in the text you want to add to your headline.
In this case, I typed in “Team Meeting” and selected the color pink. Then I made the text a little bigger and positioned it within the word “Team” at the top of the screen to complete the headline.
#4: Use the Brush and Font Tools to Create Rainbow Text for Instagram Stories
To create rainbow text in your Instagram story, start by taking a quick picture. It doesn't matter what the picture is because you're going to fill the whole screen with one color.
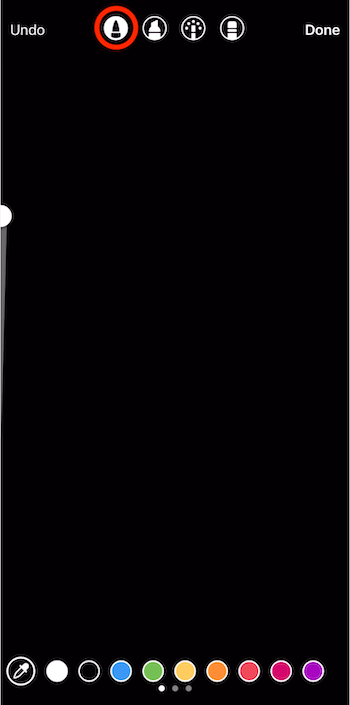
Next, open your brush tools and select the one at the far left. Then select the color you want to use as your background. For this example, I chose black.
Now tap and hold on the screen to turn the whole screen that color. When you're finished, tap Done.
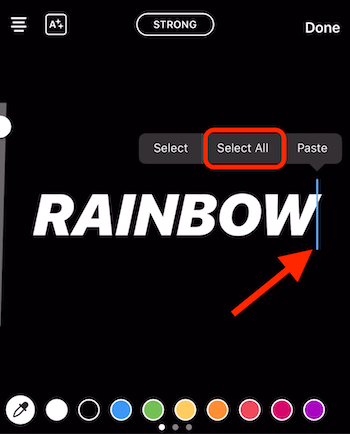
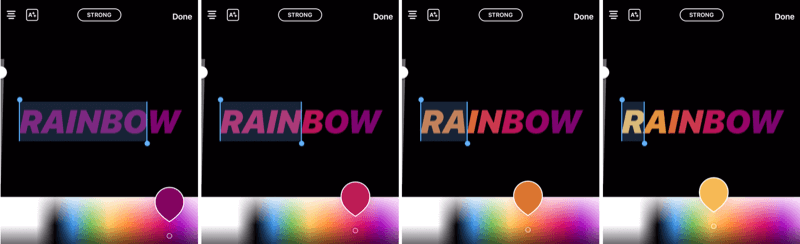
Next, tap on the text icon at the top of the screen and type in the word “rainbow.” Drag the slider to enlarge the text if you want. Then tap on the cursor and tap Select All in the pop-up.
This next part is a little tricky and will take both of your thumbs. Place one thumb where the cursor is (to the right of the word). At the same time, you'll use your other thumb to tap and hold on one of the colors at the bottom of the screen.
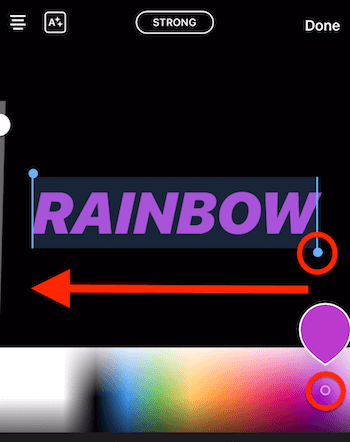
Now drag both of your thumbs from the right-hand side of the screen to the left-hand side of the screen. As you do that, you'll apply a rainbow effect to the word.
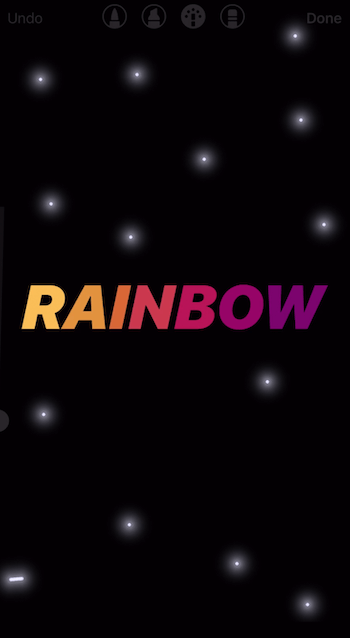
Pro Tip: If you want to add another element of magic to your image, open the brush tools and select the neon tool. Drag the slider to make the brush size as small as possible and select a bright color (white, for instance). Then tap on the screen to add dots all over your image. This effect works particularly well with photographs.
3 Days of World-Class Training—Zero Travel!

Couldn't make it to Social Media Marketing World and AI Business World this year? Get all of the great content at a fraction of the price with a Virtual ticket.
That’s full access to recordings of every keynote, workshop, and session—the ones people travel thousands of miles to see. Don't wait. Get your Virtual ticket and enjoy actionable content that you can watch anytime, anywhere.
#5: Use the Brush Tool to Create a Border for Instagram Stories
Adding a border to your Instagram stories is a quick and easy way to brand your content.
To do this, tap on the brush tool icon and select the highlight brush. Drag the slider about 75% of the way up. Then select your brand color at the bottom of the screen.
Now with your finger, draw a border all the way around the image. Be sure to start on the right side of the screen; if you start at the bottom, left, or top, it will be difficult because of the other icons on the screen.
Remember, the border doesn't have to be perfect. If you aren't happy with it, simply tap Undo at the top left and try again. Sometimes if your brush size is bigger, it's easier.
To discover some hidden features in Instagram Stories, read the text below for an easy-to-follow walkthrough or watch this video:
#6: Save Your Favorite Stories Effects for Quick Access
This is an exciting hack that not many people know about: You can save your favorite Stories filters for easy access.
First, open up the camera within Instagram Stories and swipe through all of your filters until you see an icon that says Browse Effects. Tap that to open the Effect Gallery.
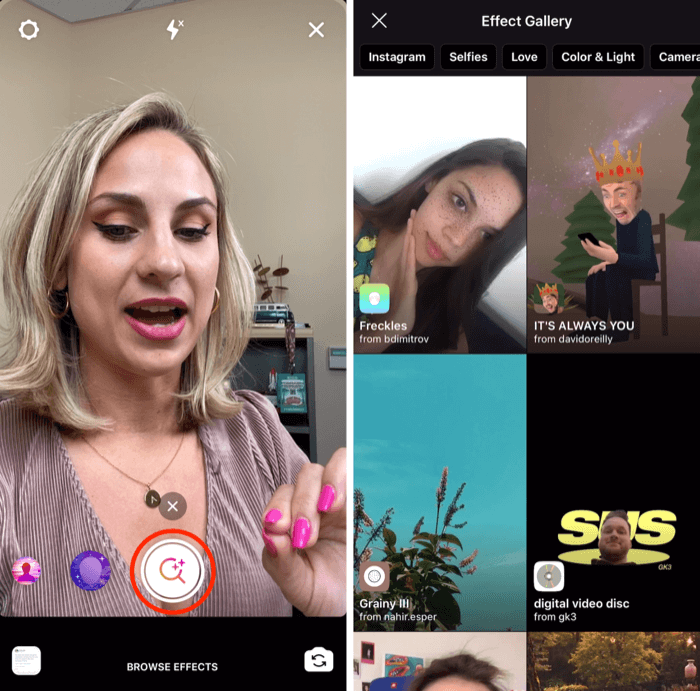
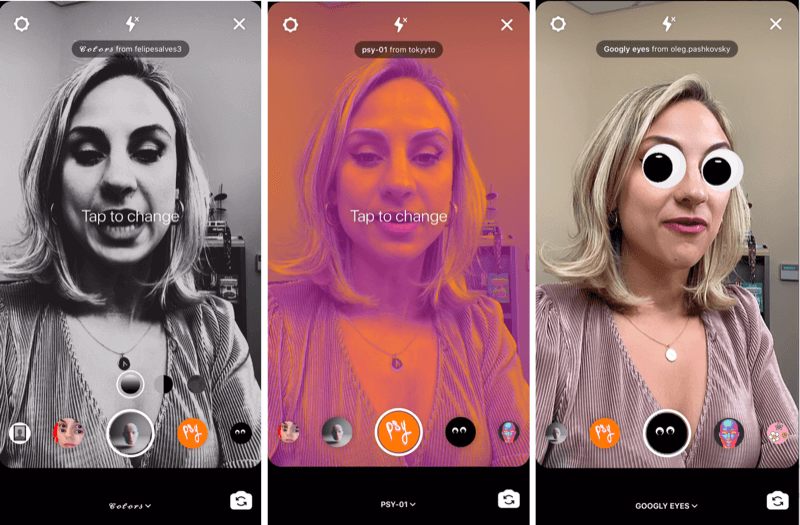
If you see an effect that catches your eye, tap it in the gallery to see a preview. Tap Try It at the bottom of the screen to try it in your Stories camera.
You can also scroll the list of other effects at the bottom of the camera screen to see what they do.
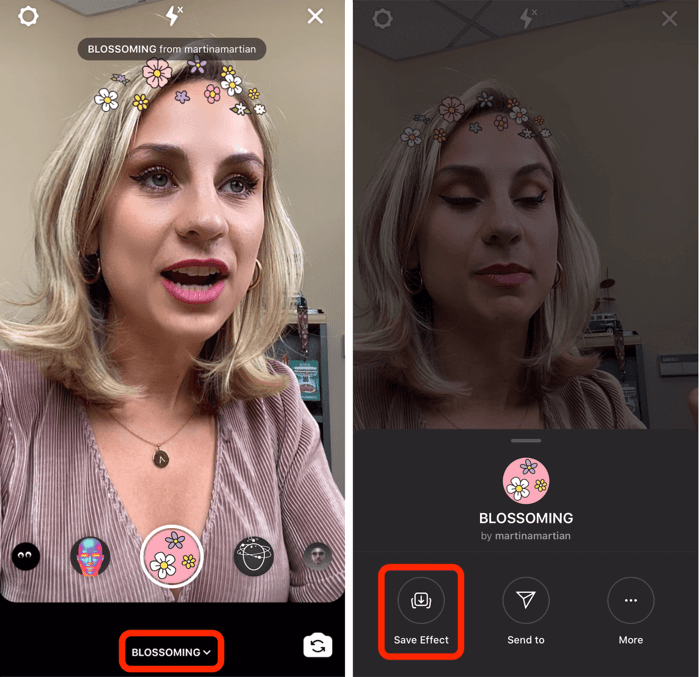
If you see an effect you want to save, tap on the name of the effect at the bottom of the screen and choose Save Effect in the pop-up. All of your saved filters will appear to the left of the record button in your Stories camera for easy access.
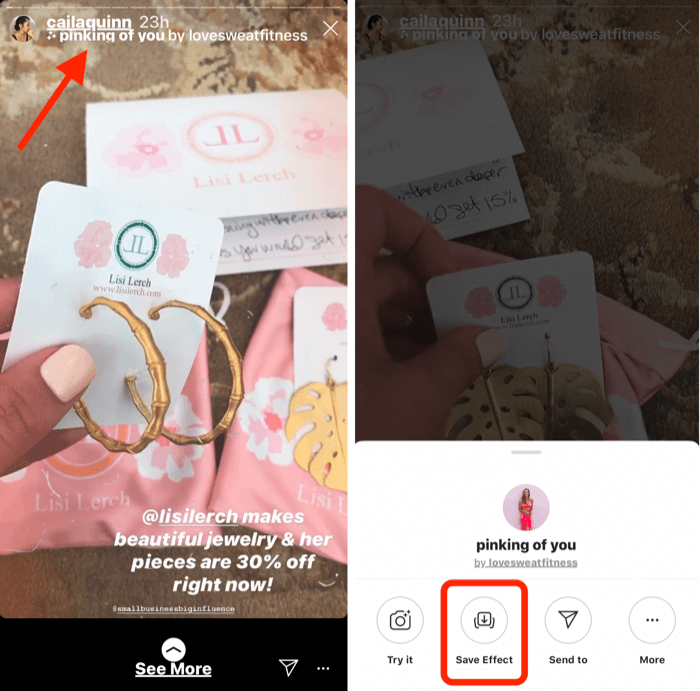
Another way to find fun filters is by looking at the filters other people are using. If you open the story of someone you follow and they're using a filter, you'll see the filter name below their user name at the top-left corner of the screen. Tap on the filter name to open a pop-up that will let you save the effect so you can use it yourself.
#7: Add an Extra Image or Custom GIF to Your Instagram Story Visual
Typically, Instagram Stories will only allow you to upload one video or image in a single story. But I'm going to show you how you can copy and paste an additional image to your story. This is a great way to add your own on-brand photos and custom GIFs that may not be available in the GIF library.
Start by recording a video or taking a photo of whatever you plan to share. In this example, I'll show you how to use a photo.
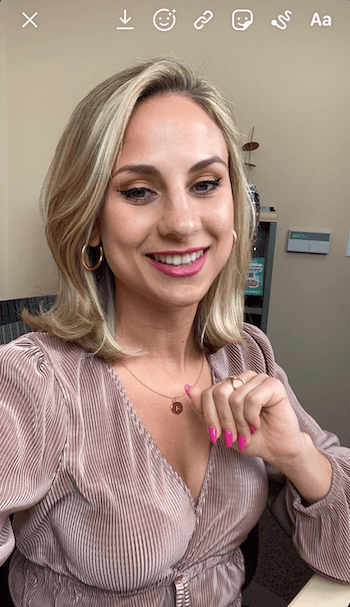
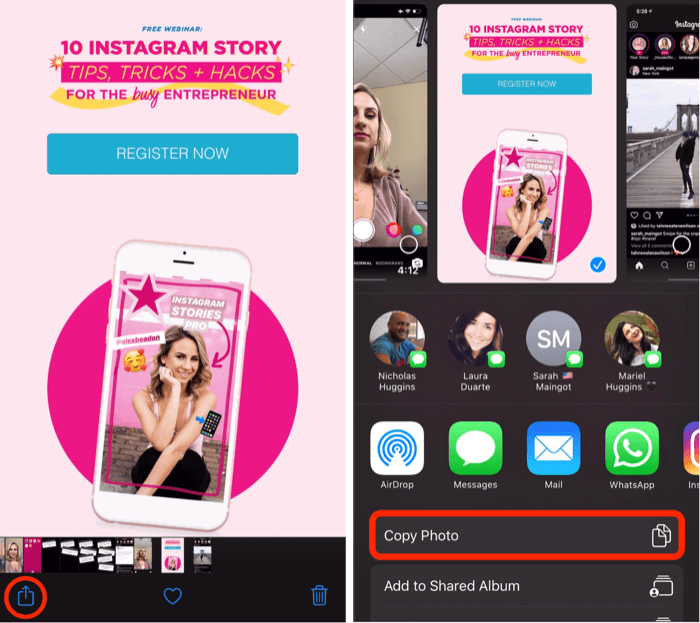
Now go into your camera roll and open the image you want to add to your story. Tap the up-arrow icon at the bottom-left corner of the screen. From the pop-up menu, select Copy Photo.
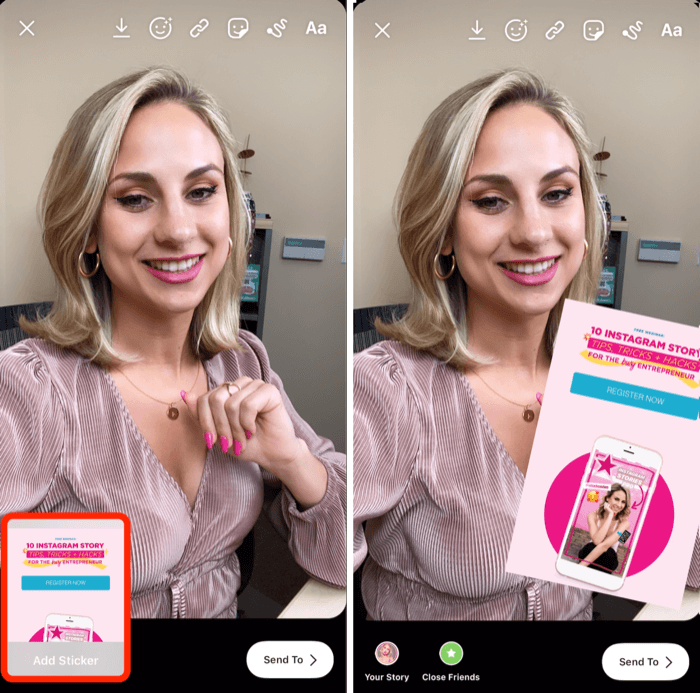
Once you've copied your photo, go back into your Instagram story and you should see a little pop-up that says Add Sticker. Tap that to add the extra image to your story.
Note: If you don't see the Add Sticker pop-up, it's not the end of the world. As a workaround, just select the Text tool, tap on the cursor, and then tap Paste to add the image to your story.
Once you've pasted your image into the story, you can pinch to resize it, rotate it, or drag it around the screen. If you want to add more images, simply repeat the process.
You can also add GIFs the same way. If you have a custom GIF you want to use and it's saved to your camera roll, open the image and tap the up-arrow icon. In the pop-up menu, select Copy Photo.
Then go back to your story, and again open the Text tool, tap on the cursor, and tap Paste. Your custom GIF will now be added to your story.
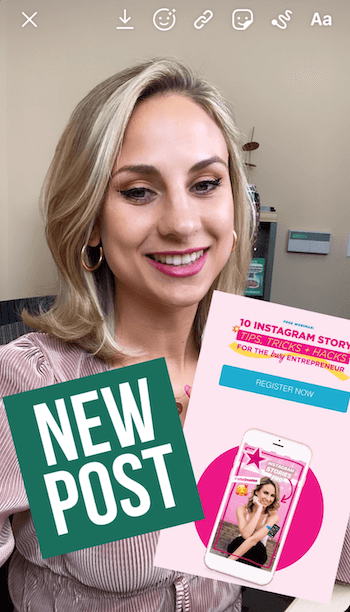
Pro Tip: If you want to draw or add text on top of any of the extra images you added, first save the story to your camera roll. Then re-upload the saved image to Stories and you'll be able to add whatever you want on top of the custom GIFs and images.
#8: Combine Questions Sticker Responses With Instagram Live and Stories
This hack shows you two creative ways to use the responses to a questions sticker in your Instagram story.
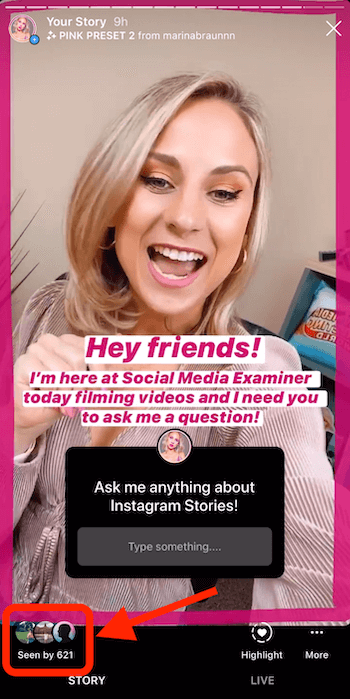
Start by asking your audience a question in an Instagram story video. Once you've recorded your video, tap on the sticker icon (with the smiley face) at the top of the screen and select the Questions sticker from the tray.
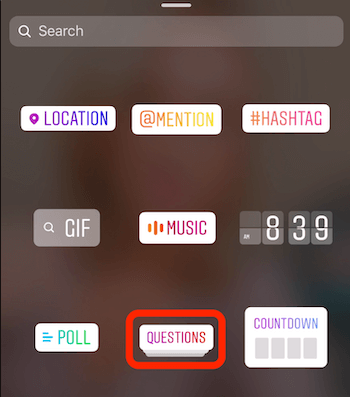
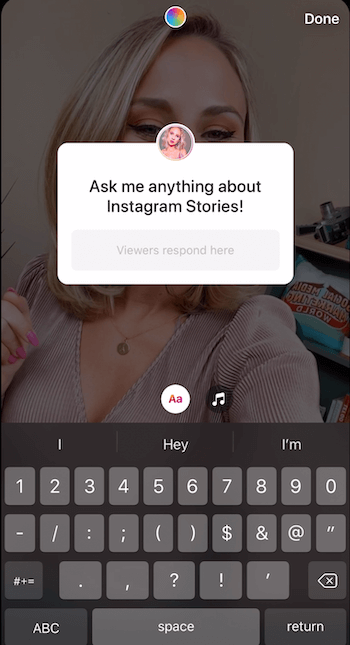
You can change the text on the sticker to anything you want, such as “Ask me anything about Instagram Stories!”
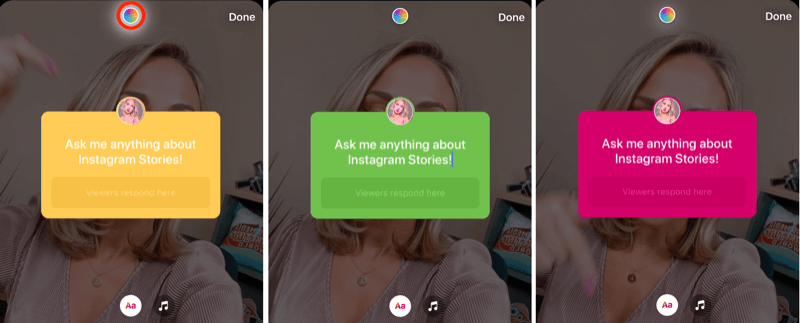
If you want to change the color of the sticker, tap the rainbow-circle icon at the top of the screen. Keep tapping it until you find a color you like. You can also pinch the sticker to make the sticker bigger or smaller on the screen and drag it anywhere you want.
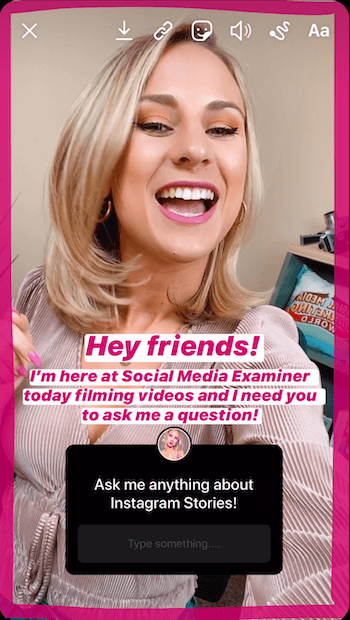
You may also want to type in what you're saying in the video for people who are watching your story with the sound muted. Once you've added the text, you can resize it and center it on the screen. When you're done, tap to add this content to your story.
Now you'll need to wait a bit for some responses to start coming in. Then you can go on Instagram Live and respond to them in real time. Another option is to create a story image that shares multiple responses at once.
Go Live With Viewers' Responses to Your Questions Sticker
To go live on Instagram and answer questions from your followers, start a live video and tap the little question-mark icon at the bottom of the screen.
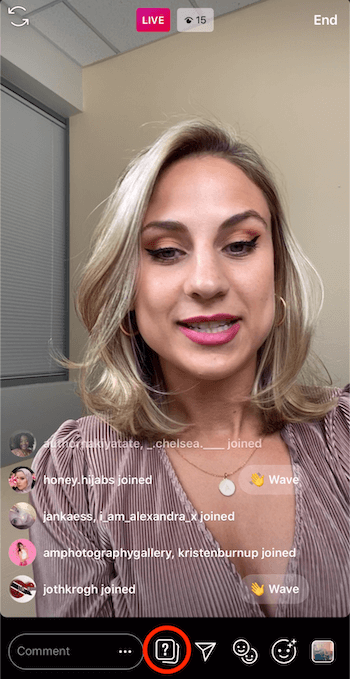
That will bring up all of the responses to your questions sticker.
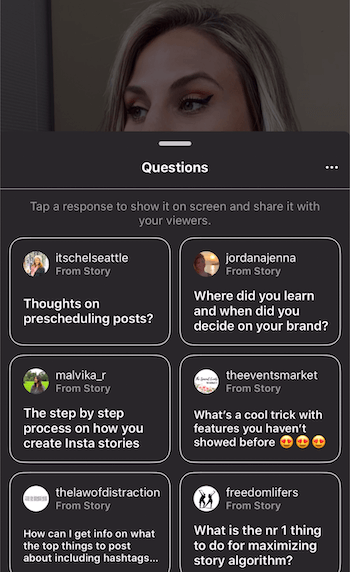
From the list, select the question you want to share with viewers during your live broadcast. The question will then appear at the bottom of the screen for viewers to see. Additionally, the top of the screen will now show Q&A as the category.
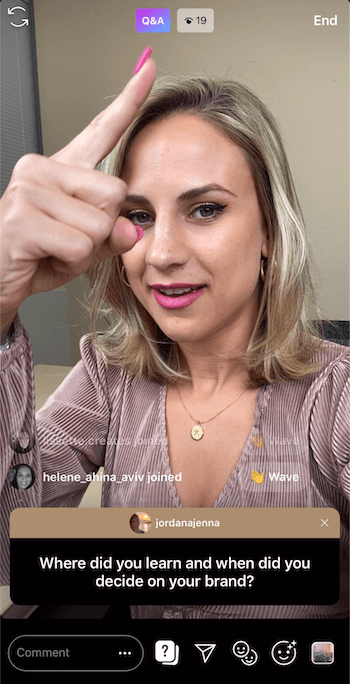
Use this Q&A as an opportunity to connect with your audience and answer the question on the screen. Anyone who pops into your live broadcast will know exactly what you're talking about and which question you're answering. It also shows your audience that you're engaged, participating, and want to hear from them.
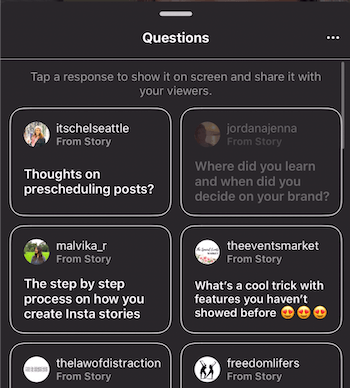
One thing to note while you're answering questions is that once you select a question, it will be grayed out in the Questions list so you don't pick it again.
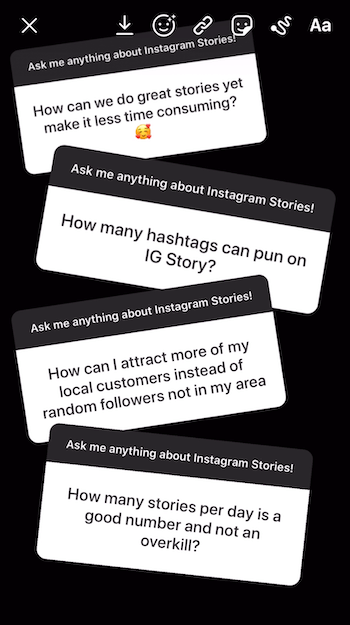
Share Multiple Responses in the Same Story Image
You can also share multiple responses to your questions sticker in a single story. This helps you create that sense of community with your audience. I recommend using this tactic when you know people will be interested in seeing a variety of responses at once.
To add multiple responses to your image, find the question in your story and tap at the very bottom of the screen where it says how many people have seen that story.
On the next screen, tap See All next to Responses.
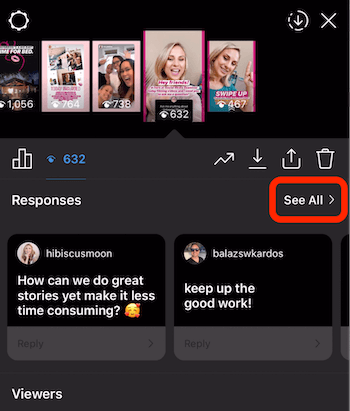
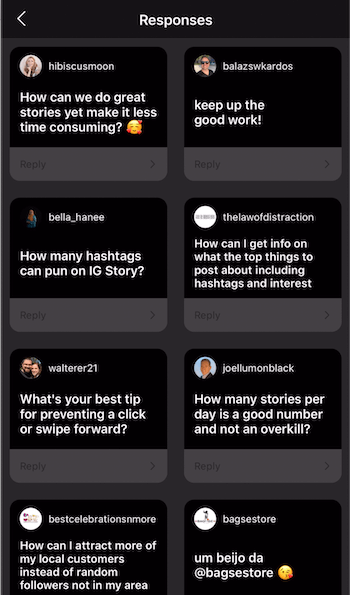
Now you can see all of the responses you've received to your question. Tap on the first response you want to add to your story.
In the pop-up, tap Share Response.

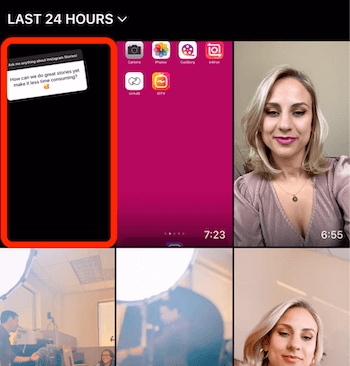
When you see the camera screen, make the background a single color. From there, you can drag the response on the screen, make it bigger or smaller, or rotate it. When you're happy with it, tap the down-arrow button at the top of the screen to save it to your camera roll.

Then tap the X at the top left to discard it. This will bring you back to the screen that shows all of the responses to your question. Pick another response to share in your story.
Now, instead of taking a picture, swipe up and select the image you previously saved to your camera roll.
Drag the second question to where you want it to appear on the image. Once it's there, tap the down-arrow button to save it to your camera roll. Then tap the X to discard your story.
Keep repeating this process to add more responses to your image. When you're happy with the visual, share it to your story.
Conclusion
Instead of posting to your Instagram story in the moment, record your video or take your photo and then save it to your camera roll before uploading it. The benefits are twofold. First, you'll be more present so you're not buried in your phone during special occasions. Second, you'll be more intentional with what you're posting to Instagram Stories.
You'll have time to add a creative headline, draw a border in your brand color, or create sequenced text to make the content as engaging as possible to your audience. Putting a little more thought and energy into your stories will lead to more compelling content.
More articles on Instagram Stories:
- Learn how to create an Instagram Stories content plan.
- Discover six Instagram Stories design tools for marketers.
- Find out how to make your first Instagram Stories ad.

Curious About How to Use AI?
Our newest show, AI Explored, might be just what you're looking for. It's for marketers, creators, and entrepreneurs who want to understand how to use AI in their business.
It's hosted by Michael Stelzner and explores this exciting new frontier in easy-to-understand terms.
Pull up your favorite podcast app and search for AI Explored. Or click the button below for more information.
