Wondering how to appear consistently in your audience's Facebook news feed while limiting the impact of ad fatigue? Looking for a Facebook ad campaign you can model?
In this article, you'll discover how to run a Facebook advertising campaign that consistently puts your business in front of your target audience with unique messaging at every touchpoint.

Why This Type of Facebook Ad Campaign Is Different
This type of campaign differs from a regular Facebook campaign in that it only uses the Reach objective and you're not looking for winning ads. Instead, you show multiple ads with different messaging angles to your target audience in a short period of time.
Additionally, instead of setting up a campaign with multiple ads in one ad set (as you would find in a traditional Facebook ad campaign), you create multiple single-ad ad sets targeting the same audience.
This type of campaign is best used for high-end services for which the purchase decision-making process is long and your target audience needs to consume a lot of information before they're ready to buy. If you sell a physical product, you're better off using the Reach objective for short-duration website remarketing and then the Conversion objective for warm and cold audiences.

As a service provider, one of the best places to use this type of campaign in your sales funnel is after an event trigger such as an opt-in. To illustrate, select the Conversion objective for an opt-in campaign driving lead magnet signups and then use the Reach objective to create an omnipresence campaign that serves ads to people who have opted into your lead magnet.
Another way to use this type of campaign is toward the top of your sales funnel, before the opt-in, to target very specific local markets or visitors to specific pages on your website such as the contact page or services page.
#1: Create a Facebook Custom Audience of People Who Opted Into Your Lead Magnet
When setting up your Facebook campaign, the first step is to create the audience you want to target. As mentioned earlier, you'll define your audience based on where in the funnel you're using the campaign.
In this example, you're using the campaign after an opt-in trigger for a lead magnet, so you want to create an audience that isolates just the people who have opted in. For this, you'll use a website custom audience and event action.
To create this audience, open Facebook Ads Manager and select Audiences in the main menu to navigate to your Audiences dashboard.
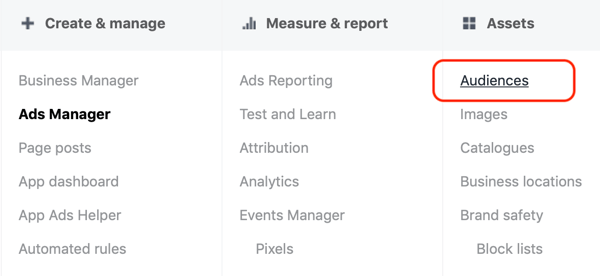
Then click on Create Audience, and from the drop-down menu, select Custom Audience. In the custom audience creation window, choose Website Traffic as the source for this audience.
In the condition section of the website custom audience creation window, select Lead as the event type, assuming you've already installed the lead event action to trigger on the thank-you page of the opt-in. If you haven't installed event tracking for leads, this article explains how to use the Facebook Event Setup Tool.
Get World-Class Marketing Training — All Year Long!
Are you facing doubt, uncertainty, or overwhelm? The Social Media Marketing Society can help.
Each month, you’ll receive training from trusted marketing experts, covering everything from AI to organic social marketing. When you join, you’ll also get immediate access to:
- A library of 100+ marketing trainings
- A community of like-minded marketers
- Monthly online community meetups
- Relevant news and trends updates
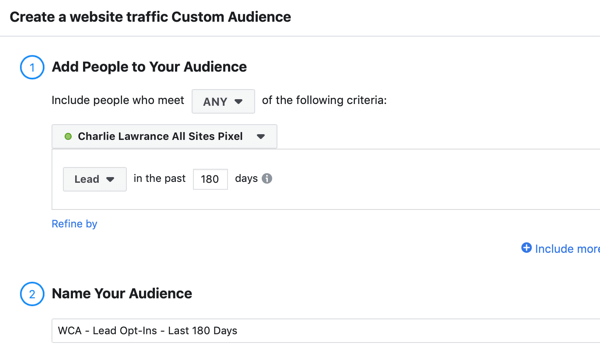
Note: Alternatively, you can use the website URL instead. To create this audience, change the condition variable to People Who Visited Specific Web Pages and set an exact URL of the page excluding the https and www parts of the URL.
Finally, change your audience duration from 30 days to 180 days. Because this will already be a small audience, choosing the 180-day duration allows you to include as many people as possible. Also, type in a name for your new audience, such as WCA – Lead Opt-Ins – Last 180 Days. Using a naming structure like this makes it easy to see the type of audience, condition, and duration at a glance.
After you click Create Audience, it will take a few hours for your audience to populate. You'll see an actual size in 2–3 days.
#2: Create a Facebook Reach Campaign and Set Up Your First Ad Set
The next step is to select the Reach objective and configure your ad set. Navigate to your Ads Manager dashboard and click on Create to set up a new campaign.
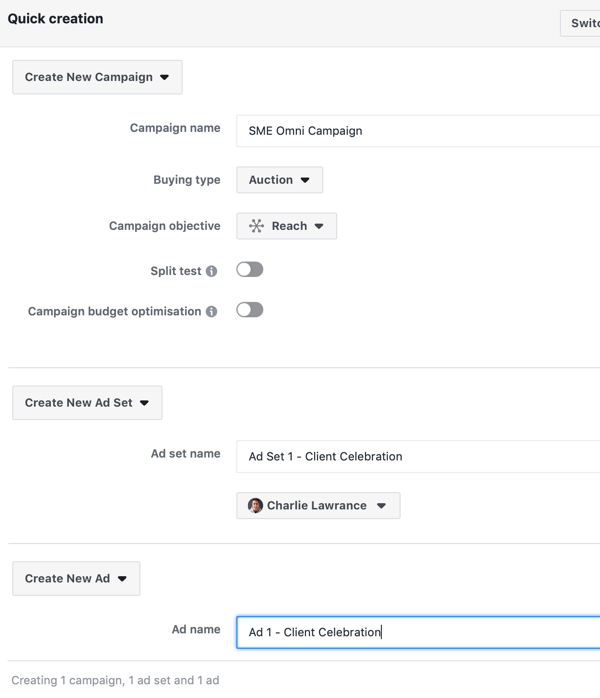
Next, select Quick Creation mode and name your campaign. From the Campaign Objective drop-down list, select the Reach objective. Also make sure Campaign Budget Optimization is set to Off; you don't want Facebook to optimize reach to just one ad set.
Then name your ad set and select your Facebook page. Finally, name your ad and click Save to Draft.
Set a Budget of $1 per Day
Now navigate to the Ad Set level and define your budget and schedule.
Start with a budget of $1 per day. This isn't a high-budget ad set, but remember that you'll have 5–10 ad sets, each with their own budget. Your total campaign budget will be your daily budget per ad set multiplied by the number of ad sets. To visualize this, if you budget $1 per day for each of your 10 ad sets, your total daily budget on the campaign will be $10 per day.
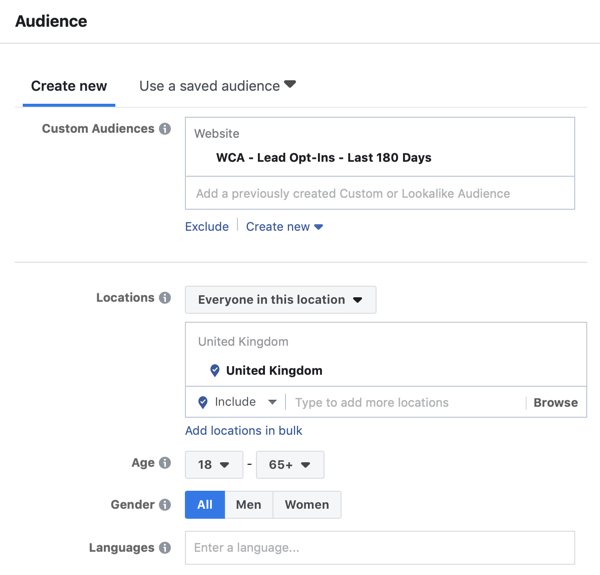
Next, in the Audience section, select the opt-in website custom audience you just created and leave the rest of the demographic information open. You've done all of the segmenting in the website custom audience, so you don't need to narrow the audience.
Select Facebook and Instagram Feed Placements
In the Placements section, click on Edit Placements and choose Facebook and Instagram Feeds as the only two placement options—these are the highest-quality placements.
Set a Frequency Cap
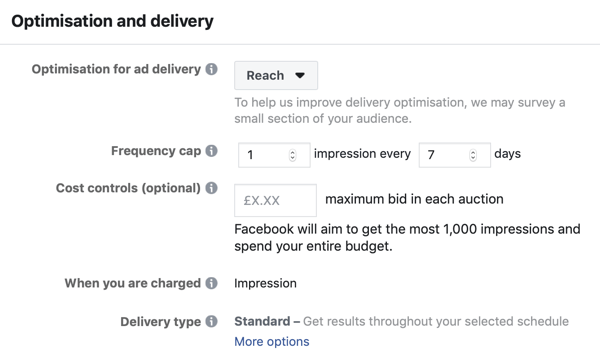
Finally, set a frequency cap and campaign optimization. The main advantage of using the Reach objective is that you can reduce the impact of ad fatigue using frequency capping. Set a limit on how regularly your audience will see each ad.
You want to stay top of mind but not become annoying, so set an initial frequency cap of one impression every X number of days with X being the total number of ads you want to run in your campaign. To illustrate, if you're running seven different ads in your campaign, the frequency in each ad set would be 1 impression every 7 days.

Discover Proven Marketing Strategies and Tips
Want to go even deeper with your marketing? Check out the Social Media Marketing Podcast! Publishing weekly since 2012, the Social Media Marketing Podcast helps you navigate the constantly changing marketing jungle, with expert interviews from marketing pros.
But don’t let the name fool you. This show is about a lot more than just social media marketing. With over 600 episodes and millions of downloads each year, this show has been a trusted source for marketers for well over a decade.
#3: Create Your First Facebook Reach Ad
The last step in setting up the first of your ad sets is to create an ad you want to show your target audience.
The type of ad you create will depend on your specific business and the content you have. For inspiration, here are some ad types and use cases:
- Create an ad that simply thanks people for opting in and pushes them to check their inbox for the lead magnet.
- Increase lead magnet consumption with an ad that previews the lead magnet and sends people to the landing page to consume it.
- Deliver more content—and therefore value—to your audience with video ads based on your lead magnet topic.
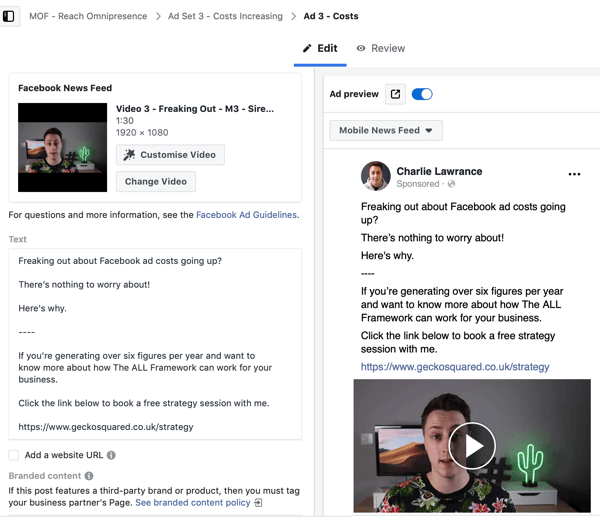
- Set up a call-to-action ad that moves your target audience to the next step in your sales funnel, such as a complimentary session.
- Create an ad that uses a client testimonial followed by a call to action to build social proof and then direct people to the next stage in your sales funnel.
- Build an ad that features a client or customer milestone to demonstrate results and increase the social proof of your service.
To create any of the ad examples above, at the Ad level, first ensure that your page and Instagram profile identities are selected. Then select your ad format such as single image, video, or carousel.
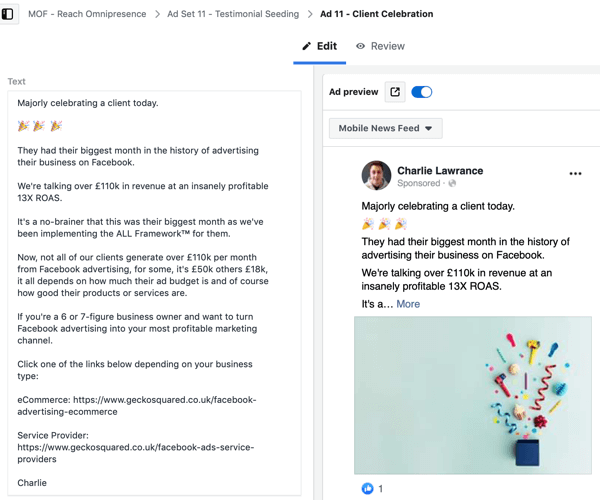
Below is a client celebration ad that uses the single image format and stock photo creative. The text highlights the amazing results we generated for a client and features a call to action to move people along our sales funnel.
After you've created the ad, ensure that all stages of your campaign (the ad, ad set, and campaign) are toggled off and publish it for review. The reason for this will become clear in the next section.
#4: Duplicate Your Facebook Ad Set and Create a New Ad
Now you'll duplicate your first ad set and change your ad.
The number of duplications you make will depend on how many ads you want to serve to this audience. Duplicating your ad makes it quick and easy to create new draft ad sets with the same settings you used earlier. All you have to do is create the new ad in each ad set.
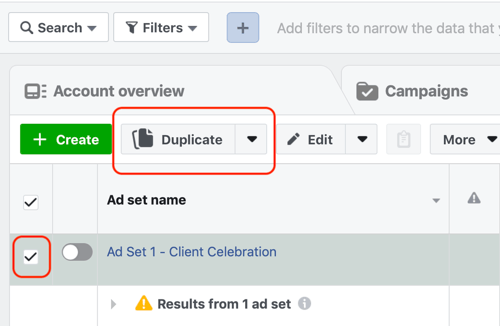
To create your second ad, go to the Ad Set level of your campaign and select the first ad set you created. Click the Duplicate button, rename the ad set as Ad Set 2, and include the ad type you're using. Naming your ad sets this way will make it easy to identify which ads are in which ad sets.
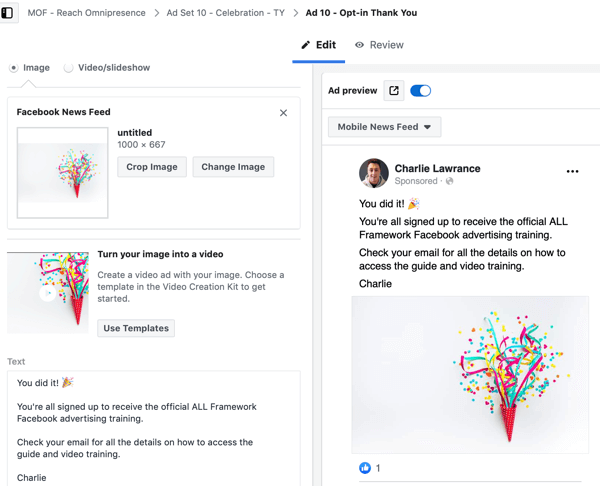
Next, navigate to the Ad level of your new ad set and change the ad to one of the examples mentioned earlier. For instance, if the first one is a client celebration ad, you might make the second one an opt-in thank you and reminder.
The ad below thanks people for opting in and reminds them to check their inbox for the lead magnet.
#5: Create the Rest of the Ads for Your Campaign
Now repeat this process to duplicate your ad sets to set up all of the ads you want to serve to your audience. Keep in mind that it's easier to keep track of the ad sets and ads you're creating if you duplicate them one at a time instead of duplicating all of them at once.
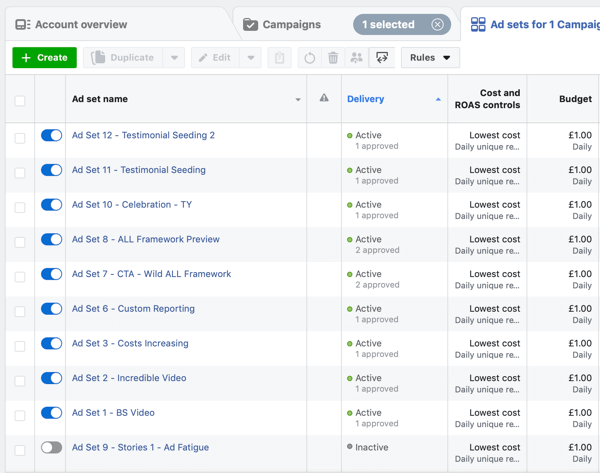
Ultimately, you should have an ad set level that looks like this, with multiple ad sets targeting the same audience, each containing a single ad, with no two ads being the same.
After you've created all of the ad sets and ads in your campaign, toggle them on and set them live.
Keep in mind that this is just the start of this type of ad campaign. Over time, you can create new ad sets with ads based on new content you've created and use updated client results or testimonials.
Conclusion
Facebook advertising is more complicated than ever. When you first create a new campaign, you can choose from 14 objectives, the most common of which are Post Engagement (Boost Posts), Traffic, and Conversions.
In the Awareness category, you'll find the Reach objective. You may be thinking, “Why should I use the Reach objective when conversions will target people who are likely to take a specific action that I set, such as a purchase or lead event?”
The answer lies in how you use the Reach objective and at what stage of your sales funnel. If you use it in the same way as you use the Traffic and Conversions objectives—targeting large audiences—it won't deliver results and you'll be wasting ad budget.
Instead, use the Reach objective when you want to target smaller, hyper-responsive audiences that are already in your sales funnel, such as low-duration website custom audiences. Check out this article for more specific cases of when to use the Reach objective.
By following the steps above, you can create a Facebook marketing campaign that limits the impact of ad fatigue while consistently appearing in your target audience's news feed. This type of campaign helps you effectively build recognition and authority for your business and get your target audience to take action, moving them along your sales funnel.
The key to success is to ensure you're continuously building the size of your target audience. In the example above, this would mean driving new opt-ins to your lead magnet on a daily basis.
What do you think? Will you try this type of Facebook ad campaign? Where will you use this type of campaign in your sales funnel? Share your thoughts in the comments below.
More articles on Facebook ads:
- Learn how to use Facebook ad relevance diagnostics to improve your campaigns.
- Discover three ways to use Facebook ads to promote your products.
- Find four tips to help you spend less on Facebook ads.
Attention Agency Owners, Brand Marketers, and Consultants

Introducing the Marketing Agency Show–our newest podcast designed to explore the struggles of agency marketers.
Join show host and agency owner, Brooke Sellas, as she interviews agency marketers and digs deep into their biggest challenges. Explore topics like navigating rough economic times, leveraging AI, service diversification, client acquisition, and much more.
Just pull up your favorite podcast app, search for Marketing Agency Show and start listening. Or click the button below for more information.

