Want to collect more leads using Facebook? Have you considered using the platform's built-in lead form feature?
In this article you'll learn, step-by-step, how to set up effective Facebook lead ads. You'll discover which lead gen form options to use, how to add custom questions and fields to your form, and more.
To learn how to create Facebook lead ads, read the article below for an easy-to-follow walkthrough or watch the video below:
#1: Set Up Your Facebook Lead Form
One of the great things about Facebook lead ads is that they minimize the amount of friction with your audience. If you send people offsite (off of Facebook) to, say, the third-party landing page software you use, that page may take 3–10 seconds to load. When you create a Facebook lead form, it's an instant experience, and Facebook pre-populates the form with the information from that user's Facebook profile, allowing you to capture a lead in 5–10 seconds.
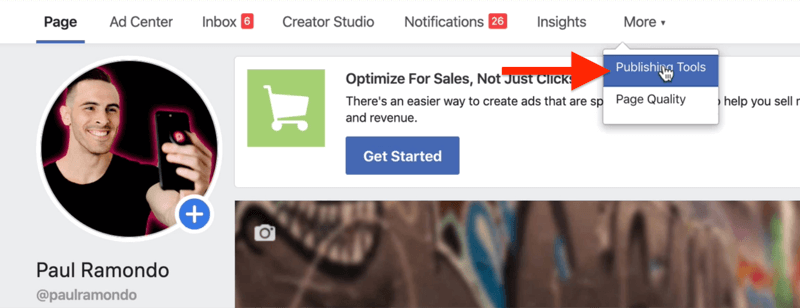
Before you can run Facebook lead ads, you need to create the lead form itself. To do this, go to your Facebook page, click on the More tab, and select Publishing Tools.
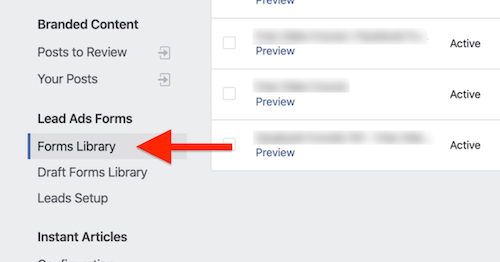
Now that you're in the Publishing Tools section of your Facebook page, click on Forms Library on the left.
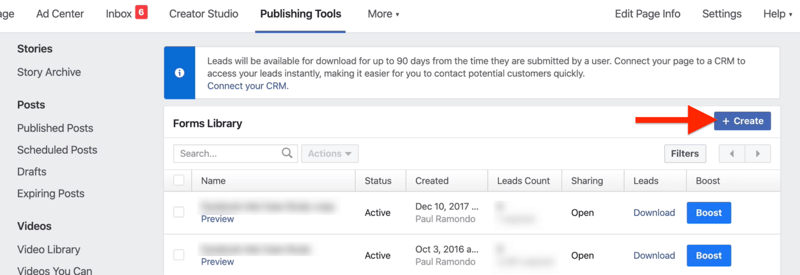
In the top-right corner of the Forms Library, click Create.
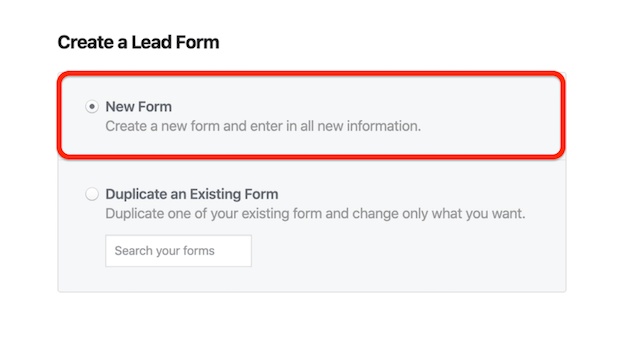
On the next screen, select the option to create a new form and click Next.
Start by giving your form a name in the Create Form window. For this example, we're creating a form for a free case study so the name reflects that.
Get World-Class Marketing Training — All Year Long!
Are you facing doubt, uncertainty, or overwhelm? The Social Media Marketing Society can help.
Each month, you’ll receive training from trusted marketing experts, covering everything from AI to organic social marketing. When you join, you’ll also get immediate access to:
- A library of 100+ marketing trainings
- A community of like-minded marketers
- Monthly online community meetups
- Relevant news and trends updates
For Form Type, you can choose from two options: More Volume or Higher Intent. The More Volume option is a good choice if you're trying to get as many leads as possible. If you want to focus on driving high-quality leads and eventually high-quality sales, choose the Higher Intent option.
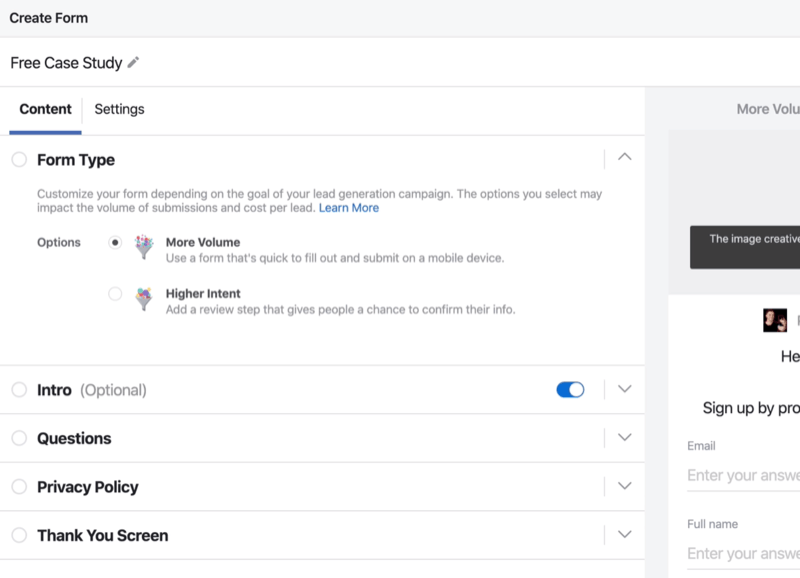
The option you choose here will affect your overarching return on ad spend and how successfully your form generates leads. We'll choose More Volume for this example.
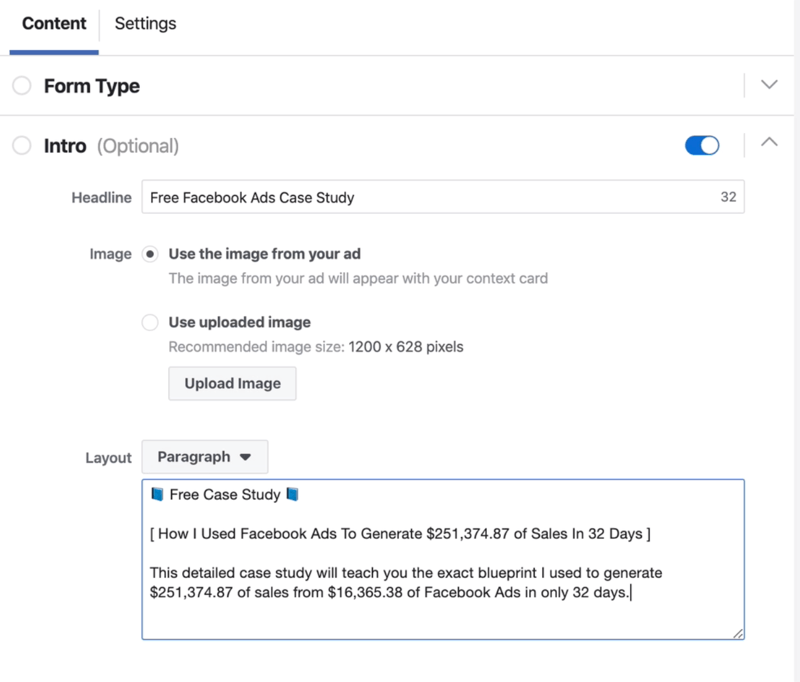
Next, click on Intro and type in a headline (“Free Facebook Ads Case Study,” for instance).
For the image creative, you can either upload a custom image, a static piece of creative that follows your ad around for eternity, or use dynamic creative, which is variable to the ad that you're running. I recommend using Dynamic Image so you can split test and switch out ad creative without having to create new forms in the future.
In the Layout drop-down, you can choose either Paragraph or Bullets—it's up to you how you want your form to look.
Also provide some kind of call to action (CTA) or a description of the form that people will be filling in. Ask yourself why someone would want to provide you with their email address, phone number, and contact information. In this case, we're using a lead magnet to give people access to a case study so we can capture their email address and add them to our email list.
You can do lots of really cool things with your Facebook lead ads. Let's say you want to do a survey or ask people for more information so you can get their email address and full name. In the Questions section, click Add New Question and choose contact fields, user information, demographic questions, work information, or national ID number.
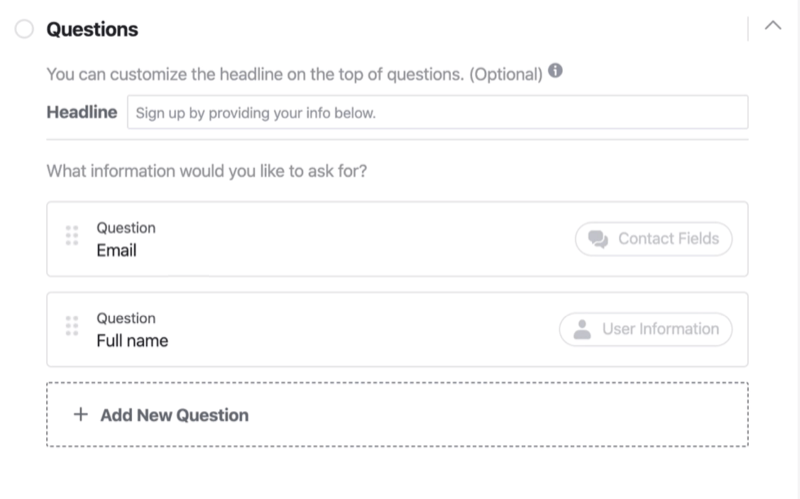
You can also create custom questions with multiple choice and conditional logic, schedule appointments, or qualify leads.
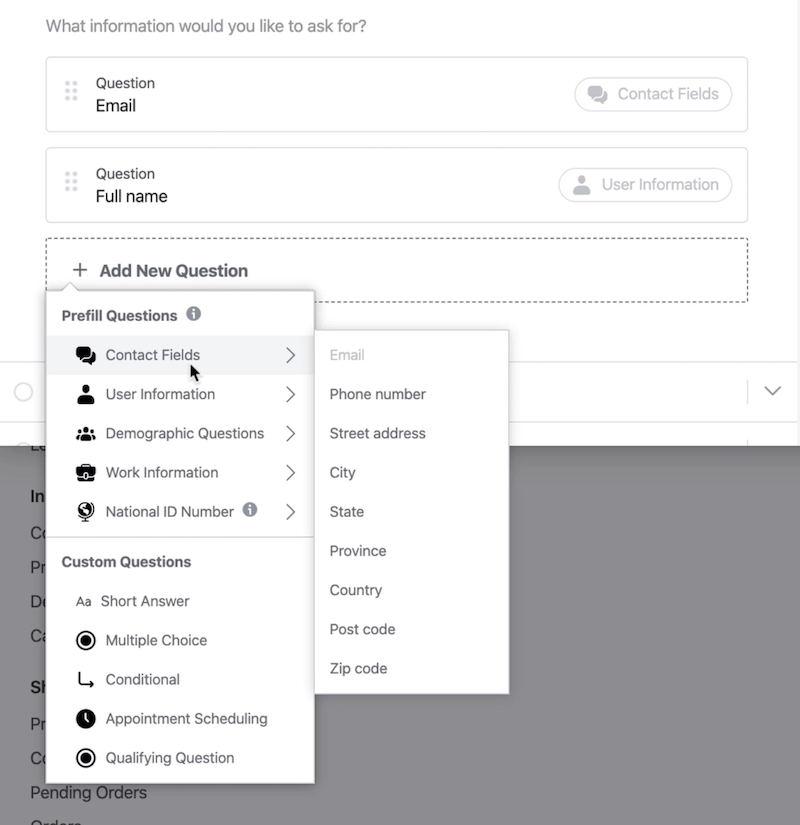
Seeing all of these options and fields, you might be inclined to get as much information from your audience as possible. Don't do that—the more questions you ask, the less likely you'll convert these leads.
Pro Tip: I recommend asking for the minimum information needed to achieve the goal of your Facebook lead ad campaign. The idea is to minimize the friction points in generating those leads from your audience.
Next, fill in the fields in the Privacy Policy section. To run a Facebook-compliant lead ad, you need to link to a privacy policy. The easiest way is to create a privacy policy on your website, paste that link here, and make the link text “Privacy Policy.”
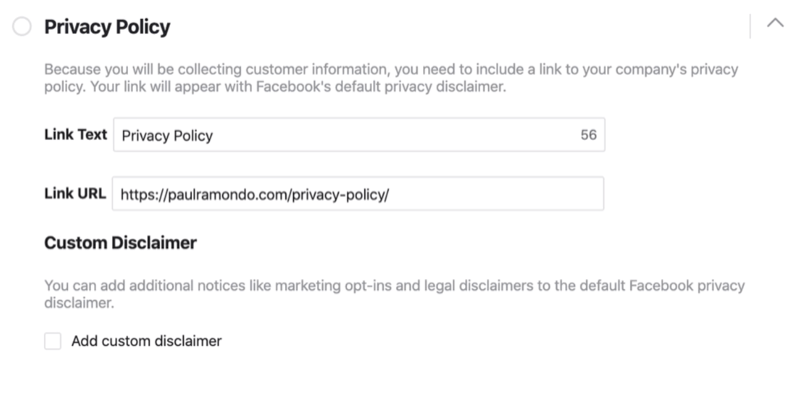
Depending on where your business is located and where you're generating leads from, you may need to add a disclaimer (for instance, a GDPR disclaimer) if it's not included in your terms of service or website privacy policy. You can do that by clicking the Add Custom Disclaimer checkbox.
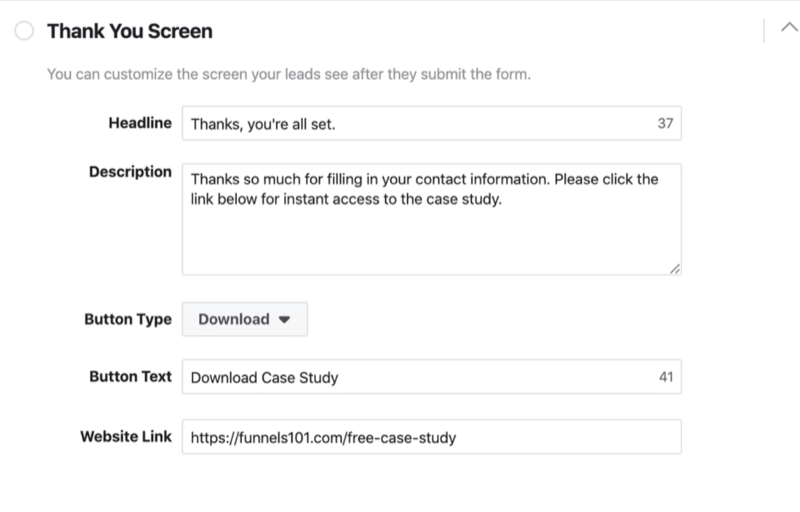
Now complete your thank-you screen. For this example, we'll type, “Thanks, you're all set,” for the headline. For the description, we'll use, “Thanks so much for filling in your contact information. Please click the link below for instant access to the case study.” Obviously, the description is relevant to what we offered in the form.
You can choose from three options for the button: View Website, Download, or Call Business. In the Website Link box, type in the URL where people can download the lead magnet.
When you're done, click Save in the upper-right corner. Before you click Finish, exit the form setup window.
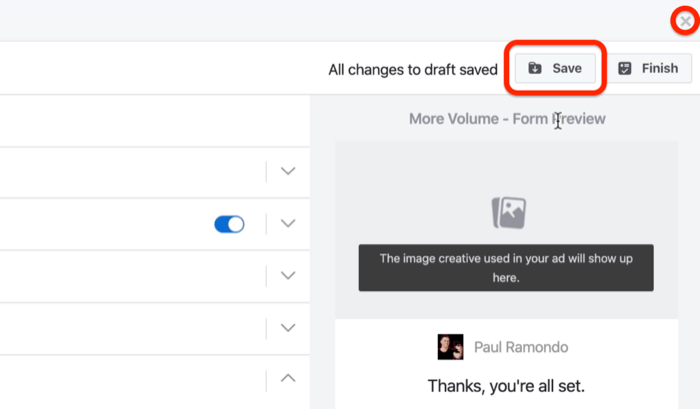
You'll see a pop-up asking if you want to close the lead form. Click OK.
Your draft will now appear in your list of forms. Navigate to the Draft Forms Library and you'll see the form you just created. Click Edit next to the form and then double-check that everything looks okay. Then click Finish.

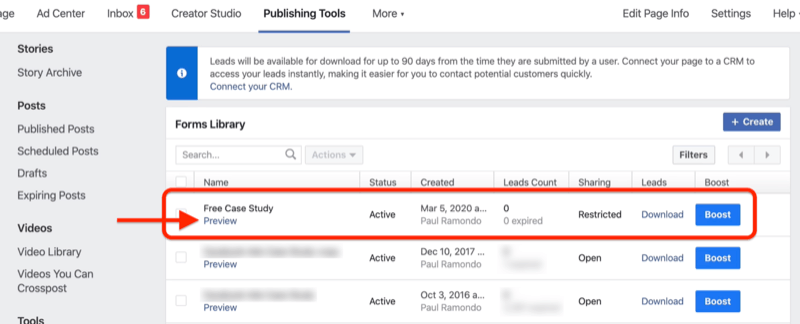
Now go to your Forms Library and you'll see the completed Facebook lead form. Click Preview to see what the experience will be like for people interacting with your form.
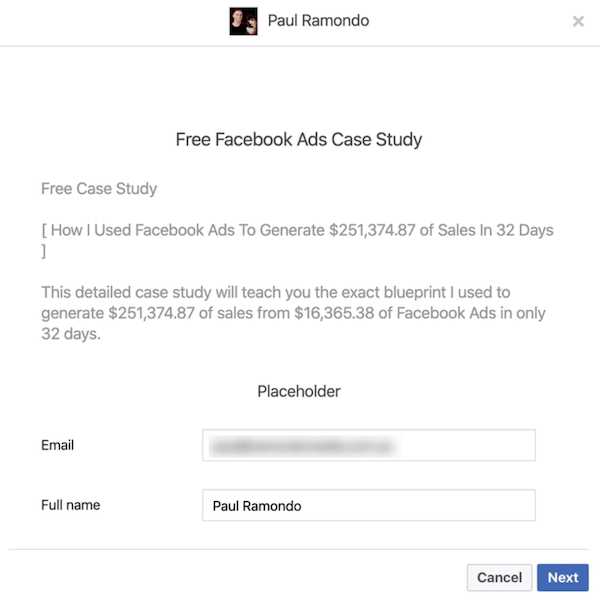
You'll see that the form is pre-populated with placeholder information. Click Next.
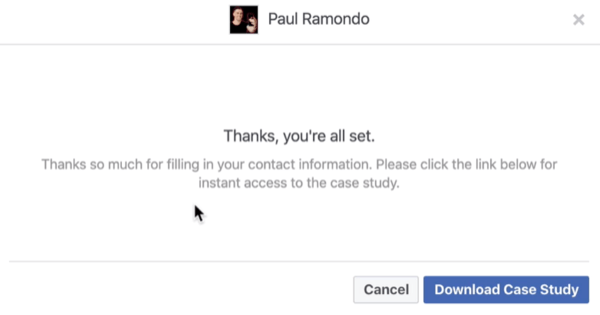
On the next page, click Submit.

Discover Proven Marketing Strategies and Tips
Want to go even deeper with your marketing? Check out the Social Media Marketing Podcast! Publishing weekly since 2012, the Social Media Marketing Podcast helps you navigate the constantly changing marketing jungle, with expert interviews from marketing pros.
But don’t let the name fool you. This show is about a lot more than just social media marketing. With over 600 episodes and millions of downloads each year, this show has been a trusted source for marketers for well over a decade.
Now click Download Case Study to go to the page where you can download and view the case study. It's as simple as that.
#2: Create Your Facebook Lead Ad Campaign
Now that you've created this awesome lead form, you need people to see it. So hop into Ads Manager and create a quick little test campaign to see how people in your audience react to this lead form.
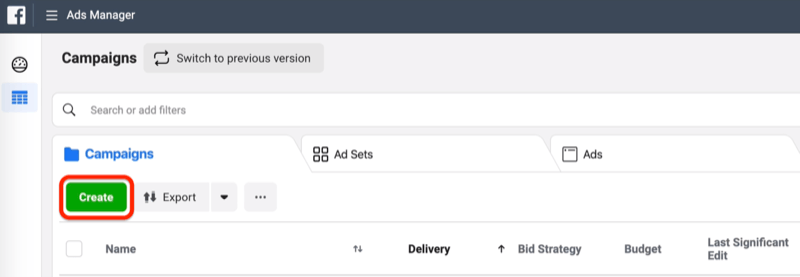
Click on Create to create a new Facebook campaign.
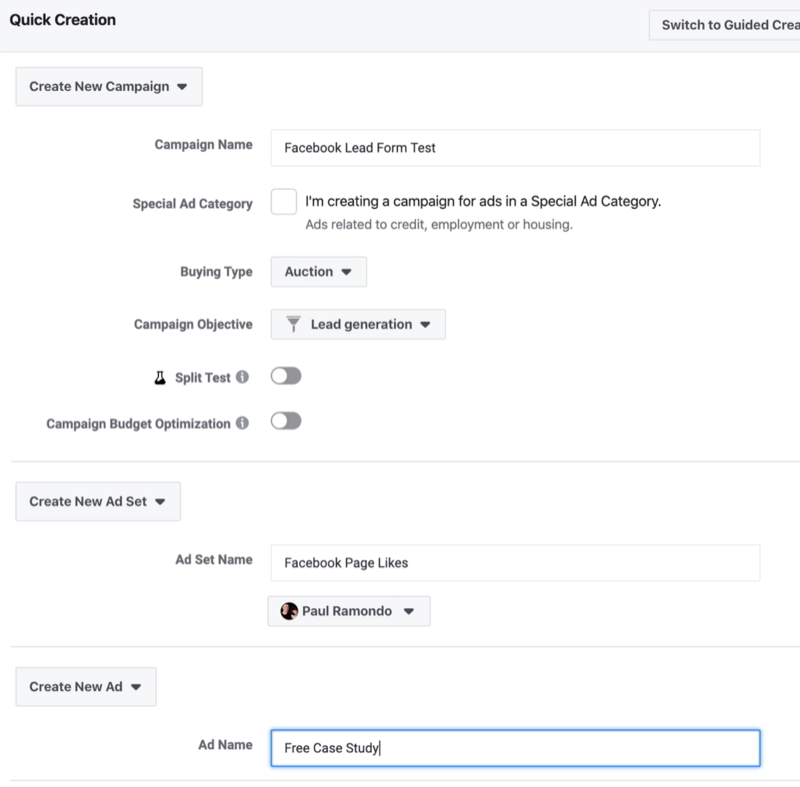
In the Quick Creation window, select the Lead Generation objective and fill in the details for your campaign. For this example, we'll call our campaign “Facebook Lead Form Test” and name our ad set “Facebook Page Likes.” I like my ad set names to reflect the audiences I'm targeting. For the ad name, we'll use “Free Case Study,” which reflects the lead form in this ad.
When you're done, click Save Draft.
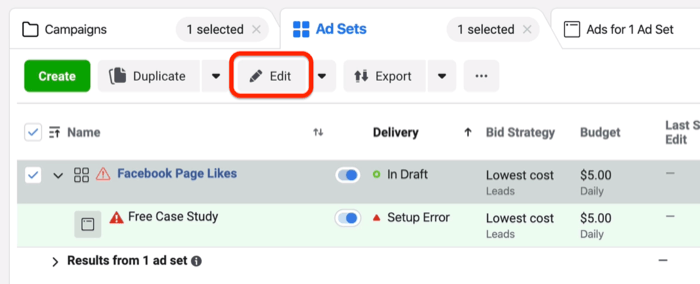
Now click on the Ad Sets tab and click Edit.
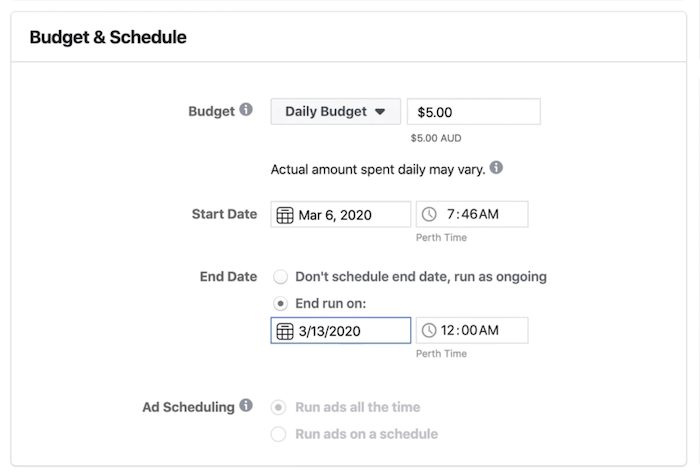
Now that you're inside the ad set, set your budget and schedule.
Define Your Target Audience and Exclude People Who Previously Interacted With Your Lead Form
Next, define the audience that's most likely to respond positively to your lead ad.
You'll also want to add some exclusions to filter out people who already interacted with your lead form. To do this, create two custom audiences to exclude:
- People who opened your lead form in the past 90 days
- People who downloaded your lead magnet or submitted the form in the past 90 days
To create the first audience to exclude, go to the Ad Set level and click Exclude in the Audience section. Then click Create New and select Custom Audience.
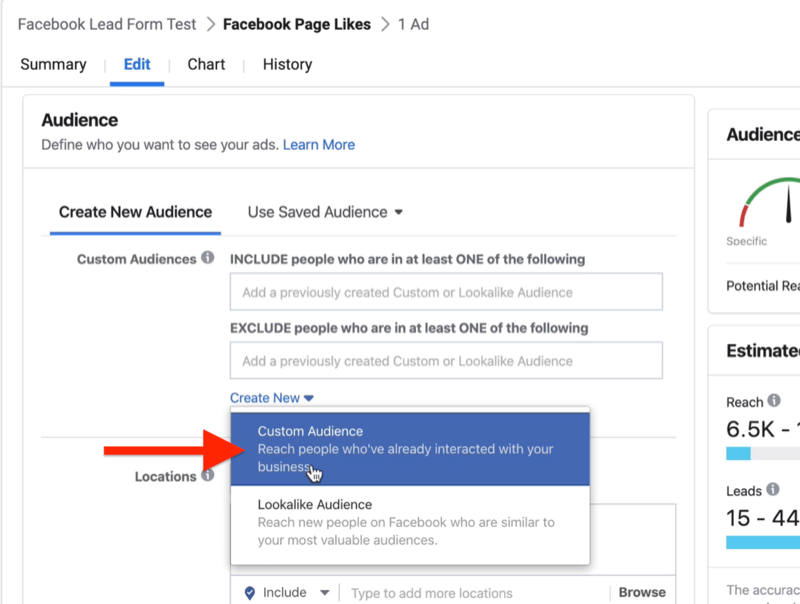
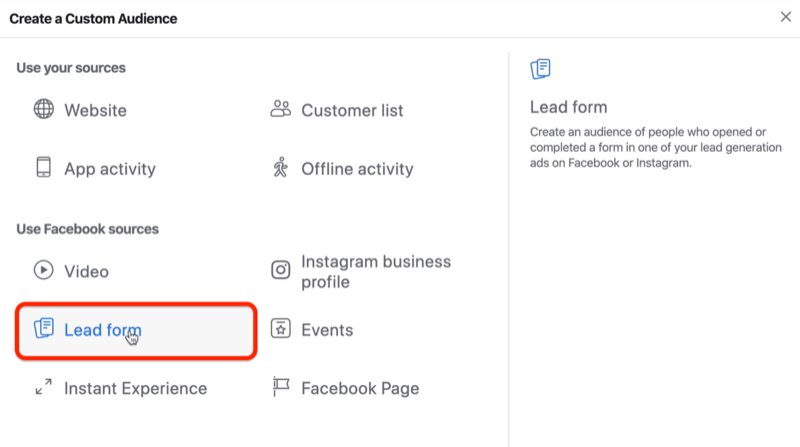
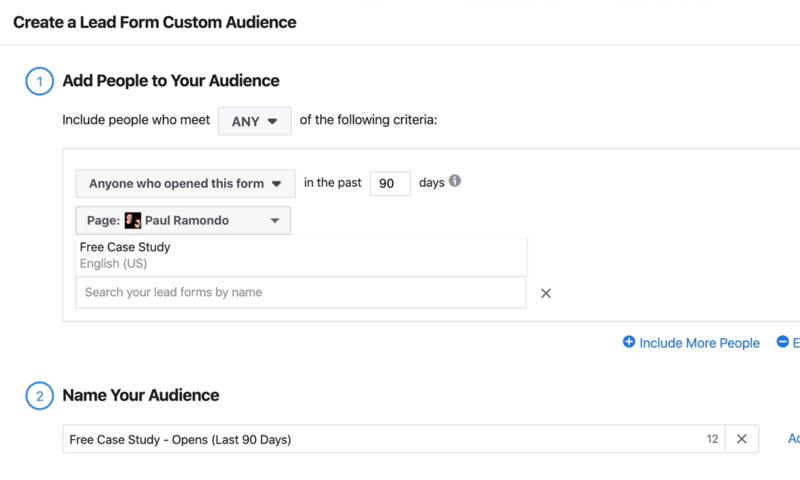
In the Create a Custom Audience window, click Lead Form.
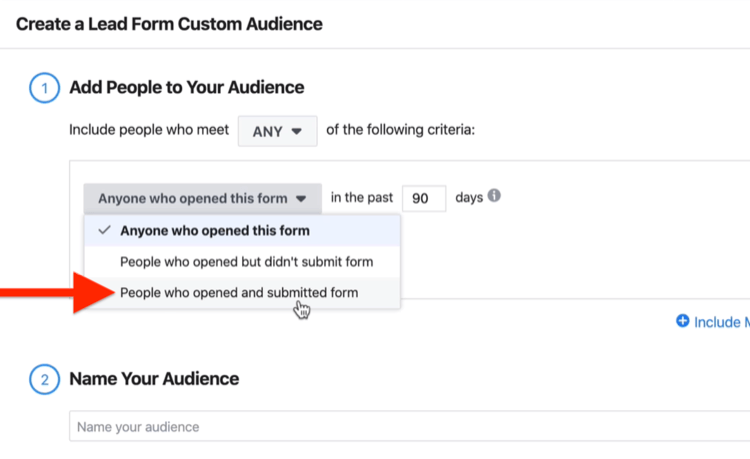
On the next screen, select People Who Opened and Submitted Form from the drop-down menu. Choose 90 days as the time frame.
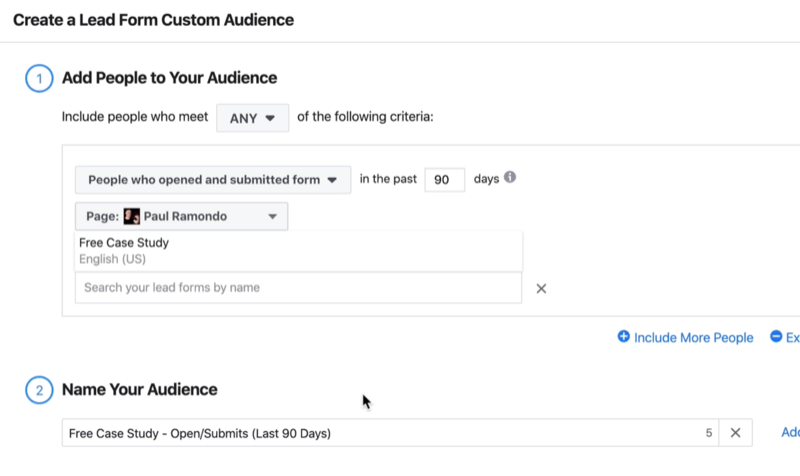
Next, select the form you just created and give a descriptive name to your audience. For this example, we'll name our audience “Free Case Study – Opens/Submits (Last 90 Days).”
When you're finished, click Create Audience.
On the next screen, click Done.
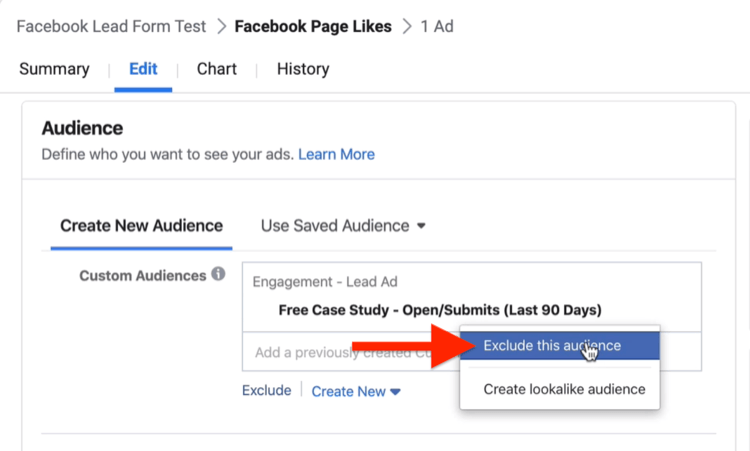
If you look at your targeting, you'll see that this audience was automatically added. But you don't want to target it—you want to exclude it. So click the down arrow and select Exclude This Audience.
The next audience you want to exclude is people who opened the form but didn't submit. To create this custom audience, follow the same process as before, but this time, select the Anyone Who Opened This Form option from the drop-down menu.
We'll name this audience “Free Case Study – Opens Last 90 Days.”
When you're finished, click Create Audience and then Done.
To make sure you're excluding this audience in your targeting, click the down arrow next to the audience and select Exclude This Audience.
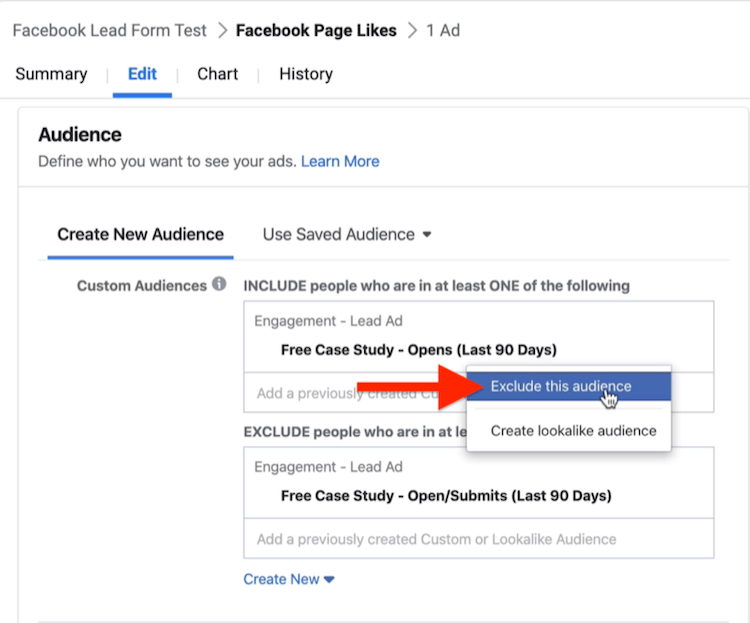
Creating these exclusion audiences ensures your ads will only be shown to people who haven't interacted with your lead form before.
Build Your Facebook Lead Ad
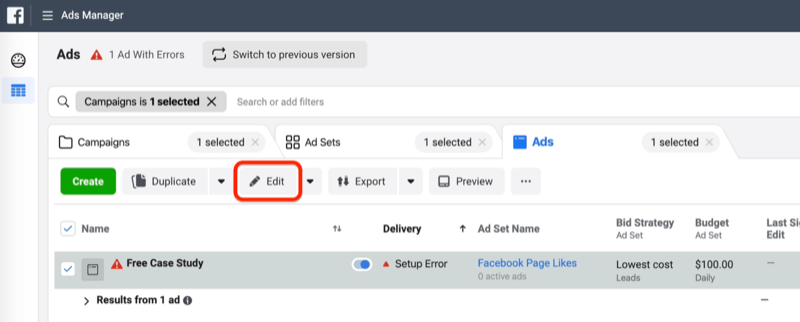
Now that your ad set is completed, you need to build your ad. Click on the Ads tab and click Edit on the top ad.
Scroll down and select your form.
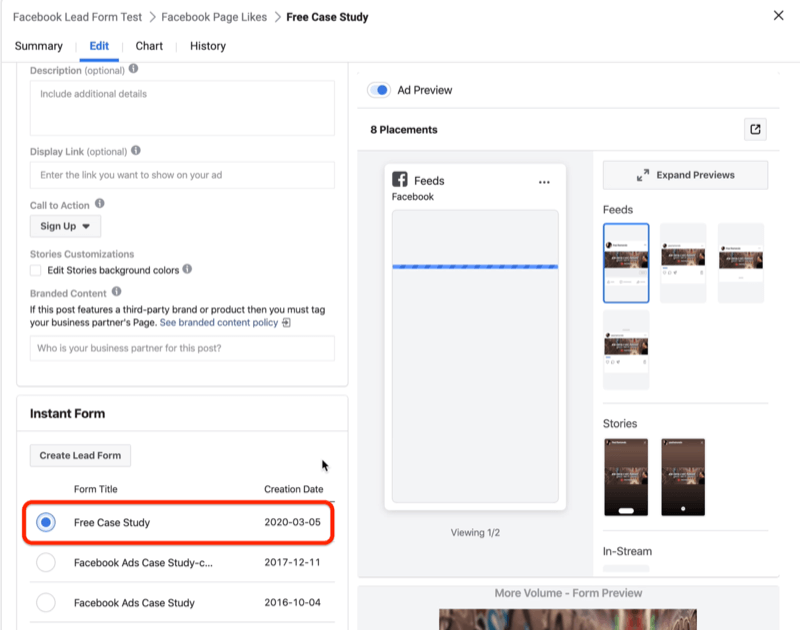
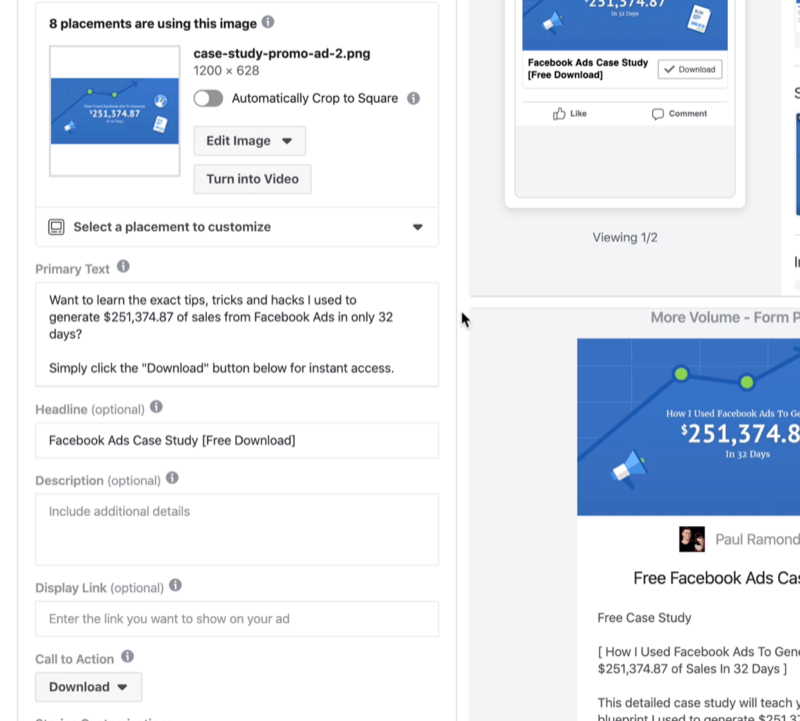
Next build out your ad. To change your creative, click Edit Image and select a different image. Also populate your primary text and CTA, and choose a CTA button.
If you want to customize the Instagram Stories colors, you can do that as well.
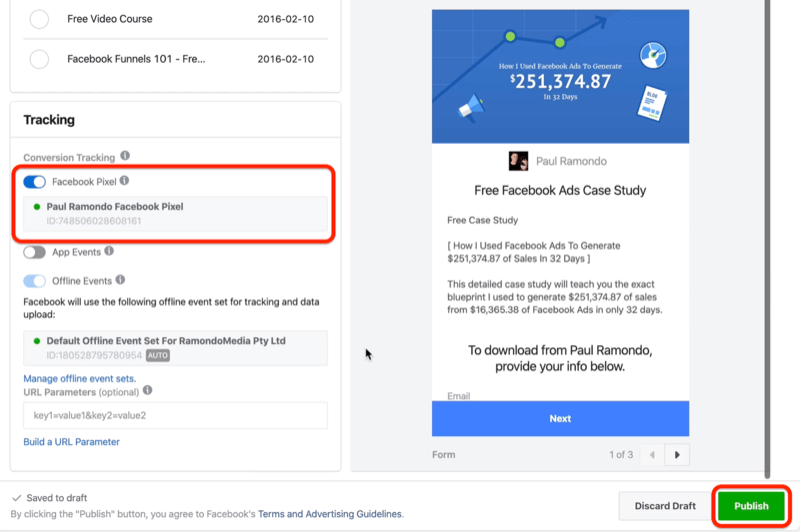
Also make sure your Facebook pixel is on.
When you're finished designing your ad, click Publish and you're done.
#3: Download or Export Your Leads
Once you start generating leads from your ad, go to the Forms Library for your page to download those leads. Facebook lets you download your leads up to 90 days from the time they were submitted by the user.
Click the Download button next to your form.
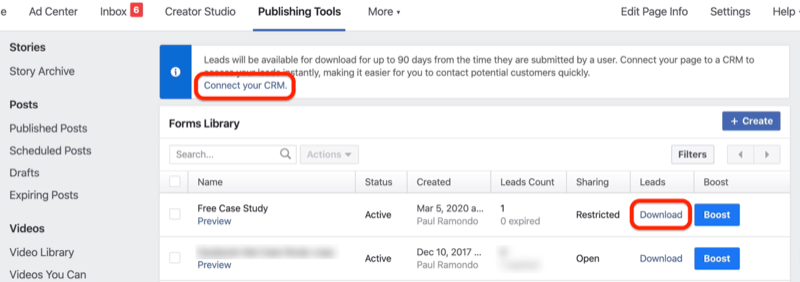
Depending on what kind of CRM you have, you can connect it through to the back end of your Facebook lead ads by clicking the Connect Your CRM link shown above.
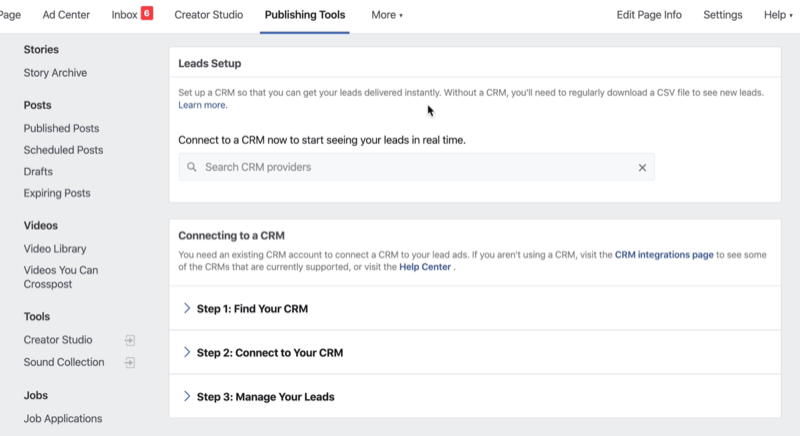
From here, you'll be prompted to search for your CRM. You can then connect it and manage your leads. If your email marketing platform or CRM isn't listed inside Facebook, you can use a tool like Zapier to find an integration that works with your platform.
Conclusion
Facebook lets you generate leads inside of the platform without any third-party software needed. With the built-in Facebook lead form feature, you can add custom questions and fields to your form and then use it in a lead generation ad campaign. To refine your ad targeting and optimize your results, make sure you exclude custom audiences of people who previously interacted with your lead form.
What do you think? Have you tried Facebook lead ads? How have they performed for you? Share your thoughts in the comments below.
More articles on Facebook advertising:
- Learn how to set up standard events and custom conversions to better track leads from your Facebook ads.
- Discover six Facebook advertising mistakes and how to fix them.
- Find out how to use Facebook lead ads without spending any money.
Attention Agency Owners, Brand Marketers, and Consultants

Introducing the Marketing Agency Show–our newest podcast designed to explore the struggles of agency marketers.
Join show host and agency owner, Brooke Sellas, as she interviews agency marketers and digs deep into their biggest challenges. Explore topics like navigating rough economic times, leveraging AI, service diversification, client acquisition, and much more.
Just pull up your favorite podcast app, search for Marketing Agency Show and start listening. Or click the button below for more information.

