Do you blog?
Facebook has released a highly comprehensive plugin for WordPress.
With the new plugin, you can perform sophisticated auto-publishing to your Timeline and add many Facebook features to your self-hosted WordPress blog. (This plugin does not work on blogs hosted on WordPress.com.)
This makes advanced Facebook social sharing features accessible to everyone.
This detailed article tells you how to install and use this powerful plugin.
#1: Install the Facebook Plugin on Your Blog
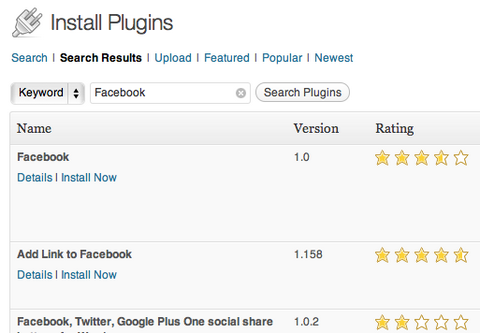
From inside your WordPress admin dashboard, go to the Plugin section and search for “Facebook.” The Facebook plugin for WordPress should appear at the top of the search results.
After clicking “Install Now,” you'll need to activate the plugin.
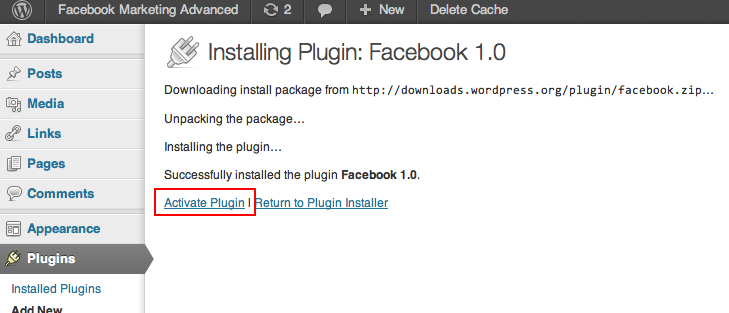
WordPress will guide you through the necessary steps. The next step will be to create your own Facebook application. Don't be afraid, this does not require a single line of code and is a pretty easy process.
#2: Create Your Very Own Facebook Application
In order to benefit from your newly installed Facebook plugin for WordPress, you need to create your own Facebook application.
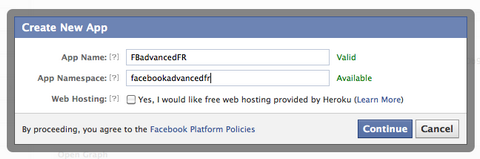
To begin, go to Facebook apps and click on the Create New App button on the top right of your screen.
You'll then be prompted to enter your App Name and your App Namespace. Choose that name wisely. In most cases, the best choice is to name your app after your blog's name, as it will publish on Facebook with this name.
You can use spaces in your App Name (such as “Social Media Examiner”) but not in the App Namespace field (which should read something like “socialmediaexaminer”).
Once your name is defined, you'll be taken to the setup screen. Enter your contact email, your blog's domain, its exact URL in the “Website with Facebook Login” field and its mobile URL if you have a mobile version.
Get World-Class Marketing Training — All Year Long!
Are you facing doubt, uncertainty, or overwhelm? The Social Media Marketing Society can help.
Each month, you’ll receive training from trusted marketing experts, covering everything from AI to organic social marketing. When you join, you’ll also get immediate access to:
- A library of 100+ marketing trainings
- A community of like-minded marketers
- Monthly online community meetups
- Relevant news and trends updates
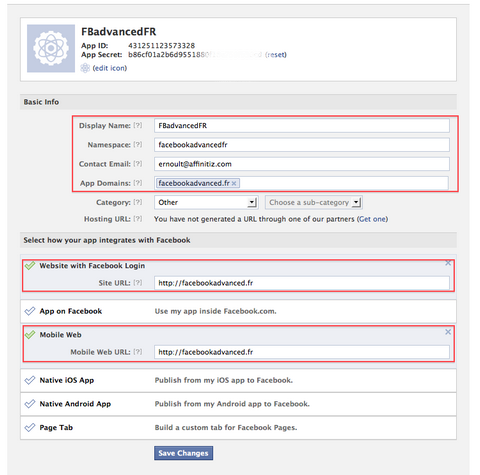
Also, don't forget to personalize your app logo and icon. They'll both be visible with all of your blog publications on Facebook. Don't miss this opportunity to increase your brand's visibility!
These are the only options you need to set in the basic options menu. Don't forget to click Save changes!
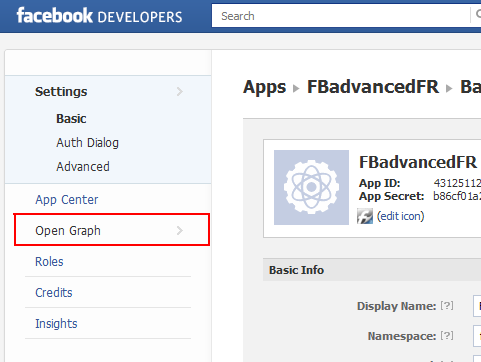
Once these basic options are defined, you need to set the Open Graph actions for your app.
Just click on the Open Graph menu of your app settings.
The next step is to define your action type and your object type. In our case, the action type will be “publish” and the object type will be an “article.”
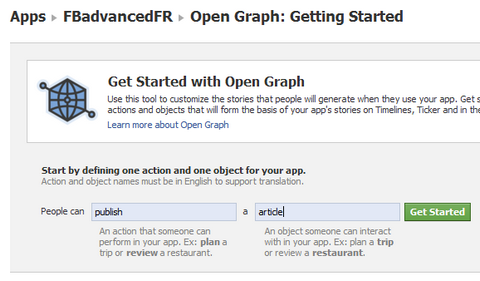
To learn more about how to complete the setup of your Open Graph action, check out this guide from Facebook.
Now that you've successfully created your Facebook application, you need to copy your App ID, App Secret key and App Namespace.
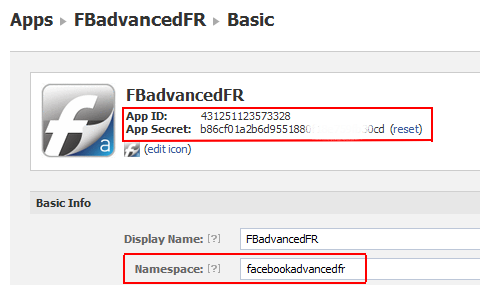
Then go back to your WordPress admin, access the Facebook plugin setup screen and paste this information into the corresponding fields.
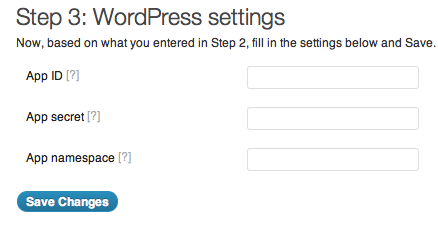
Save changes, and voila! Your Facebook plugin is now fully installed. You can adjust the settings to benefit from its numerous social features.
#3: Set up Your Facebook Plugin for WordPress
Once installed, you can access all of the settings of your Facebook plugin. In a single interface, you can configure:
- Social Publishing features
- The position and design of the Like buttons on your articles
- The Subscribe button to allow readers to follow article authors
- The Send button to ease the one-on-one sharing of your articles by Facebook messages or even emails
- Comments to let your readers comment on your articles with their Facebook identity
- The Recommendations bar to display personalized article recommendations based on your readers' friends' favorites and activate your very own social reader

You can choose to activate all of these options or only the ones you want. It's your call!
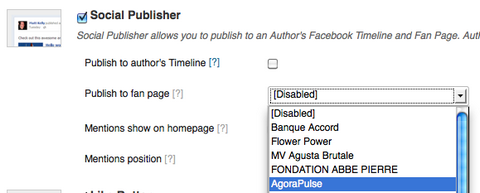
Activate Social Publishing.
The Social Publishing feature is a great way to promote your latest blog post to your friends, your Facebook page or even another Facebook page where the audience may be interested in your article.
Your first option is to activate the automatic publication of your blog post to its author's Timeline.
Then, you can also automatically publish each article to one of your Facebook pages. This is limited to one Facebook page only.
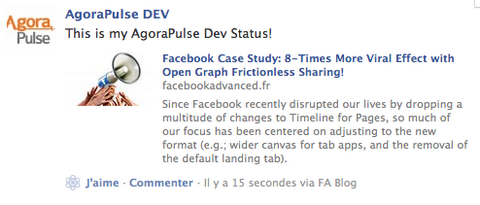
Each of the articles published on your blog will then be automatically published on the Facebook page you selected. When publishing your article, you'll have the option to add a personalized description.
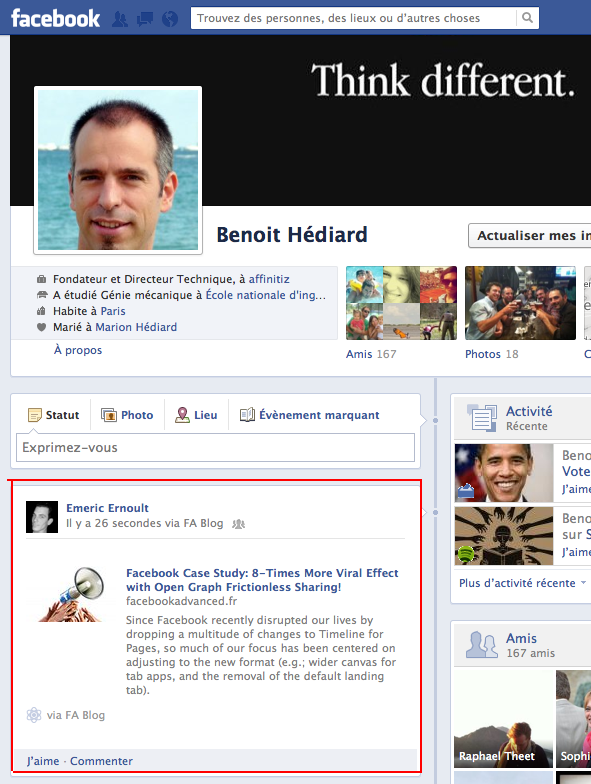
More importantly, if you have activated the Social Publisher, when editing your article you'll have the option to mention friends or Facebook pages.
Just enter the name of your friends and Facebook pages you want to share your article with and Facebook will auto-suggest the appropriate friends and pages.
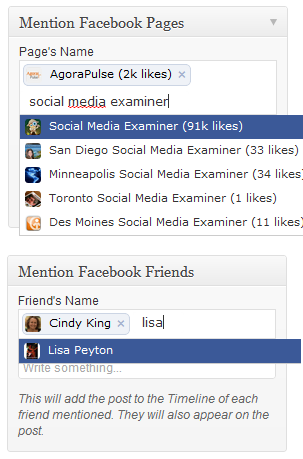
This sharing option is a great way to give some serious visibility to your article as soon as it publishes. Share your article both with friends interested in your article and relevant pages with audiences interested in what you have to say. If you do this wisely, you'll increase your number of blog readers.
Your article will appear on your selected friends' and Facebook page's Timelines just as if you had shared it directly on their Timelines. Another big time-saver!
The update will show that it was made “via” your App Name. This is why you need to choose your name wisely.
Discover Proven Marketing Strategies and Tips
Want to go even deeper with your marketing? Check out the Social Media Marketing Podcast! Publishing weekly since 2012, the Social Media Marketing Podcast helps you navigate the constantly changing marketing jungle, with expert interviews from marketing pros.
But don’t let the name fool you. This show is about a lot more than just social media marketing. With over 600 episodes and millions of downloads each year, this show has been a trusted source for marketers for well over a decade.
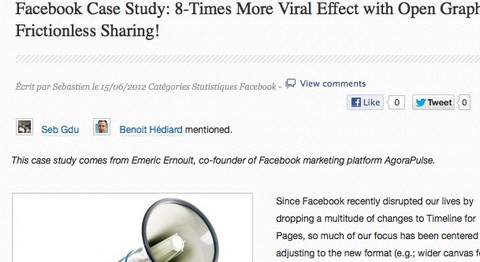
Finally, the friends and pages mentioned at the time you published your article will appear on the blog at the top or bottom of your article, depending on the option you selected in the settings.
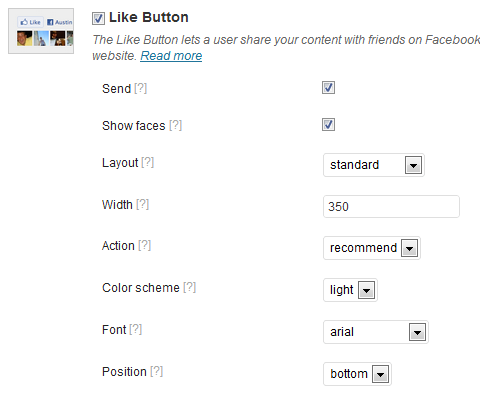
Add Like buttons and set their position and design.
Adding a Like button on your articles is as easy as a walk in the park. You can even add a Send button, choose to show likers' faces (which is recommended), choose the name of the action (Like or Recommend), select its position on the top or bottom (or both) of your article (recommended) and the width allocated to the button.
You can do all of this in the easy process below.
Add a Subscribe button to allow readers to follow the articles' authors.
You can add a Subscribe button on each of your articles. This will allow your readers to subscribe to the authors' public updates on Facebook. This is a great way to give your authors additional visibility on Facebook in recognition for their contribution.
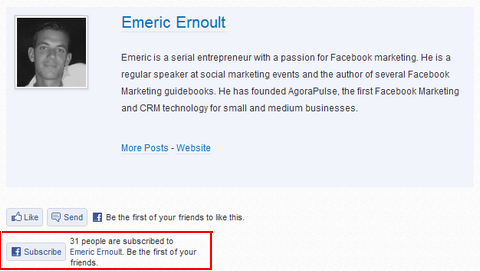
You can adjust the Subscribe button settings to have it appear where appropriate. Usually it's at the bottom of your article, where the author's profile is displayed.
It's also recommended to select the “Show faces” option and select a font in line with the one used on your blog.

Add the Send button to ease one-on-one sharing of your articles.
The Send button is a convenient way to allow your readers to send your articles to a specific Facebook friend (or several friends) or by email.

You can choose where to display a Send button, its color scheme and the font you want to use for it.
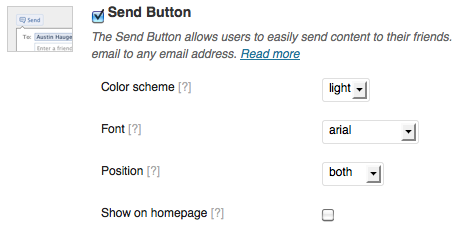
Note that if you set the Like button option to also include a Send button, you won't need to select this Send option a second time.
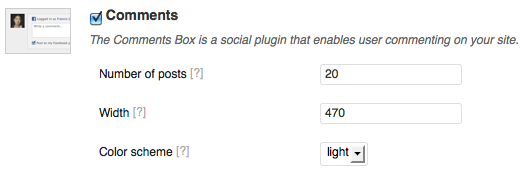
Activate Comments to let your readers easily comment from within their Facebook accounts.
Facebook Comments are the best way to add a social commenting feature to your blog. This will make it easy for your readers to comment on your content using their Facebook accounts AND this will dramatically reduce spam and trolls as commenters use their real identities.
This also boosts your content's visibility as each comment is published on your commenter's Timeline.
These three great benefits are probably why the TechCrunch blog switched to Facebook comments and why you should consider this option for your blog.
The Comments option is pretty straightforward—select the option, fill in the maximum number of comments to be displayed on one page, the width of your comment box—and that's it; your comment plugin is up and running.
Not only do you have a built-in commenting feature under each of your articles immediately…
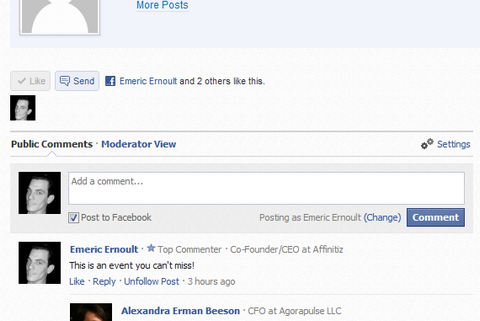
…you also have the number of comments for each article updated in real time.
This Facebook Comment plugin offers great admin options, including some impressive moderation features.
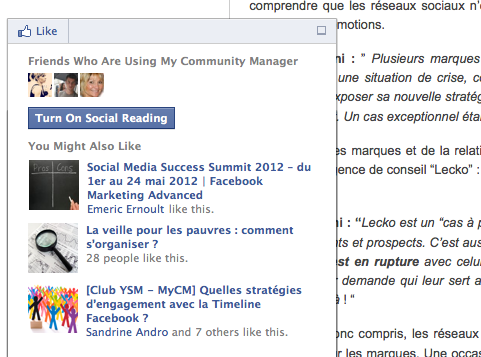
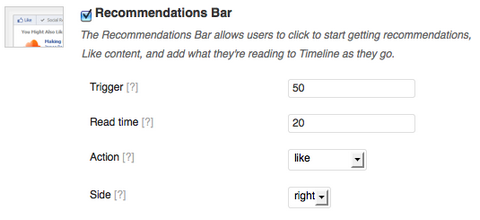
Use the Recommendations bar to display personalized article recommendations based on your readers' friends' favorite articles and also to activate your own social reader.
The Recommendations bar is one of the most powerful features of the plugin. In a nutshell, it does two things:
- It displays a pop-in bar at the bottom of the navigation window to recommend articles to your readers based on what their friends have Liked on your blog.
- It offers a social reader that your visitors can turn on to automatically share all of the articles they read on your blog.
In the settings, you can define when the Recommendations bar will be displayed (after a certain time and/or after having scrolled a certain percentage of the page). You can also choose on which side of the screen it will be displayed.
Note: At the time of this writing, Facebook has temporarily deactivated the automatic sharing of the articles (the “social reader”). Facebook's explanation is that “The Recommendations Bar is currently in beta. [We] have temporarily removed the social reading functionality of the feature as we test the product and iterate further. We'll follow up with updates. Thanks.”
To follow up, visit WordPress Forum discussion.
#4: Measure Your New Social Traffic!
Once you've properly installed and set up all of these great social features, you should see your traffic soar! To help you follow the growth of your new social traffic, the Facebook plugin displays a convenient link to Facebook Insights for your application.
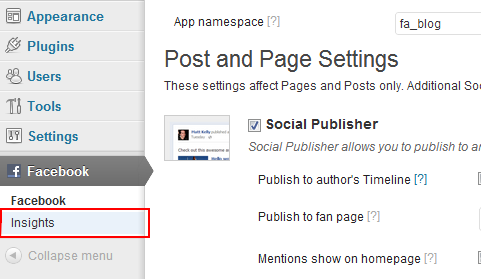
Click that link to access an incredible depth of insights on how Facebook is driving traffic and attracting active readers to your blog.
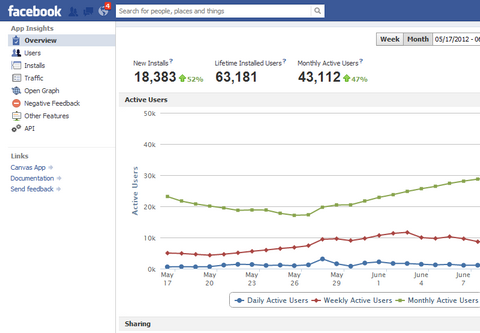
These insights include the number of visitors Facebook has sent to your blog thanks to an action (liking, commenting or sharing) of one of their friends.

The Insights data also includes demographic information about your audience; negative feedback on your application; and number of daily, weekly and monthly users. However, this alone is the subject of another article!
What do you think? Are you convinced the Facebook plugin for WordPress will increase traffic to your blog? Are you willing to install it on your WordPress blog? Let us know in the comment section below.
Attention Agency Owners, Brand Marketers, and Consultants

Introducing the Marketing Agency Show–our newest podcast designed to explore the struggles of agency marketers.
Join show host and agency owner, Brooke Sellas, as she interviews agency marketers and digs deep into their biggest challenges. Explore topics like navigating rough economic times, leveraging AI, service diversification, client acquisition, and much more.
Just pull up your favorite podcast app, search for Marketing Agency Show and start listening. Or click the button below for more information.