Want to create engaging short-form video on Instagram? Have you heard about Instagram Reels?
In this article, you'll discover what Instagram Reels is, learn how to create a reel on Instagram, and discover how to use Instagram Reels for business.
To learn how to make Instagram Reels, read the article below for an easy-to-follow walkthrough or watch this video:
What Is Instagram Reels?
Instagram Reels rolled out to the majority of users in August 2020. The feature is touted as a response to the popularity of TikTok and a way to create similar content within the Instagram platform.
Unlike IGTV, Instagram realized that for Reels to be effective and used regularly, the feature had to be built into the existing Instagram interface. In this way, Reels is very similar to Instagram Stories—and you even access the Reels camera from the same Stories camera.
Here are some quick highlights about reels:
- They're short-form video content in full 9:16 portrait mode.
- They can be from 3–15 seconds in length.
- They can be filmed directly within the Reels camera and/or uploaded from your camera roll on your mobile device.
- They can be filmed as one full take or a series of takes stitched together.
- They're mobile-only. They can only be uploaded on mobile devices.
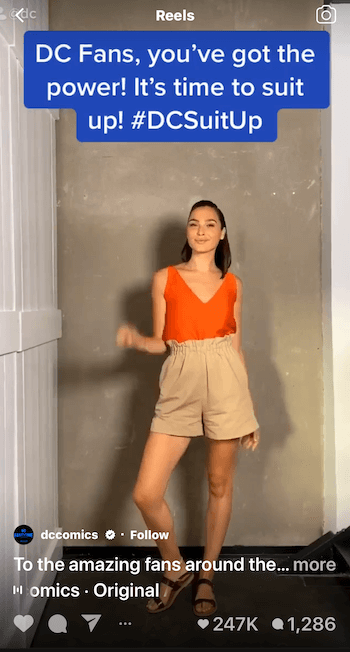
Chances are you've seen reels on Instagram already, even if you didn't realize it. Reels can be uploaded to Stories or the feed in addition to a Reels gallery on your profile, and they can even appear on the Explore page. They're pretty much everywhere!
You'll recognize an Instagram Reels video by the icon in the lower-left corner of the video when scrolling through your feed, or in the upper-right corner when looking at someone's Instagram profile. If someone you follow uploaded a reel, you'll see that video in your home feed as you scroll through.
![]()
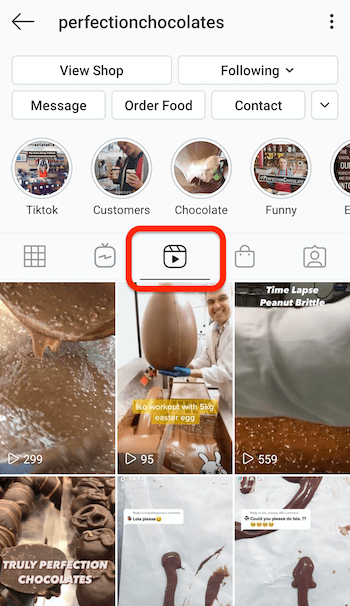
You can also see the reels for an account by going to their profile. If they've uploaded a Reels video to their feed, you'll see the cover image in the grid on their profile like any other post. In addition, the Reels tab on their profile will display any reels they've uploaded, including those they didn't share to their feed.
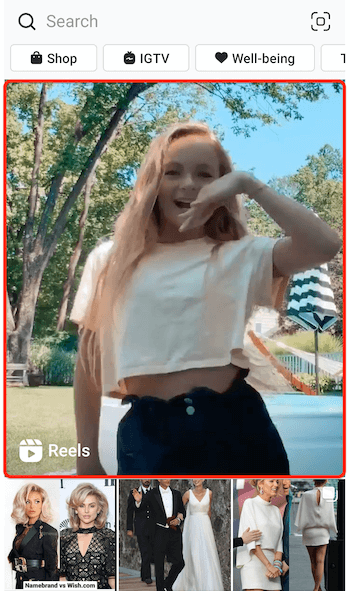
You can also discover reels from other accounts on the Explore page on Instagram. The top of the Explore page will show a big Reels video selected for you. As you scroll through the Explore feed, you'll see more Reels videos interspersed as vertical videos and labeled as Reels.
Get World-Class Marketing Training — All Year Long!
Are you facing doubt, uncertainty, or overwhelm? The Social Media Marketing Society can help.
Each month, you’ll receive training from trusted marketing experts, covering everything from AI to organic social marketing. When you join, you’ll also get immediate access to:
- A library of 100+ marketing trainings
- A community of like-minded marketers
- Monthly online community meetups
- Relevant news and trends updates
Once you view one video from the Explore feed or your home feed, you can swipe up to scroll through more videos within Reels and find fun new content from other creators.
Businesses Uses for Instagram Reels
Now that you know what Instagram Reels is, you may be wondering how to use this feature for your brand or business.
It's worth pointing out that not all reels (or TikTok videos for that matter) are just dancing or music. In fact, because business accounts don't have the music option, you're most likely going to have to find other ways to use these videos.
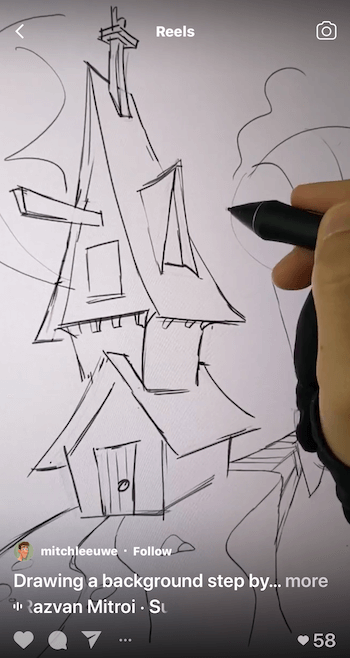
If you do tutorials or step-by-step videos for products or tips in your industry, you can definitely create similar-style videos for Reels. You could do some quick behind-the-scenes or meet-the-staff videos to showcase what your company is doing.
If you're in the fashion industry, there are lots of fun ideas out there for showing off clothing combinations and styles.
Stop motion videos, where one scene ends and jumps into the next, are really popular. If you have a product that requires assembly, you could create a fun video that shows the progression of building the product from start to finish.
It's worth noting that most people watching reels aren't going to read a caption, especially a long one. If you have a call to action (CTA) or key point to stress in your post, make sure it's in the audio and any text overlay on the video so the viewer does see and hear it.
#1: Create an Instagram Reel
Before you jump headfirst into creating reels, I recommend scrolling through the Reels feed on the Explore page and looking at the reels of other accounts or brands you like. Get a feel for what works, what you like, and what inspires you to create.
When you're ready to get started creating your own reels, here's what you need to know.
You access the Reels camera from the original Stories camera. You can get there by swiping right from your Instagram home feed (not from your profile). At the bottom of the screen, you'll see three options: Live, Story, and Reels. Scroll to Reels to open the camera.
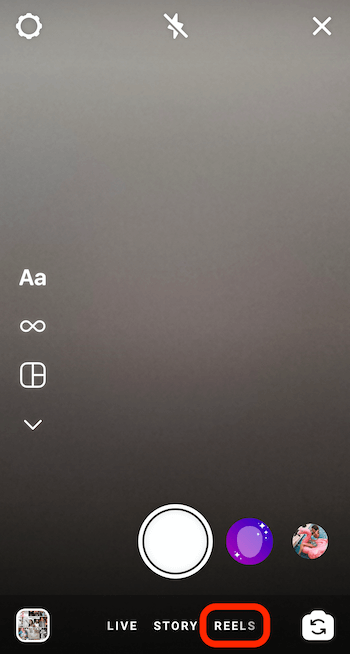
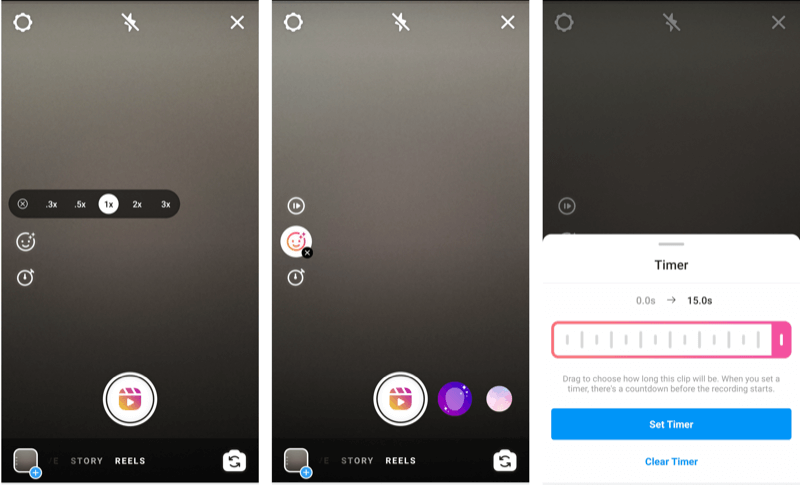
Once the Reels camera opens, you'll see navigation tools on the left side of the screen. At the top left is the Settings gear icon, which retains the same settings as for your Instagram Stories. The icons in the middle of the screen are for shooting and editing your videos.
If you want to add creative effects to your clips, you have to select them before you record. You can't go back and add or edit clips for these features after you've recorded a reel.
Instagram business profiles will have access to these three features along the left edge of the screen:
- Speed: Tap on Speed to select faster or slower recording speeds.
- Effects: Tap on Effects and scroll through the filter options at the bottom where the shutter button is. If you don't find the right option in the effects provided, there's an option to browse effects at the end of the scroll.
- Timer: Tap on the clock icon to set a timer for recording so you can do hands-free recordings.
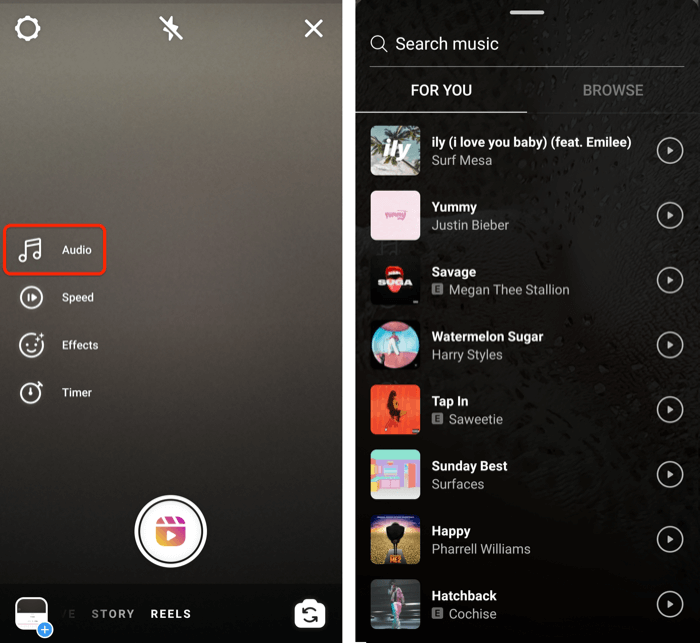
Instagram personal and creator profiles will have access to the same three features plus the audio (or music) feature on Reels. You can search through suggested audio clips, popular music, or genres to use in your video.
Once you've selected your effects, it's time to record an Instagram Reels clip. Press and hold the large shutter button at the bottom of the screen to record.
You can record multiple clips, up to 15 seconds total. As you record, you'll see a progress bar move across the top of the screen (from left to right) as you approach 15 seconds. After you record your clip, the progress bar will indicate the total length of your video and the number of clips you've recorded so far.
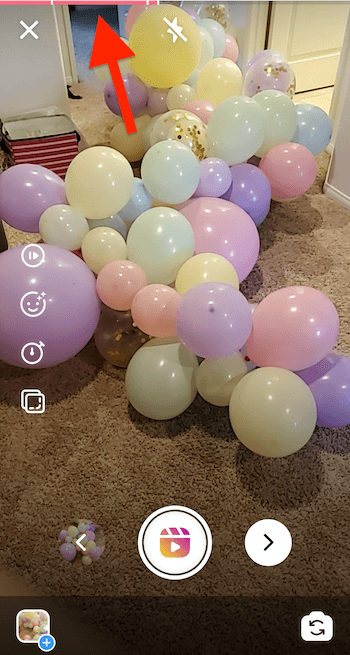
Once you've filmed your clip, you'll see two arrows on either side of the shutter button. The left-pointing arrow is a replay of the clip you just filmed.
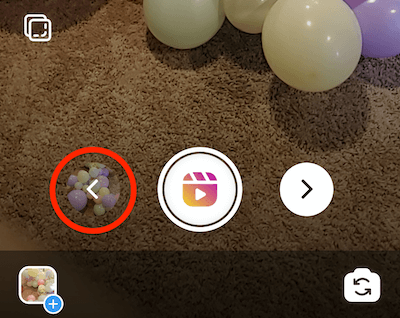
If you tap on the left-pointing arrow, you can trim or delete the clip.
To trim the clip, tap on the scissors icon. You'll see a timeline for the clip on the next screen. Drag the start and end bars of the clip to mark where you want the video to start/stop. When you're done, tap on Trim in the upper-right corner.
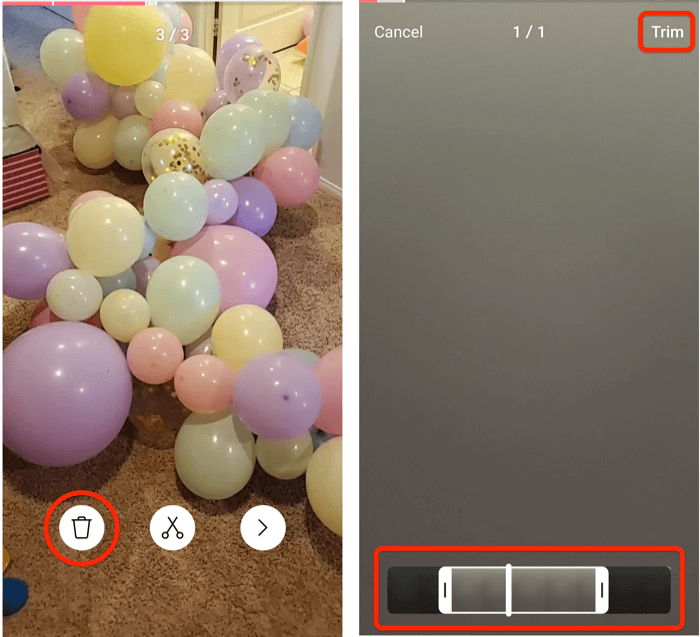
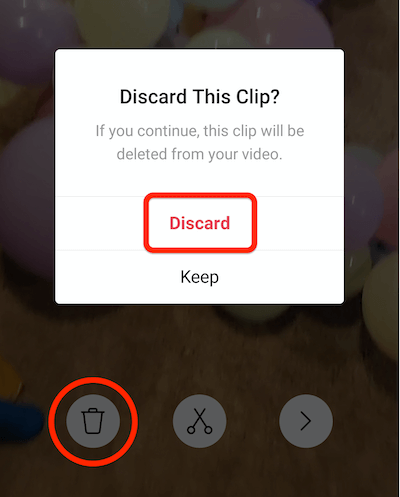
If you want to discard the clip, tap the trash can icon and confirm your choice to discard the clip. Tap the right-pointing arrow to return to the Reels camera.
In addition to filming with the Reels camera, you can upload videos from your camera roll. The platform only supports videos so you can't upload images.

Discover Proven Marketing Strategies and Tips
Want to go even deeper with your marketing? Check out the Social Media Marketing Podcast! Publishing weekly since 2012, the Social Media Marketing Podcast helps you navigate the constantly changing marketing jungle, with expert interviews from marketing pros.
But don’t let the name fool you. This show is about a lot more than just social media marketing. With over 600 episodes and millions of downloads each year, this show has been a trusted source for marketers for well over a decade.
To access your camera roll, tap on the small square at the bottom-left corner of the screen, which shows your most recent camera roll item. Scroll through your camera roll to the video of your choice and select it to import it into Reels.
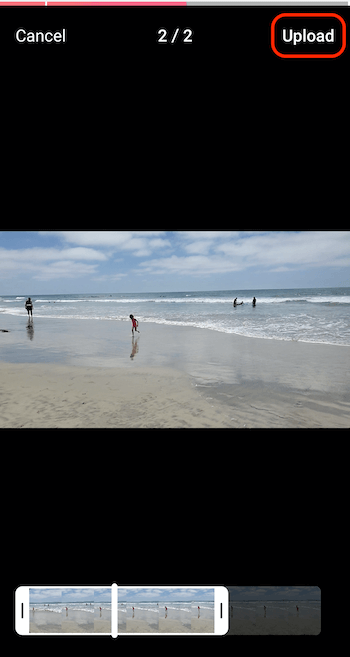
If you import a video that's longer than 15 seconds or the amount of time left in your current Reels video, the imported video is cropped to the allowed time. Select the portion of the video to upload and then tap Upload in the upper-right corner to add it to your Reels creation.
If you want to film another clip for your Instagram Reels video, tap and hold the shutter button, repeating the steps above to film your next clip. Remember that if you want to add the same music or effects to the next clip, you have to select them before you begin filming.
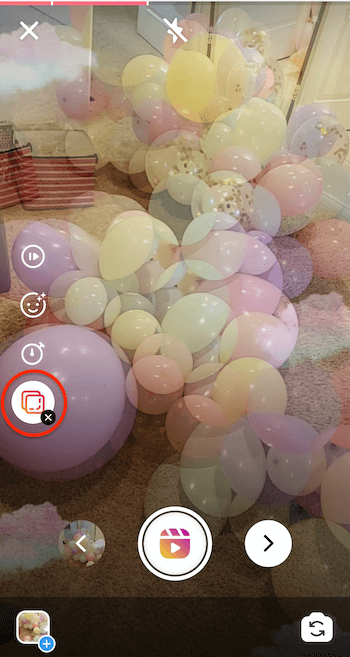
To line up your shot with the last one you took, use the Align tool (the icon with two squares) on the left side of the screen. This will create a translucent copy of the last frame of your last clip so you can line up the new clip and create a more seamless transition between clips.
When you're happy with your complete video clip, tap the right-pointing arrow next to the shutter button to move to the next stage of creating your reel.
Now you can use the icons at the top of the Reels camera to add stickers, text, and doodles to the clip, much like you're accustomed to in Instagram Stories. Tapping the down-pointing arrow in the top toolbar lets you save the video clip to your camera roll.

#2: Post Reels Content to the Instagram Reels Feed, Your Feed, and Stories
When you're done creating your reel, tap on the right-pointing arrow at the bottom of the screen next to the frame-by-frame player of your video. You'll be taken to the Share screen to format your video for sharing to Reels, your feed, and/or Stories. You'll see two tabs at the top of this screen: Reels and Stories.
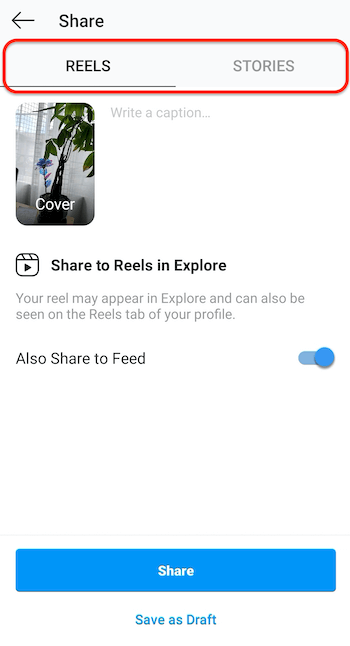
Important: If you want to share a reel to your story, you have to share it to your story first from this Share screen. Once you share it to your feed or Reels or save the video as a draft, you'll no longer have the option to share it to your Stories.
To share an Instagram Reels video to your Stories, tap on the Stories tab on the Share screen and tap the Share button next to Your Story. You can also share it to your Close Friends list or as a direct message to an individual or group.
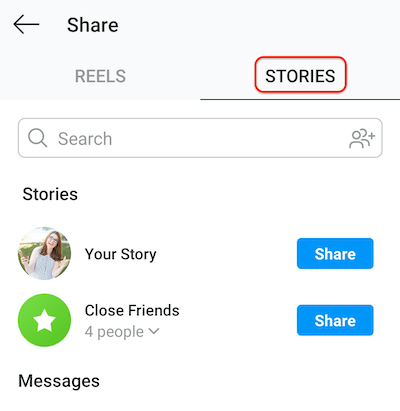
When you tap the Share button to share the reel to your story, the video is uploaded as-is. You can't add stickers, tags, or anything else to the post.
Tap on the Reels tab to edit and format the video for upload to your feed and/or your Reels gallery. To edit the cover image for the video, tap on the thumbnail image where it says “Cover.” The selected cover image is the large image in the center of the screen.
Drag your finger across the video player at the bottom of the screen to select the ideal video frame as your cover image. The cover image in the display will update when you choose a new frame. When you're finished, tap Done.

Now add a caption to your video. You can use up to 2,200 characters and 30 hashtags, just as you would in a regular feed post on Instagram.
Warning: If you exceed 2,200 characters or the 30-hashtag limit, your video won't post with the caption. Make sure you don't exceed those limits. And you may want to copy your caption before you post the video just in case.
Once your post is ready to upload, you can choose where to share it. It will automatically go to the new Reels gallery/tab that appears on your Instagram profile. You can also share it to your feed for your followers to see when they're scrolling through their feeds. If you don't want to share the video to your feed, tap on the slider for that option so it will only upload to your Reels tab.
If you're not ready to share the post publicly but want to save it for later, tap the Save as Draft option at the bottom of the screen. This will save the video file as-is. You'll then be able to go back and add more clips, update your caption, and so on at a later date.
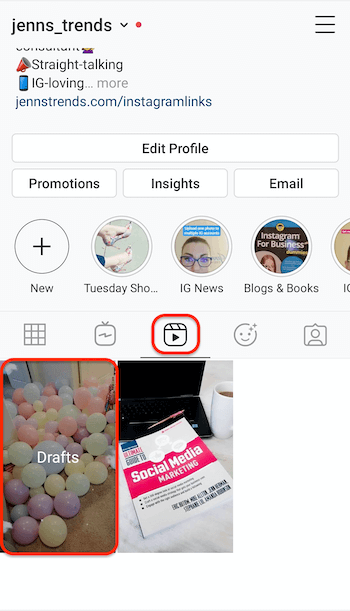
To access your saved drafts, go to your Instagram profile and tap on the Instagram Reels icon directly above your grid of posts. You'll see a placeholder for Drafts. Tap on that to access your saved drafts and select the video to edit. Continue editing using the steps mentioned above.
#3: Delete an Instagram Reel Video or Remove It From Your Grid
Once you've uploaded at least one Instagram Reels video to your profile, you can tap on the Reels icon on your profile to access the videos. They're displayed chronologically and the view counts for each video are shown on the cover image. The view counts are visible to anyone looking at your account or Reels videos.
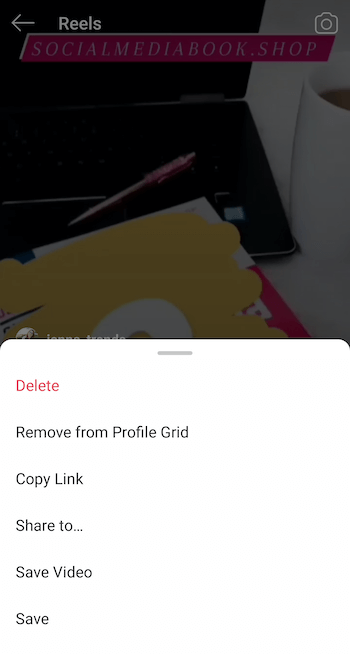
If you tap on the three-dot button next to the like/comment/share icons at the bottom of your video (in the full video player mode), you can access additional functions for that video. From here, you can:
- Delete the video from your Reels tab.
- Remove the video from your grid (but leave it on the Reels tab).
- Grab/copy the video URL to share with others.
- Share the video URL to another platform or delivery option (like email).
- Save the video to your mobile device.
Limitations of Instagram Reels
As with any new feature, there are currently a significant number of limitations to using Instagram Reels. If you're familiar with TikTok, you'll notice a lot of TikTok features aren't available in Reels. Even if you're accustomed to using Instagram Stories, you're going to feel like Reels is missing some key functionality.
In addition to the warnings and suggestions listed above, here are some other limitations to be aware of:
- There's no progress bar when viewing a reel so you don't know how long it is (but at a max of 15 seconds, it's not a huge problem).
- You can pause a reel when watching it but you can't rewind or fast-forward it. You have to let the video play out and then it will loop back around again.
- For a reel you've created, you can't edit the caption after uploading it. This is incredibly frustrating if you made a typo or need to edit it. In this case, you would need to delete the video and re-upload it (assuming you saved the video) after making your changes.
- The caption for any reel is there on the video but the preview shows only one line of text. Viewers have to tap the More at the end of the line to read and scroll the whole caption. This isn't ideal for long captions or CTAs.
- There aren't any Insights available for Instagram Reels. The video thumbnail will show you total view counts but there's no data for likes, comments, clicks, followers, or other metrics. And the Insights tab on your profile doesn't currently list any details about your reel. However, if the post was uploaded to your feed, that reach does count toward your account's overall reach for the week.
Conclusion
Instagram Reels was much anticipated and a lot of brands are looking for ways to capitalize on this platform. While many people are repurposing their TikTok videos to Reels, if you really want to stand out, focus on creating unique content for Reels that works within the scope of your brand voice and style.
Make sure to test creating content and get used to the limitations of Reels before you're too committed to creating your brand content as well. Once you have a grasp of the process to film, edit, and upload videos, have fun!
What do you think? Have you created any Reels videos yet? Are you going to give it a try after reading this? Please share your thoughts or tips in the comments below.
More articles on Instagram video:
- Explore seven ways to use Instagram video for business.
- Discover apps to edit and produce creative Instagram Stories video.
- Find six ways to use IGTV to grow your brand's visibility with a new Instagram audience.
Attention Agency Owners, Brand Marketers, and Consultants

Introducing the Marketing Agency Show–our newest podcast designed to explore the struggles of agency marketers.
Join show host and agency owner, Brooke Sellas, as she interviews agency marketers and digs deep into their biggest challenges. Explore topics like navigating rough economic times, leveraging AI, service diversification, client acquisition, and much more.
Just pull up your favorite podcast app, search for Marketing Agency Show and start listening. Or click the button below for more information.

