 Need to manage your Facebook ad spend more effectively?
Wondering how Facebook's Automated Rules feature can help?
In this article, you'll learn how to set up automated rules to better manage the costs of your Facebook advertising campaigns.
Why Use Automated Rules for Facebook Ad Campaigns?
As your number of Facebook campaigns grows, optimizing them manually becomes increasingly time-consuming. One way to free up some of your valuable time is to set up automated rules.
Facebook's automated rules feature is a hidden gem for improving Facebook ad performance without relying on manual optimization. It can save busy Facebook advertisers time, energy, and resources. By combining different KPI metrics when defining rule conditions, you can design your custom automation workflow on Facebook. It may require some trial and error to find the right automated rules, but it's worth the investment.
With automated rules, you set predefined conditions for key performance indicators (KPIs) such as likes, reach, and leads, and ad campaign elements (campaigns, ad sets, ads, etc.) in your Facebook ad accounts. Facebook will check the condition you set at specific time intervals, and when a campaign meets that criterion, it will take your predefined action, essentially saving you time and money.
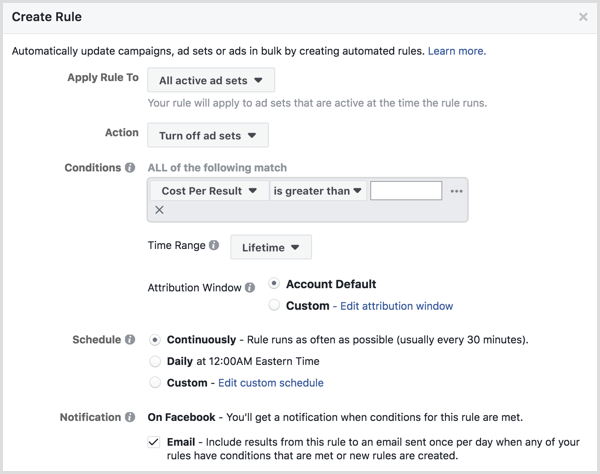
It's the “if this then that” concept that automation platforms like IFTTT and Zapier use. If a predefined condition is met, take the predefined action. For example, you might set up a rule that if cost per click (CPC) for a particular ad set increases beyond $X, turn off that ad set.
So now that you understand how automated rules work, here's how to get started.
#1: Decide What Campaign Level Your Rule Will Apply To
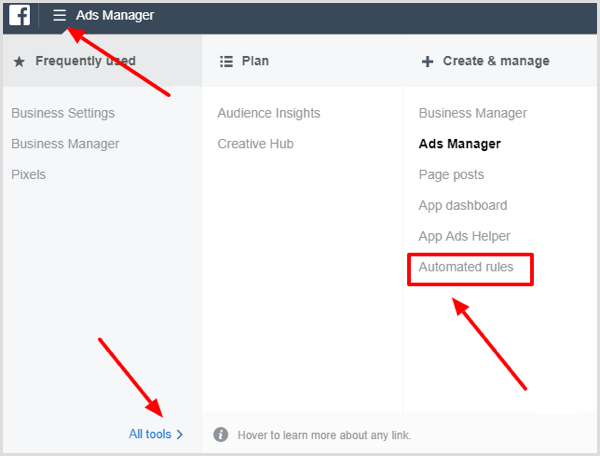
To create an automated rule for all active campaigns, ad sets, or ads, open Facebook Ads Manager and click the menu icon (with the three lines) in the top-left corner. In the pop-up menu, hover over All Tools and then select Automated Rules under the Create & Manage column.
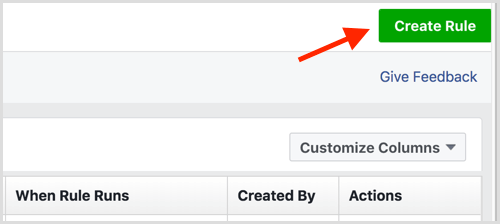
In the next window, click the Create Rule button in the top-right corner.
Get World-Class Marketing Training — All Year Long!
Are you facing doubt, uncertainty, or overwhelm? The Social Media Marketing Society can help.
Each month, you’ll receive training from trusted marketing experts, covering everything from AI to organic social marketing. When you join, you’ll also get immediate access to:
- A library of 100+ marketing trainings
- A community of like-minded marketers
- Monthly online community meetups
- Relevant news and trends updates
In the Create Rule dialog box, you'll find various options to configure your automated rule. All of these options may seem daunting at first, so we'll look at each one in turn.
First, you need to select the campaign level for which you want to apply this rule. Your options are All Active Campaigns, All Active Ad Sets, and All Active Ads.
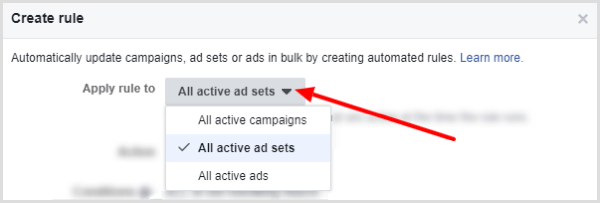
Note: If you prefer to apply a rule condition to only one or several campaigns, ad sets, or ads, check out this guide to setting up Facebook automated rules for only specific campaigns.
#2: Select the Action You Want Facebook to Take
Next, you choose what happens when your rule condition is met. The first two options are to turn campaigns, ad sets, or ads off or on.
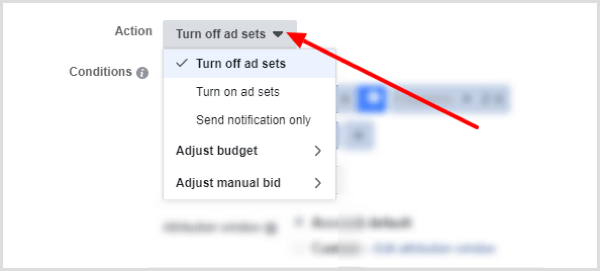
Or you can simply have Facebook send you a notification when your condition is met. Then you can take action manually if needed.
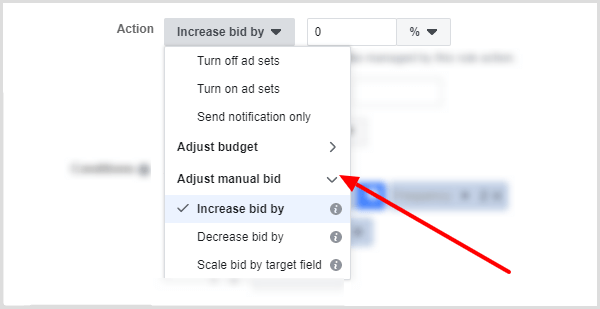
The final two options are to adjust your budget or manual bid.
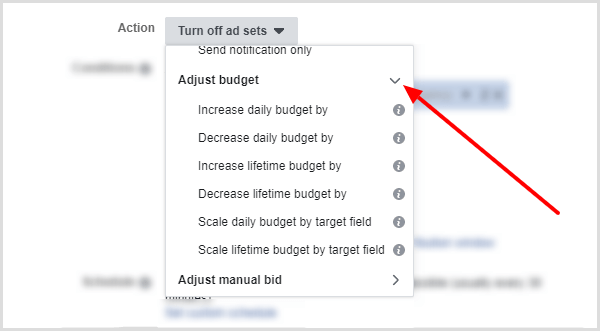
You can increase or decrease daily/lifetime budget or manual bid by a certain percentage/amount when the condition is met.
#3: Define the Condition for Triggering Your Action
Now you're ready to set up the rule condition that determines when the rule will run and trigger your action.
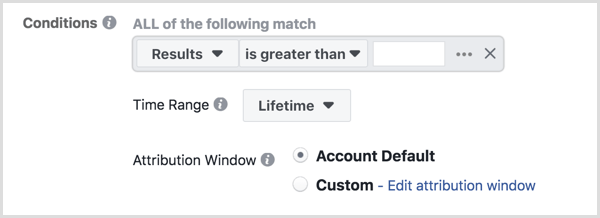
Select a KPI Metric
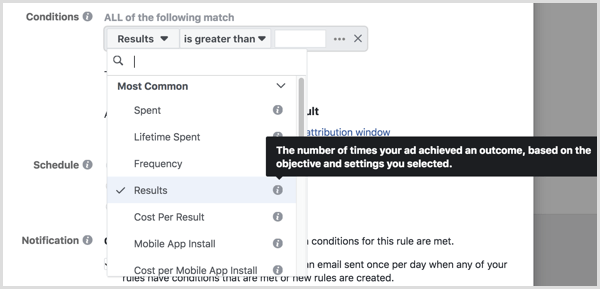
First, choose a KPI metric from the Results drop-down list. Facebook offers more than 50 metrics to choose from for your rule condition. The most popular options are listed first (Spent, Lifetime Spent, Frequency, Results, etc.). If you're not sure where to begin, start with KPIs that bring major performance boosts and can be applied in multiple situations.
Tip: If you're not sure what a particular metric is, hover over the “i” icon to the right of it to reveal a tooltip with more information.
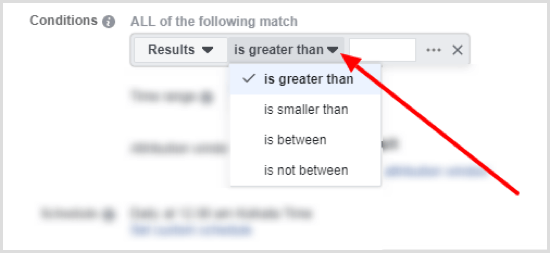
Choose a Logical Expression and Value
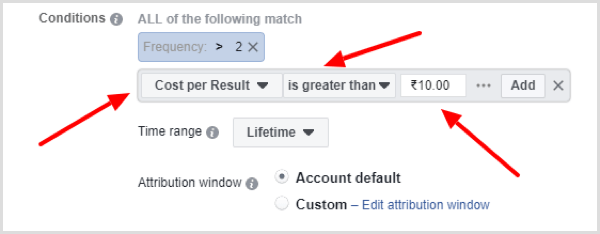
Next, select a logical expression to add to your condition. In the second drop-down menu, your choices are Is Greater Than (the default), Is Smaller Than, Is Between, and Is Not Between. What you choose here determines the scope or flexibility for the KPI you selected.
To the right of logical expression is an input field. This is where you enter a value for the condition you selected. For instance, if you selected Frequency … Is Greater Than, enter 2 in this box to trigger the action when the frequency exceeds 2.
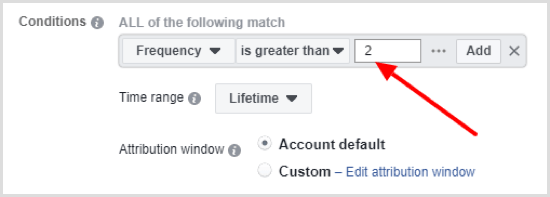
When you're finished defining your condition, click Add to apply it.
Note that you can set multiple conditions in a single rule for more advanced automation. After you click Add, Facebook gives you the option to define another condition for the rule. Click the + button to add another condition.
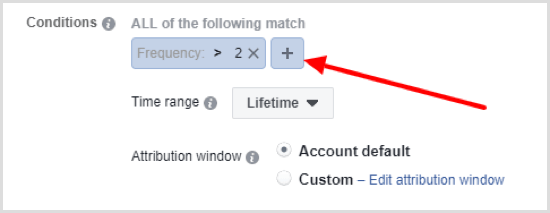
To illustrate, you might combine the frequency condition with a cost per result condition. Restricting frequency to 2 will help stop ad fatigue, but as long as the desired results are less than the target cost, letting ads run poses no problem. It also means that audience has more ad tolerance.
Select a Time Range
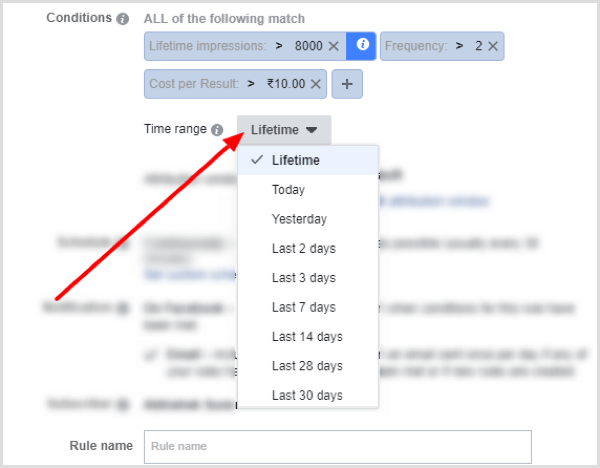
From the Time Range drop-down list, choose the number of days of data for Facebook to look at to assess the rule condition. You can apply the rule based on lifetime data, data from the last 7 days, 14 days, and so on.
Modify the Attribution Window
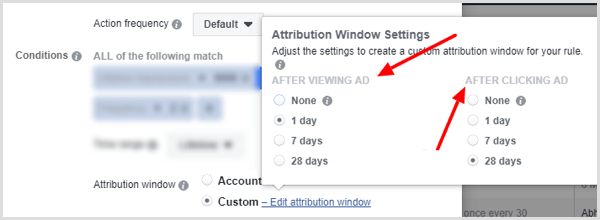
The attribution window defines how Facebook will attribute conversions/results to determine conditional parameters. The default settings are 1 day after viewing the ad and 28 days after clicking the ad.
To define a custom attribution, select the Custom option and click the Edit Attribution Window link. Then select the number of days for conversions that occur after viewing and clicking the ad.
Set a Schedule

Discover Proven Marketing Strategies and Tips
Want to go even deeper with your marketing? Check out the Social Media Marketing Podcast! Publishing weekly since 2012, the Social Media Marketing Podcast helps you navigate the constantly changing marketing jungle, with expert interviews from marketing pros.
But don’t let the name fool you. This show is about a lot more than just social media marketing. With over 600 episodes and millions of downloads each year, this show has been a trusted source for marketers for well over a decade.
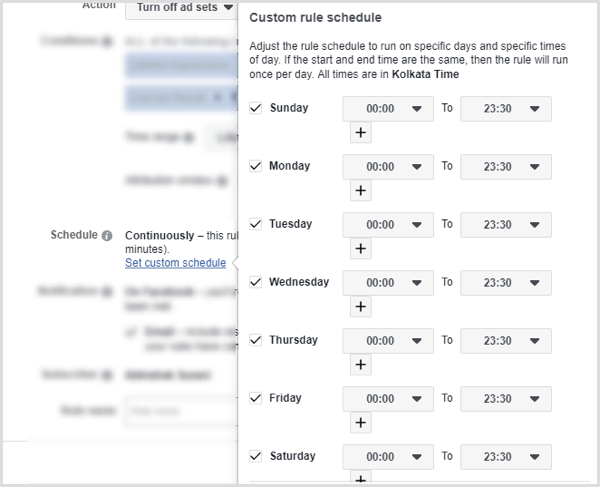
Under Schedule, specify how often Facebook should review ad account data to check the rule.
If you select Continuously, Facebook will check the automated rule condition as often as possible, which is generally every 30 minutes.

If you click Set Custom Schedule, you can define days and times when you want Facebook to check the rule.
Choose Notification Preferences
Facebook will send you a notification when the rule's conditions are met and the action is triggered. In addition, you have the option to receive notification via email.

Note that anyone who has access to the Facebook ad account will receive a notification for automated rules.
The choice of turning on email notifications depends on how many rules you set up and how frequently you want Facebook to run them. For a few rules, the email option can work, but if you have more than 10 rules, email notifications can become annoying.
There's another way to see rule changes, which we'll discuss later in this article.
Add a Rule Name
The last step is to type in a name for your ad rule and click Create. If you're planning to set up multiple rules, choosing a descriptive name will help you avoid confusion.

#4: Manage Your Automated Rules
After you click Create, Facebook brings you back to the Automated Rules dashboard where you can manage your rules and view results.
Manage Rules
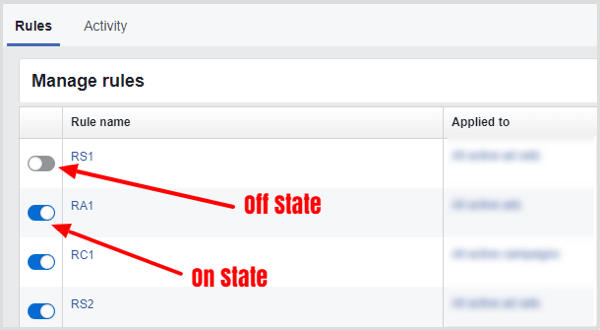
Click the Rules tab to see all of the rules you've set up, both active and paused.

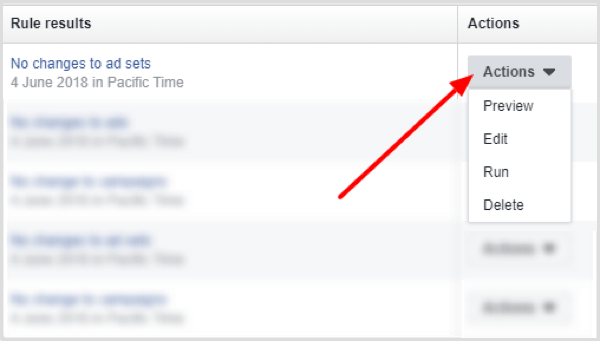
Using the Actions drop-down menu to the right of each rule, you can preview, edit, run, or delete the rule. If you select Preview, you can run the rule to see a preview of which campaigns will be affected.
Use the switch to the left of a rule to turn it off or on.
View Rule Activity
While Facebook gives you the option to receive Facebook notifications and emails about rules activity, it can be a cumbersome way to track activity. If you miss an email or notification, it may negatively affect your campaign performance.
An easier way to track activity is to open the Activity tab. Here you'll see a summary of rule activity.
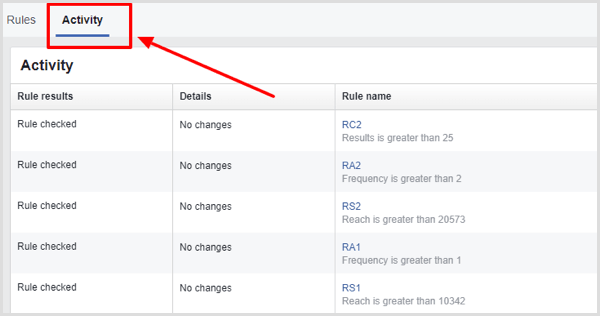
By default, this tab shows data from all of your rules, whether they make any changes in campaign levels or not. But you can filter this data to see changes made at different campaign levels (campaign, ad set, or ads) and only view activity reports related to these filtered rules.
To filter your rules, select the Hide Rule Results With No Changes checkbox in the top-right corner. You'll then see a list of all automated rules that actually made changes in the account.
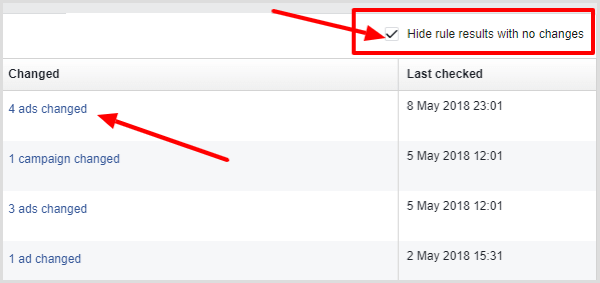
If you click a link in the Changed column, Facebook opens Ads Manager and you can see the exact changes selected in the account.
For instance, if you click the first link in the image above, you can see the four ads selected.
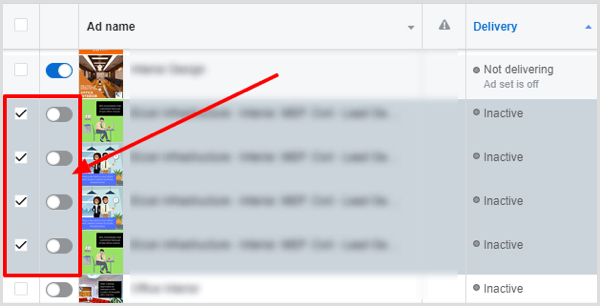
Tip: If you manage multiple Facebook automated rules, you can check all rules' activity once a day on the Activity tab and then make any necessary changes to an automated rule based on changes it made the previous day.
5 Facebook Rules That Will Turn Off Non-Performing Campaigns, Ad Sets, or Ads
Now let's look at five rules you can set up to stop non-performing ad campaigns, ad sets, or ads, whichever campaign level you want to control. You can use these rules individually or in combination, and customize them with your input values.
Rule #1: When ad frequency increases, it leads to decreased click-through rate (CTR) due to ad fatigue. With a lower CTR, you have to pay more for each impression, leading to decreased campaign performance. This automated rule will turn off the selected campaign level when the CTR goes below a target percentage (5%, for example) along with two other matching conditions:
- Frequency > 2
- CTR < 5% (you can choose a different percentage depending on your expectation)
- Lifetime impression > 8,000 in lifetime duration
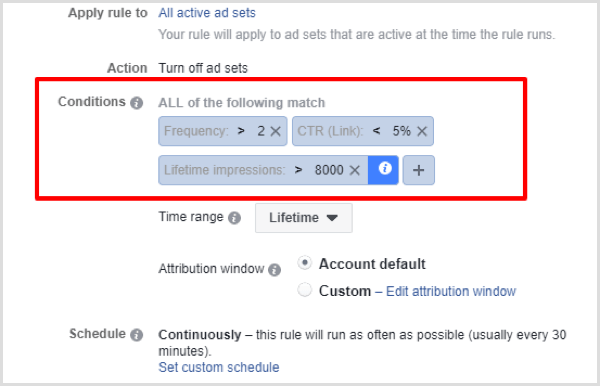
Rule #2: As discussed above, when CTR decreases, it leads to increased ad costs. With this rule, you can keep CPC/CPA under control when CTR drops below the target.
This rule turns off campaigns, ad sets, or ads (depending on what you choose at Apply Rule To step) when the following conditions are met:
- CTR drops below 5%.
- CPC/CPA goes above the target cost (10, for instance).
- The selected campaign level receives more than 2,000 impressions in the Yesterday time range.
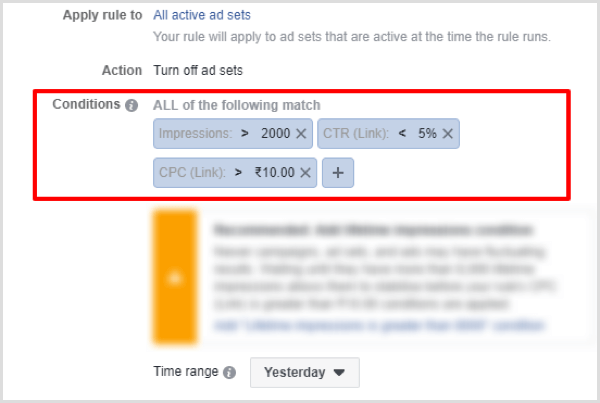
Keep in mind that Facebook by default recommends using 8,000 lifetime impressions. However, because this rule is based on accumulated data from “yesterday,” it uses 2,000 impressions instead of 8,000 lifetime impressions as the condition.
Rule #3: This automated rule works best when you want to A/B test different ad sets without looking back to determine a winner manually. Instead of direct-cost metrics like CPC or cost per result, this rule is based on a target CTR. At the end of the day, your CTR represents the ad engagement level better than CPC or cost per result.
This rule will turn off ad sets when these conditions are met:
- CTR drops below the target percentage (in this case 5%).
- Audience reach for the ad set targeting is more than 5% of the total audience size.
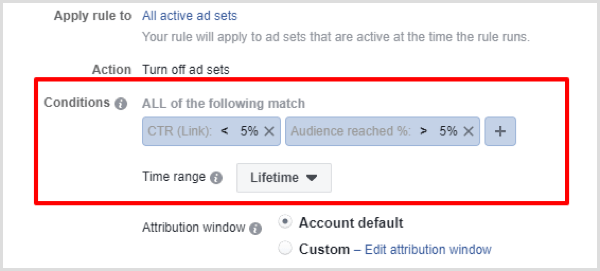
Rule #4: This is another automated rule for A/B testing ad sets and ads. Sometimes despite a good CTR, you don't get the expected number of results for your selected objective. When you check the campaign, it's too late; you've already spent the entire budget for the ad or ad set.
This rule will help you solve that issue to some extent. It will turn off the ad set or ad when the following conditions are met:
- The number of results is less than X (in this case 5).
- You've spent half of the lifetime budget of the ad set or ad.
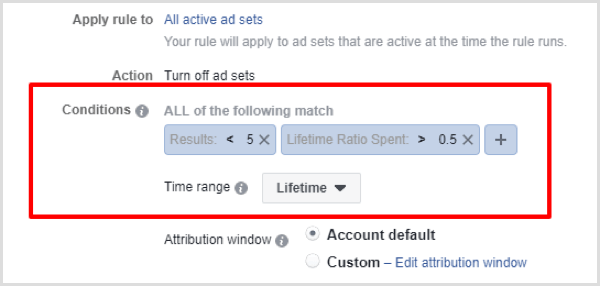
Facebook defines the lifetime ratio spent as “the ratio (between the number 0.0 to 1.0) of how much money you have spent over the lifetime of your ad or ad set to the lifetime budget.” In other words, it represents the percentage of lifetime budget spent on an ad set or ad where 0.5 represents 50% of the lifetime ratio spent.
Rule #5: The result rate represents the percentage of results you received out of all of the views of your ads. As an example, if you get 2 results out of 100 views, your result rate will be 2%.
This rule lets you turn off campaigns, ad sets, and ads when the following conditions are met:
- The result rate drops below X% (in this case 2%).
- The impressions in the Yesterday time range exceed 3,000.
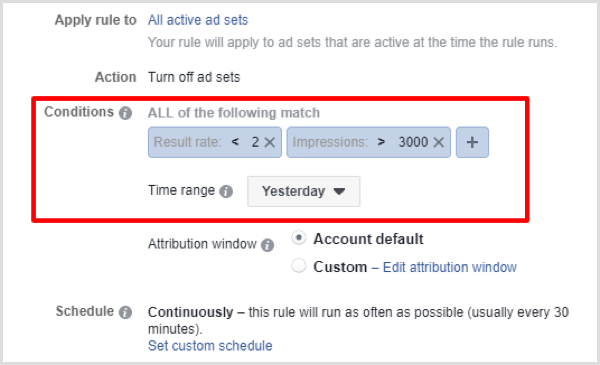
This rule helps you control campaign performance by taking advantage of result rate concepts.
Want more like this? Explore Facebook Ads for Business!
What do you think? What Facebook automated rules have you set up? How have they impacted your ad performance? Please let us know in the comments.
Attention Agency Owners, Brand Marketers, and Consultants

Introducing the Marketing Agency Show–our newest podcast designed to explore the struggles of agency marketers.
Join show host and agency owner, Brooke Sellas, as she interviews agency marketers and digs deep into their biggest challenges. Explore topics like navigating rough economic times, leveraging AI, service diversification, client acquisition, and much more.
Just pull up your favorite podcast app, search for Marketing Agency Show and start listening. Or click the button below for more information.

