Have you used Google Analytics to get an idea of what content your audience responds to most?
Have you tried split testing?
Using Google Analytics gives you an idea of which social media tactics are working so you can change directions if needed.
In this article you'll discover how to use Google Analytics for informal split testing.
Why Use Google Analytics for Split Testing?
Split testing is a crucial part of any digital marketing strategy. Unfortunately, unless you're running high-budget ad campaigns, it's nearly impossible to test different creative on social media using traditional split testing formats.

Luckily, Google Analytics offers a free and easy option to compare how much traffic two variables—creative A vs. creative B—are sending to your website and what those visitors are doing once they get there.
All you need are two variables to test, links back to your website and of course, Google Analytics.
While a Google Analytics test isn't statistically significant, it does provide anecdotal data you can use to improve your current social media content tactics.
#1: Choose Variables and Creative
Variables can be just about anything—determining when to post, what to post or maybe which call to action (CTA) results in the most click-throughs.
If you want to test the best time of day to post, choose two designated timeframes. If you want to test response to a topic, select two distinct topics. For a CTA test, pick two CTA phrases to compare.
The image below shows you some options for split testing.
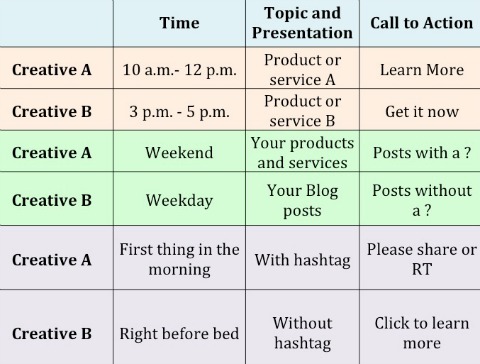
When you've established your variables, decide on two types of creative to use. Each variable is either creative A or creative B.
Just make sure whatever creative you choose can be applied to multiple posts over a designated period of time and link back to your website so Google Analytics can track the results.
Get World-Class Marketing Training — All Year Long!
Are you facing doubt, uncertainty, or overwhelm? The Social Media Marketing Society can help.
Each month, you’ll receive training from trusted marketing experts, covering everything from AI to organic social marketing. When you join, you’ll also get immediate access to:
- A library of 100+ marketing trainings
- A community of like-minded marketers
- Monthly online community meetups
- Relevant news and trends updates
Now that doesn't mean each creative has to link to the same page on your website—as long as the landing page is tracked in Google Analytics, it'll work! (I'll tell you how to track everything in #4.)
#2: Choose a Social Channel and Timeframe
Before you start the testing process, determine the social channel and timeframe you want to use for your test.

The social channel doesn't really matter, but you should definitely stick to just one, at least for your first test. The best option is the social channel that both you and your audience are most active on—that will give you the most reliable results.
The timeframe depends largely on how often you usually post on your chosen network. You don't want to randomly increase your posting frequency for the sake of getting your split test out the door. That could feel awkward to your audience and will likely skew your results.
Instead, think about how quickly you can publish 20 or more posts (more on that in #3) without sacrificing the quality or diversity your audience is used to.
#3: Add Google Analytics UTM Parameters to Links
To track the links each creative uses, you need to add custom Google Analytics UTM parameters. To separate each creative in the Google Analytics report, you'll need to make two UTMs, each with a different campaign name.
The easiest way to create UTM parameters is with Google’s URL builder.
To get started, go to the URL builder and type the URL of the page you're linking to in the first box. You're required to enter text into the Campaign Source, Campaign Medium and Campaign Name fields (Campaign Term and Campaign Content are optional).
You can type anything you want in the Campaign Source and Campaign Medium boxes—it won't have any effect on your results. If you want to get creative, you can add the date and time the post is scheduled, the network you're posting it to or some of the post language. Or you can just write a random letter or word for the sake of time.
Discover Proven Marketing Strategies and Tips
Want to go even deeper with your marketing? Check out the Social Media Marketing Podcast! Publishing weekly since 2012, the Social Media Marketing Podcast helps you navigate the constantly changing marketing jungle, with expert interviews from marketing pros.
But don’t let the name fool you. This show is about a lot more than just social media marketing. With over 600 episodes and millions of downloads each year, this show has been a trusted source for marketers for well over a decade.
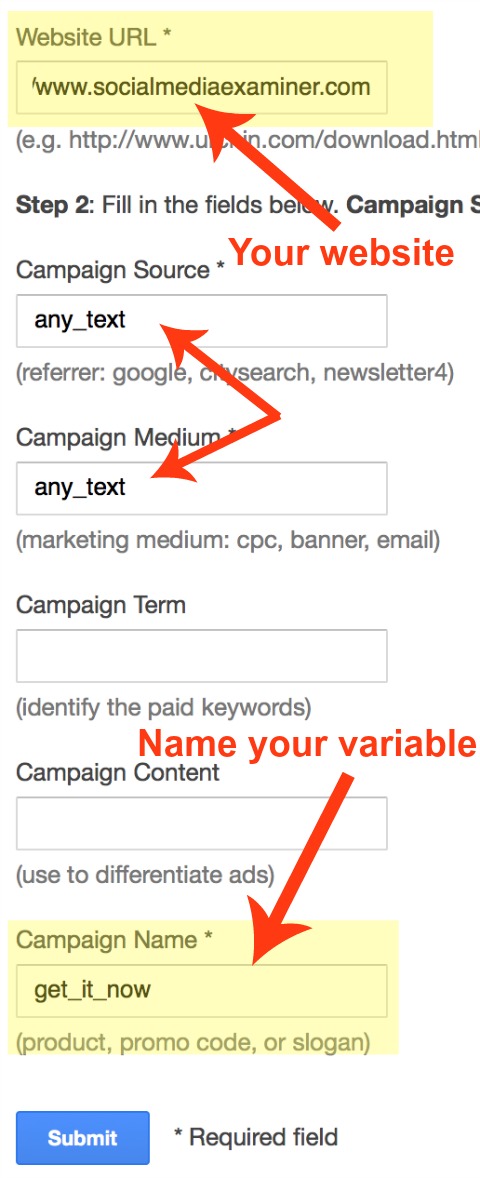
As for the Campaign Name, while the URL builder suggests using your product, promo code or slogan, you don't have to. You can type in anything you want—say for instance, the name of your creative—that makes it a lot easier to quickly identify each creative.
For example, if you're testing “Learn more” vs. “Get it now,” name your first UTM learn_more and use the generated link for all posts with “Learn more.” Name your second UTM get_it_now and use the new link for the posts with “Get it now.”
What's most important here is consistency. Make sure every one of your links contains the corresponding campaign name parameter (i.e., learn_more or get_it_now). This is how you'll group posts together in Google Analytics to analyze your results.
Click the Submit button and Google will give you a long URL that looks something like this (for the get_it_now creative):
Copy and paste the URL into your browser to make sure it works, and then shorten it in your URL shortener of choice (e.g., Bit.ly). Use the shortened link in your respective posts.
#4: Write, Write, Write!
You need multiple updates for testing—enough posts so you can identify patterns in your results. I suggest writing a minimum of 10 posts for each creative—20 in total.
When you're ready to write, gather all of your assets—links, images, etc. Make sure each of your links points to a page on your website so Google Analytics can track the results.
With the exception of the creative components you're testing, try to diversify the posts as much as possible—you don't want them to be too similar. It's important to keep the components consistent so it's easier to attribute results to each (rather than unrelated factors).
You don't need to publish all 20 updates in a row—you can post anything you want in between your test posts. The most important things are to space the test posts equally apart and keep your creative consistent throughout your test.
#5: Analyze Results
It's time to get down to business. Put your shortened links in your pre-written posts, schedule the posts to publish during the timeframe you determined and wait.
A day or two after your last post is published, dig into Google Analytics.
Sign into your account and change the timeframe to the start date of your campaign and the end date to a day or two after the campaign ended (this way you'll capture any click-throughs on your final social media posts that may not have happened on the day of publication).
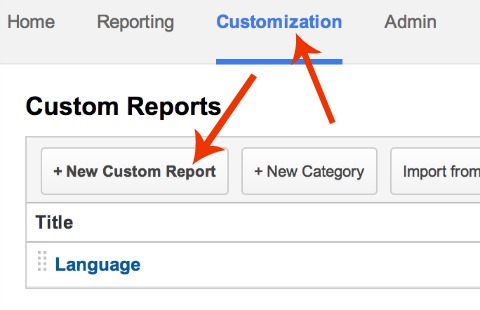
Click on the Customization tab in the top menu. Then select +New Custom Report.
Give your custom report a name. Then, under Metric Groups, select the metrics you want to associate with your campaign. There are several to choose from—here are the ones I recommend:
- Sessions
- Pageviews
- Pages/Session
- Users
- Time on Page
- % New Sessions
- Bounce Rate
- Transactions
- Revenue
If you're not familiar with these terms, this post on Google Analytics basics provides a glossary and tips for getting started on the platform.
In the Dimension Drilldowns (a little farther down the Custom Report page), choose Advertising, then Campaign. This pulls in all of the links you tagged with a campaign name UTM parameter.
Click Save to see your custom report.
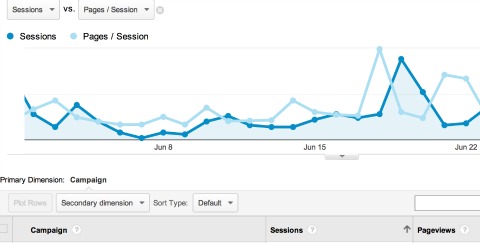
Unless you've added Google Analytics UTM parameters to any other links not associated with your social media split test, the report only shows you the two creative groups you named in Google's URL builder.
Each campaign encompasses all data associated with the links tagged under each variable so you can compare side by side to gauge results.
Conclusion
If you don't have the budget for traditional split testing methods, Google Analytics offers an easy way to see how your audience responds to certain variables. The process takes very little time to set up and the results are a good starting place for defining future social media content.
What do you think? Have you used Google Analytics to split test? What variables do you test? Tell us in the comments below!
Pixelated A/B made from cubes, mosaic pattern photo and Twitter and other popular social media website logos on smart phone screen photo by Quka / Shutterstock.com
Attention Agency Owners, Brand Marketers, and Consultants

Introducing the Marketing Agency Show–our newest podcast designed to explore the struggles of agency marketers.
Join show host and agency owner, Brooke Sellas, as she interviews agency marketers and digs deep into their biggest challenges. Explore topics like navigating rough economic times, leveraging AI, service diversification, client acquisition, and much more.
Just pull up your favorite podcast app, search for Marketing Agency Show and start listening. Or click the button below for more information.