Have you thought about podcasting? Does the idea of having your own Internet radio show sound exciting?
Podcasting has taken on new steam in recent years. Many individuals, from well-known celebrities to people like you and I have had achieved great success with podcasting.
This article will show you precisely what you need to know.
Is There Money in Podcasting?
According to Wikipedia, “A podcast (or non-streamed webcast) is a series of digital media files (either audio or video) that are released episodically and often downloaded through web syndication.”
When it first started, podcasting was probably ahead of its time. Though it arrived on the scene years ago, there was a time when people thought that the format was dead. My, how things have changed.

Today, podcasting has taken on a life of its own. Consider market leaders like Adam Carolla inking five- and even six-figure advertising deals, Jason Calacan toying with the idea of VC money for ThisWeekIn and Andrew Warner of Mixergy earning a full-time living courting sponsors for his podcast.
Ad money seems to be finally pouring in to a point when even small players have a chance to make some decent cash by jumping into the fray.
Outside of monetizing your podcast directly, there’s a host of other reasons to be using one, such as getting clients, repurposing blog content or just having the opportunity to talk about something you love to do.
For example, podcasting is fantastic for social media and content marketers. One needs to look no further than Mitch Joel or Copyblogger as proof.
So I suppose that the question isn’t “Should I podcast?” but “How do I podcast?”
Luckily, the answer isn’t as difficult as you might think. Here’s how you can get your very own podcast up and running on any WordPress blog in five easy steps.
#1: Choose a Host
Early on, you’re probably best served by self-hosting using the same server you use to host your blog. The upside is that if you’re on shared hosting, it won’t cost you a dime. The downside is that the more popular your podcast becomes, the harder it will be to maintain quick loading times, at which point you’ll need to move to a hosting service. Of course, that means you’re looking at downloading and then re-uploading every single episode, which isn’t a lot of fun.
If you’re looking for an inexpensive alternative to self-hosting, I recommend checking out the following services:
We host our entire BlueRize network on Amazon S3, and love it for its cost and reliability.
Get World-Class Marketing Training — All Year Long!
Are you facing doubt, uncertainty, or overwhelm? The Social Media Marketing Society can help.
Each month, you’ll receive training from trusted marketing experts, covering everything from AI to organic social marketing. When you join, you’ll also get immediate access to:
- A library of 100+ marketing trainings
- A community of like-minded marketers
- Monthly online community meetups
- Relevant news and trends updates
#2: Install and Configure PowerPress
For the sake of this guide, we’ll assume that you already have your first episode or two recorded and ready to go. From here, you’ll need to figure out how to easily insert your audio or video into a blog post and customize the look of your media player.
The easiest way to do this, by far, is to download and install the PowerPress podcasting plugin for WordPress, developed by BluBrry, which does most of the heavy lifting for you.
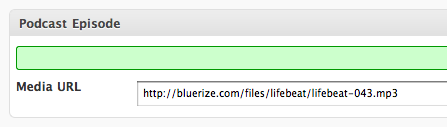
Adding Episodes
Once you’ve installed PowerPress, you’ll see this box near the bottom of every WordPress post.
Choosing Your Player
PowerPress gives you several media players to choose from, and you can change the look and feel at any time.
Discover Proven Marketing Strategies and Tips
Want to go even deeper with your marketing? Check out the Social Media Marketing Podcast! Publishing weekly since 2012, the Social Media Marketing Podcast helps you navigate the constantly changing marketing jungle, with expert interviews from marketing pros.
But don’t let the name fool you. This show is about a lot more than just social media marketing. With over 600 episodes and millions of downloads each year, this show has been a trusted source for marketers for well over a decade.

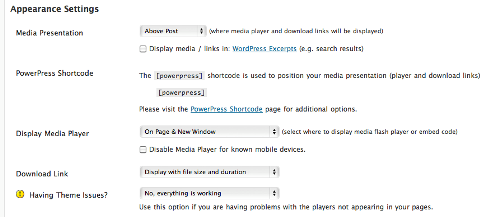
Adjusting Your Settings
By default, PowerPress runs in simple mode, and will detect size and duration of podcast episodes. You’re also free to choose where in each post you want to display the media player, as well as how much detail you wish to show about each episode.
#3: Set Up Your Podcast Feed
For this step, we’ll simply head to Feedburner and add a new feed, with podcast support, using the URL given in PowerPress.
The reason for using Feedburner to submit your podcast to iTunes instead of the default WordPress feed is that there may come a time when you need to change the feed source. By using Feedburner, you can do that at any time without losing your subscribers. It’s also much better looking than plain XML.
#4: Install Analytics
Analytics are crucial to understanding how well you’re doing. Sadly, iTunes does not offer a single statistic other than your ranking, which you must dig out by browsing through individual categories.
To fix this, we’re going to take advantage of another BluBrry service, which is their free podcast analytics.

From here, head back to your blog admin panel and paste the URL into the redirect URL text box, which can be found in the Services & Statistics tab of your PowerPress settings.
Click to save and you’re done. From this point forward, you should be able to monitor your podcast downloads via your WordPress dashboard. If you want to monitor subscriptions, you’ll be able to do that via Feedburner.
#5: Prepare Artwork and Submit to iTunes
The last step is the most important, and probably the easiest, so take heart—we’re almost done!
iTunes suggests that you use a nice-looking 512 x 512 pixel image for your podcast, and I recommend that you follow their advice. You have a much better chance of getting featured this way. Add this image to the input boxes in the iTunes settings tab, also located in your PowerPress admin panel.
You want to take the time to create a killer podcast name, description and summary. Once you click Save, you’re done. All of this information should also appear in your Feedburner settings as well. If it doesn’t, simply copy and paste it, just to be safe.
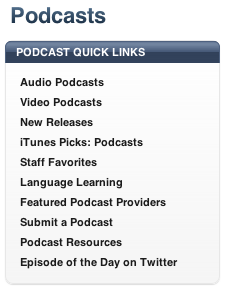
Lastly, head to your iTunes client and open up the iTunes store. Click the Podcasts link up top, and you’ll see this menu on the top right:
Click the text that says “Submit a Podcast,” at which point you’ll see this dialog box:
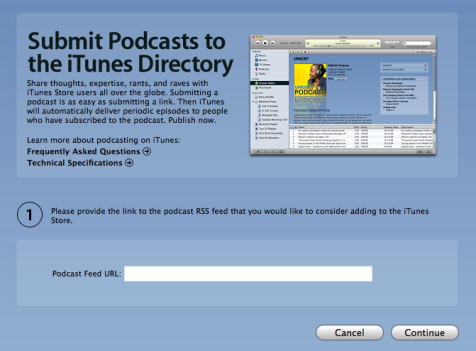
Enter your Feedburner feed URL (usually looks like http://feeds.feedburner.com/mypodcastfeed) and hit Continue. You’ll get a dialog that asks you to verify information. Make sure to read this carefully to make sure it looks correct and then submit.
That’s it! Within a few minutes, you’ll receive an email to let you know they’ve received your submission, and within a few days, you’ll get an approval or rejection notice.
Provided there are no copyright issues, you should have no problem getting approved, at which point you’ll be able to see your show directly in iTunes.
Suggestions for Improvement
Before we close, one thing I’d like to mention is that as a new podcaster, you’ll want to make sure that people can subscribe to your show. I usually recommend offering a button and link for both iTunes and RSS subscriptions.
Also, try to be timely and produce your podcast at the same time each week/month. You’re far more likely to get picked up if you broadcast consistently. Lastly, have fun. You’re officially a podcaster!
Are you podcasting? What success stories do you have? Leave your comments in the box below.
Attention Agency Owners, Brand Marketers, and Consultants

Introducing the Marketing Agency Show–our newest podcast designed to explore the struggles of agency marketers.
Join show host and agency owner, Brooke Sellas, as she interviews agency marketers and digs deep into their biggest challenges. Explore topics like navigating rough economic times, leveraging AI, service diversification, client acquisition, and much more.
Just pull up your favorite podcast app, search for Marketing Agency Show and start listening. Or click the button below for more information.