
Worried that most people view your social media video with the sound off?
Looking for quick and efficient ways to produce captioned video?
In this article, you'll discover three ways to automatically caption social media video.
#1: Use Live Titles to Caption Apple Clips
Need a quicker way to do captions for a video? Apple Clips is now available and one of its key features is the ability to create Live Titles, or real-time captions. Plus, the square video layout is ideal for posting to Facebook and Instagram.
Ready to get started?
First, download the app from the App Store on your iOS smartphone and open it.
Tap on the down arrow in the upper-left corner and select the New Video drop-down that's revealed.
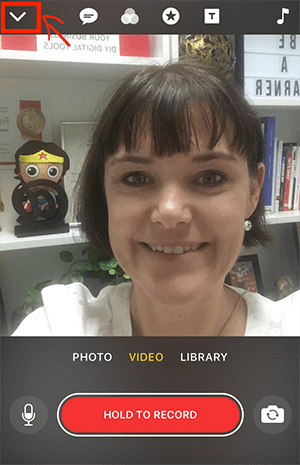
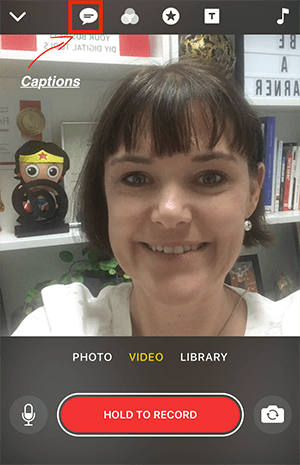
Now, select Video from the three media options and tap on the speech bubble to enable captioning.
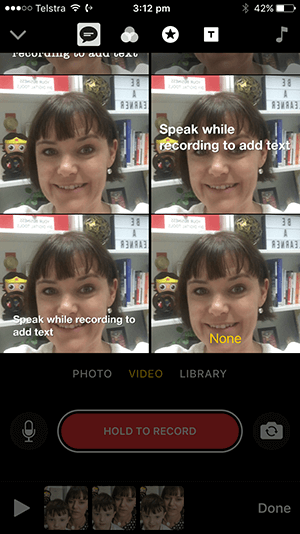
You'll have three animated caption styles to choose from, as well as an option for None. Select the caption type you want and get ready to record. The captions appear in real time with your voice.
Not camera-ready? There's also an option to select a set screen and then record audio only with captions. This is great if you're camera-shy but want an effective video to get your message out with captions.
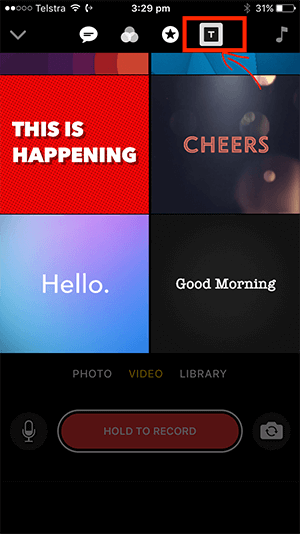
Pro Tip: To get the most out of this app, have a short script ready and then record your video scene by scene. The scenes will be threaded together to form your video.
#2: Generate Automatic Captions via Facebook Video Library
Did you know you can easily add captions to your published Facebook video (including Facebook Live videos), as well as your unpublished videos? Adding captions before your video is published means that they're properly captioned when they do go live.
To get started, select the Videos tab from the left-hand menu of your Facebook page, then click on the Video Library button.
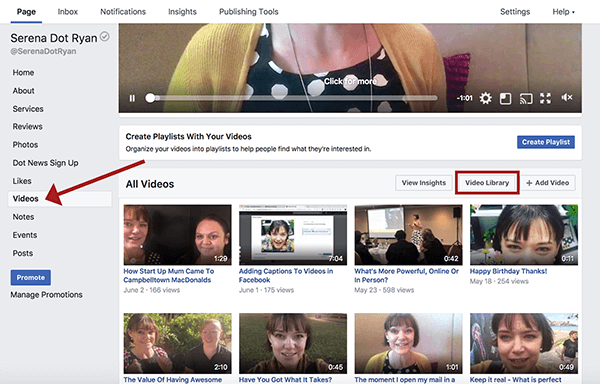
Within the video library, you can see your published and unpublished videos. Unpublished videos are noted with a yellow dot and published videos with a green dot.
Get World-Class Marketing Training — All Year Long!
Are you facing doubt, uncertainty, or overwhelm? The Social Media Marketing Society can help.
Each month, you’ll receive training from trusted marketing experts, covering everything from AI to organic social marketing. When you join, you’ll also get immediate access to:
- A library of 100+ marketing trainings
- A community of like-minded marketers
- Monthly online community meetups
- Relevant news and trends updates

Discover Proven Marketing Strategies and Tips
Want to go even deeper with your marketing? Check out the Social Media Marketing Podcast! Publishing weekly since 2012, the Social Media Marketing Podcast helps you navigate the constantly changing marketing jungle, with expert interviews from marketing pros.
But don’t let the name fool you. This show is about a lot more than just social media marketing. With over 600 episodes and millions of downloads each year, this show has been a trusted source for marketers for well over a decade.

From this list, select the video you want to add captions to. When the video opens in the player window, click the Edit button and then the Captions tab. Simply click on the Generate button to automatically generate captions.
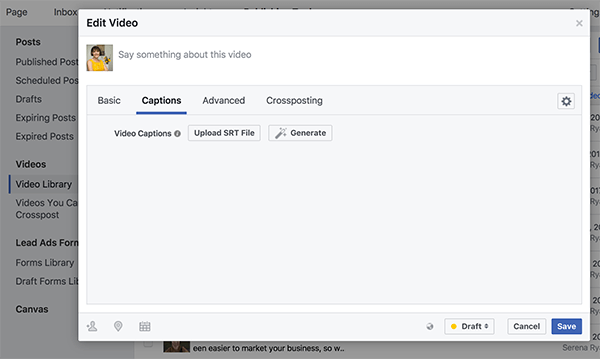
After the captions are generated, you'll see your video broken into timed segments with their corresponding captions.
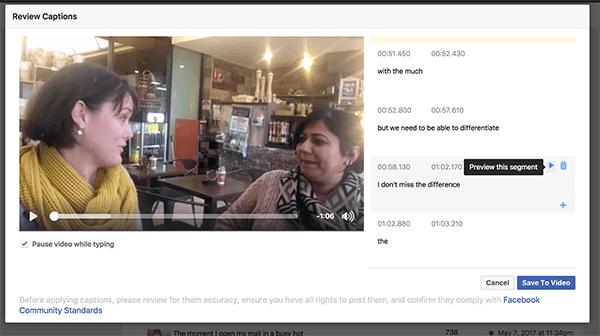
Given that the captions are automatically generated, they may not be 100% accurate. It's a good idea to play each segment individually and edit captions if necessary.
Make sure the Pause Video While Typing box is checked; this makes it very easy to play only the portion of the clip you're editing, making it transcribe what you hear. To change any caption, select the text of the automatically generated caption and type the correct text.
Pro Tip: Wearing headphones will help you concentrate as you edit the captions.
#3: Enable Subtitles for YouTube Video via Video Manager
YouTube also has an automatic captions option. To take advantage of this feature, upload your video to your YouTube channel, then go to Video Manager.
Navigate to the video you want to add captions to, and click on the arrow next to the video name to reveal a drop-down menu. Click the Subtitles/CC button.
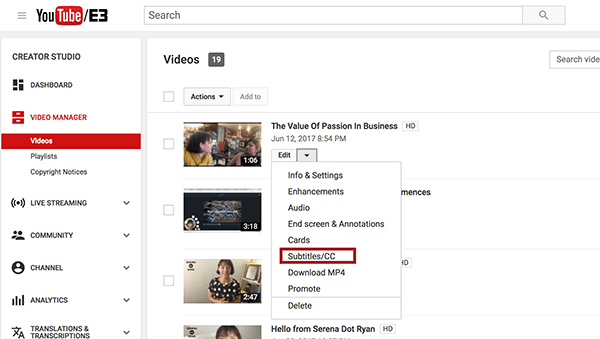
You should then see the language file with a bright-green button next to it; English captioning is the default choice.
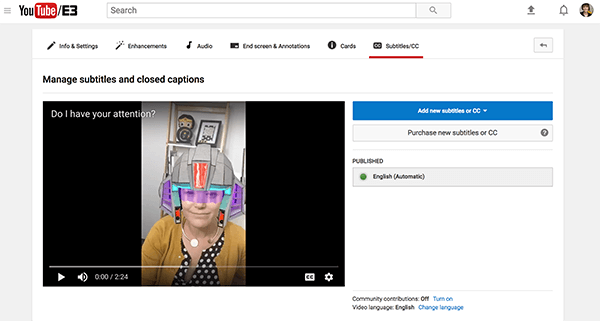
Again, these captions have been automatically generated, so make sure you check them for accuracy.
To review the captions and edit them, click the language caption file and then click the Edit button in the top right of the caption column.
As with the Facebook process, check the Pause Video While Typing box, then play the video. Click on any individual caption segment to play each piece and revise the caption.
When you're happy with the captions, click Save.
Conclusion
Adding captions to your videos is not just important, it's essential. On Facebook, for example, 85% of videos are played without sound.
The best timesavers for all captions being added to videos is to have a script. With a script, you can automatically add the captions to your YouTube video and then download the .srt file to upload to Facebook. Alternatively, you can quickly and easily use your script to create a short video on Apple Clips with captions.
What do you think? Have you tried any of these options for creating captions for your social media video? Which of these options seems most helpful to you? How do you add captions to your videos? Share your thoughts and any questions in the comments below.
Attention Agency Owners, Brand Marketers, and Consultants

Introducing the Marketing Agency Show–our newest podcast designed to explore the struggles of agency marketers.
Join show host and agency owner, Brooke Sellas, as she interviews agency marketers and digs deep into their biggest challenges. Explore topics like navigating rough economic times, leveraging AI, service diversification, client acquisition, and much more.
Just pull up your favorite podcast app, search for Marketing Agency Show and start listening. Or click the button below for more information.

