What matters to most potential customers is not what you say about your business, but what your existing customers have to say.
Here's a simple strategy to help you convince prospects to become customers. And it's done by embedding Twitter testimonials on your website.
Why Testimonials Matter
When potential customers check out your business online, they want to see proof that you deliver what you promise. It's important that you provide evidence that you have happy customers.
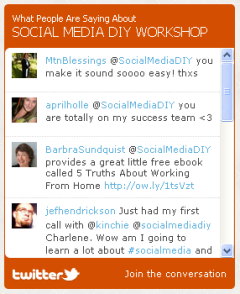
Testimonials are powerful because they come straight from your customers in their own words. It's important you add testimonials to your site. You can easily tap into tweets from people who say great things about your business.
Why Tweets Make Good Testimonials
Tweets make great testimonials for several reasons:
- They're short, so they get to the point quickly.
- People write them in a moment of enthusiasm, so they're filled with praise and excitement.
- They're written for public review, so you don't need to ask permission to use a tweet as a testimonial.
What kinds of tweets make great customer testimonials? Those whose entire content is about your business, your product or your service.

Use Twitter Favorites to Display Testimonials
Twitter makes it easy for your business to capture and display tweets when you mark them as Favorites. To make this strategy work, you must use Favorites exclusively for testimonials.
To Favorite a tweet, hover your mouse over the tweet. Twitter displays a list of commands that are not visible until you hover on the tweet. Locate the Favorite (star) option and click it. Twitter adds this tweet to your list of Favorite tweets.

Twitter allows you to display your most recent Favorite tweets on your website or blog using a widget. Every time you mark a new Favorite tweet, Twitter adds it to your customer testimonials automatically.
How to Create Your Testimonials Twitter Widget
Before you start creating your Twitter Favorites widget, you need this information:
- The size of the spot for your Twitter widget on your site in pixels (height and width).
- Optional: The hex code (for example: #d34e01) for colors used on your site to customize the widget.
You may also need technical assistance to insert the HTML code into your blog or website.
To create and customize your widget:
#1: The Twitter Widgets page
Choose widgets for your website on the Twitter Widgets page.
Click My Website.
Get World-Class Marketing Training — All Year Long!
Are you facing doubt, uncertainty, or overwhelm? The Social Media Marketing Society can help.
Each month, you’ll receive training from trusted marketing experts, covering everything from AI to organic social marketing. When you join, you’ll also get immediate access to:
- A library of 100+ marketing trainings
- A community of like-minded marketers
- Monthly online community meetups
- Relevant news and trends updates

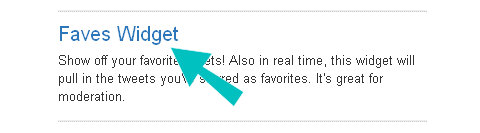
Click Faves Widget.
Make sure you have Favorited some tweets.
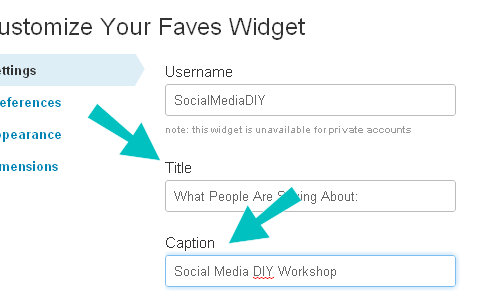
#2: Customize your widget heading
To customize your widget:
- Change the Title to What People Are Saying About (or something similar).
- Change the Caption to your business name (if necessary).
Click Test Settings to see your changes take effect (if necessary). On the right, Twitter displays your widget with your favorites and your settings.

Discover Proven Marketing Strategies and Tips
Want to go even deeper with your marketing? Check out the Social Media Marketing Podcast! Publishing weekly since 2012, the Social Media Marketing Podcast helps you navigate the constantly changing marketing jungle, with expert interviews from marketing pros.
But don’t let the name fool you. This show is about a lot more than just social media marketing. With over 600 episodes and millions of downloads each year, this show has been a trusted source for marketers for well over a decade.
#3: Customize your widget preferences
Click Preferences. Twitter displays the Customize Your Faves Widget Preferences page. This page allows you to customize how your widget works. Choose the options that you want for your widget.
- Poll for New Results keeps checking for new tweets marked as a Favorite.
- Include Scrollbar lets you add more tweets than fit into the widget display area.
- To make your list scroll through your tweets, choose Timed Interval and Loop Results.
- To remove the date, uncheck Show Timestamps. (Leave this checked if you want to display the customer testimonial dates.)
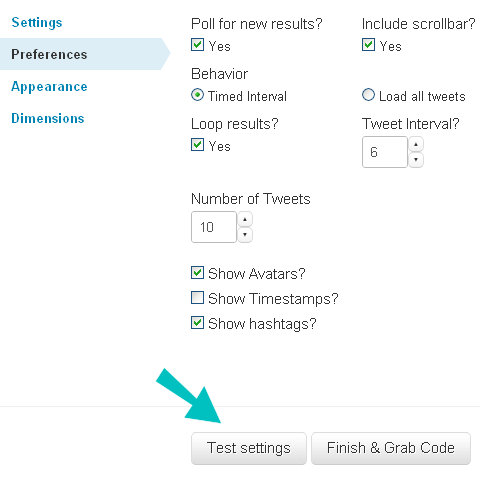
To see the effect of your options, click Test Settings. Experiment until the widget works the way you want it to work on your site.
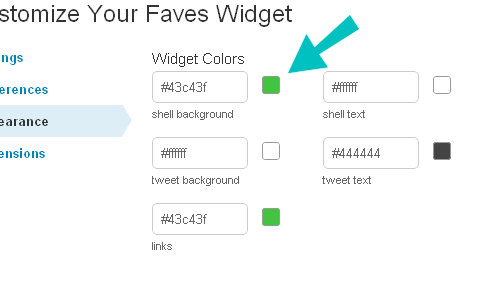
#4: Customize your widget to your site and brand colors
Click Appearance. Twitter displays the Customize Your Faves Widget Appearance page.
This page allows you to change the colors used in your widget. Use the hex codes for your site colors to exactly match your Twitter widget to your site.
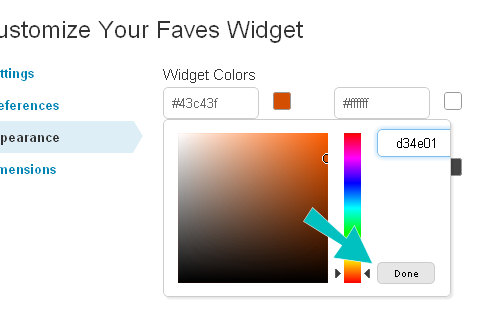
To change a widget color:
Click the color box next to the color you want to change. Twitter displays a color picker window.
Type the hex code for the desired color.
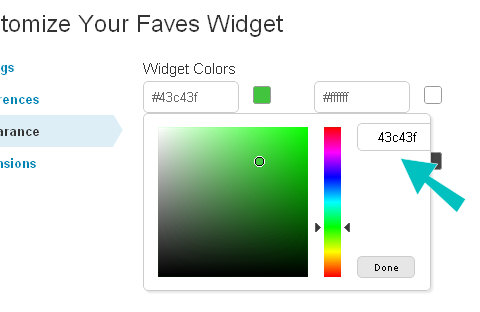
Click Done. Twitter updates the color box and the widget example.
Click Test Settings to see your colors (if necessary).
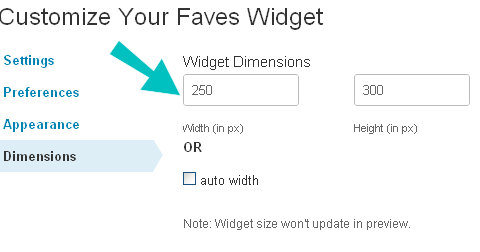
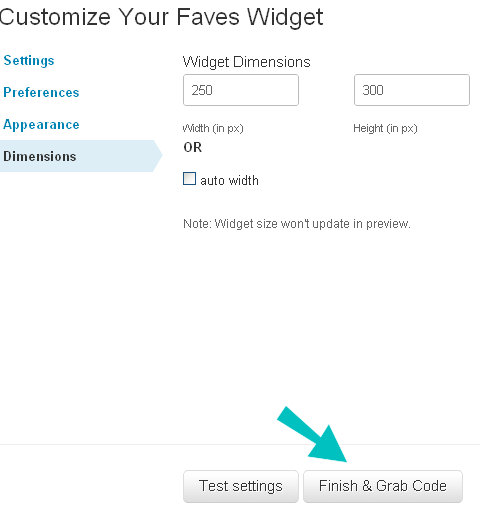
#5: Customize your widget to fit the space on your site
Click Dimensions. Twitter displays the Customize Your Faves Widget Dimensions page.
Type the height and width of your finished widget in pixels.
#6: Finish your Twitter Faves Widget
When you have finished customizing your Twitter Faves Widget, click Finish & Grab Code.
Twitter displays the code in a text box in the middle of the page. Copy and paste this code into a text file for storage, or directly into your website.
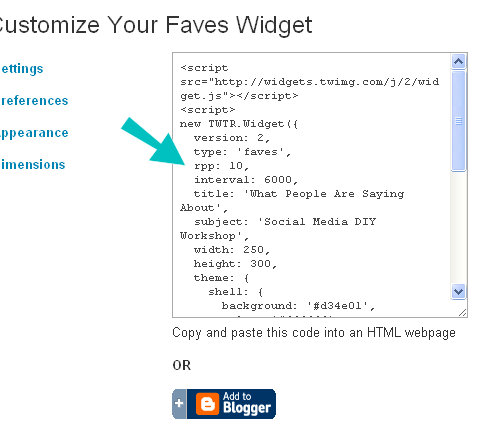
Tip: When you leave this page, your customization settings are lost. Save this code permanently by storing it in a text file, Microsoft Word document or other location.
Your website uses this code to display your Twitter widget. You insert the code into your website at the location where you want the Twitter widget to appear. Common places for Twitter widgets include:
- The front page of your website. Put your customer testimonials where new visitors can easily find them.
- In your blog sidebar. If your website gets traffic landing directly on blog posts, consider adding your Twitter widget in the blog sidebar.
- In your website footer. You can adjust the height of the Twitter widget to fit your footer height.
When you install the code, the Twitter widget appears immediately and displays your current favorite tweets. As you mark new tweets as favorites, they appear in the widget, also.
It's Your Turn
What do you think? Have you used tweets as testimonials on your site? Have you tried the Twitter Favorites Widget? What testimonial strategy works well for your business? Leave your comments in the box below.
Attention Agency Owners, Brand Marketers, and Consultants

Introducing the Marketing Agency Show–our newest podcast designed to explore the struggles of agency marketers.
Join show host and agency owner, Brooke Sellas, as she interviews agency marketers and digs deep into their biggest challenges. Explore topics like navigating rough economic times, leveraging AI, service diversification, client acquisition, and much more.
Just pull up your favorite podcast app, search for Marketing Agency Show and start listening. Or click the button below for more information.