Looking for an all-in-one tool to improve Facebook business page management? Wondering how to set up Meta Business Suite for your team?
In this article, you’ll learn how to use Meta Business Suite so you can manage your organization’s Facebook business page and Instagram account more efficiently.

What Are Meta Business Suite and Meta Business Manager?
Formerly known as Facebook Business Suite and Facebook Business Manager, Meta Business Suite and Meta Business Manager are Meta's built-in social media management tools. Each serves as a centralized place to manage Facebook business pages and Instagram accounts and both are free to use.
Although the two tools are similar, they have some key differences. Let's look at what sets these two tools apart and explore how they can improve the way your team manages social media.
What Is Meta Business Manager?
Launched in 2014, Meta Business Manager is a platform that lets you manage assets like Facebook business pages, Instagram accounts, and ad accounts separately from your personal profile. From Business Manager, you can access Meta Business Settings, which lets you assign roles, request access to accounts, and collaborate with team members.
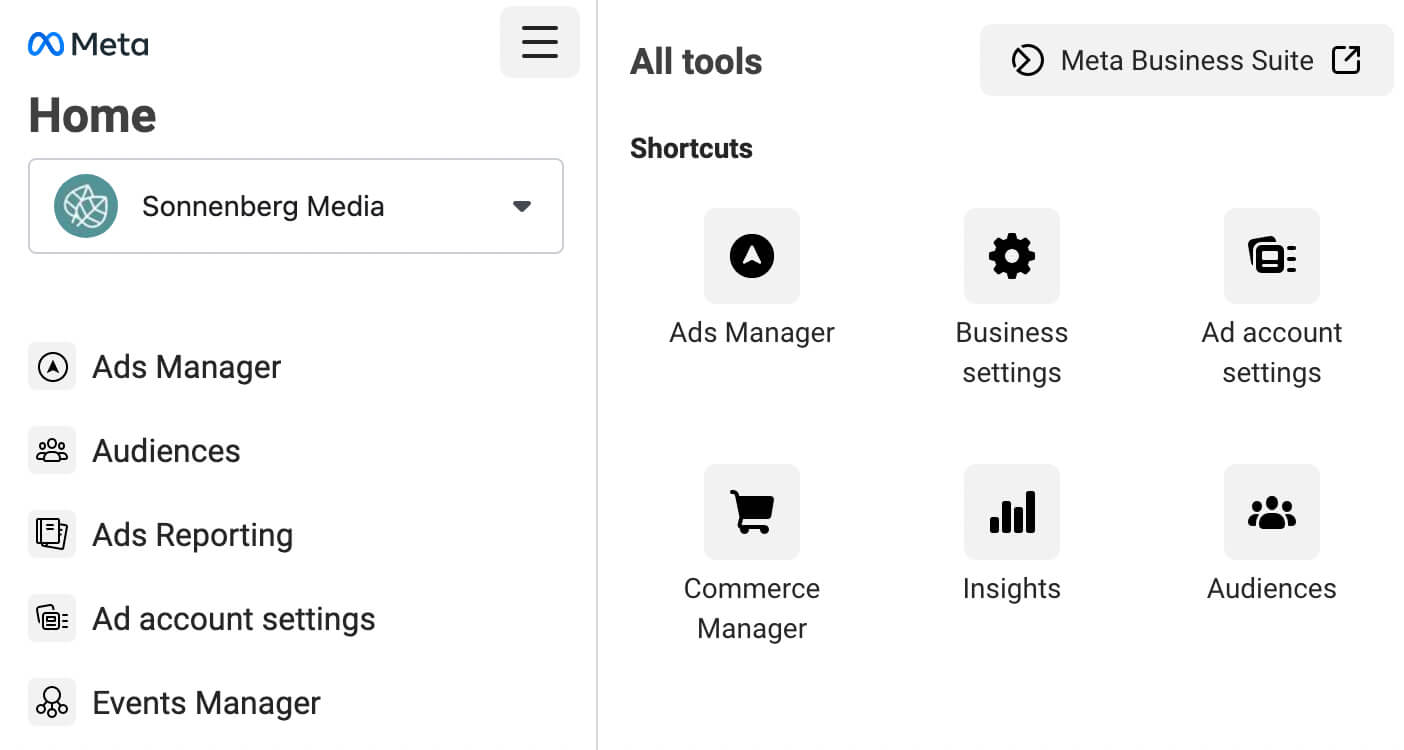
Business Manager provides quick access to tools for social media management tasks like publishing content and reviewing analytics. You can also access Meta Events Manager, Brand Collabs Manager, and Brand Rights Protection tools from Business Manager.
So what doesn't Business Manager do? For starters, Business Manager doesn't function like most social media management tools. Don't expect to toggle between accounts easily or create content, respond to engagement, and review insights for all of your Facebook pages and Instagram accounts in a single tab. You'll need a separate tab for each linked tool.
Business Manager doesn't make it particularly easy to collaborate with colleagues either. For example, you can't manage post drafts or share to-do lists in Business Manager. This platform also lacks an organic content calendar tool, which can make it challenging to plan campaigns.
What Is Meta Business Suite?
Launched in 2020, Meta Business Suite is a complete social media management tool for Facebook and Instagram. With this native tool, you can do everything from creating and scheduling content to responding to engagement to analyzing insights. You can also plan organic campaigns, run ads, and organize assets.
Since Business Suite functions more like a typical social media management tool, you can do all of the tasks above (and many more) in a single tab. Business Suite also lets you toggle between accounts so you can manage Facebook and Instagram seamlessly.
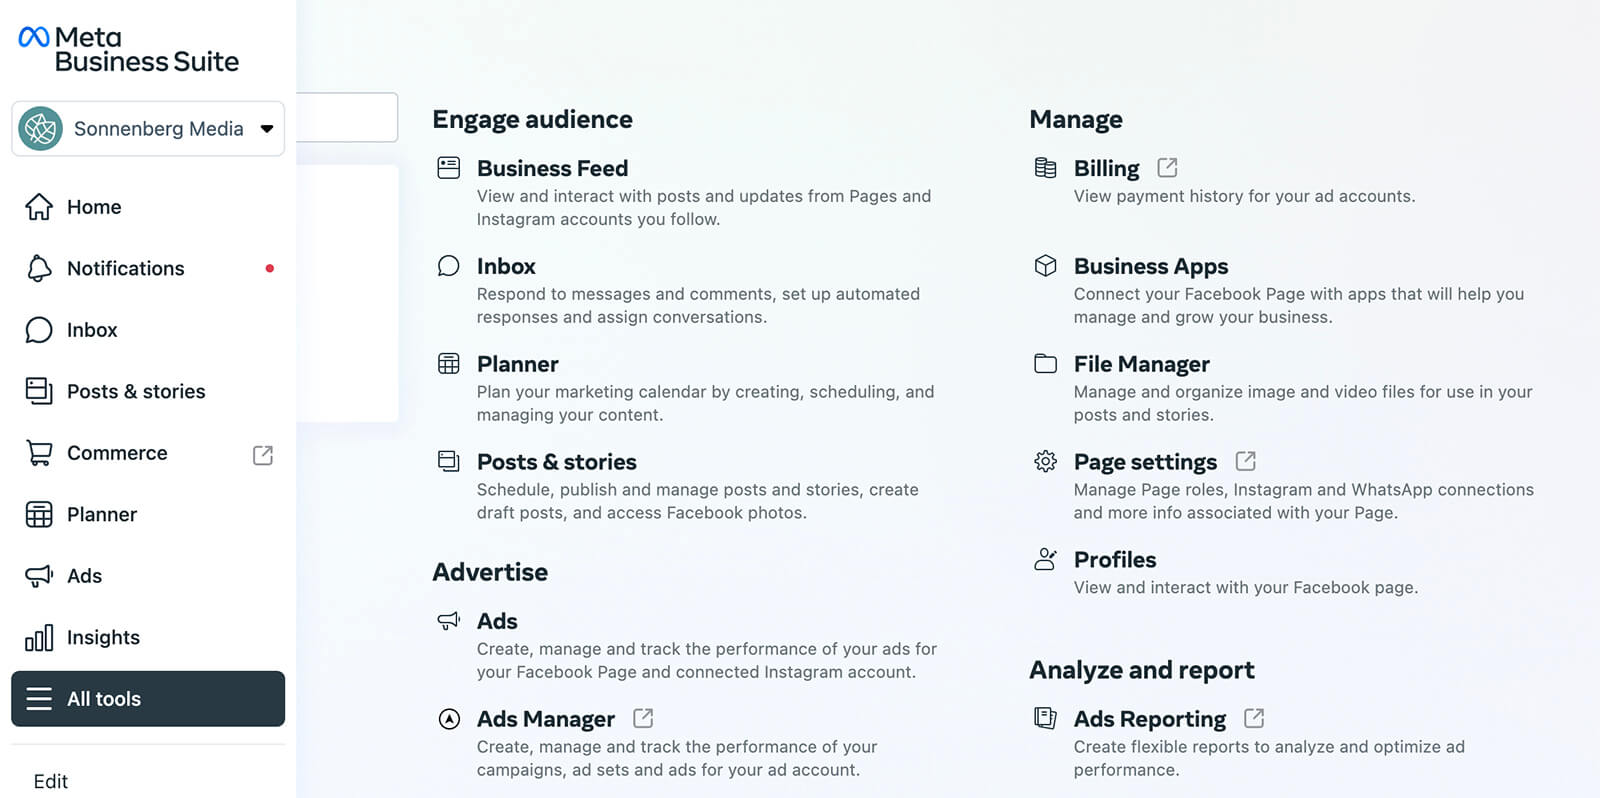
Business Suite offers one-click access to virtually every Meta tool you need to run your business. That means you can easily prioritize conversion events, set up eCommerce, and manage roles and permissions from the tool's main menu.
How to Set Up and Use Meta Business Suite to Manage a Facebook Page and Instagram Account
Follow the steps below to start managing Facebook and Instagram accounts with Meta Business Suite. Although you can complete most of these tasks in the mobile app, the workflow can be clunky. So we'll use the desktop version of Business Suite for this tutorial.
#1: Invite Colleagues to Business Suite
Start by inviting your team to work with you in Business Suite. Open Business Suite and use the drop-down menu in the upper-left corner to select the right Meta business account. Then click the gear icon in the lower-left corner to open the account settings.

Click the People tab to review or add to your team. To invite another team member, click the Add People button in the upper-right corner. Keep in mind that every business account should have at least two admins. Beyond that, it's usually best to assign people employee access or another limited-access role.
Get World-Class Marketing Training — All Year Long!
Are you facing doubt, uncertainty, or overwhelm? The Social Media Marketing Society can help.
Each month, you’ll receive training from trusted marketing experts, covering everything from AI to organic social marketing. When you join, you’ll also get immediate access to:
- A library of 100+ marketing trainings
- A community of like-minded marketers
- Monthly online community meetups
- Relevant news and trends updates
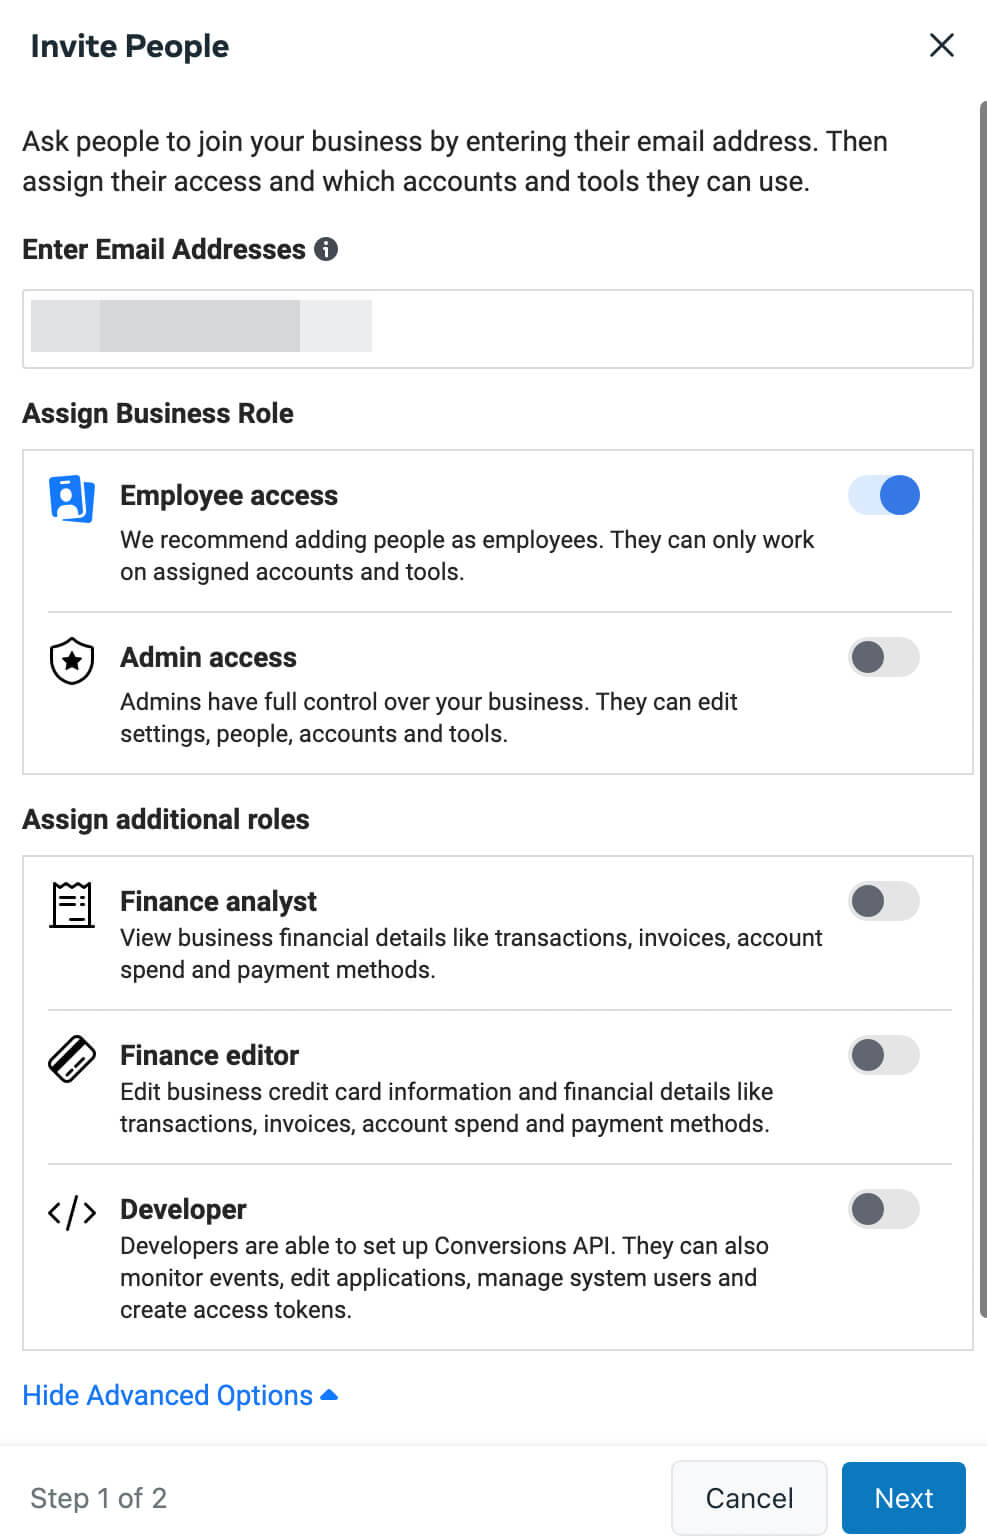
If you've already added Facebook business pages or other assets to your business account, then you can choose the access level you want to assign for each. If you're not ready to assign assets yet, click Send Invitation and configure the rest later. See step #6 below for recommendations.
#2: Add Facebook Pages to Business Suite
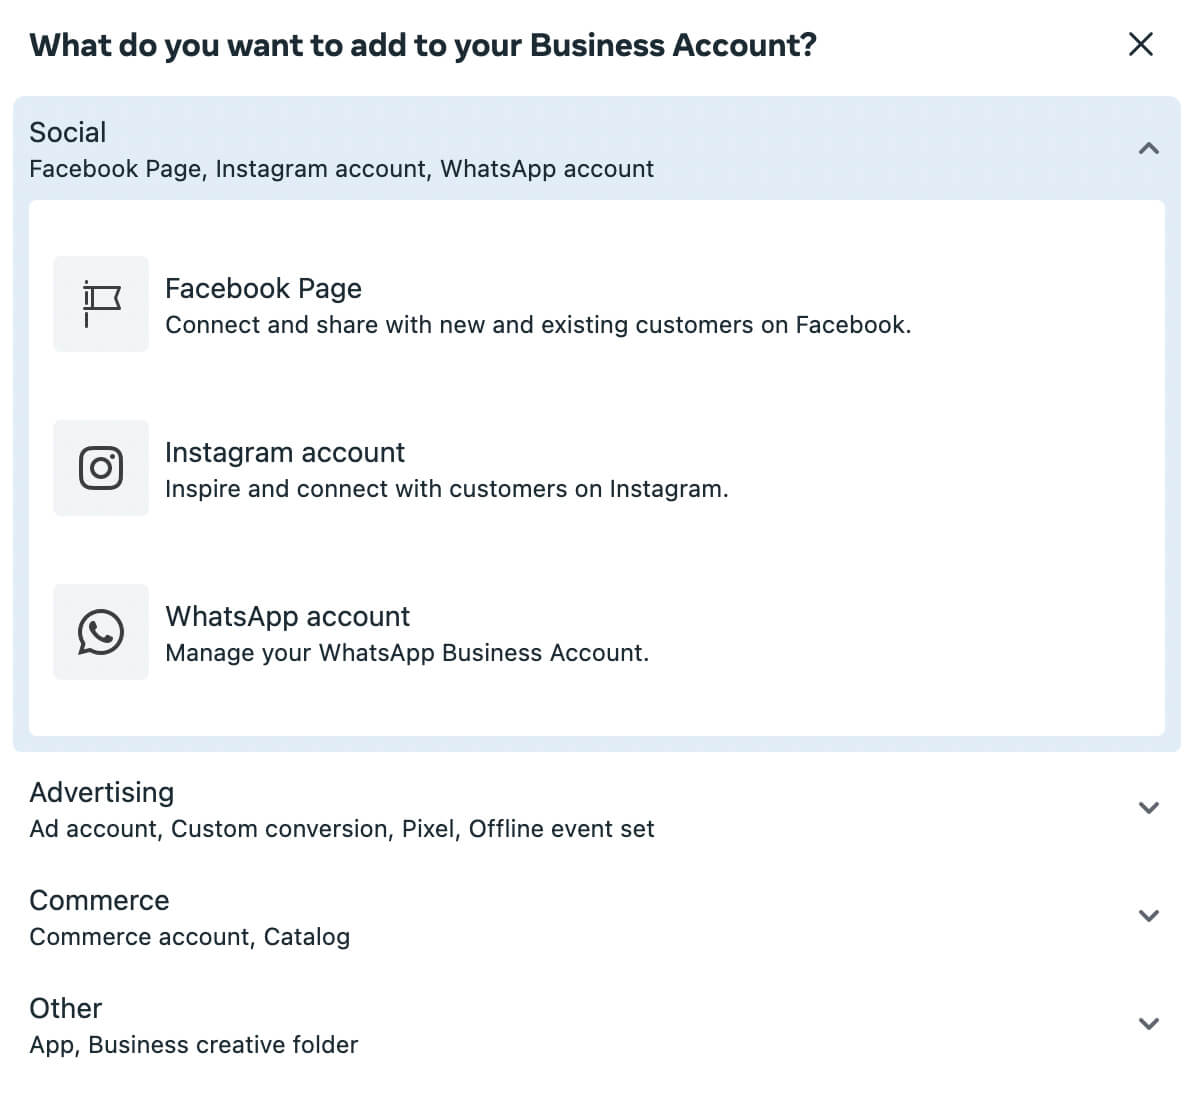
To manage a Facebook business page in Business Suite, select the Business Assets tab. Then click Pages to review the pages your business account already owns or uses. To add another page to your account, click the Add Assets button in the upper-right corner. Then select Facebook Page.
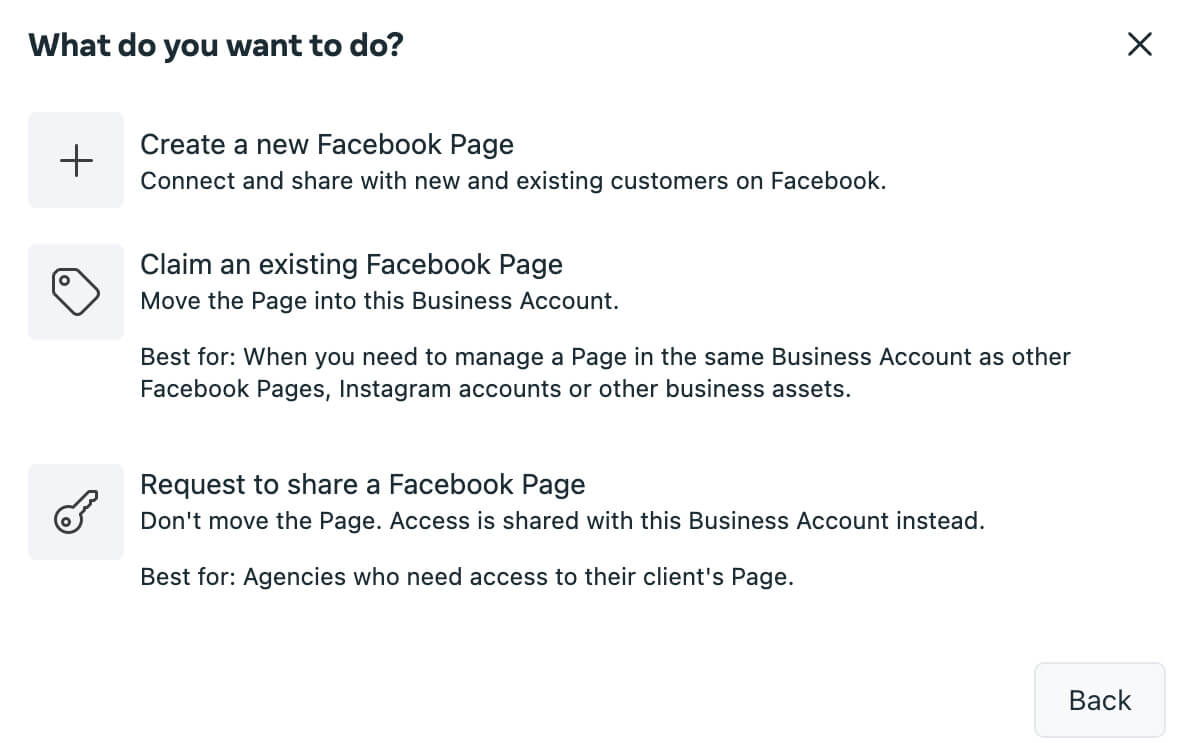
Here, you can create a completely new page for your business or move an existing page into your Meta business account. If you work for an agency, you can also request to share a client's Facebook page, which gives your team access without completely taking it over.
Once you've added a Facebook business page to your account, you can control which team members get access. See step #6 below for a complete walkthrough.
#3: Add Instagram Accounts to Business Suite
With just a few clicks, you can also add Instagram accounts to Business Suite. From the Business Assets tab, click the Add Assets button. Then select Instagram Account and agree to the terms.
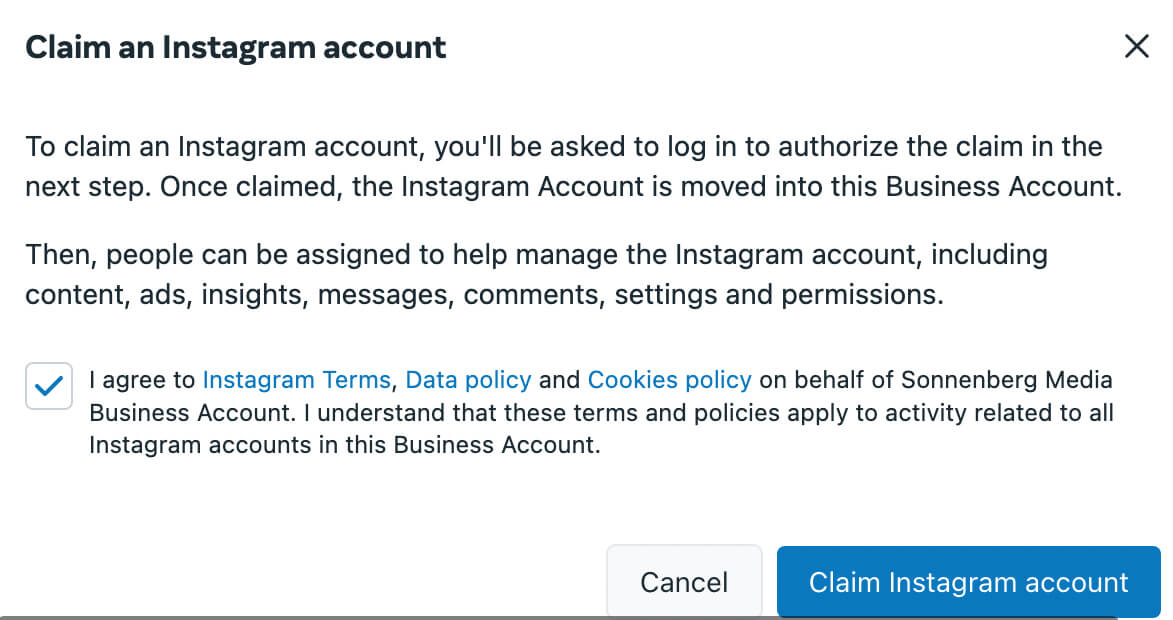
When you click the Claim Instagram Account button, you'll be prompted to log into the Instagram account you want to add to Business Suite. Then you'll be able to share access with team members as necessary.
#4: Link WhatsApp Accounts to Business Suite
You can add WhatsApp business accounts to Business Suite, too. Click the Add Assets button and select WhatsApp Account. You'll be automatically redirected to Business Settings to complete the setup.
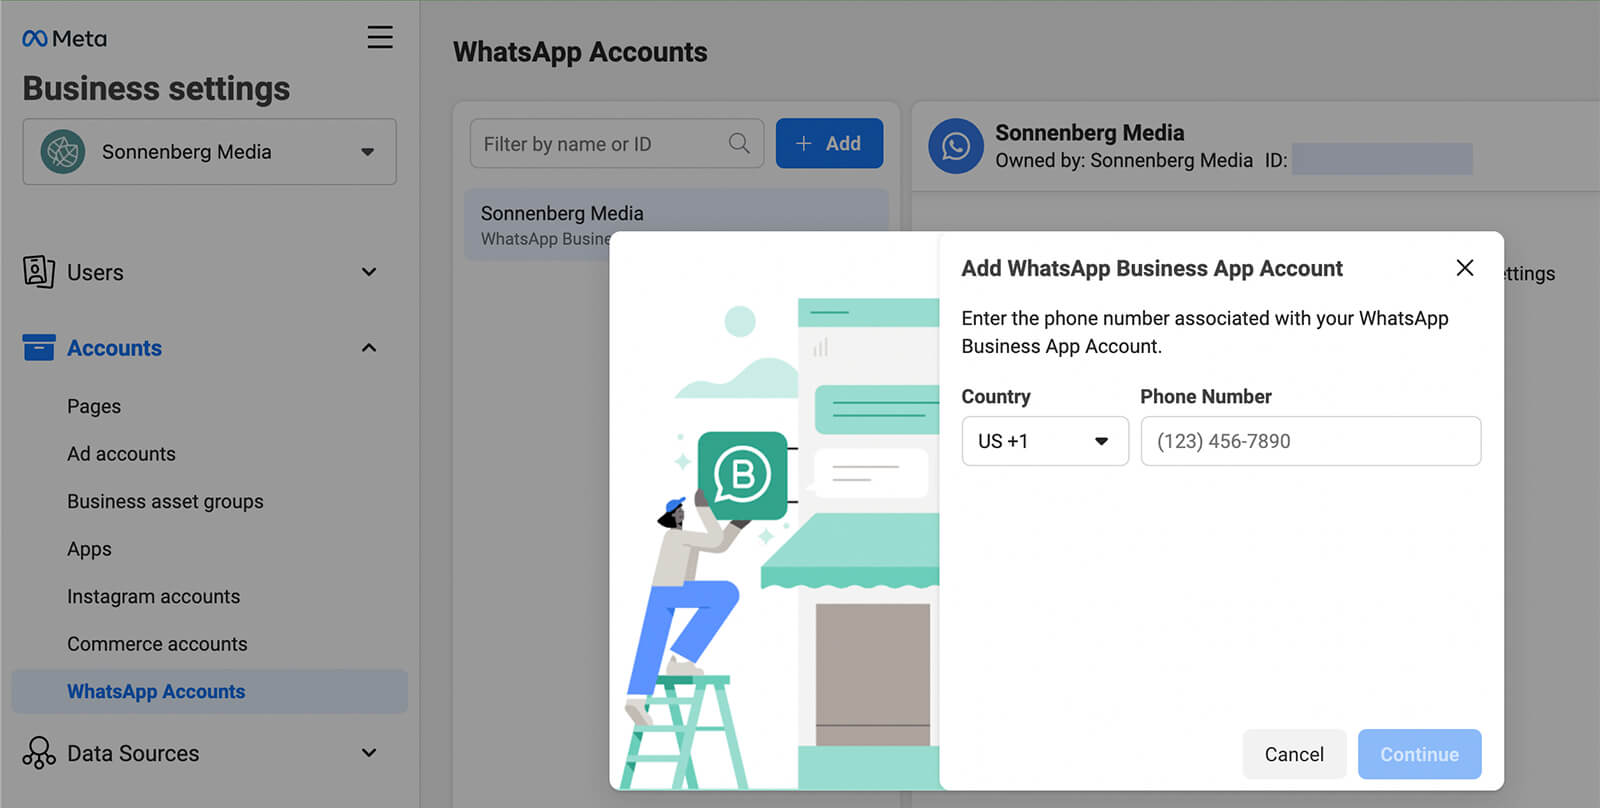
Click the Add button and enter the phone number associated with the WhatsApp account you want to link. Then enter the verification code you receive in your WhatsApp account. You'll receive a confirmation and then you'll see the WhatsApp account in Business Suite.
#5: Manage Ad Accounts in Business Suite
Business Suite also lets you claim and share advertising accounts for your business or clients. Click the Add Assets button and open the Advertising menu. Then select Ad Account and choose whether you want to claim, share, or create a new account.
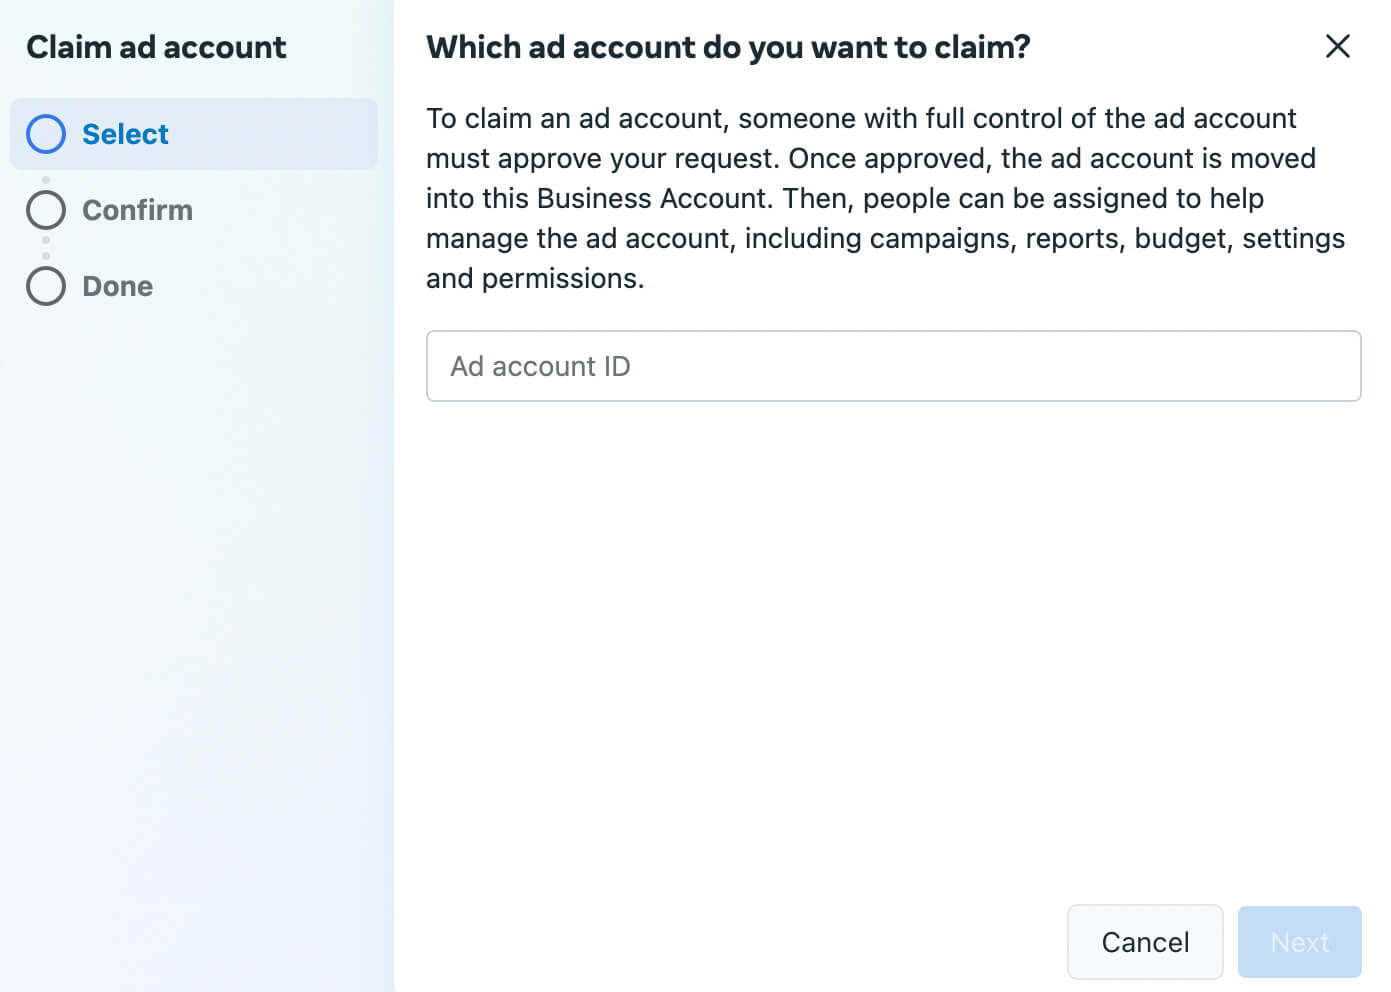
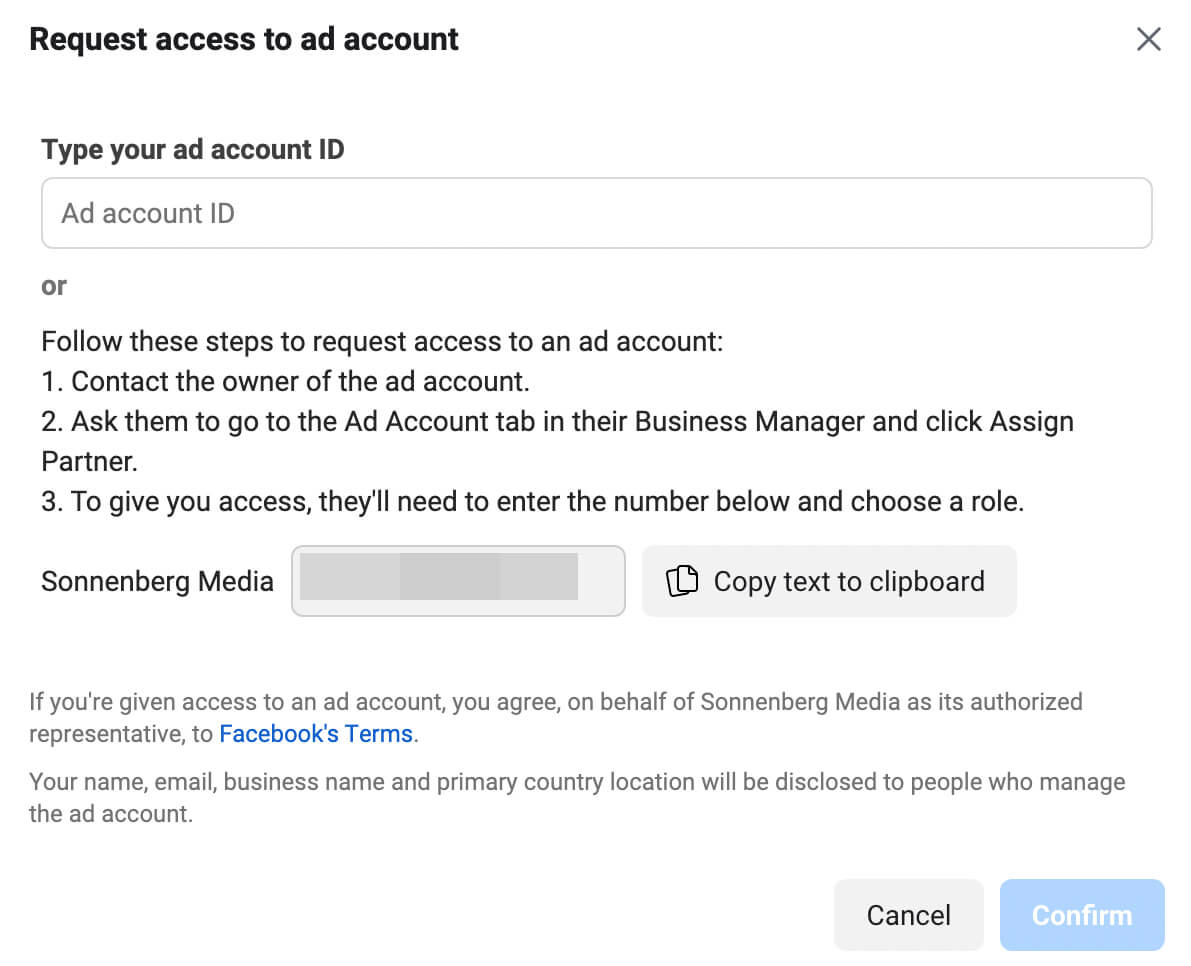
You can claim or create ad accounts without leaving Business Suite. But if you need to share an ad account, you'll automatically be redirected to Business Settings. There, you can follow the prompts to request access to client accounts.
#6: Assign Roles and Permissions to Colleagues
Now that you've added a Facebook business page, Instagram account, and other assets to Business Suite, you can assign roles to each team member. First, let's look at how you can assign permissions for each asset.
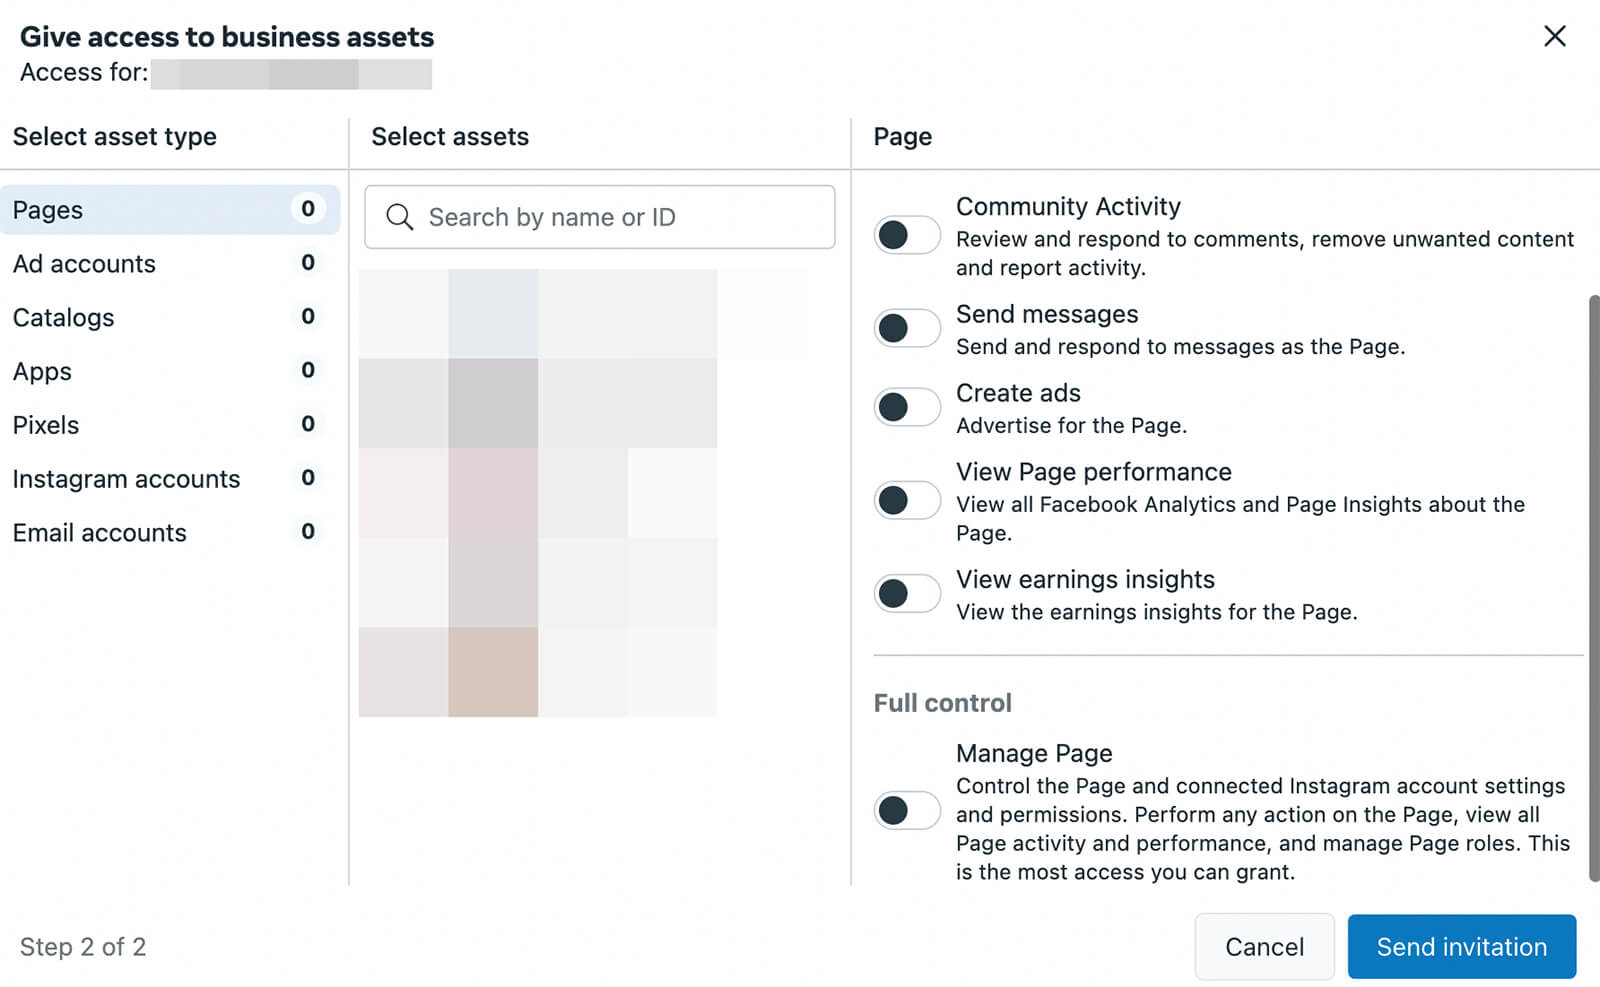
In the Business Assets tab of Business Suite, select the page or account you want to manage. Then select the Page Access tab and click the Add People button. You can toggle the Manage Page switch to give colleagues full access to the account. Or you can select individual permissions for community managers, advertisers, and analysts.
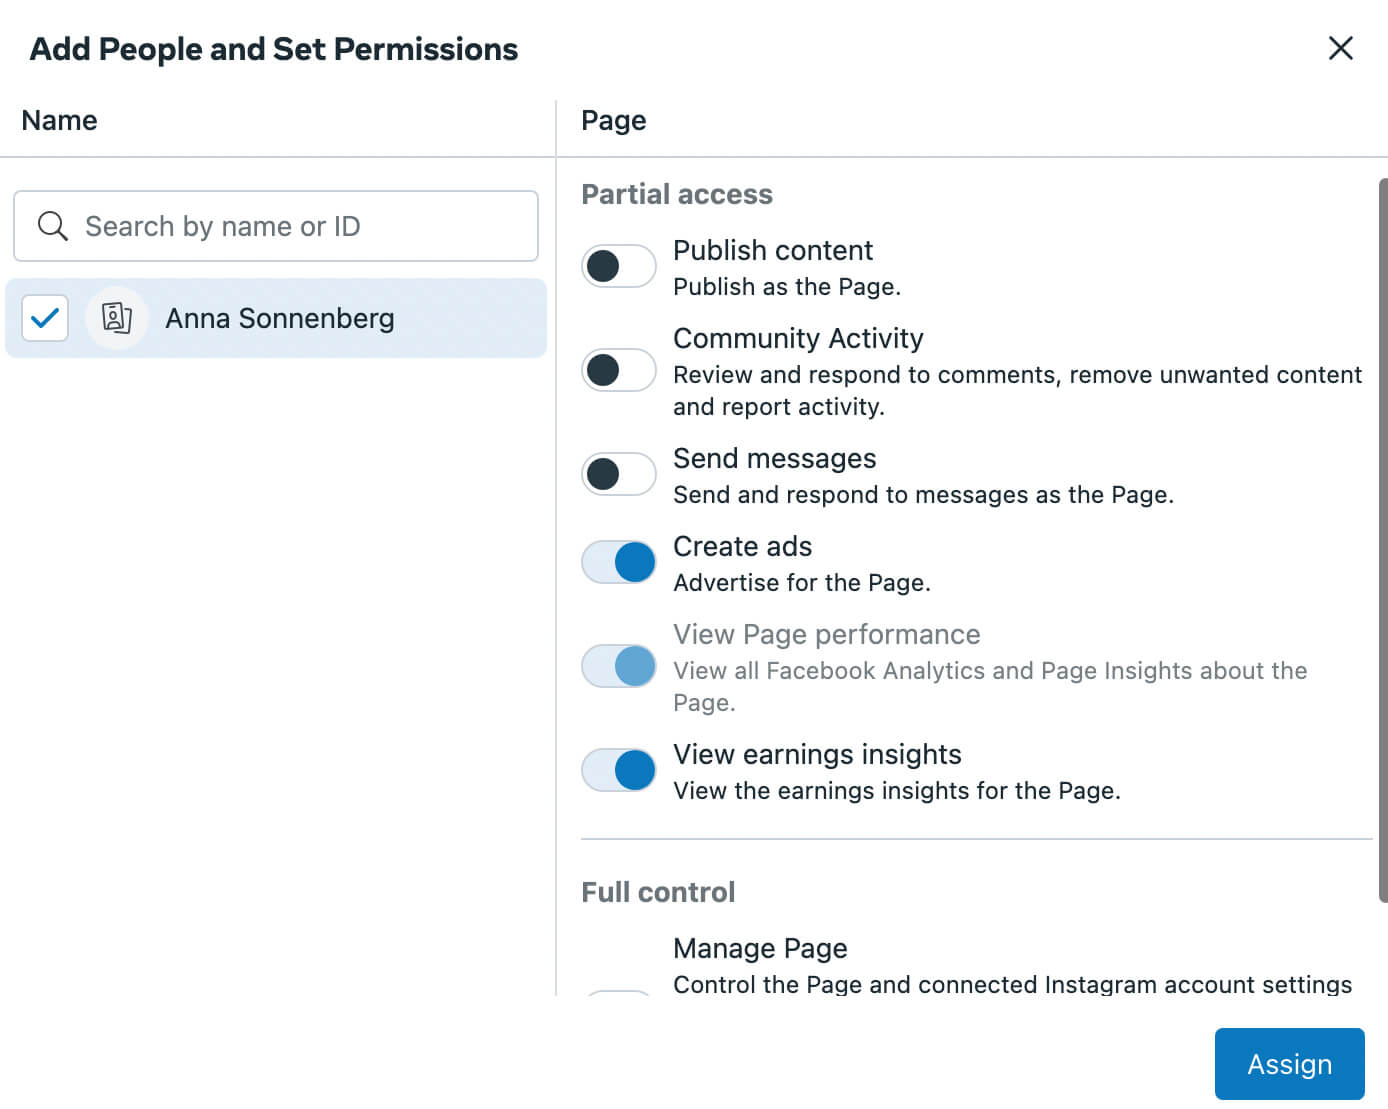
Alternatively, you can manage permissions for each person on your team. If you have a lot of assets to assign to a new team member, this workflow is much faster.
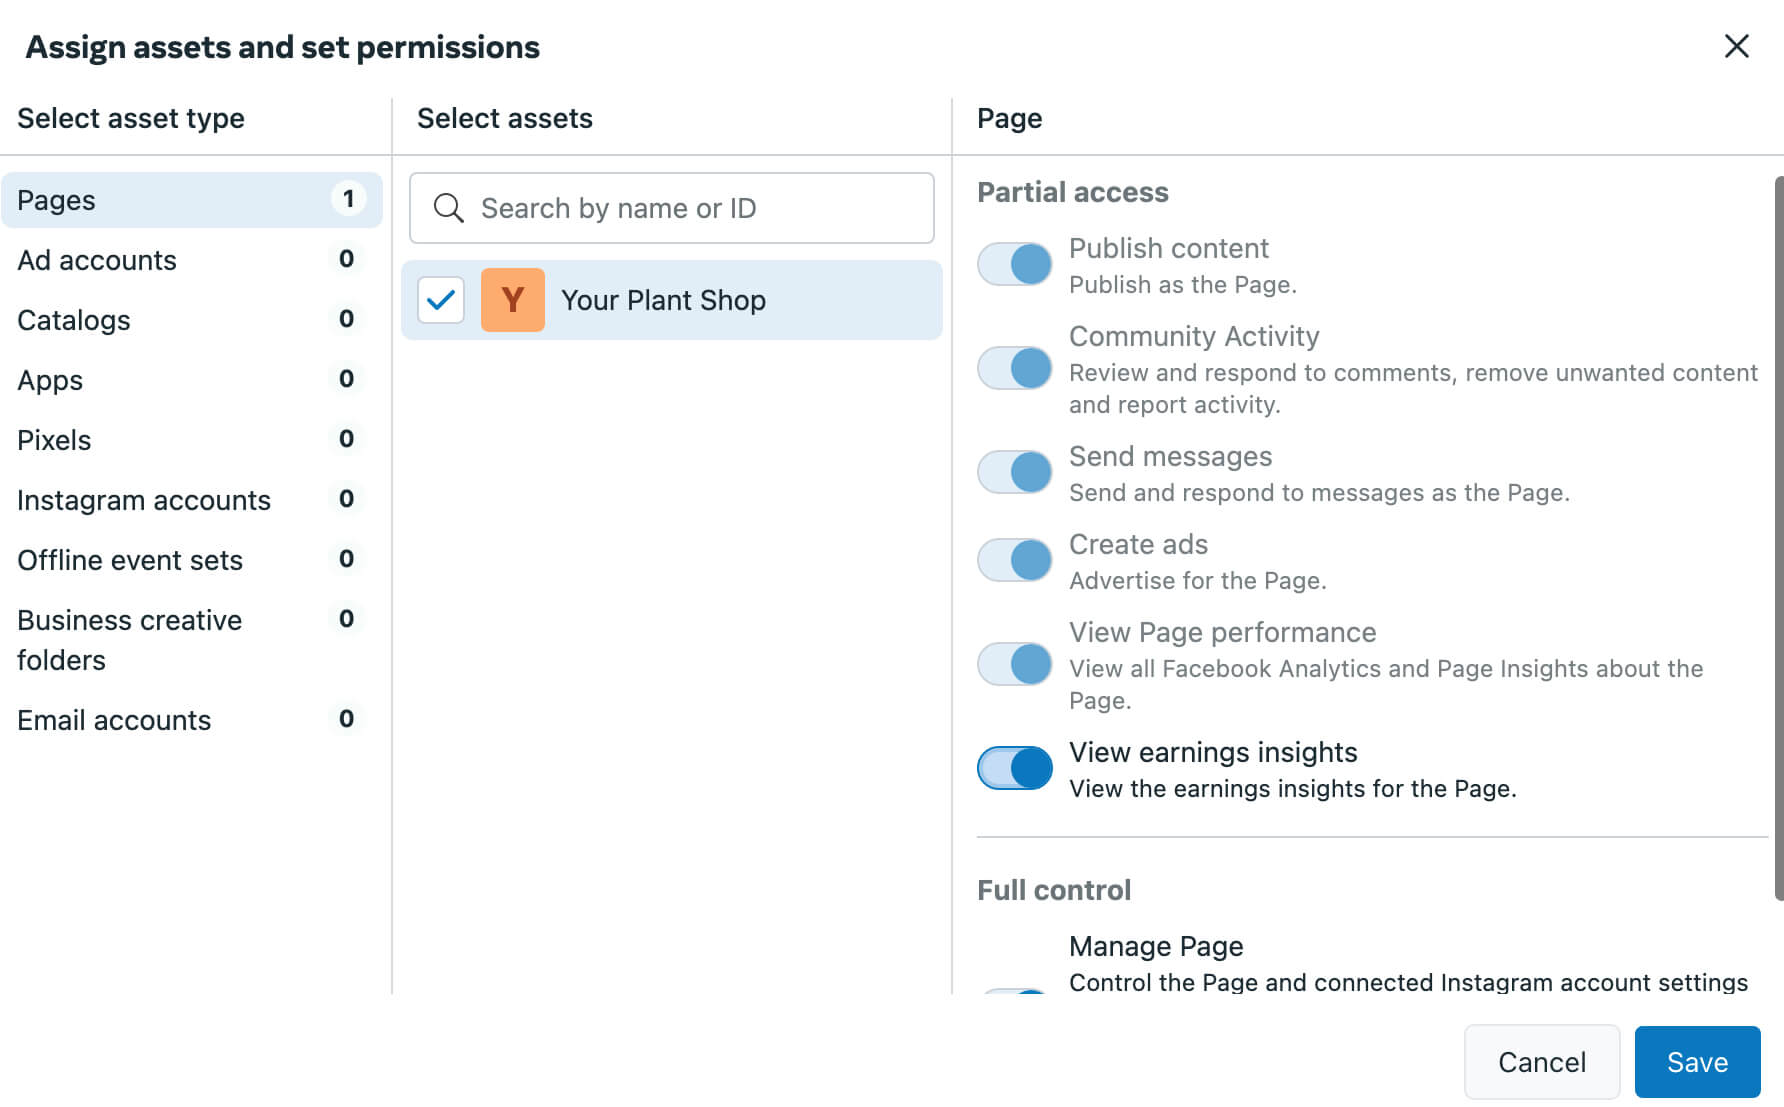
In Business Suite settings, open the People tab and select a team member. To assign a new role, click the Assign Assets button in the upper-right corner. Review each asset type and check off the assets you want to assign.

Take care to choose the right access level for each asset. Then click the Save button to apply the settings.

Discover Proven Marketing Strategies and Tips
Want to go even deeper with your marketing? Check out the Social Media Marketing Podcast! Publishing weekly since 2012, the Social Media Marketing Podcast helps you navigate the constantly changing marketing jungle, with expert interviews from marketing pros.
But don’t let the name fool you. This show is about a lot more than just social media marketing. With over 600 episodes and millions of downloads each year, this show has been a trusted source for marketers for well over a decade.
#7: List Services in Business Suite
If you manage marketing for a service-based business, you have the option to list all of your offerings on your Facebook business page. That way, you can drive consideration and attract more customers.
To configure services in Business Suite, open the All Tools menu and select Services. Then click the Add a Service button.
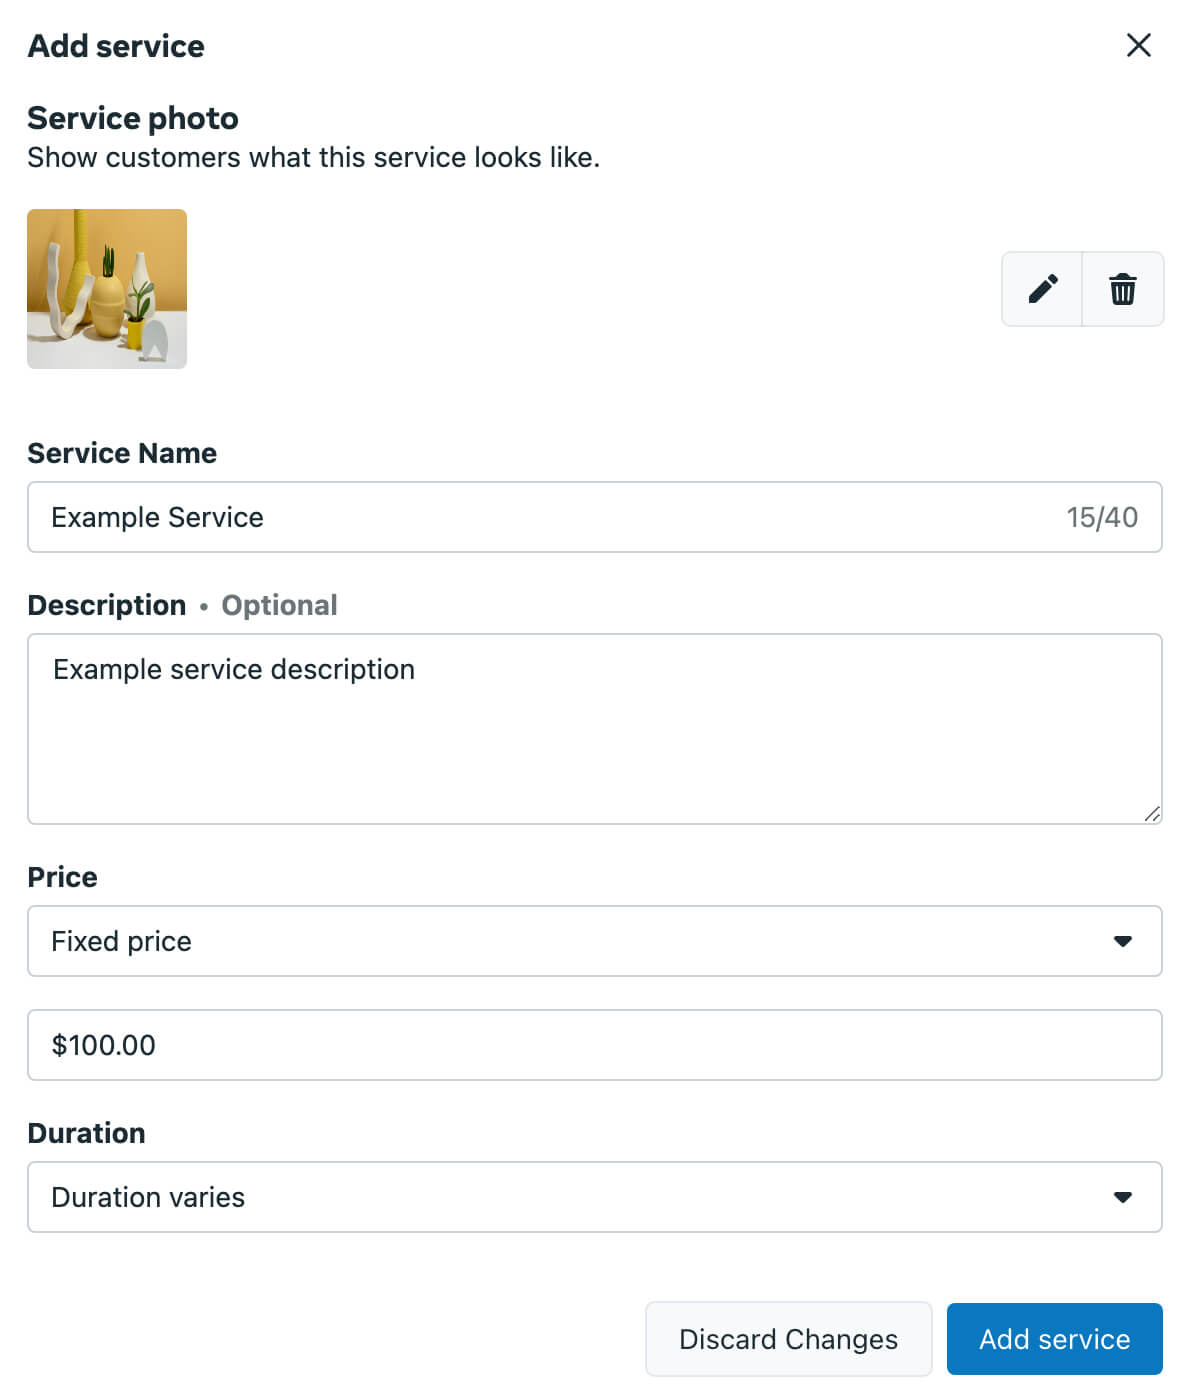
Add a name and a description, upload an image, and set the price and duration.
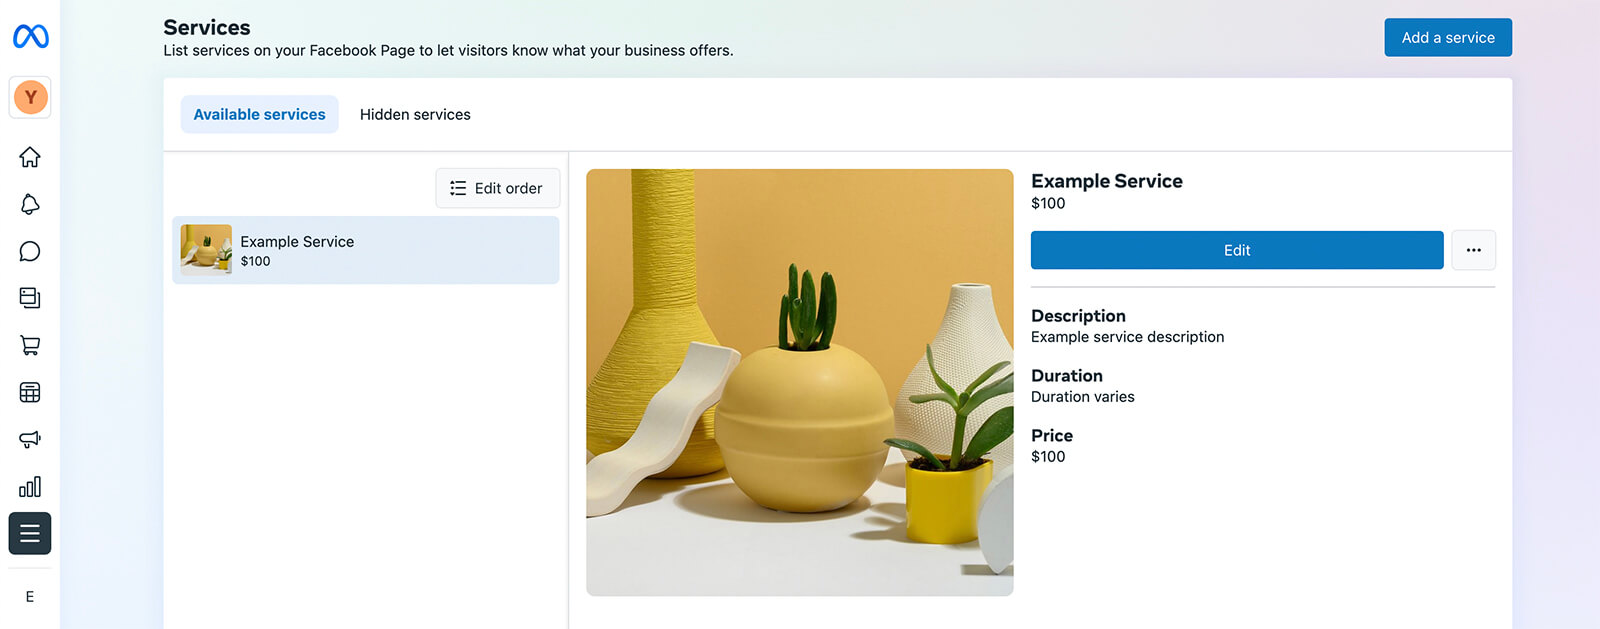
#8: Take Appointment Requests in Business Suite
With Business Suite, you can do more than just list your services. You can also take appointment requests and book services. To set up appointment booking, open the All Tools menu in Business Suite and select Appointments.
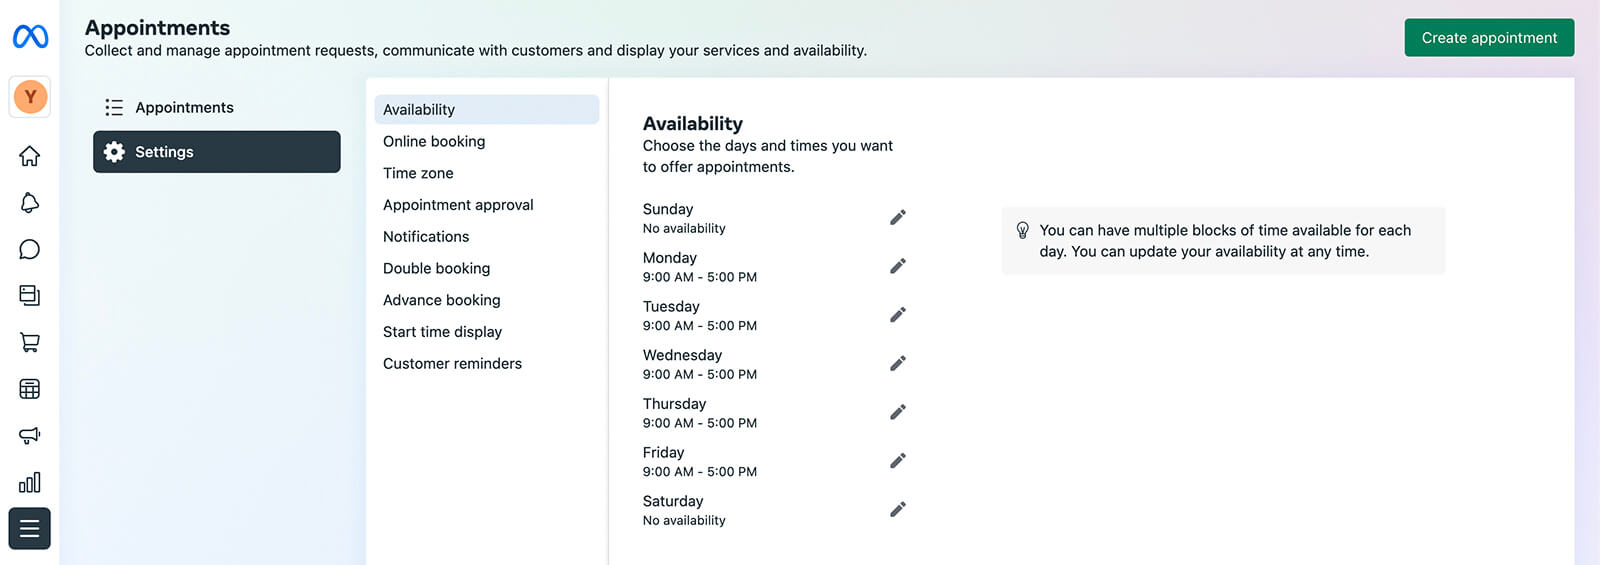
Then open the Settings tab to configure appointments. You can determine availability, set appointment approval and notification preferences, and automate reminders. When customers book time slots, you can review and confirm them in the Appointments tab.
#9: Configure Business Apps in Business Suite
Meta Business Suite gives you plenty of built-in tools for marketing your business. But in many cases, you can get more appointments, sell more products, or produce better creatives with Meta's selection of business apps.
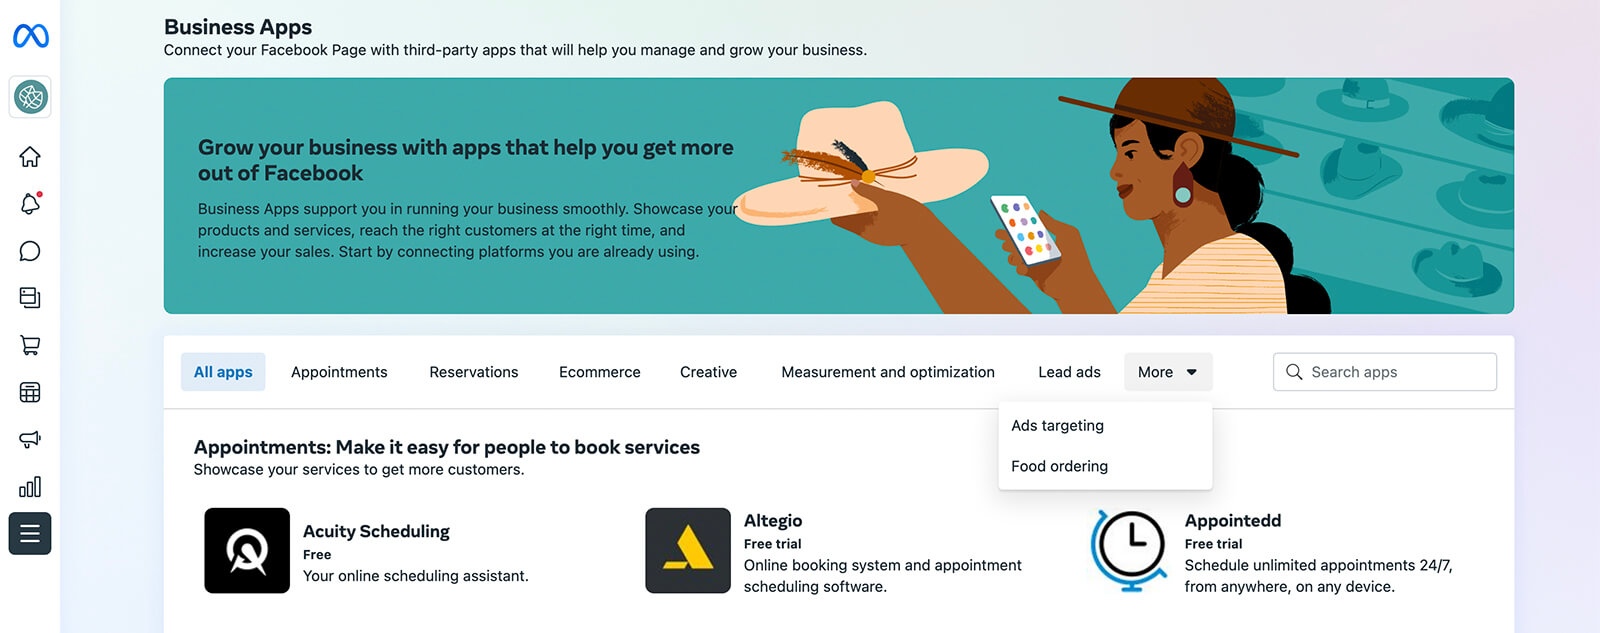
To browse your options, open the All Tools menu in Business Suite and select Business Apps. For example, you can use apps like Acuity for locking in time on your calendar or apps like Fresha to manage salon and spa appointments. You can also use apps like Reserveout and Resy for restaurant reservations.
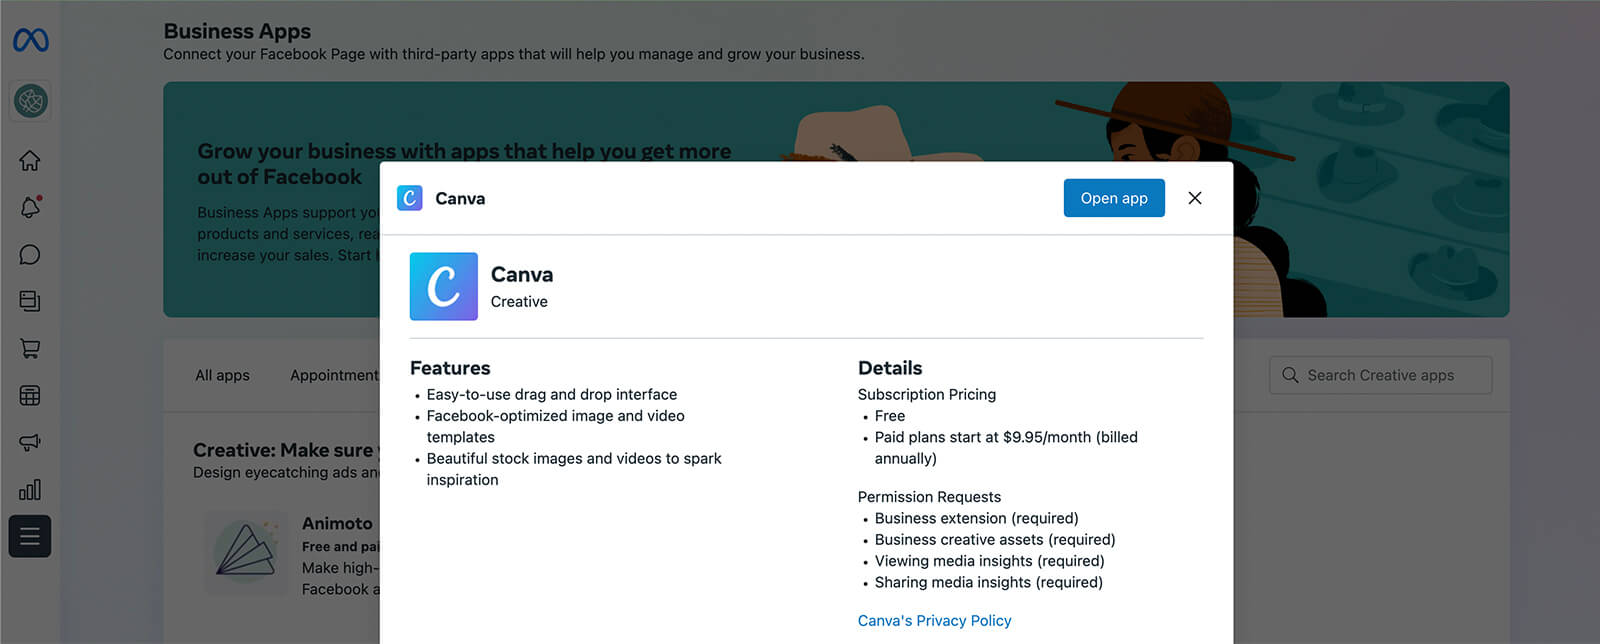
Business Suite also connects to design apps like Canva and Vimeo to help you develop more compelling creative assets. To get started with any of these apps, open it from the Business Apps menu, click the Open App button, and follow the prompts to configure your account. Note that many of these apps are free but some require a paid subscription.
#10: Structure File Manager and Creative Asset Access in Business Suite
Whether or not you opt to use one of the creative business apps, you can use Business Suite tools to organize creative assets. Using Business Suite's File Manager helps keep tabs on approved creatives and ensure that everyone on your team is using the right assets.
From the All Tools menu, select File Manager. Then click the Create Folder button to get started. Give the folder a name and add an optional description. You can create folders for campaigns, themes, seasons, social channels, or other categories that help your team stay organized. To upload photos or videos, click the Add Files button.
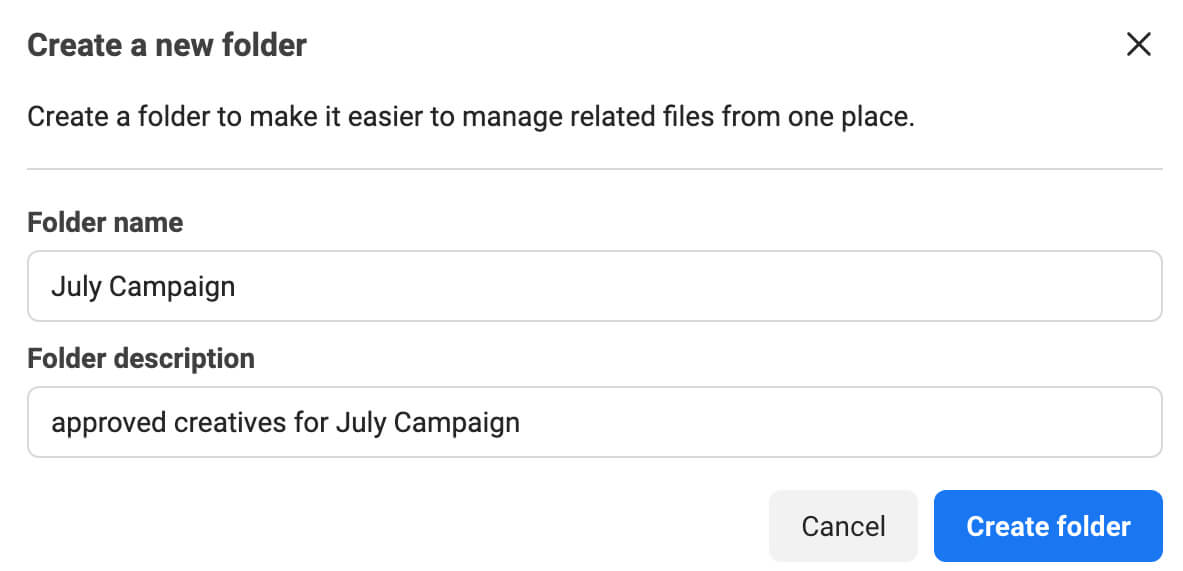
You can create posts or Stories directly from File Manager or you can select assets you've uploaded to file manager directly from Business Suite's content creation tool (see below for more details).

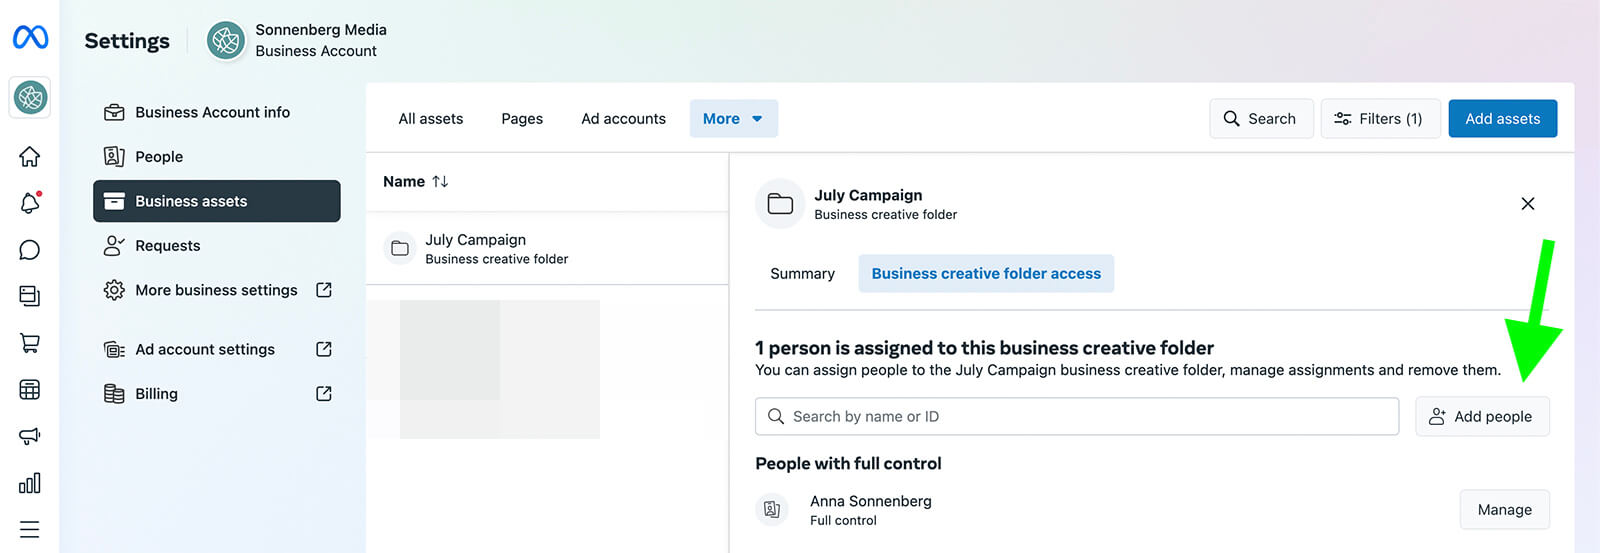
To share file manager folders with your team, click the View FolderSettings button in the upper-right, and then select Edit Folder Permissions. You'll be redirected to Business Settings, where you can add people to the folder. Alternatively, you can go to the Business Assets tab in Business Suite settings and add people to the folder without leaving Business Suite.
#11: Plan, Draft, Publish, and Schedule Social Media Content in Business Suite
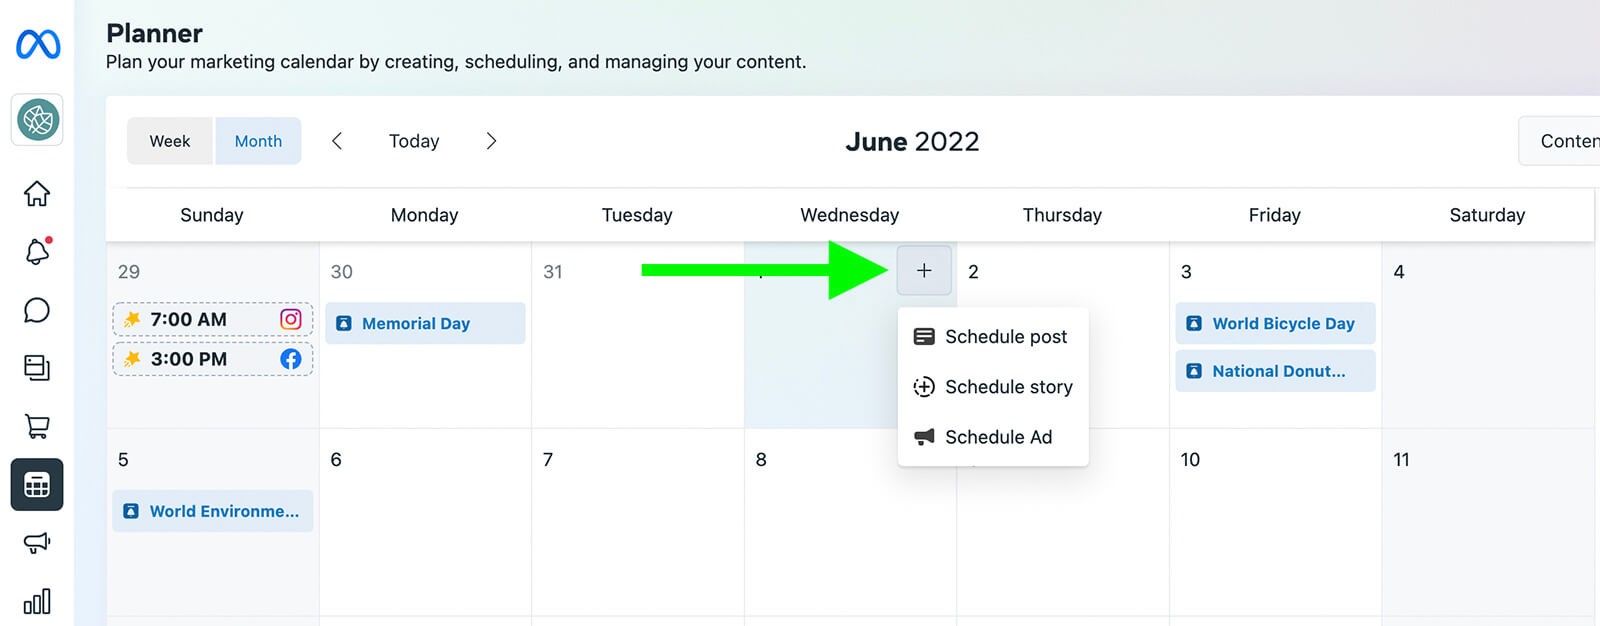
To create content with your team, open the Planner tab in Business Suite. You can click the Create button in the upper-right or select any day on the calendar. Then you can create Facebook and Instagram posts either simultaneously or separately.
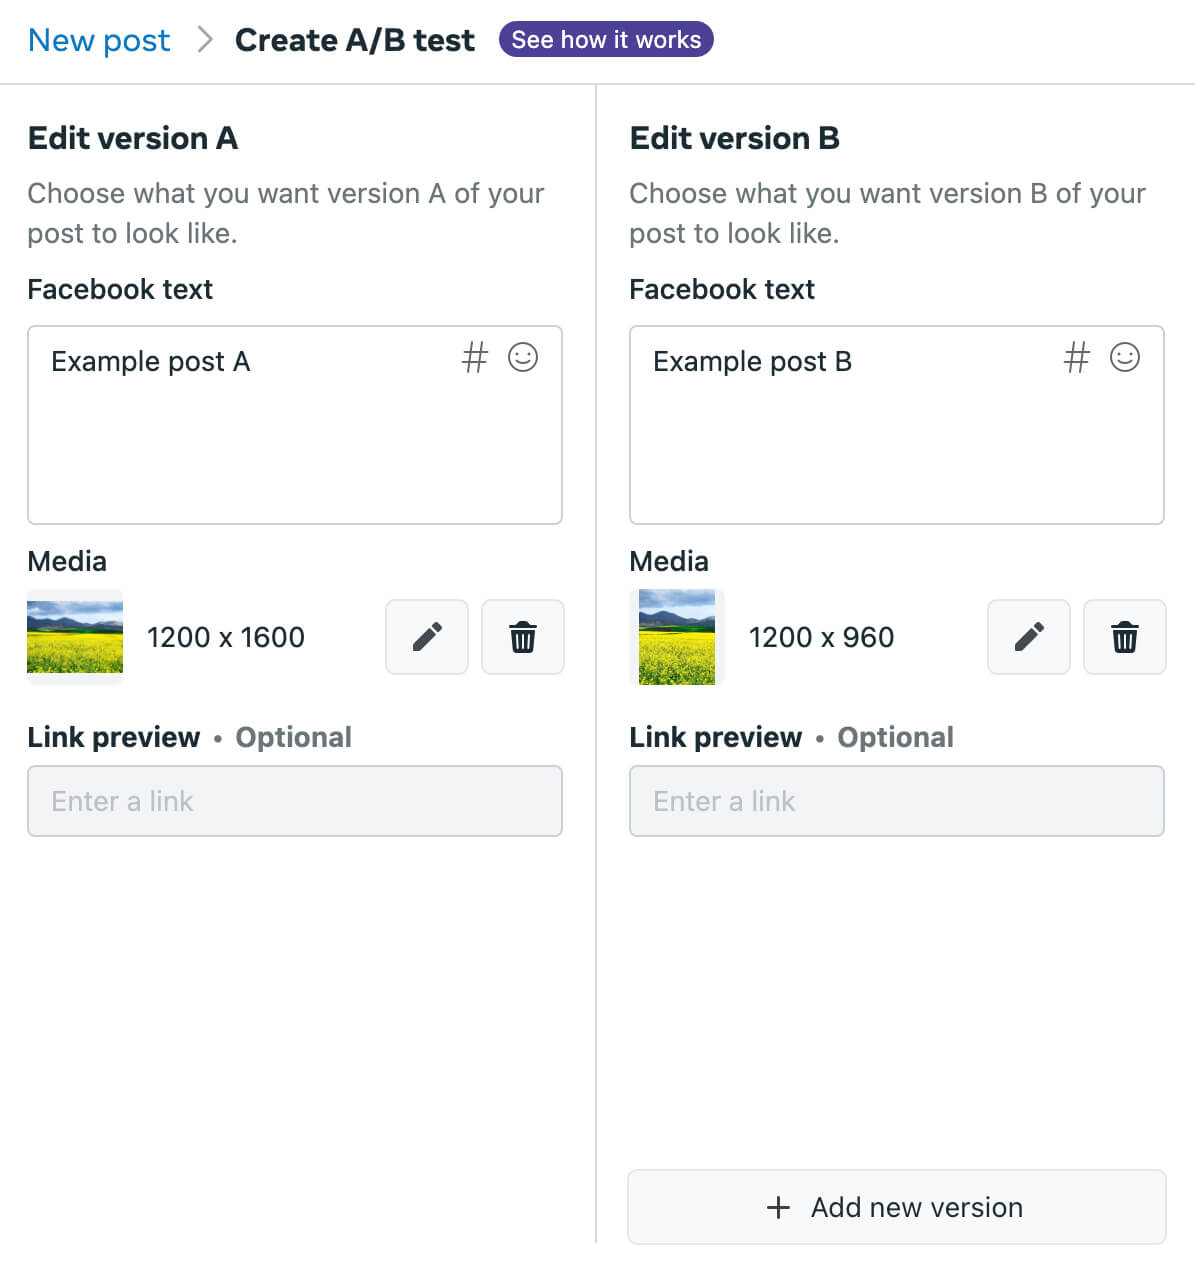
If you want to use the creatives you organized in file manager, use the drop-down menu under Add Photo or Add Video and select Add From File Manager. If you can't decide which creative or copy to use, take advantage of the built-in A/B test option (available for Facebook only). You can create up to four versions and allow Meta to determine the winner.
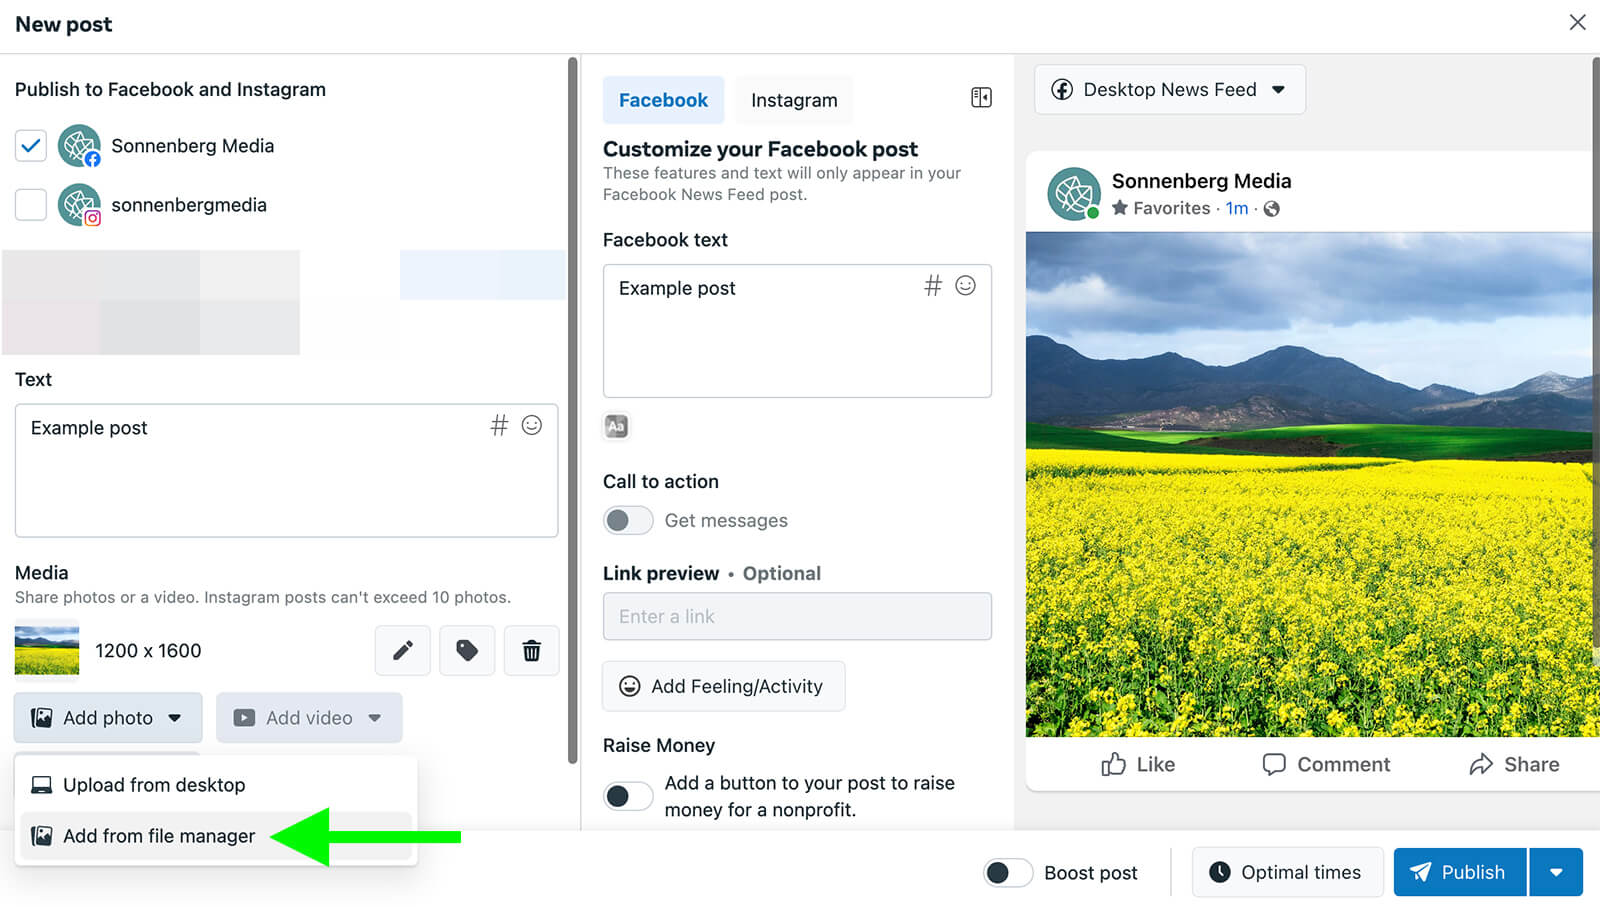
Whether or not you set up an A/B test, you can schedule, publish, or save the post as a draft. You can also use Business Suite's Optimal Times feature to schedule content at the ideal time for your audience.
To help with the content planning process, use the planner's Moments feature. Click any of the automatically generated moments to start creating a post on the topic. Alternatively, click the See Templates button to access Vimeo video templates you can use to get started.
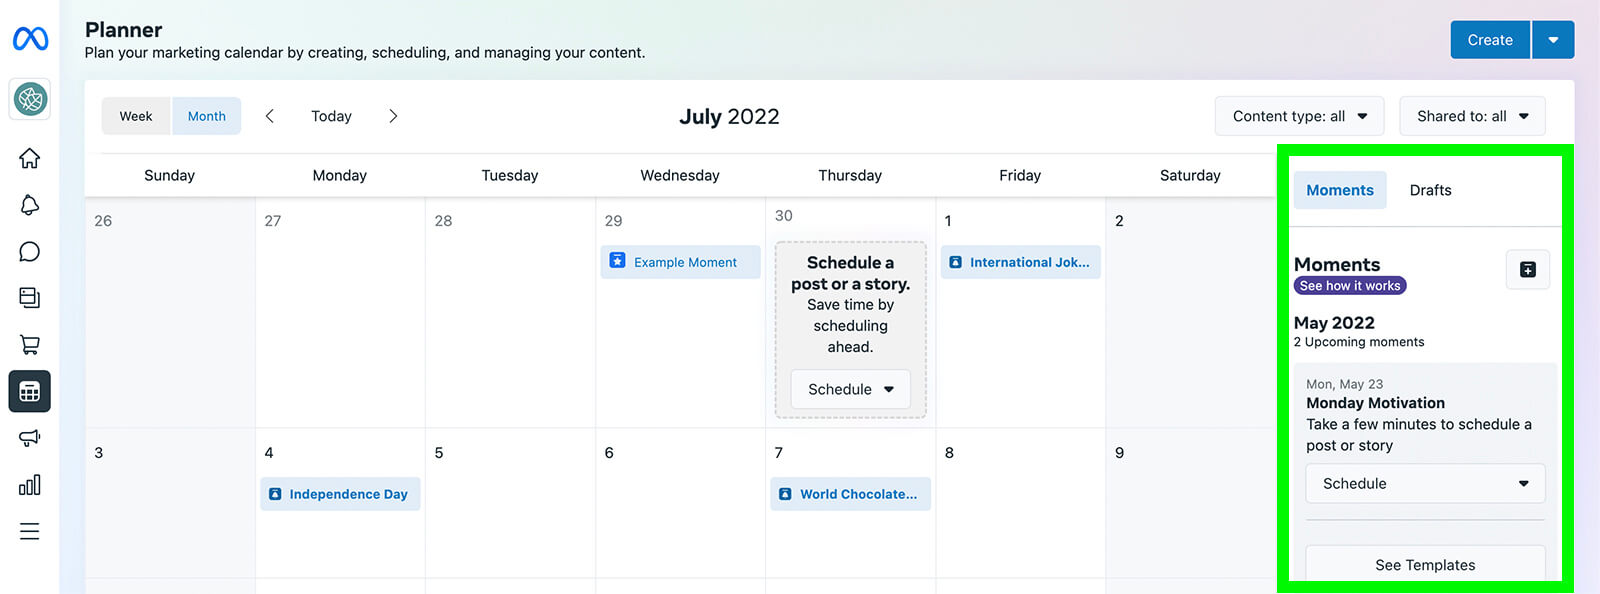
You can also click the plus icon to create moments for your own business. Your team can use these moments as reminders for seasonal content that's relevant to your organization. Then you can click it to start creating a post instantly.
#12: Manage Facebook and Instagram Engagement in Business Suite
With Business Suite, you can manage both Facebook and Instagram engagement. The Inbox tab organizes all comments and messages from the two platforms in a single folder. You can also select individual folders to tackle Messenger, Instagram Direct, or comments separately.
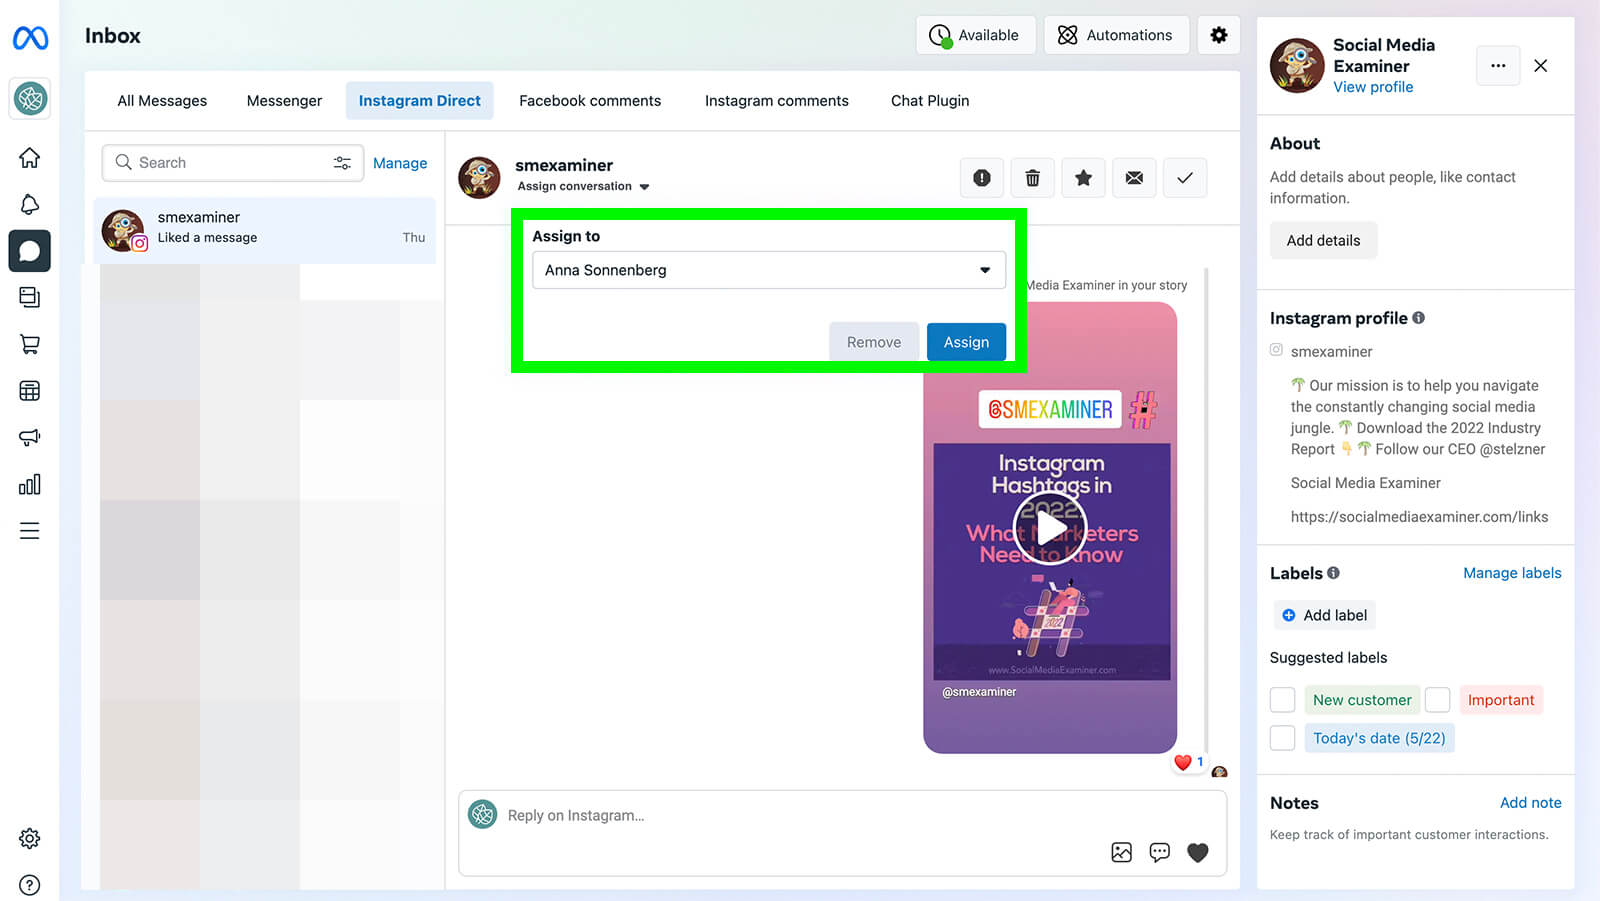
To manage your Business Suite inbox efficiently, use the Assign Conversation option to make sure each inbox item goes to the right person. You can also use the built-in system for labels and notes to keep track of customers, influencers, and user-generated content.
#13: Review Social Media Analytics in Business Suite
To review audience performance and audience growth, click the Insights tab in Business Suite. Use the Overview tab to get a bird's-eye view of your performance and spot trends related to reach and growth.

Then click through the Results, Content, and Audience tabs for a more granular look at what you've accomplished. For example, the Content tab lets you sort by your choice of metrics, making it easy to find top-performing content based on reach, clicks, comments, shares, or other data that matter to your team.
You can also use Business Suite's built-in goal-setting tool to keep your team on track. Click the New Goal button and set the audience- or growth-related goal you want to reach in the next 28 days. Then check the Insights tab regularly to monitor progress.
Conclusion
Using this Meta Business Suite tutorial, you can easily set up the social media management tool for your team. Once you've added your team and completed the setup, you can start using Business Suite to manage both organic and paid campaigns for your Facebook business page and Instagram account.
Get More Advice on Meta Business Suite:
- Learn how to set up Meta Business Suite and Business Manager for multiple accounts, including how to onboard your team and begin scheduling content.
- Find 14 Meta Business Suite features designed to help marketers work and collaborate more effectively. Plus, you’ll learn how to use them for the best results.
- Discover how to use your Facebook Business Suite to manage and schedule Instagram posts AND Instagram stories.
Stay Up-to-Date: Get New Marketing Articles Delivered to You!
Don't miss out on upcoming social media marketing insights and strategies! Sign up to receive notifications when we publish new articles on Social Media Examiner. Our expertly crafted content will help you stay ahead of the curve and drive results for your business. Click the link below to sign up now and receive our annual report!
Attention Agency Owners, Brand Marketers, and Consultants

Introducing the Marketing Agency Show–our newest podcast designed to explore the struggles of agency marketers.
Join show host and agency owner, Brooke Sellas, as she interviews agency marketers and digs deep into their biggest challenges. Explore topics like navigating rough economic times, leveraging AI, service diversification, client acquisition, and much more.
Just pull up your favorite podcast app, search for Marketing Agency Show and start listening. Or click the button below for more information.

