Do you know how to measure your return on investment (ROI) on Facebook ads?
Do you know how to tell if your Facebook ad is accomplishing your objective?
In this article, I’ll cover what Facebook conversion tracking and offsite pixels are, why they matter and how to start tracking the conversions of your Facebook ads today.
Facebook Ad ROI?
You’ve probably heard the refrain that you can’t measure ROI on Facebook.
Let me be clear—measuring the ROI of all of your Facebook efforts is dangerous. You are performing more than just a sales role—one of customer service as well.
And you absolutely can measure the ROI of your Facebook advertising efforts, particularly when you’re looking to drive an action that can be assigned a value. This is done with conversion tracking and offsite pixels.
What Is Conversion Tracking?
Facebook allows you to track the conversions that happened as a result of your Facebook ad.
This is a big deal because without it, you’re left guessing.
When you ran your ad, your conversions went up 20%. But how many of those conversions were as a result of your ads? Could they have been driven by something else?
With conversion tracking, Facebook knows that they went to your site from your Facebook ad. And with the help of an offsite pixel, they know that the user then performed your desired action.
What Is an Offsite Pixel?
An offsite pixel is a snippet of code provided by Facebook that you place within the < HEAD > tags of a specific page of your site to alert Facebook that a conversion is complete.
Get World-Class Marketing Training — All Year Long!
Are you facing doubt, uncertainty, or overwhelm? The Social Media Marketing Society can help.
Each month, you’ll receive training from trusted marketing experts, covering everything from AI to organic social marketing. When you join, you’ll also get immediate access to:
- A library of 100+ marketing trainings
- A community of like-minded marketers
- Monthly online community meetups
- Relevant news and trends updates
For example, let’s say that you’re running an ad to drive the purchase of Widget 2.0. Facebook knows that a person clicked your ad. And they are able to follow that person away from Facebook as a result of you adding that snippet of code.
You would add that offsite pixel to a success page. So once a user purchases Widget 2.0, they will be directed to a success page that holds your offsite pixel. Facebook then knows that your ad resulted in a successful conversion.
Conversion Types and Optimized CPM
One of the amazing things about conversion tracking is that Facebook utilizes Optimized CPM (oCPM) to determine who sees your ads.
oCPM allows advertisers to prioritize their marketing goals, and then automatically delivers ads against those goals in the most effective way possible. This allows advertisers to maximize the value they get from their budgets.
Your ad is optimized to be surfaced to the people most likely to perform your desired action.
When you set up your offsite pixel, you can optimize for the following conversion types:
- Checkouts
- Registrations
- Leads
- Key page views
- Adds to cart
- Other website conversions
Facebook learns which users perform these desired actions through advertisers using conversion tracking. This intelligence helps Facebook target your ad at people most likely to convert.
Now that you understand conversion tracking, let’s cover how you can start doing it today!
#1: Create an Offsite Pixel
First, you need to use Power Editor. I know it’s clunky, but if you’re serious about Facebook marketing, it’s a must-use tool.
In the top-left menu, click Conversion Tracking.
If you’ve never used Conversion Tracking before, Facebook provides a nice little explanation for you.
Now click the green Create Conversion Pixel button at the top right.
Discover Proven Marketing Strategies and Tips
Want to go even deeper with your marketing? Check out the Social Media Marketing Podcast! Publishing weekly since 2012, the Social Media Marketing Podcast helps you navigate the constantly changing marketing jungle, with expert interviews from marketing pros.
But don’t let the name fool you. This show is about a lot more than just social media marketing. With over 600 episodes and millions of downloads each year, this show has been a trusted source for marketers for well over a decade.
Now name your pixel and choose a conversion category. This is the action that Facebook will optimize for.
#2: Snag the Code
Now you’ll be given a box with some code. This is the offsite pixel!
Copy this code and proceed to #3.
#3: Paste the Code
Here is where the instructions can’t be quite as specific. You’ll need to paste this code between the < HEAD > tags of a specific page on your website. But how and where you do that will depend on a couple of things.
How you do this will be determined by your content management system (CMS). Within WordPress, you should have a text box for Custom Tracking/Conversion Code when editing your page or post.
The page that you add this code to will depend on your desired action. Here are some examples of where you would add your offsite pixel:
- Checkouts: The page indicating a completed checkout
- Registrations: The page indicating a completed registration
- Leads: The page following submitting a contact form
- Key page views: The key page itself
- Adds to cart: The page following Add to Cart
- Other website conversions: The page following a specific conversion
#4: Verify the Pixel
Within your list of conversion pixels in Power Editor, your new pixel will either be listed as Active, Unverified or Inactive.
- Active: In the past 24 hours, people have viewed the pages that contain the pixel on your website.
- Unverified: Your pixel may not be installed or properly configured because there have been no reports of people viewing it on your website.
- Inactive: In the past 24 hours, people have not viewed the pages that contain the pixel on your website.
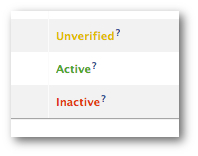
Your offsite pixel will be listed as Active, Unverified or Inactive.
Make sure you refresh the page of your website after you add the pixel to it. That will send a signal to Facebook that it is active.
If the status continues to be Unverified, go back and check your steps!
#5: Create Your Ad
When you create an ad within Power Editor to drive conversions for this pixel, you will now need to apply your offsite pixel.
Within the Creative & Placements tab, click the Conversion Tracking checkbox and select your pixel.
#6: Monitor Your Conversions
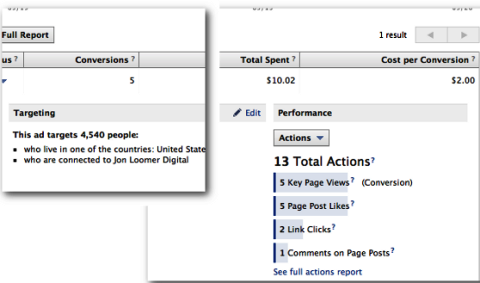
Now when you go into the Facebook Ads Manager, you’ll be given the following stats:
- Conversions: The number of times your conversion pixels fired
- Conversion Value: The value that your ad returned to you based on the conversion details you set up (if available)
- Cost Per Conversion: The average you paid for each conversion
Assuming you know the value of each conversion, you can now determine ROI of your ad campaign!
Results
Conversion tracking is something all savvy Facebook marketers need to be aware of and implement. According to Facebook, optimizing ads for conversions has reduced cost per conversion by 40%. What results are you seeing?
What do you think? Have you tried measuring your Facebook ads? What results did you have? Leave your questions and comments in the box below.
Images from iStockPhoto.
Attention Agency Owners, Brand Marketers, and Consultants
Introducing the Marketing Agency Show–our newest podcast designed to explore the struggles of agency marketers.
Join show host and agency owner, Brooke Sellas, as she interviews agency marketers and digs deep into their biggest challenges. Explore topics like navigating rough economic times, leveraging AI, service diversification, client acquisition, and much more.
Just pull up your favorite podcast app, search for Marketing Agency Show and start listening. Or click the button below for more information.