Want to use video to market your business? Wondering how to set up a brand channel on the world’s second-largest social media platform?
In this article, you’ll learn how to make a YouTube channel for your business and get a step-by-step guide to establishing your brand presence on the platform.
Why Choose a Brand Channel vs. a Personal Channel?
Before you set up your new channel on YouTube for marketing, you'll need to make an important decision. Should you create a brand channel or a personal channel? If you want your account to position you as a public figure, entrepreneur, or creator—and you plan to run your account independently—then you might be inclined to choose a personal channel.
But for most businesses and agencies, a brand channel is a better choice for marketing. Think of a brand channel as YouTube's version of a business account. It lets you create a custom business name for your channel and collaborate with your team without having to share logins or personal account access.
How to Start a YouTube Channel for Your Business
You can create a YouTube channel for your brand and begin publishing in just five steps. Use the tutorial below to get started.
#1: Create a Google Account to Manage Your YouTube Channel
Unlike many social media platforms, YouTube doesn't require you to use your personal login to create or manage a business channel. Instead, you can create a completely separate Google account to manage your company's YouTube channel.
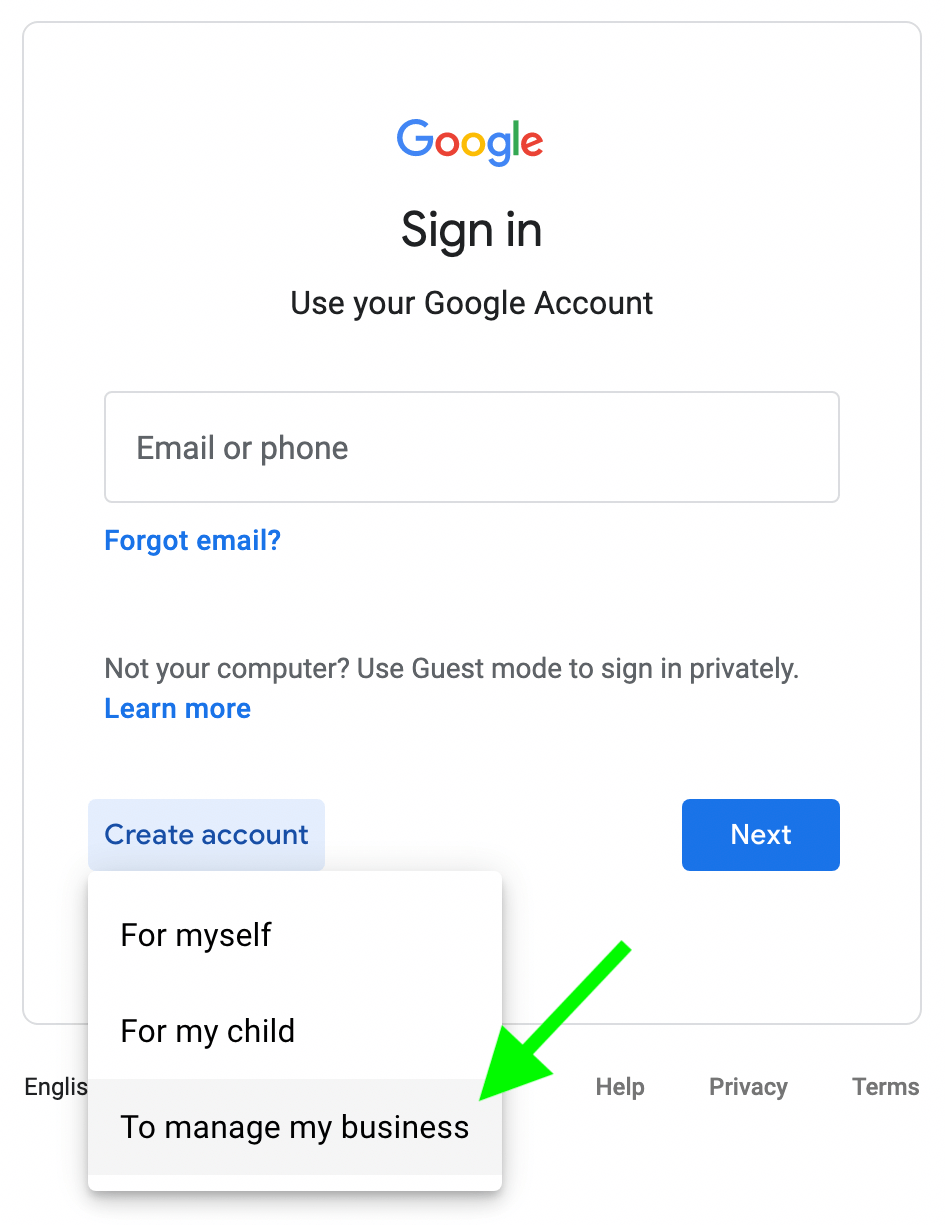
Start by going to the Google Account sign-in page and clicking the Create Account button. From the drop-down menu, select To Manage My Business. You have the option to set up a totally new Gmail address for your YouTube account. It's a good idea if you don't yet have a shared email account for your marketing team.
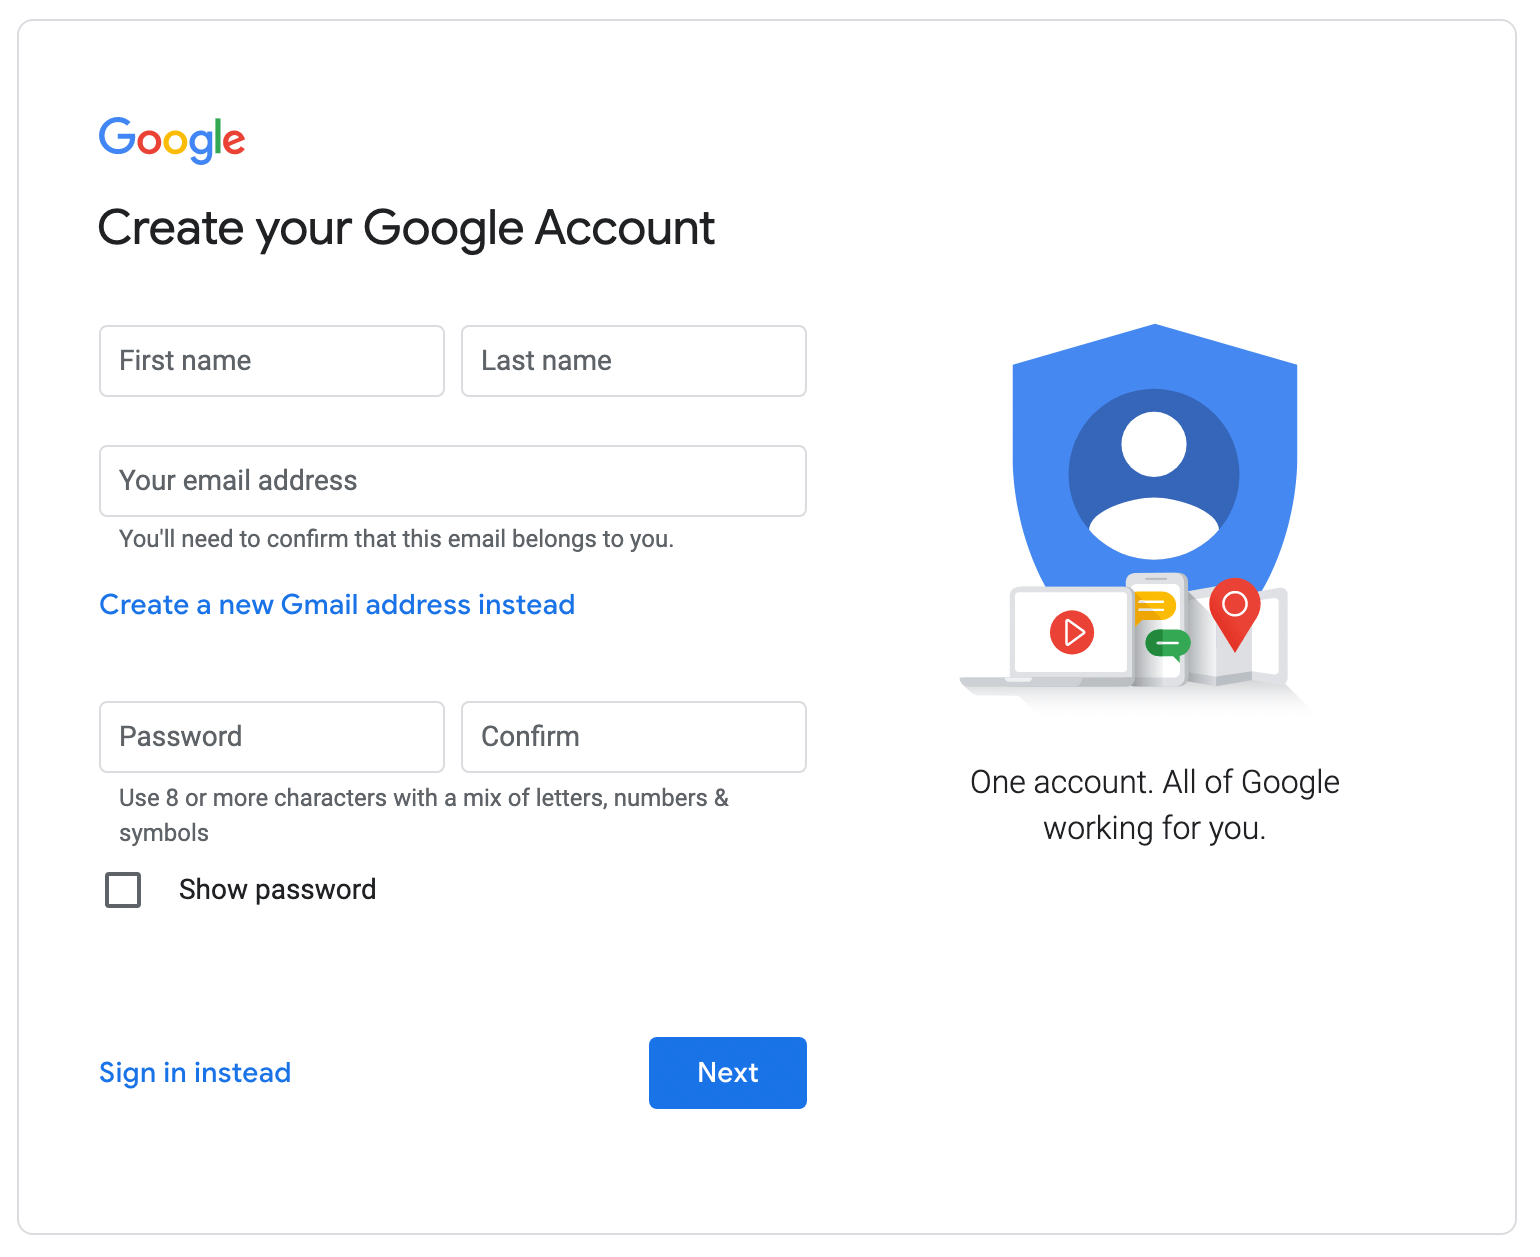
But if you already have an email account for your marketing team, click the Use My Current Email Address Instead button. Then enter your name, existing email address, and a new password. You'll need to verify ownership of the email address by entering a verification code. You may also need to verify your phone number.
Once you've completed the verification process, you can provide some optional personal details like your birthday and gender. Then agree to Google's terms by clicking the I Agree button. Google may prompt you to set up your Google Business Profile but you can click the Not Now link to get started with YouTube instead.
#2: How to Create a YouTube Channel
To create a channel, sign into YouTube with your new Google account. Go to your channel list by clicking your profile icon in the upper-right corner and selecting Switch Account.
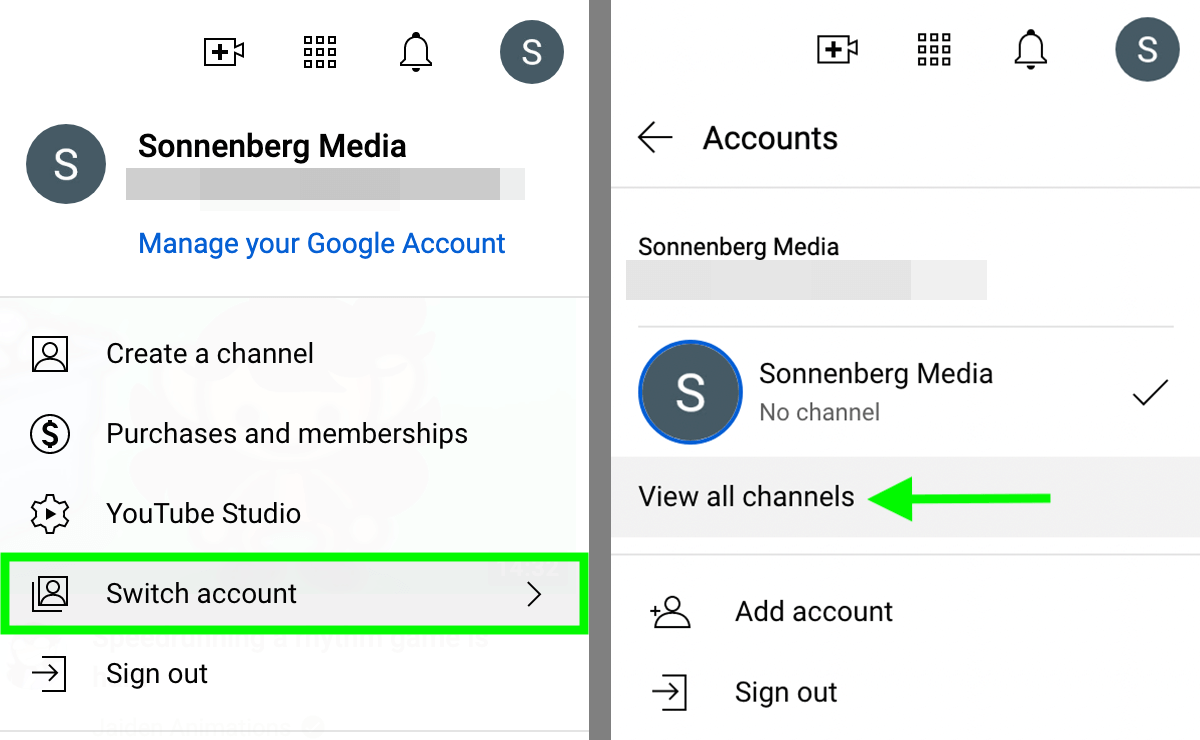
Then select View All Channels. Click the Create a Channel button to launch a new channel for your business.
Next, give your channel a name. Ideally, it should align with your business' name or describe your company in a way that's easy to search. Once you've settled on a channel name that fits within the 100-character limit, check the box to agree to the terms. Then click the Create button.
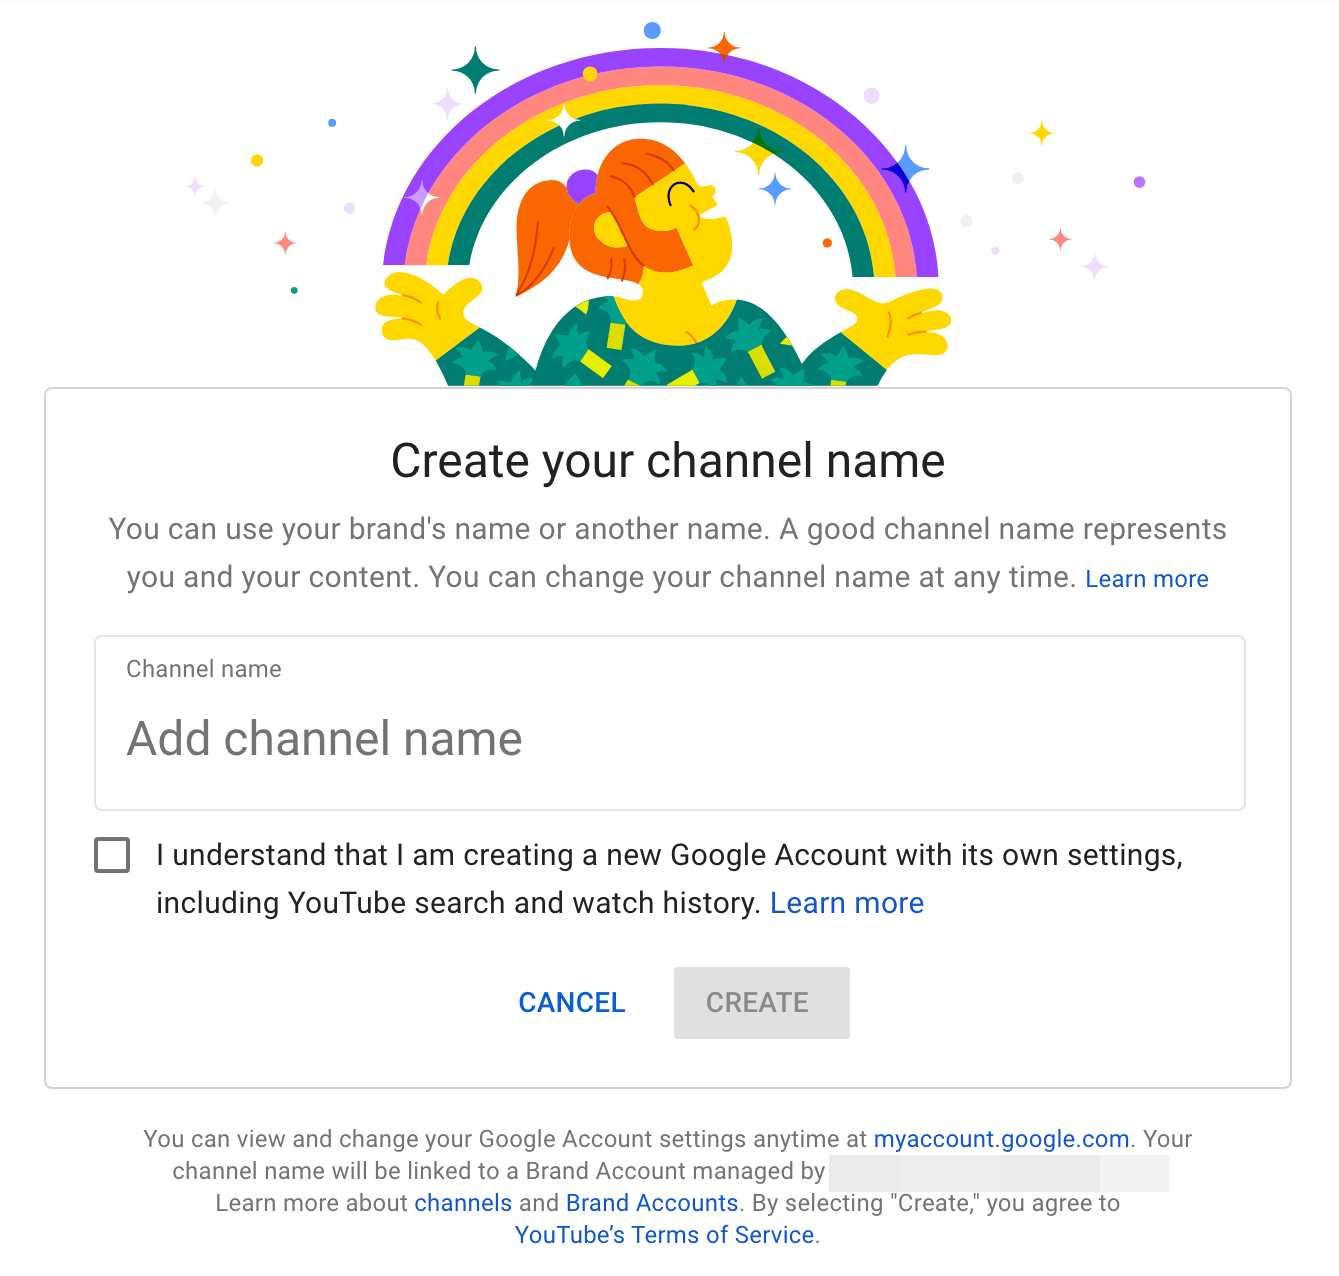
This workflow automatically creates a brand account for your YouTube channel, which allows you to add members from your marketing team. We'll cover how to invite people to manage the channel after going over the basic channel setup. But first, let's look at YouTube channel customization.
Basic Info
To finish setting up your YouTube channel, click the profile icon in the upper-right corner and select YouTube Studio. In YouTube Studio, select Customization from the left-hand menu. Then select the Basic Info tab.
Get World-Class Marketing Training — All Year Long!
Are you facing doubt, uncertainty, or overwhelm? The Social Media Marketing Society can help.
Each month, you’ll receive training from trusted marketing experts, covering everything from AI to organic social marketing. When you join, you’ll also get immediate access to:
- A library of 100+ marketing trainings
- A community of like-minded marketers
- Monthly online community meetups
- Relevant news and trends updates
Channel Description
In the Description box, tell viewers what to expect from your channel. YouTube channel descriptions have a 1,000-character limit, but the first 100 or so characters are the most critical. In search, YouTube cuts off channel descriptions after about 100 characters so include the most important information at the beginning.
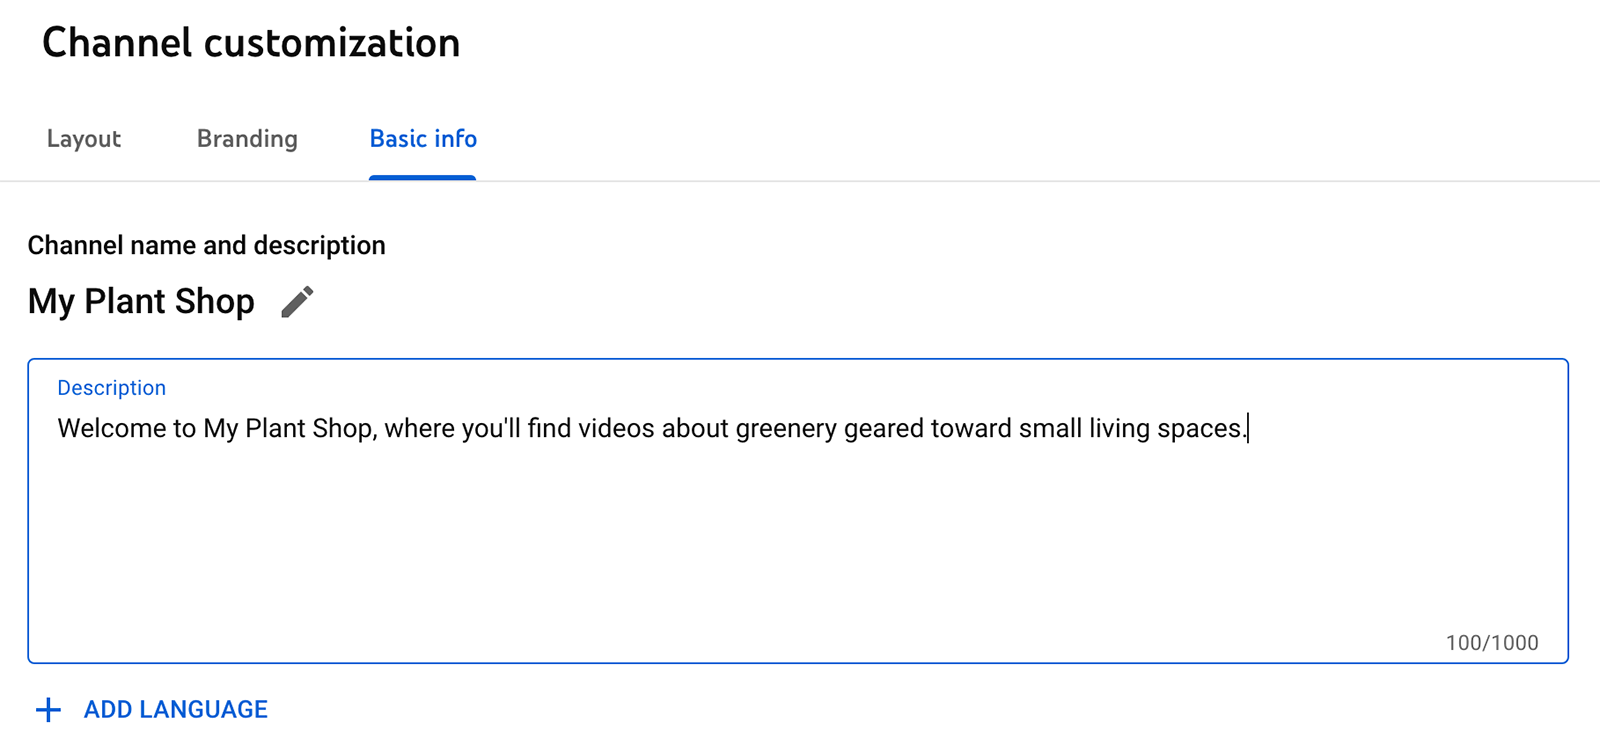
Channel Language
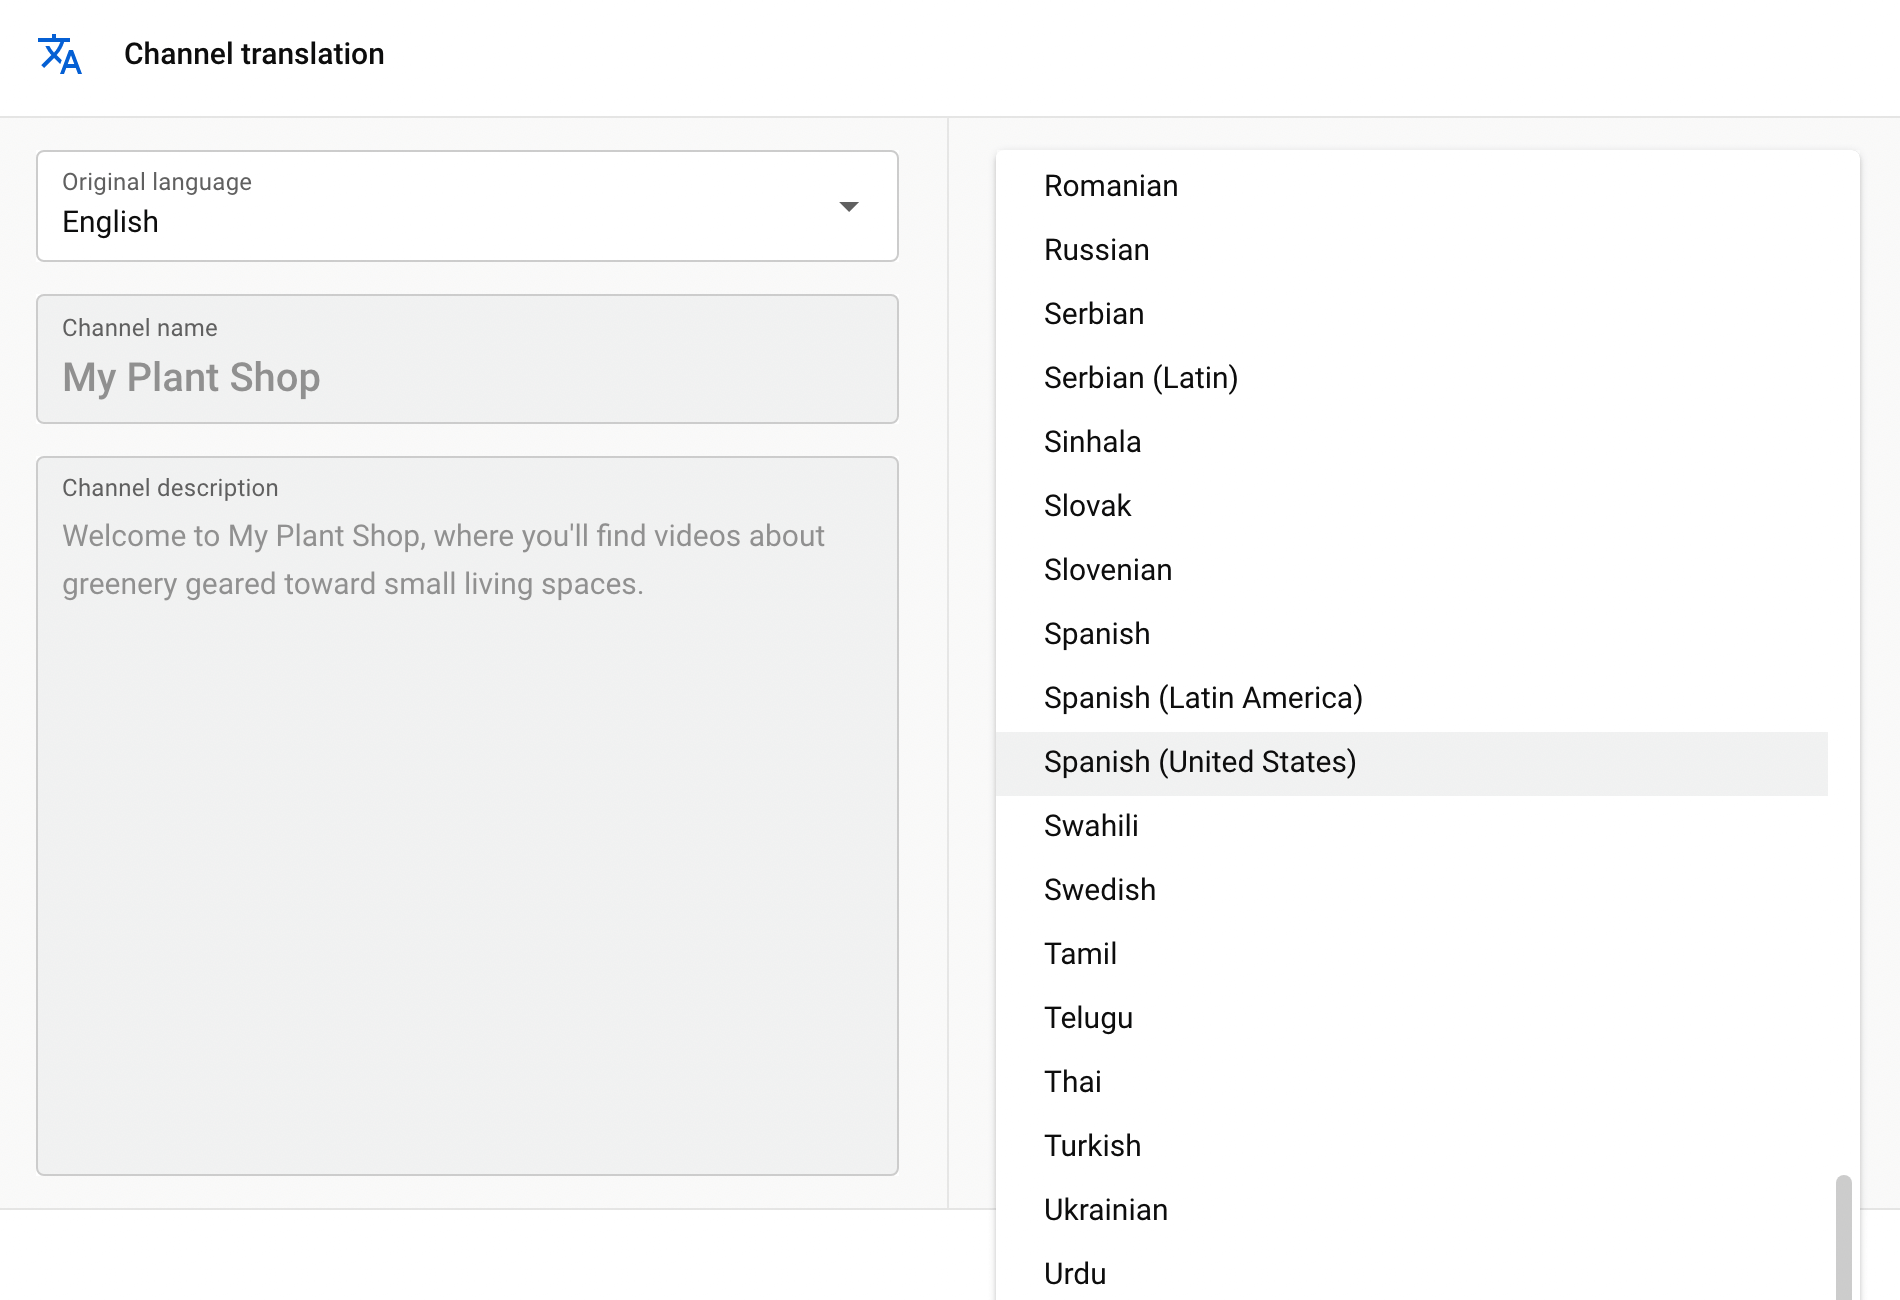
If your company's ideal customers speak multiple languages, you can easily make your channel more accessible. Click the Add Language button to choose a second language. Then enter a translated channel name and description.
Channel URL
When you first create a channel for your business, YouTube automatically generates a unique URL. Once you attract at least 100 subscribers, you can change it to a custom URL of your choice. To make it as easy as possible for customers to find your business on YouTube, aim to keep your YouTube channel URL consistent with other social media handles.

Channel Links
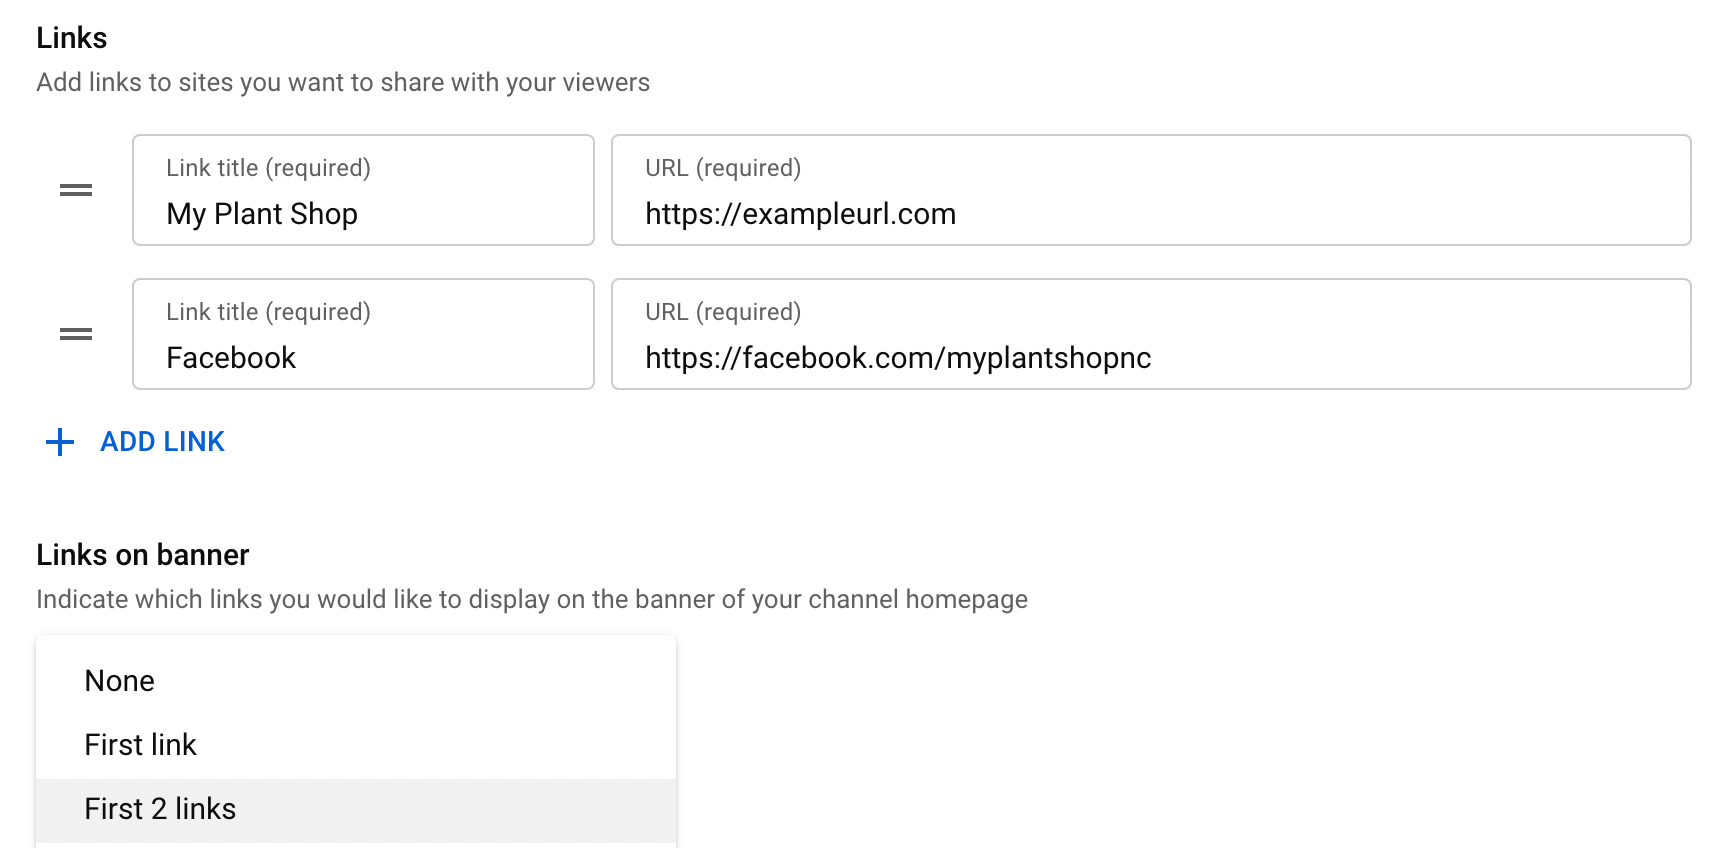
Next, add website and social media profile links to your channel. You can add multiple links, but you can only feature up to five on the banner of your channel home page. So make sure to list the most important sites and social media platforms first.
Contact Info
Finally, add an email address where viewers can contact your business. You can add the address linked to your Google account or any other address your business uses for marketing or customer service.

Branding
To add a profile picture and banner image to your channel, click the Branding tab.
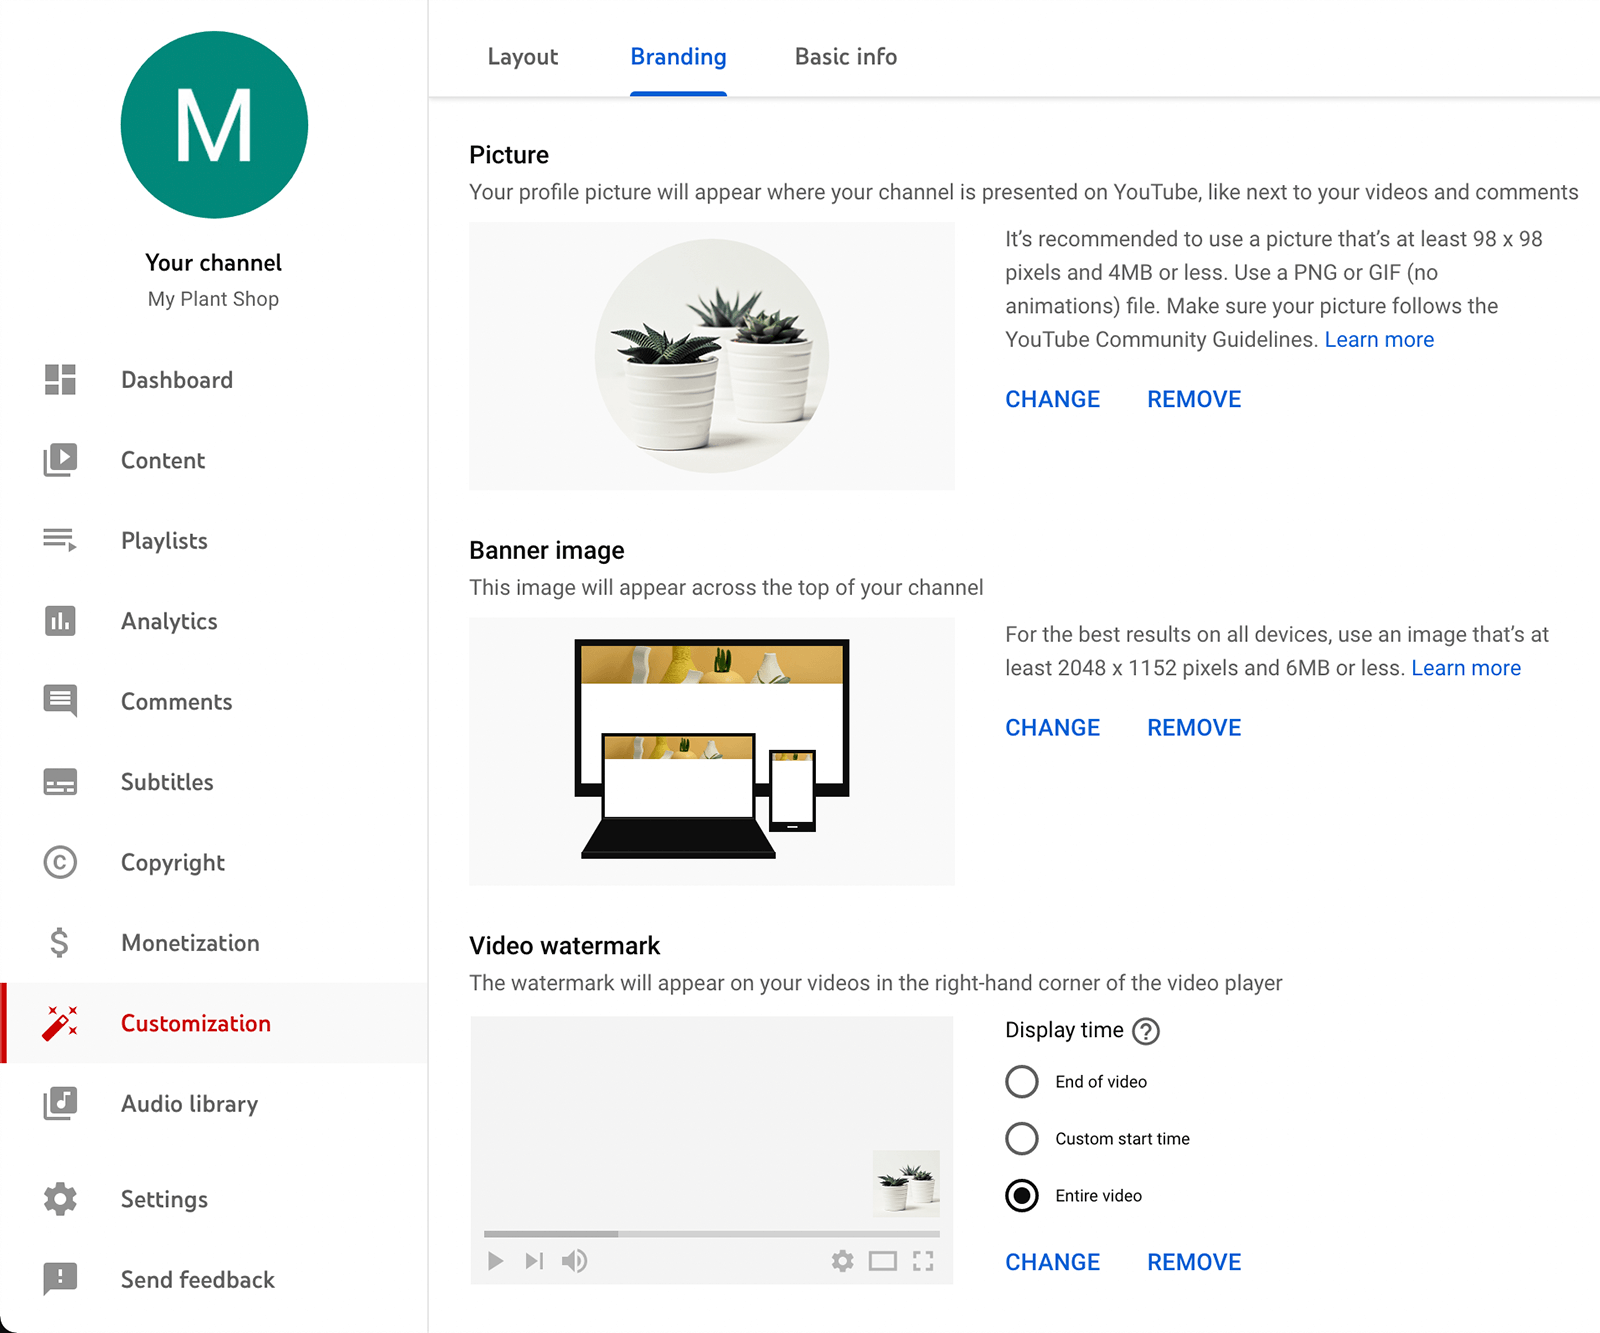
Picture
For your channel picture, choose a square image that measures at least 98 x 98 pixels. To make it easy for your audience to identify your brand, use a logo, an image of your business or product, or a photo of yourself (if you're a public figure).
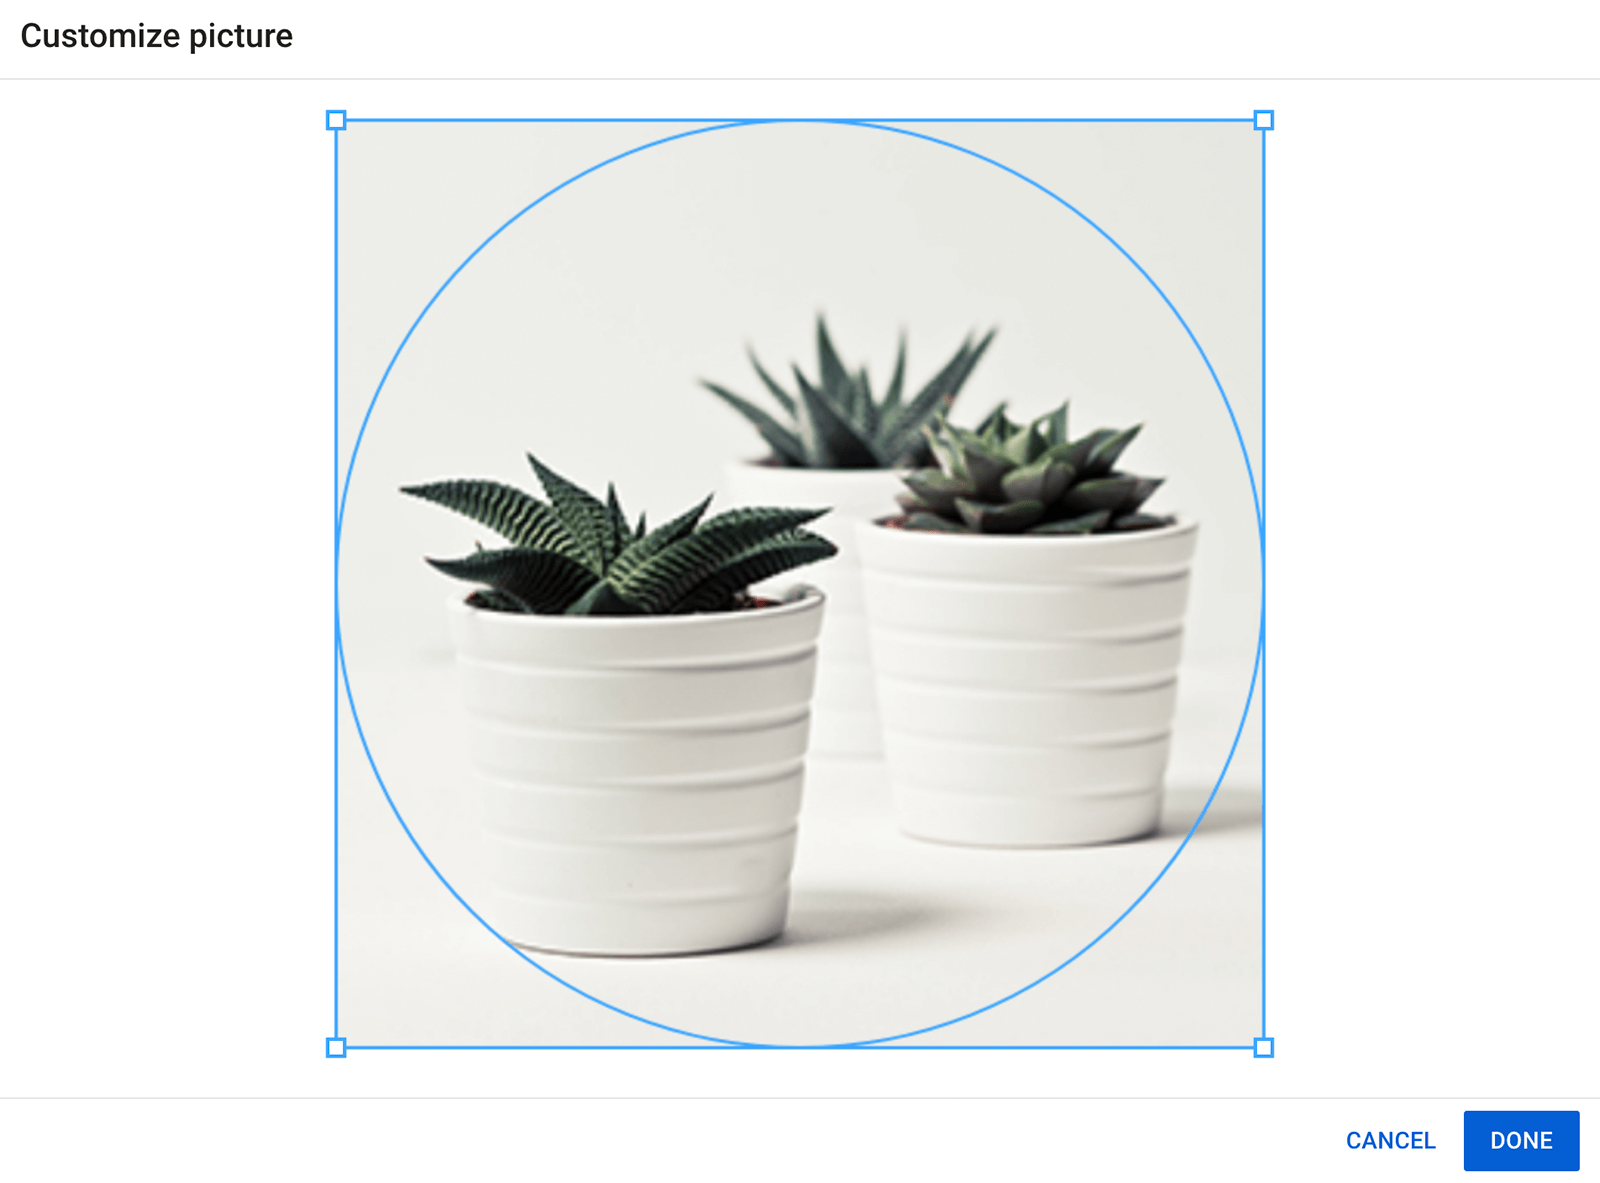
Banner Image
YouTube recommends using a banner image that's at least 2048 x 1152 pixels. But the way your banner image displays depends on the device your viewers are using. Fortunately, when you upload a banner image, YouTube Studio shows you which parts will display on different devices. Use the guides to adjust the image so it displays correctly.
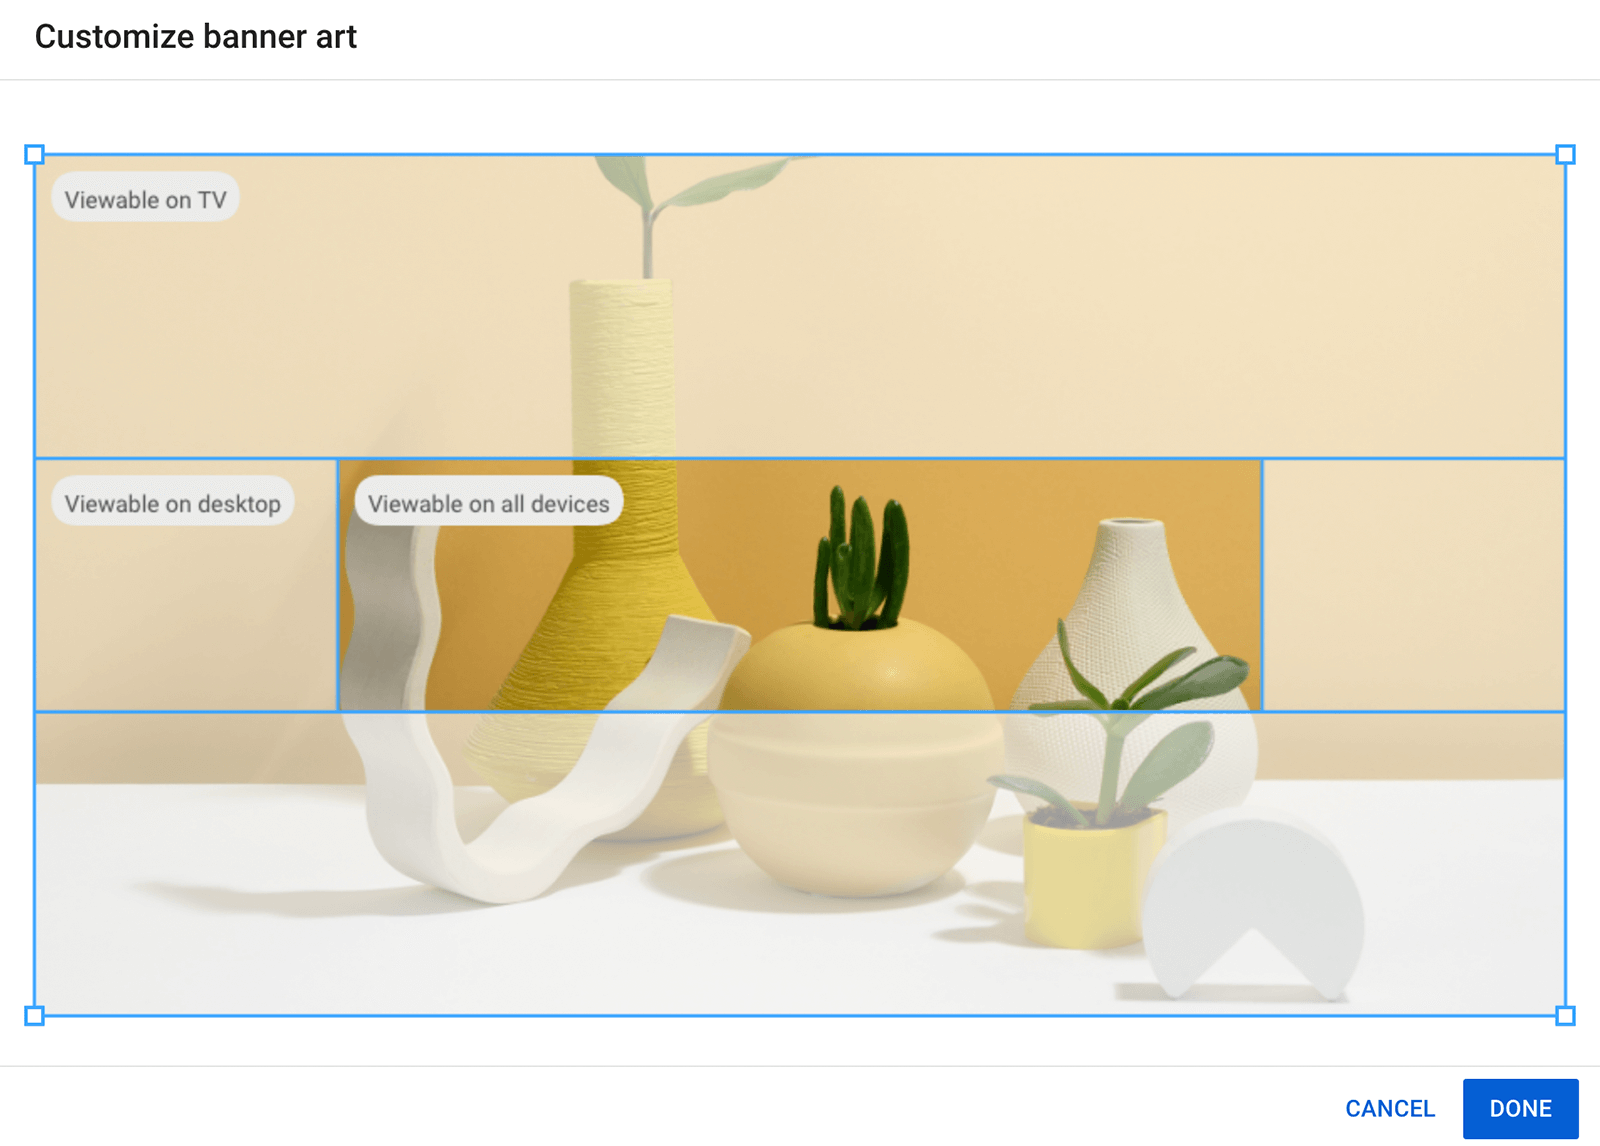
Video Watermark
You can also choose a custom watermark to display in the lower-right corner of your videos. Although a watermark isn't required, it can help you assert ownership over your content and prevent potential copyright issues.
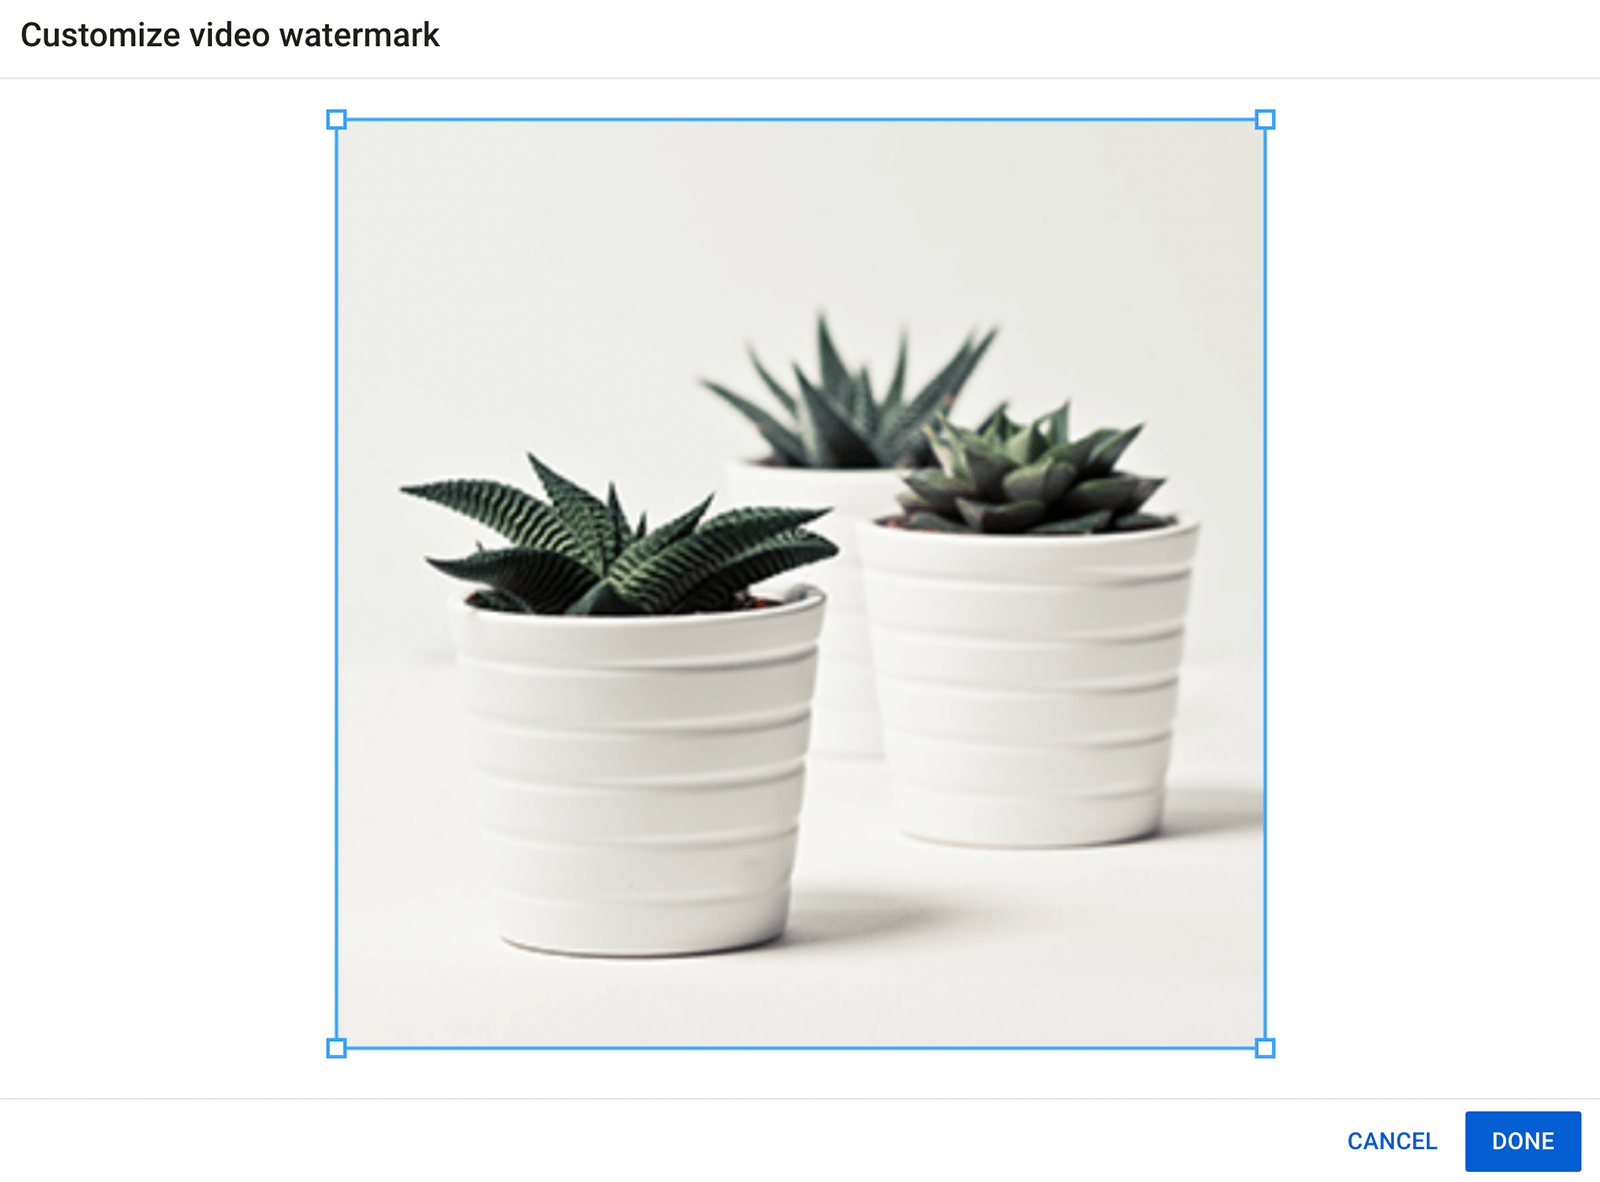
To add a watermark, upload an image file that's at least 150 x 150 pixels and choose when you want it to appear. You can set it to display at the end, throughout the video, or starting at a certain time.
Layout
To configure your channel setup, go to the Layout tab.
Video Spotlights
Your channel home page can automatically play trailers for different types of viewers. To introduce non-subscribers to your channel, add a trailer. With a trailer, you can show new viewers what to expect from your channel and give them a reason to subscribe.
You can also choose a featured video to play for subscribers. Note that if subscribers have already watched your featured video, it won't display at the top of your page.
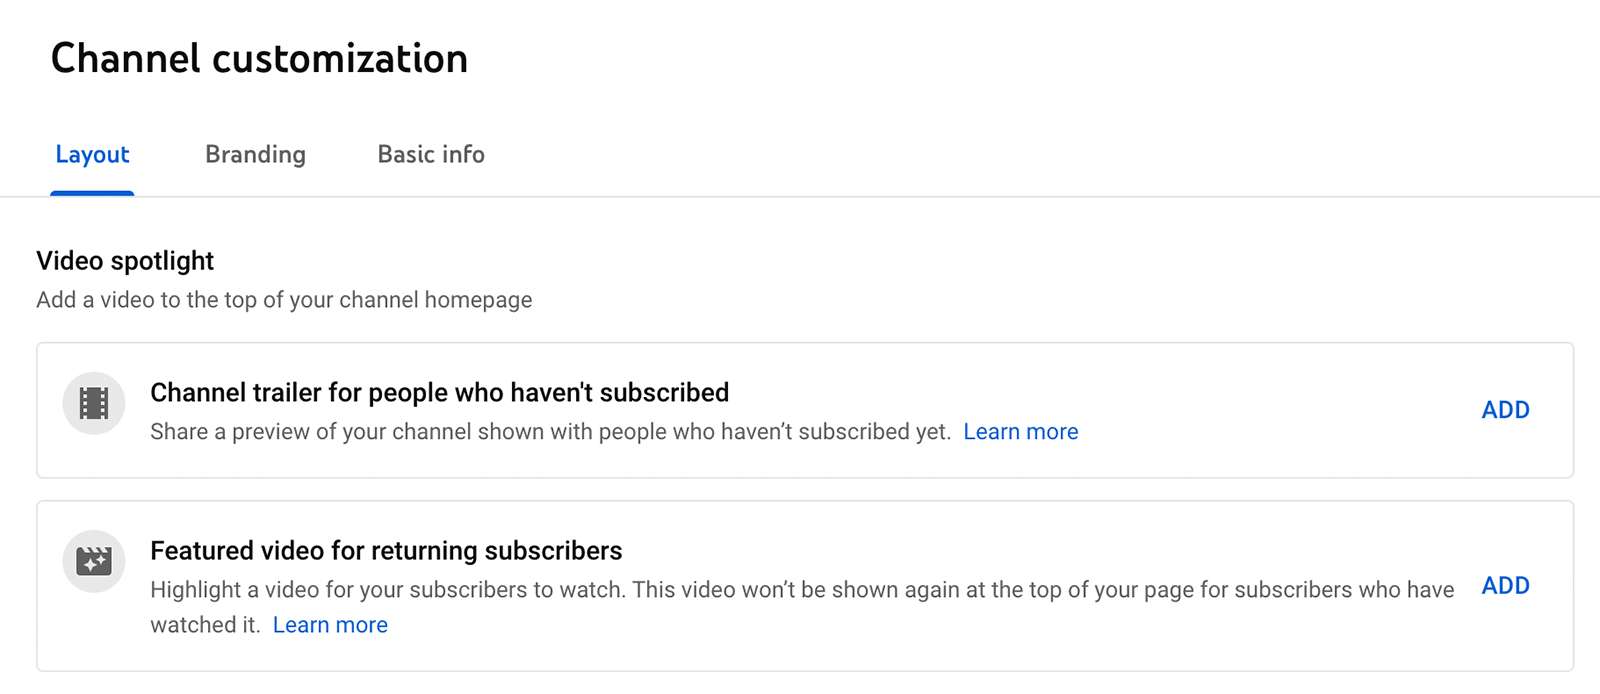
To choose either type of video spotlight, click the Add button and choose a video. Note that you can only spotlight the videos you've uploaded. If you haven't uploaded any videos to your channel yet, see below for a step-by-step guide.
Featured Sections
To organize your channel's content, choose some featured sections to display. Sections like Uploads and Short Videos automatically appear once you upload relevant content. But you can also opt to add sections for Popular Uploads to help viewers find your best videos. After you create playlists, you can also feature them on your channel home page.

#3: YouTube Brand Channel Settings
Once you configure the layout, branding, and basic info for your channel, press the Publish button to save your changes. But before you start uploading, take some time to configure settings for your channel. In YouTube Studio, click the Settings tab in the left-hand menu.
General Settings
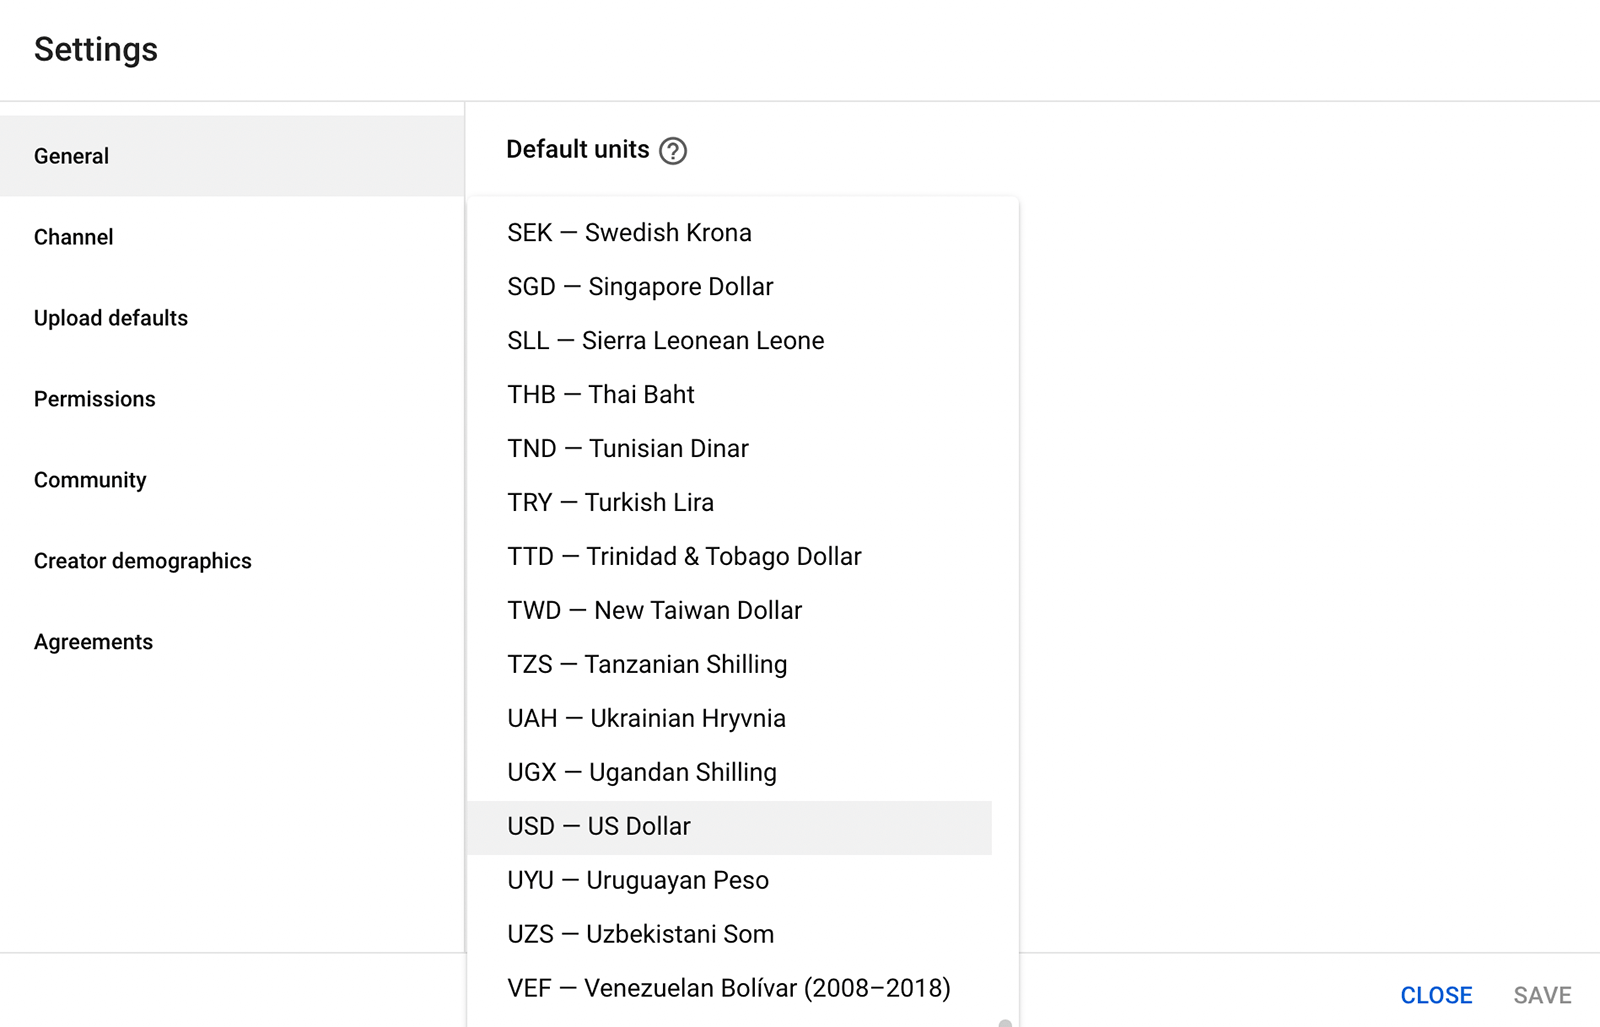
First, set the currency you want YouTube Studio analytics to display. In most cases, it should be the currency your organization uses to do business.
Channel Settings
Click the Channel tab to adjust settings for your channel.
Basic Info
Use the drop-down menu to select the country where your company does business. Then add keywords related to your brand. These keywords can help your channel appear in search so it's helpful to add as many as you can, given the 500-character limit.
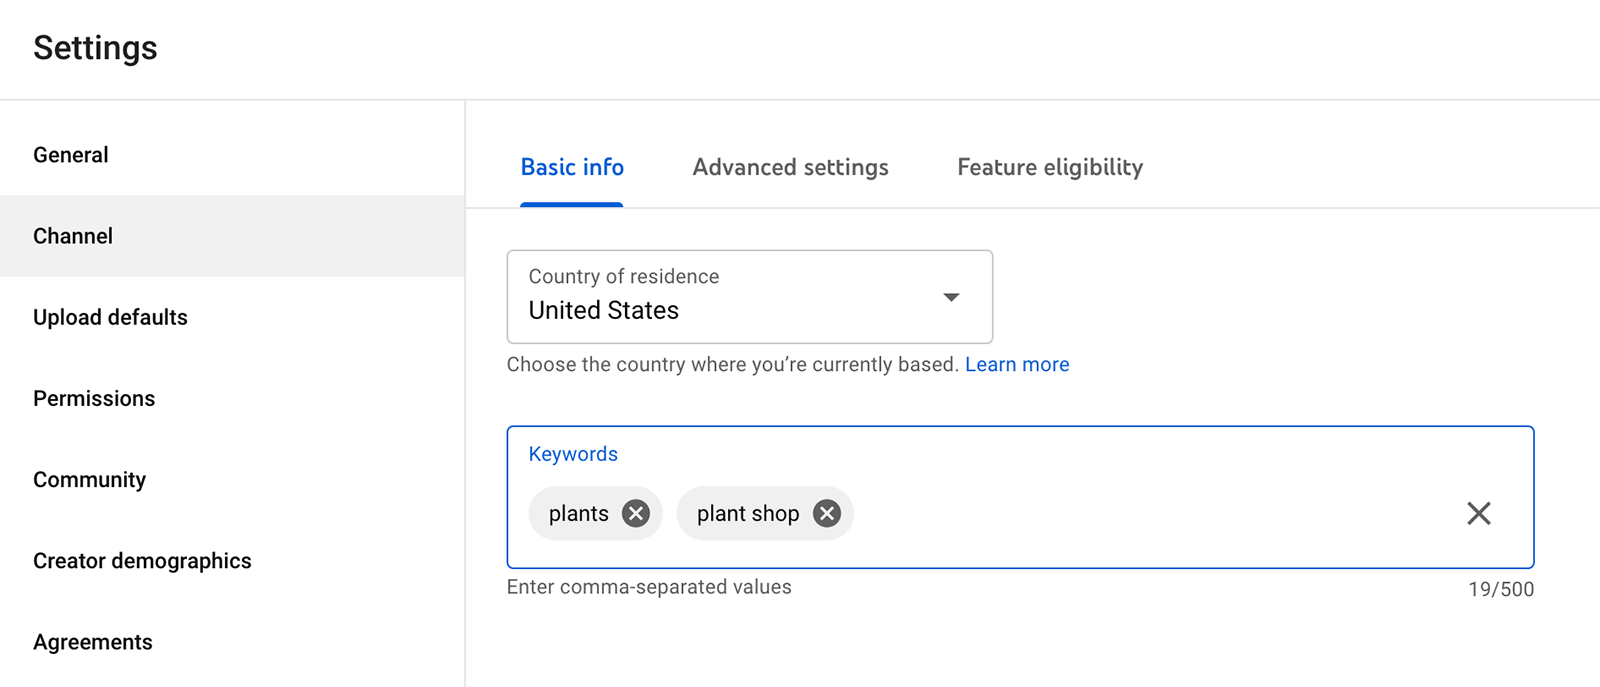
Not sure which keywords to add? You can use free tools like the Google Ads Keyword Planner to get ideas for keywords and related terms for your channel. YouTube-specific apps like TubeBuddy can also help you research keywords and optimize your channel.
Advanced Settings
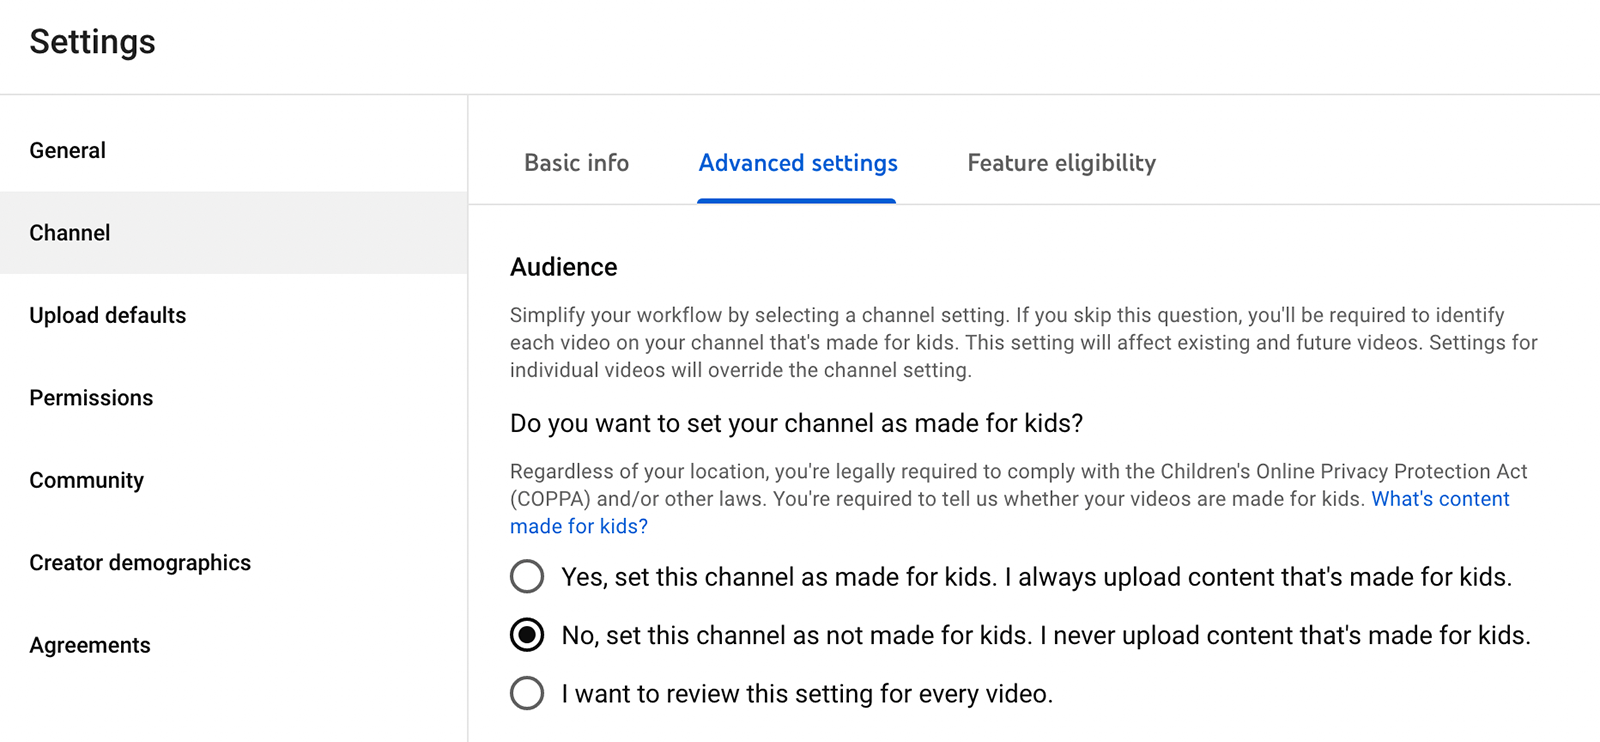
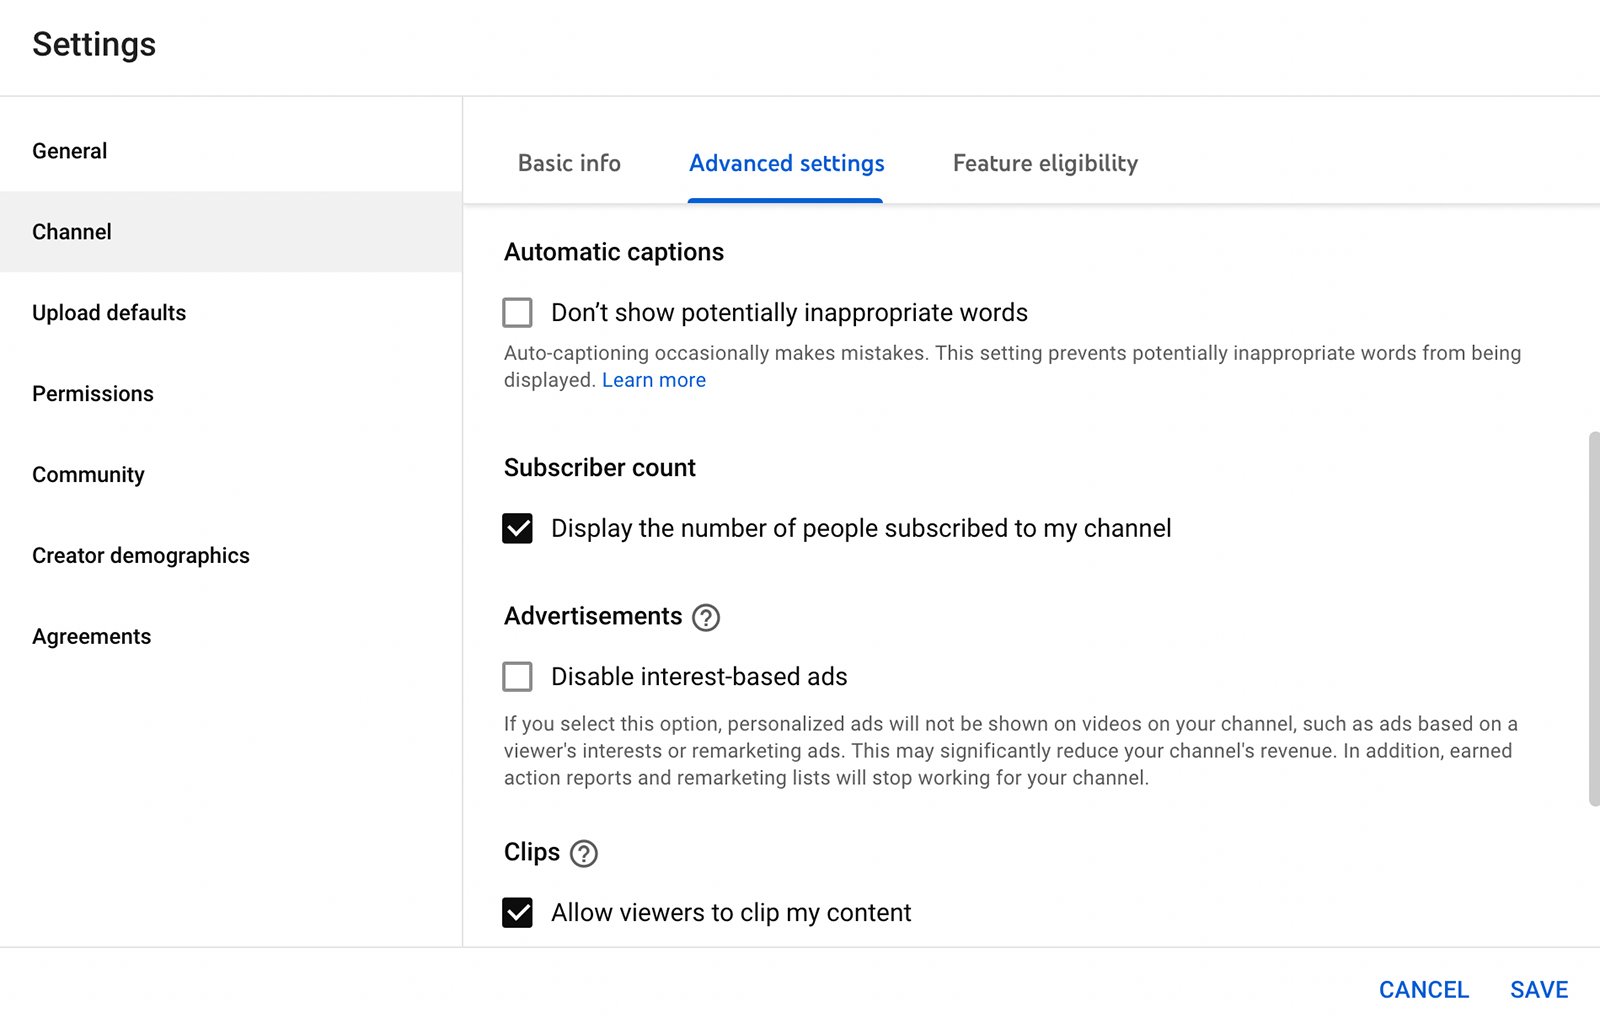
On the Advanced Settings tab, confirm whether your channel creates videos made for kids. If you're not sure, click the What's Content Made for Kids? link for more information.
Next, choose whether to display your subscriber account and decide if you want to disable interest-based ads. To clean up the language in your channel's automatically generated captions, you can also opt to remove potentially inappropriate words.
YouTube automatically allows viewers to clip content, which lets people share snippets of your videos. If you don't want to allow clips, you can disable this option on the Advanced Settings tab, too.
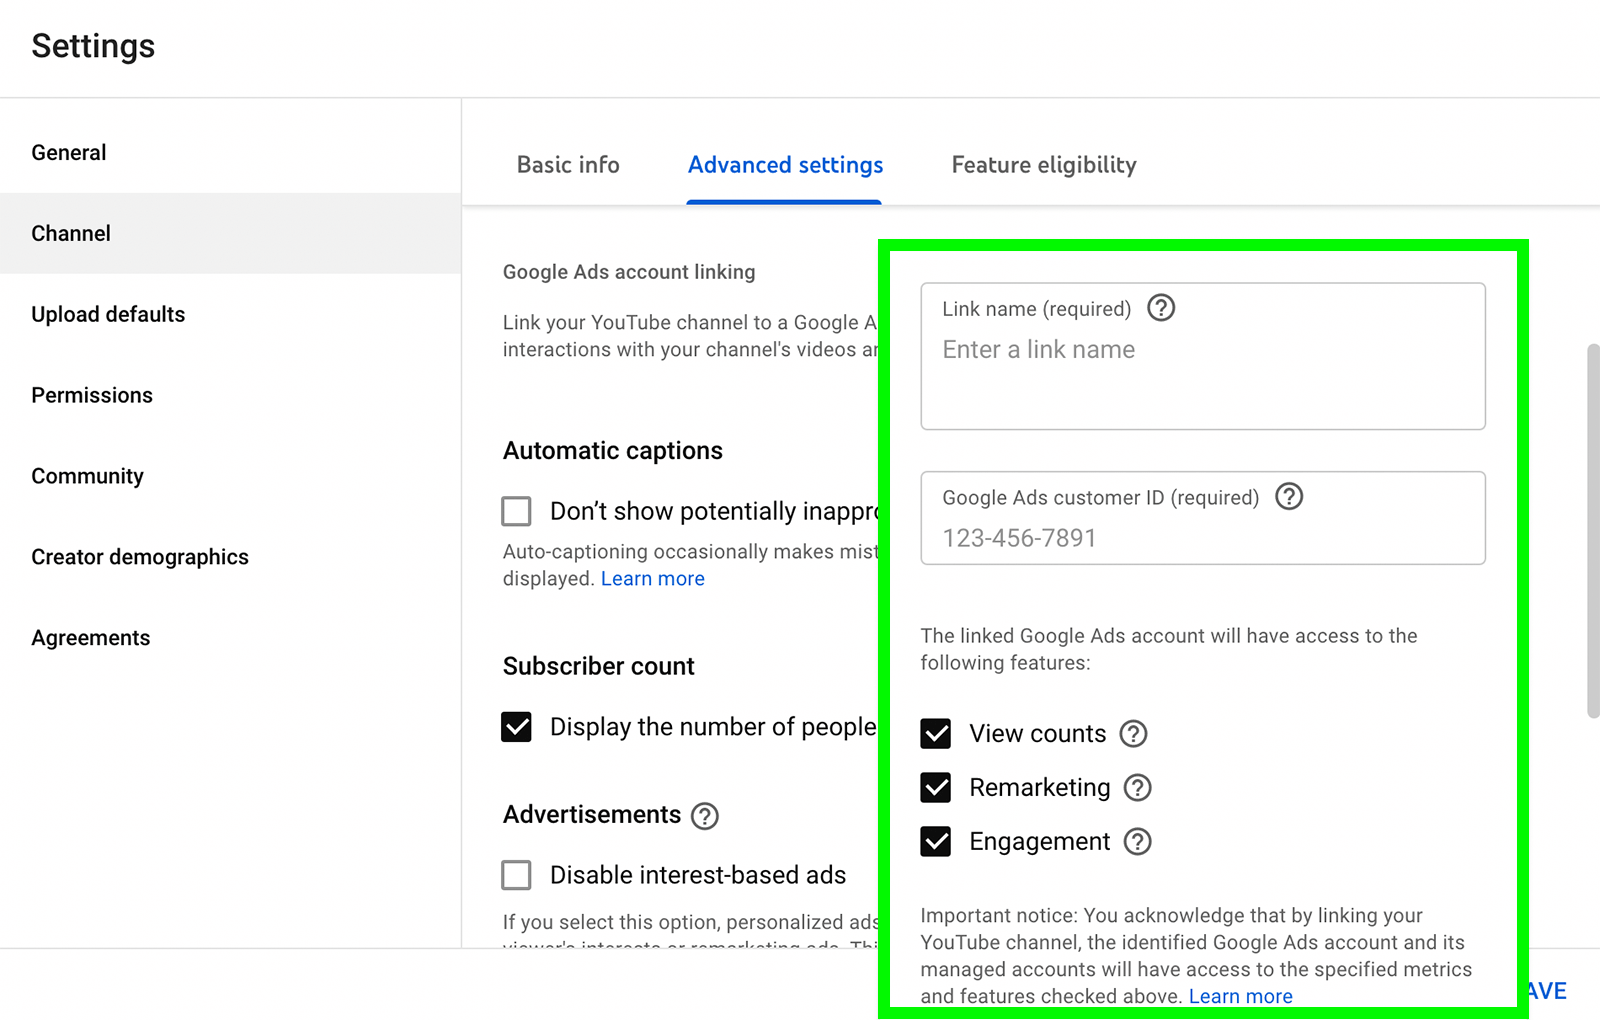
If you plan to use your YouTube channel to advertise your business, you'll need to connect your Google Ads account. Click the Link Account button to get started. You'll need to enter the Google Ads customer ID for your advertising account.
Feature Eligibility
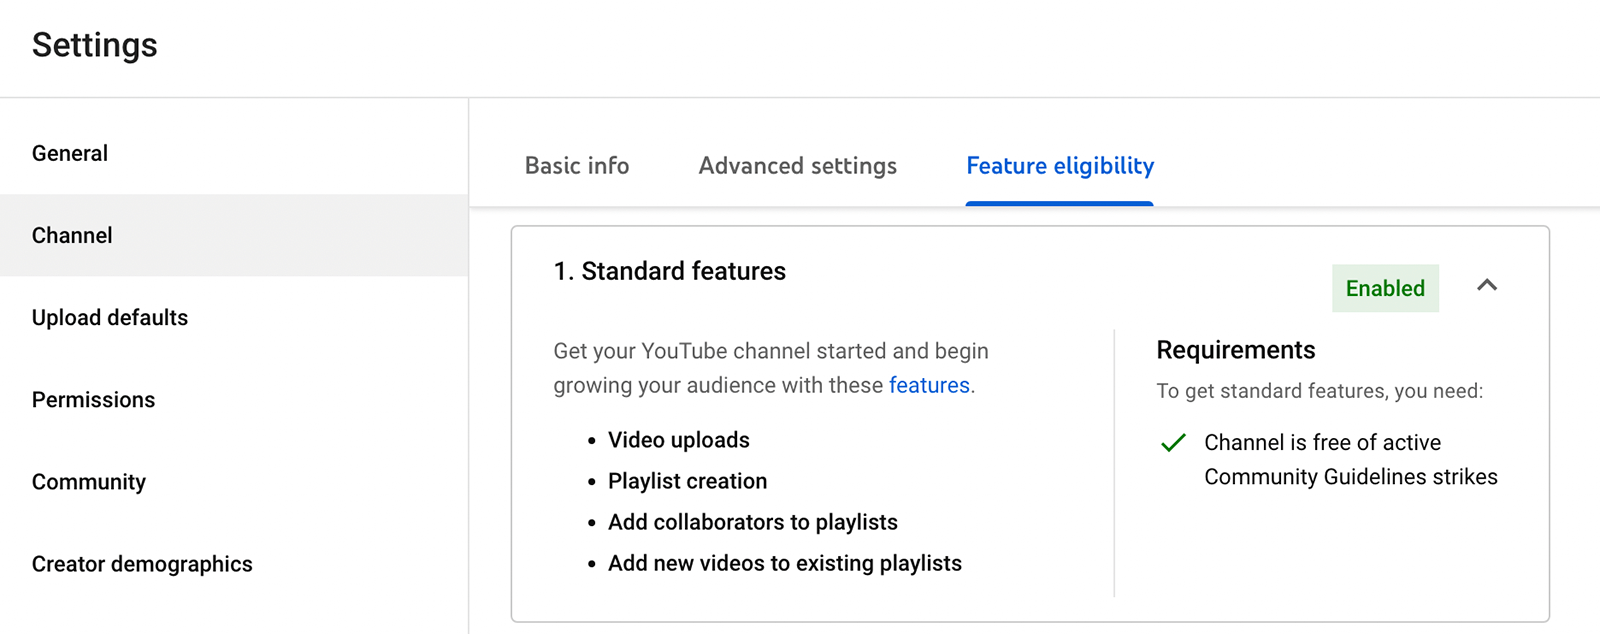
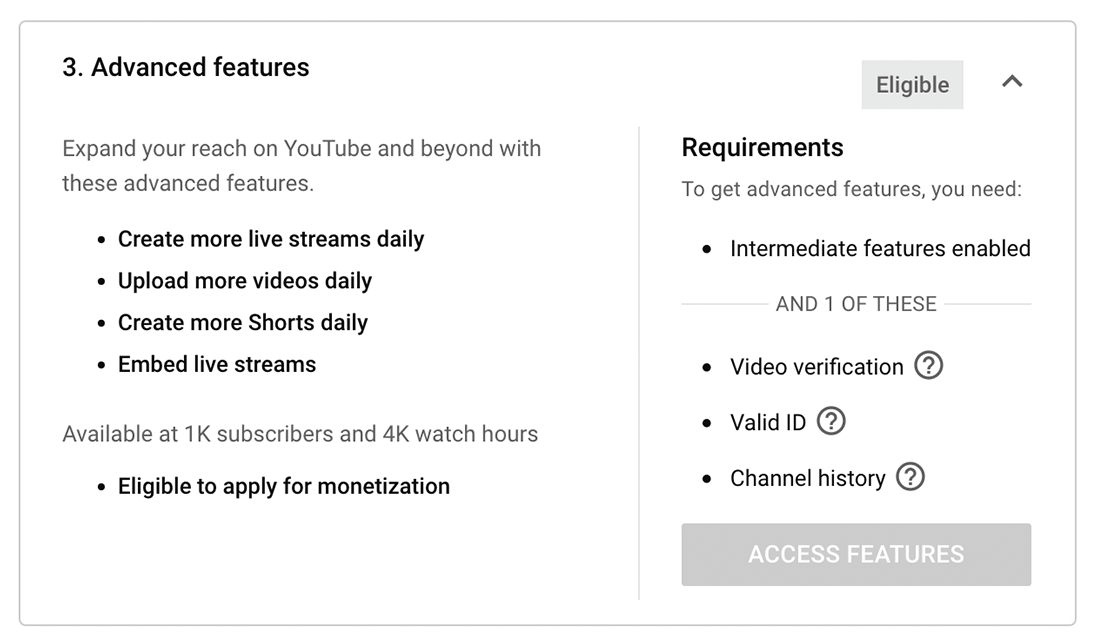
The Feature Eligibility tab helps you keep track of which features you can use and which steps you need to take before accessing more. For example, you get access to standard features as long as your channel has no Community Guidelines strikes.
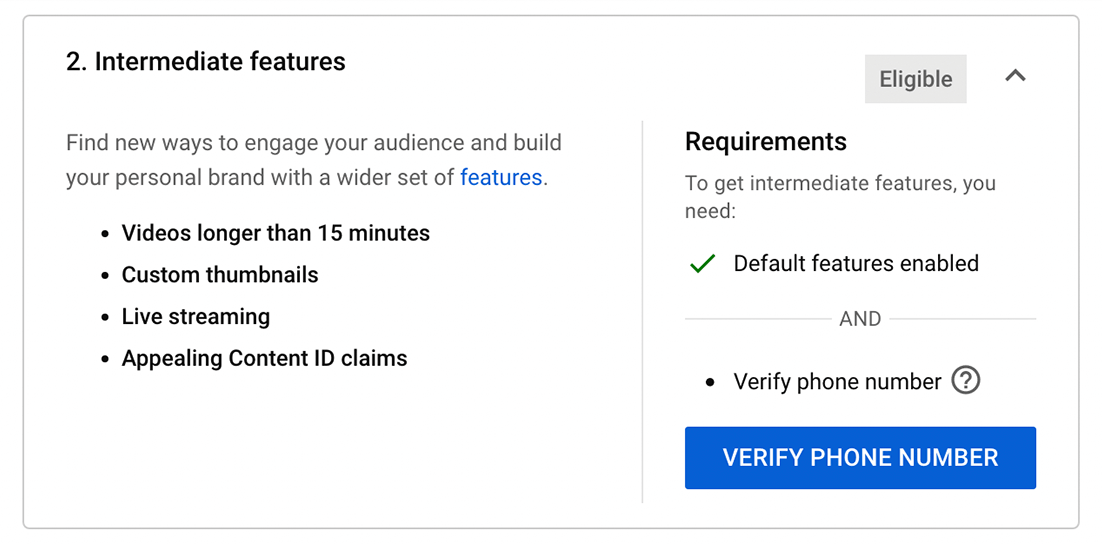
You can access intermediate features like livestreaming and videos longer than 15 minutes if you verify your phone number.
To access advanced features, you need channel history, a valid ID, or video verification. You can also apply for monetization once your channel reaches 1,000 subscribers and 4,000 watch hours.
Upload Defaults
Optimizing individual videos can be incredibly time-consuming but choosing default settings for your uploads can help. On the Upload Defaults tab, you can preset everything from titles and tags to licenses and comment preferences.
At the very least, you can save time by setting defaults for visibility, licensing, language, and comments—the elements that are least likely to change from video to video. For example, default settings like public visibility, standard YouTube license, English language content, and Hold Potentially Inappropriate Comments for Review may apply to virtually all of your content.
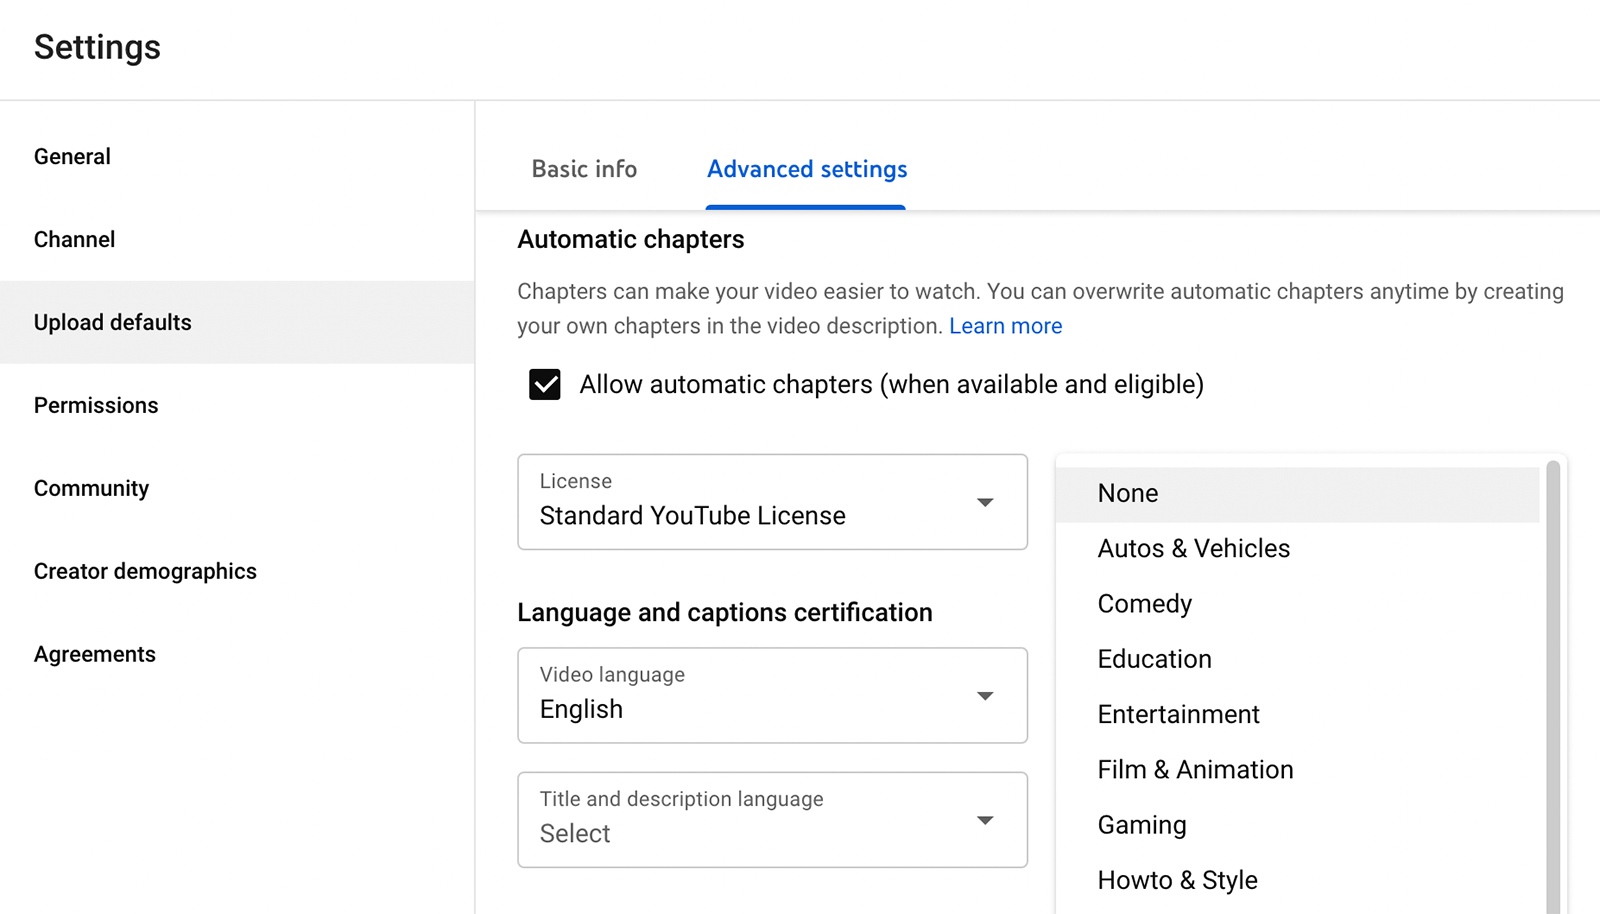
But other elements may change from video to video. For example, your videos may alternate between categories like Education, Howto & Style, and Entertainment. Or you may cover a range of topics that require vastly different tags. Avoid choosing defaults for elements that change frequently to prevent mistakes.
However, if you use similar formulas for elements like video descriptions, you can add a template as an upload default. For example, your video descriptions may always include a video summary, custom chapters, a call to action, and links to resources. When you upload content, you'll just need to fill in the specifics.
Permissions
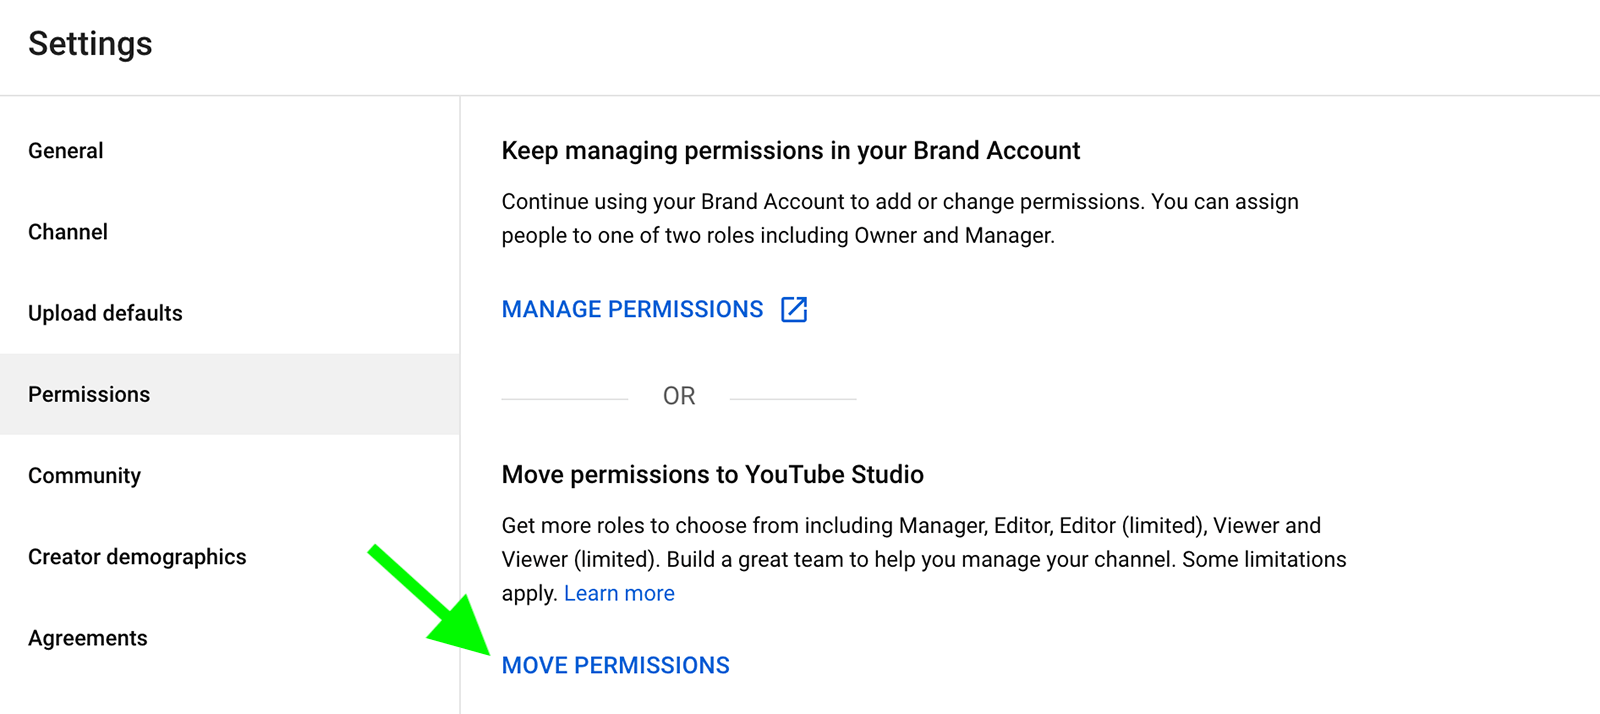
When you have a brand account, you can easily add managers or owners to your YouTube channel. But if you manage permissions in YouTube Studio, you get many more role options. To shift permissions over to YouTube Studio, open the Permissions tab and click the Move Permissions button.
Then click the Invite button to add people to your team. Enter your team member's email address and choose from the available roles. Once team members accept your invitation, you can manage everyone on the Permissions tab.
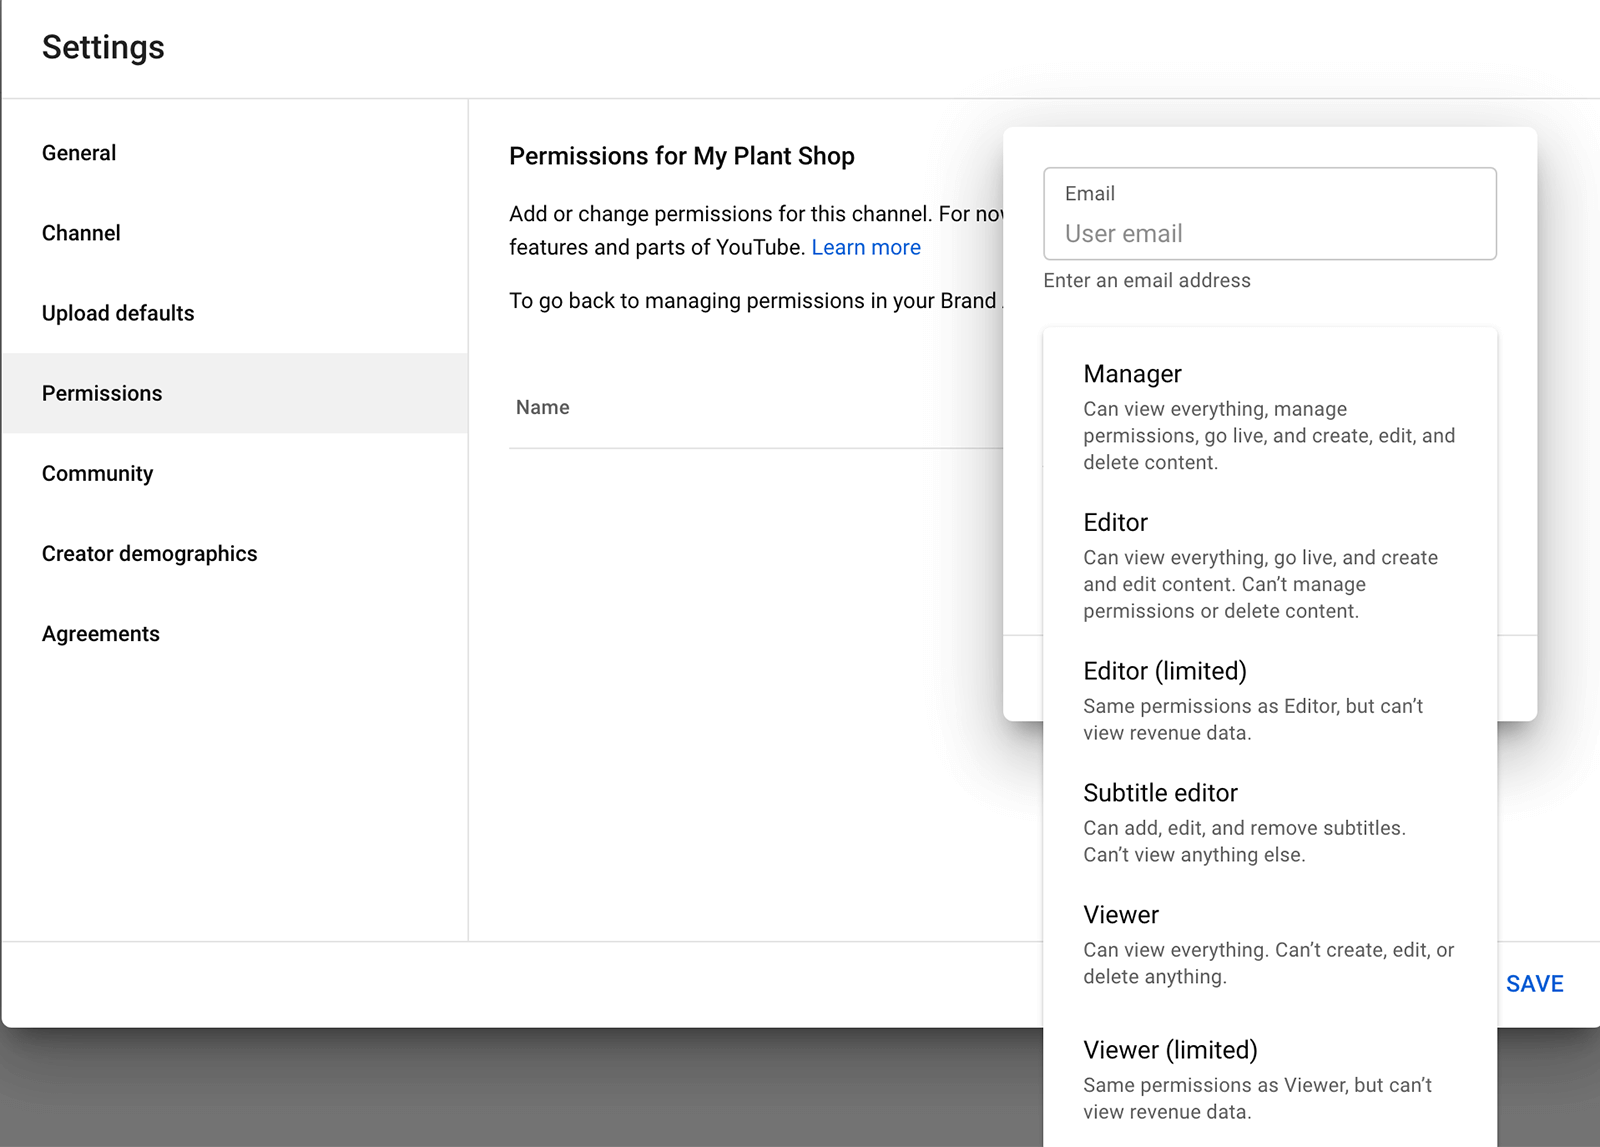
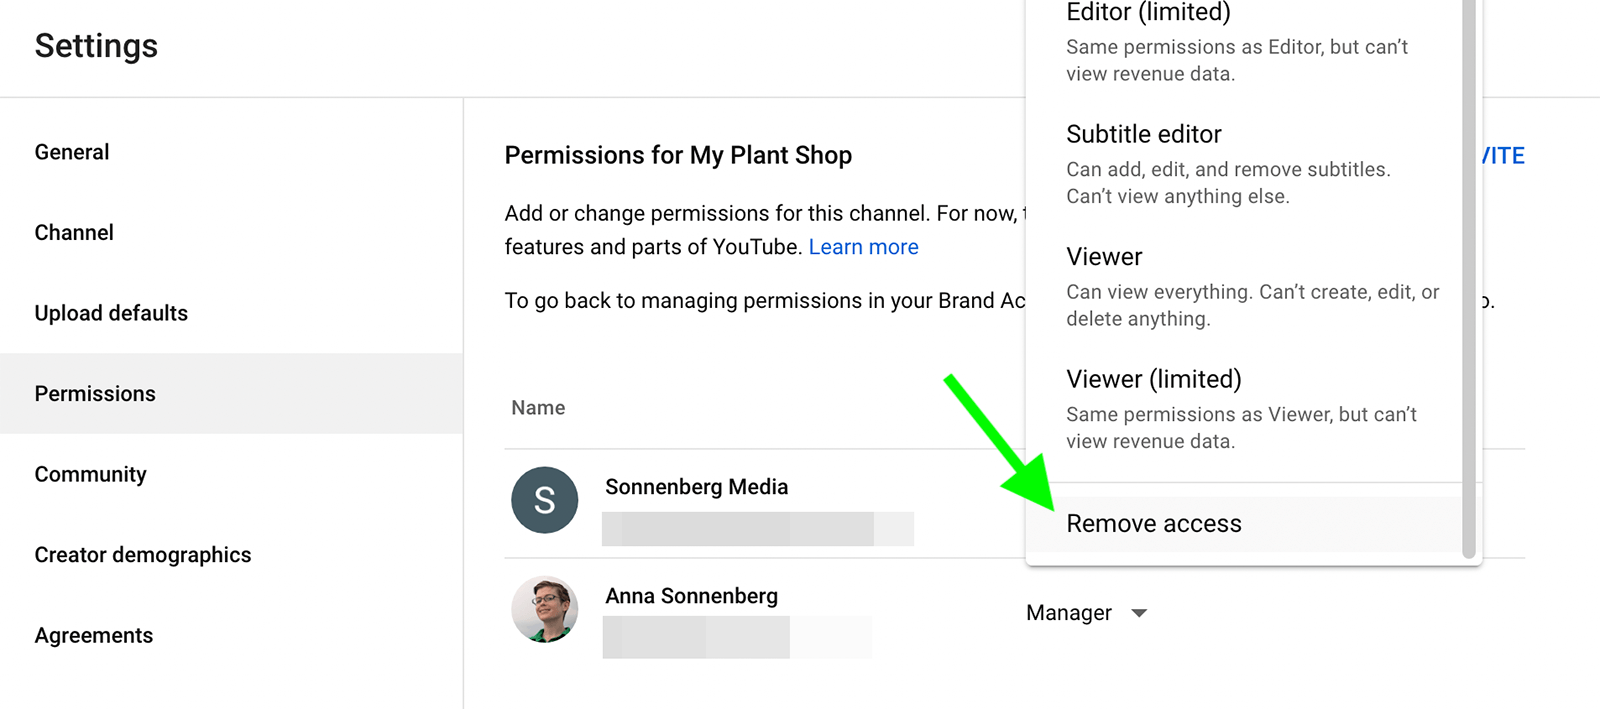
To adjust anyone's permissions, click their role to review the available options. Choose a different role and click the Save button to make the change. Alternatively, you can click Remove Access to withdraw anyone's permissions.
Community
On the Community tab of your YouTube channel settings, you can manage your channel's community-building tools.
Automated Filters
To prevent harmful or inappropriate comments from appearing on your channel or in live chat, you can add moderators. You can also add hidden users whose comments and live chat messages will never appear. To streamline comment approval, you can add approved users whose comments won't be held for review.
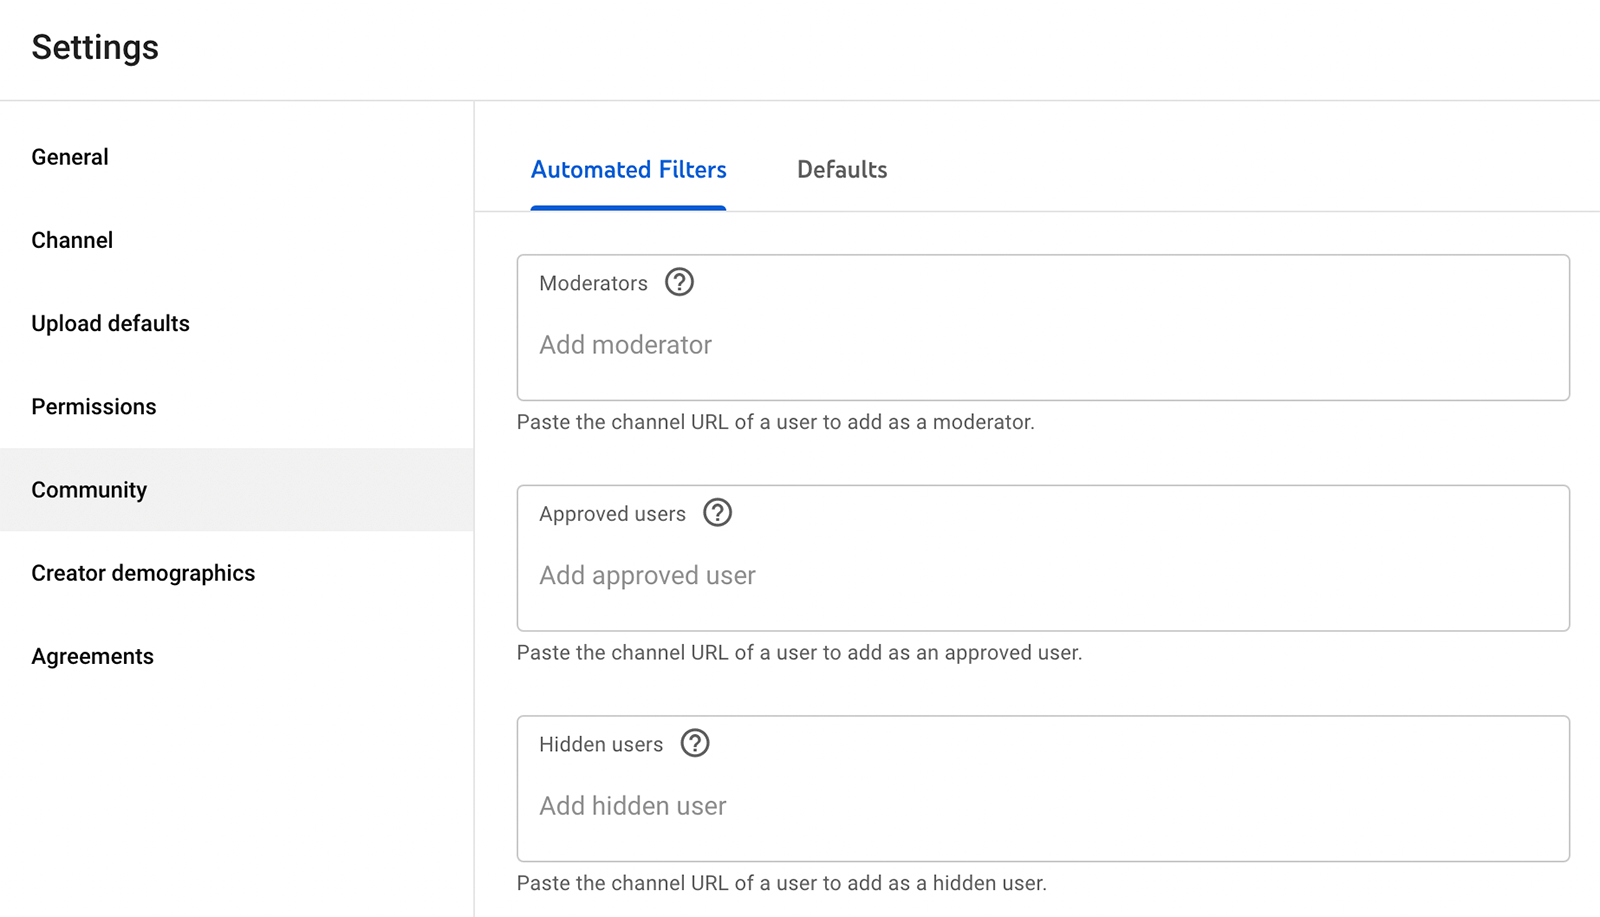
Paste the user's channel URL in the relevant section to manage their relationship with your channel. You can add or remove users from this section at any time.

Discover Proven Marketing Strategies and Tips
Want to go even deeper with your marketing? Check out the Social Media Marketing Podcast! Publishing weekly since 2012, the Social Media Marketing Podcast helps you navigate the constantly changing marketing jungle, with expert interviews from marketing pros.
But don’t let the name fool you. This show is about a lot more than just social media marketing. With over 600 episodes and millions of downloads each year, this show has been a trusted source for marketers for well over a decade.
Defaults
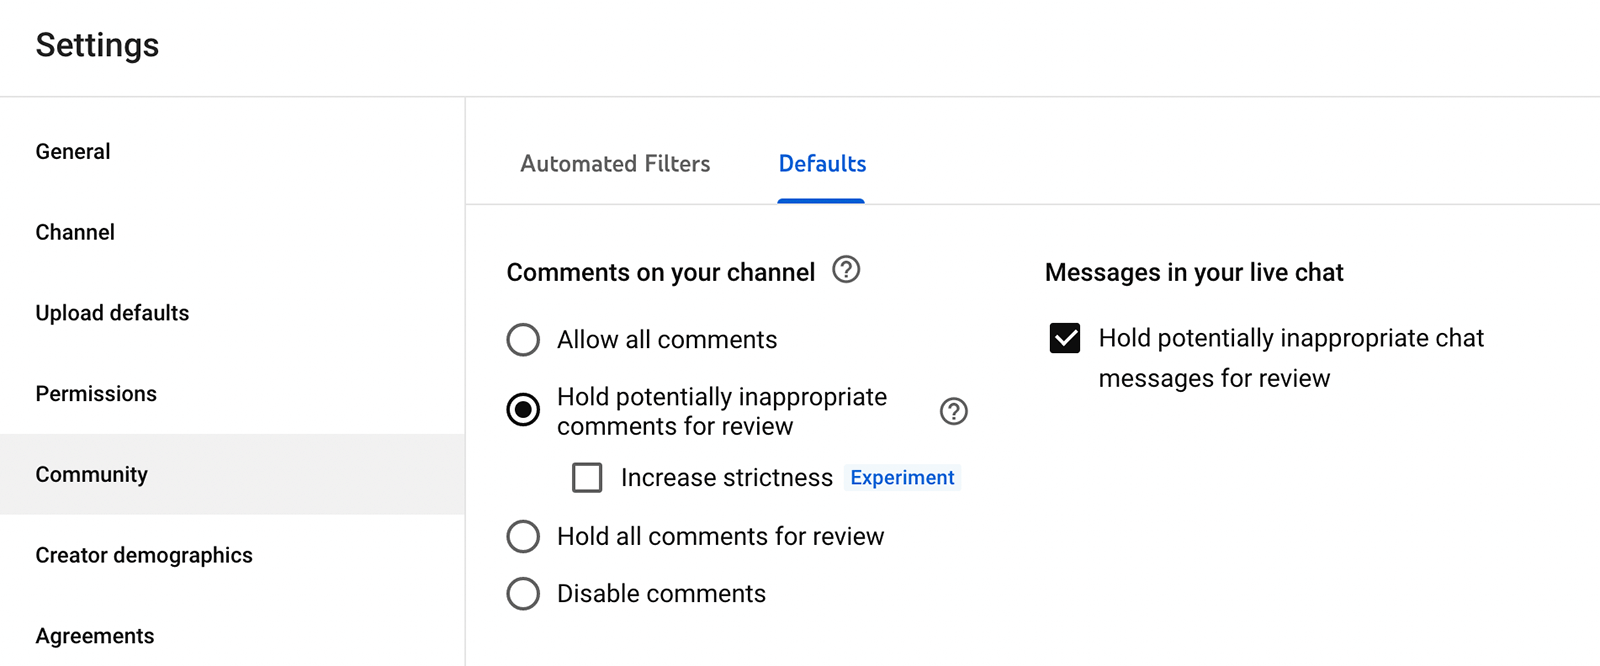
Click the Defaults tab to set preferences for comments and live chat messages. You can review all comments, potentially problematic comments, or allow or disable all comments.
Channel Guidelines
You may also have an option to add channel guidelines—a setting that YouTube is testing as of May 2022. If you have this option, you can find it by clicking the Community tab in settings. From there, you can add a welcome message for your channel and up to three guidelines. They're ideal for setting viewer expectations and building a thriving community.
Agreements
The Agreements tab in YouTube Studio settings includes a link to the terms that your channel (and anyone authorized to use it) agrees to follow. To keep your channel in good standing, it's a good idea to review YouTube agreements like the Terms of Service, Community Guidelines, and Platform Policies to make sure your video adheres to the rules.
#4: How to Upload a Video to YouTube
Once you've set up your YouTube channel, you can start publishing content. Follow the steps below to optimize, schedule, and organize videos into playlists.

Open your channel's YouTube Studio dashboard and click the Create button in the upper-right corner. From the drop-down menu, select Upload Videos. Then drag and drop your video file or click the Select Files button to upload. While YouTube Studio is processing the file and checking for issues, you can start entering video details.
Title
To create an effective title, you typically need keyword research. Use a YouTube-specific keyword tool like TubeBuddy and identify the main keyword for your video. Then craft a title that includes the keyword—the closer to the beginning the better.

Description
It's also important to include keywords in the video description, which is a key component of YouTube search engine optimization (SEO). In the video description, write a short summary of the content, taking care to incorporate keywords naturally.
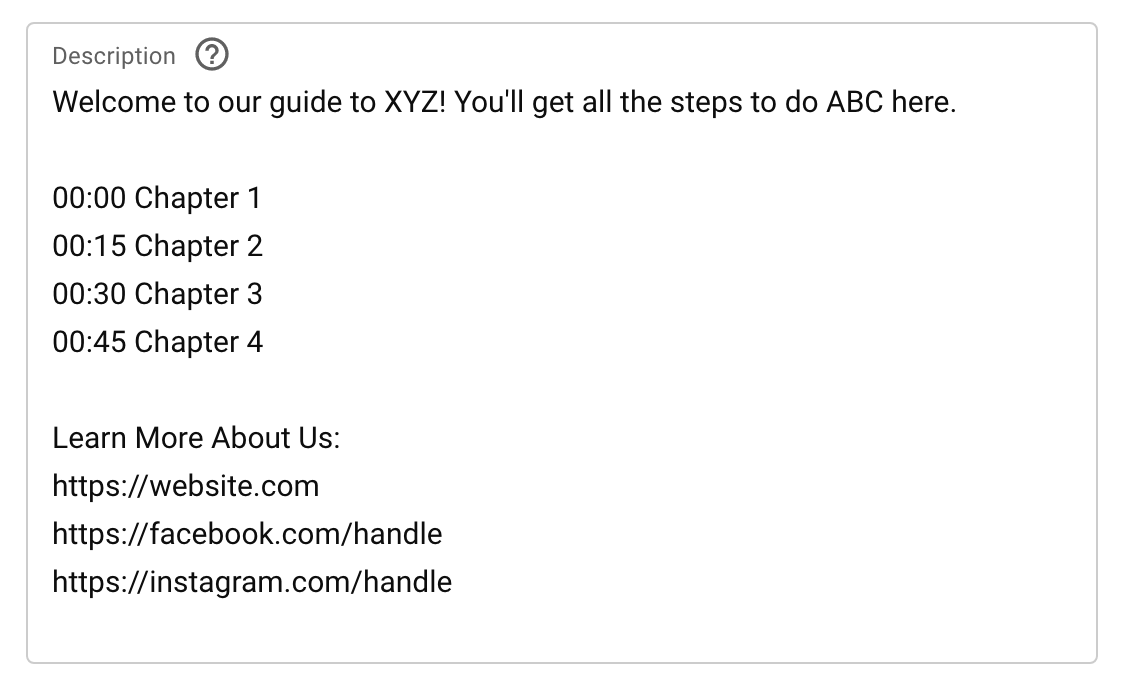
Then add other details to help viewers get more value from your content. For example, you might add:
- Custom chapters so viewers can skip to specific parts of the video
- Links to products you featured in the video
- Links to resources you mentioned including other YouTube videos
- Social media and website links where viewers can learn more
If you want to add custom chapters, create a list of timestamps (minute:second) followed by chapter titles. YouTube requires at least three chapters, and each must be at least 10 seconds long.
Keep in mind that YouTube video descriptions can be up to 5,000 characters long, allowing plenty of space for copy. Take care to keep it organized so it provides value for your audience.
Thumbnail
Next, choose a thumbnail for the video. YouTube Studio automatically recommends some stills from the video but those images aren't your only options. You can also opt to upload a thumbnail, as long as it measures 1280 x 720 pixels.

If you create a custom thumbnail, be sure to follow some best practices:
- Add text overlays that tell viewers what the video is about.
- Include graphics that capture attention.
- Develop a consistent style so viewers can easily recognize your content.
- Use a color scheme that stands out in search or on the YouTube home page.
Playlists
The more content you create, the more important it becomes to organize videos into playlists. With playlists, you can help viewers find more relevant content and encourage them to watch more of your videos.
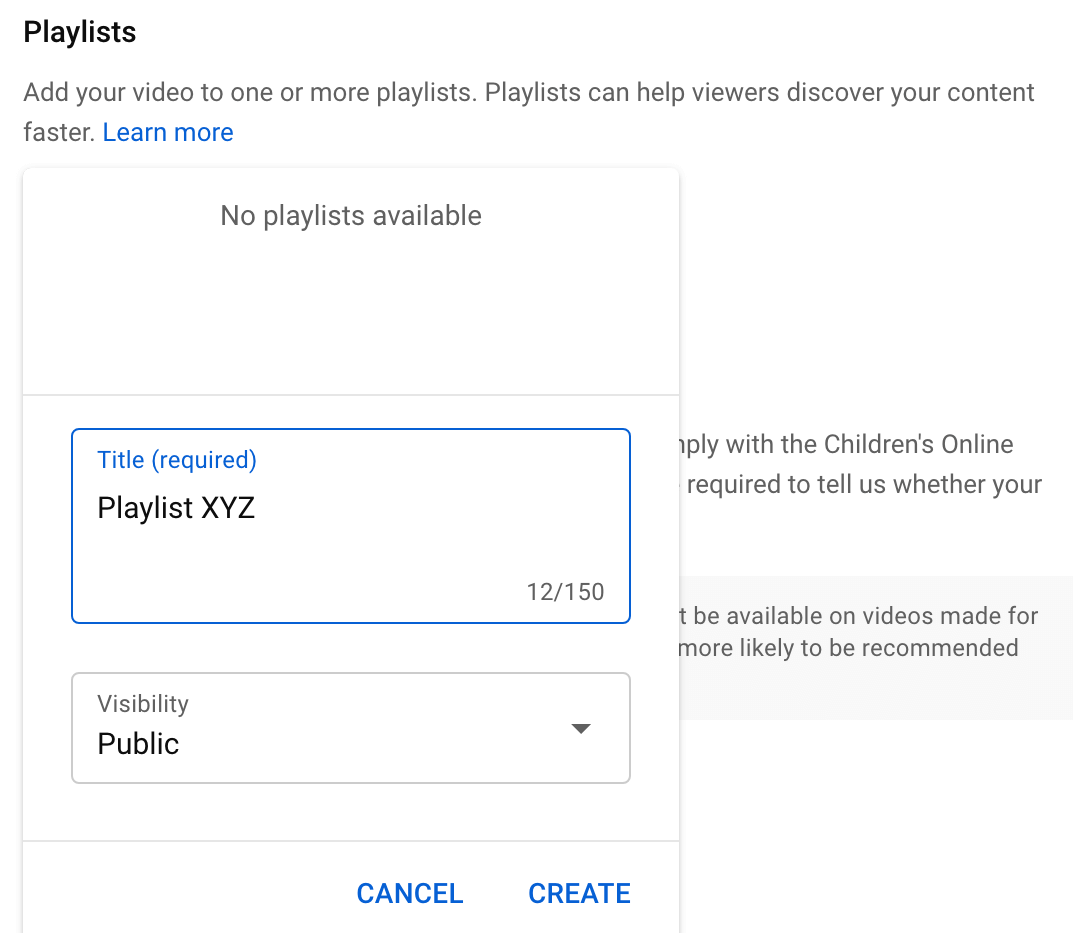
If you want to add your video to a playlist, open the drop-down menu and choose one. Alternatively, you can start a new playlist from this interface. Click the Create Playlist button and give it a title. Then click Create. Check the box next to the playlist and click Done to select it.
Audience
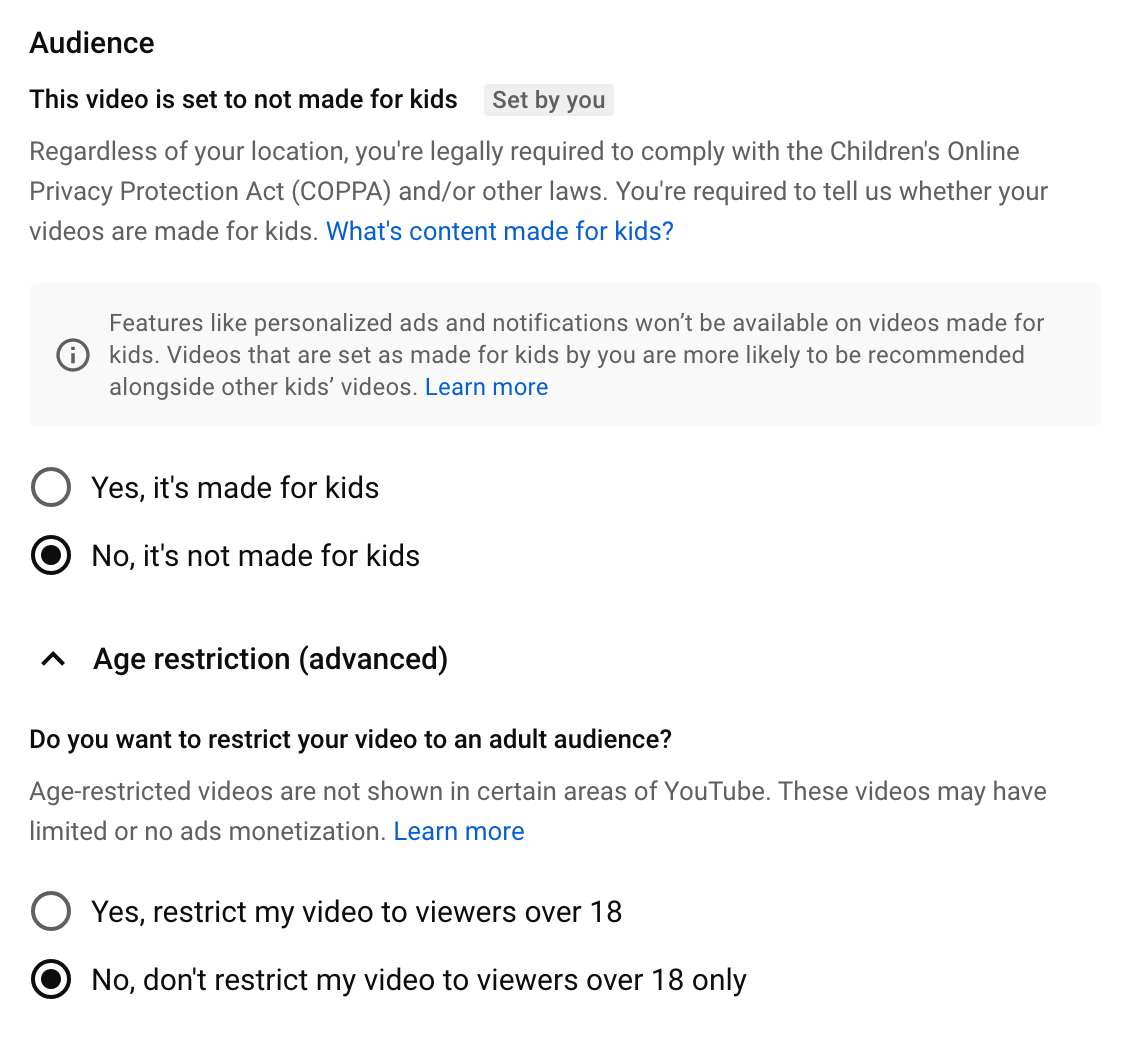
Double-check the audience settings for the video and confirm whether the content is made for kids. You can also restrict the video to viewers older than 18 if it features content that's inappropriate for younger viewers.
Paid Promotion
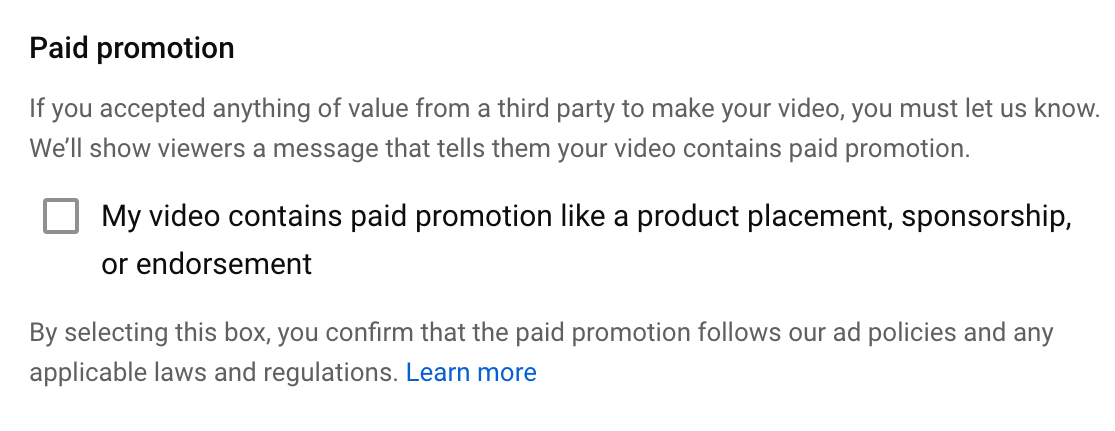
If your video includes a sponsorship or a product placement, you're required to disclose it. Check the box in the Paid Promotion section and click the Learn More link to confirm that you've adhered to YouTube's ad policies.
Automatic Chapters
Chapters can be incredibly helpful for navigation. But that doesn't mean you have to create your own. If you're short on time or unsure how to divide your video into sections, allow YouTube to create chapters for you. Check the Allow Automatic Chapters box to enable this feature.

Tags
According to YouTube, video tags make a minimal contribution to SEO. Yet it's still a good idea to add your keywords here to improve discovery, especially if you didn't include them all in the description.

Add your main keyword, followed by secondary keywords. You can add keywords until you reach the 500-character limit. But if you only have a few to add, it isn't necessary to fill the space.
Language and Captions Certification
Select a language for your video and choose a caption certification. In some cases, the FCC may require captions so it's important to read the descriptions and choose the one that applies to your video.

Recording Date and Location
You have the option to add a recording date and location to your video but this information isn't required. Consider adding a location if you want viewers to be able to find your video in a location search.

License
In most cases, you'll probably choose Standard YouTube License for your videos. But if you want to give other creators permission to reuse your content, you can choose Creative Commons instead.
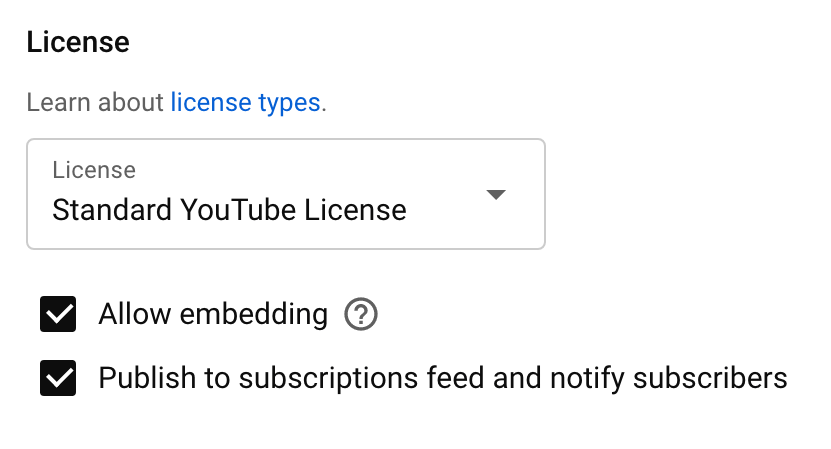
In the License section, you can also determine whether you want people to be able to embed your video on their websites and if you want to notify subscribers about your content. By default, both of these options are checked.
Shorts Sampling
Also by default, YouTube allows users to remix video content into shorts. If you don't want people to be able to sample your videos, uncheck the box.

Category
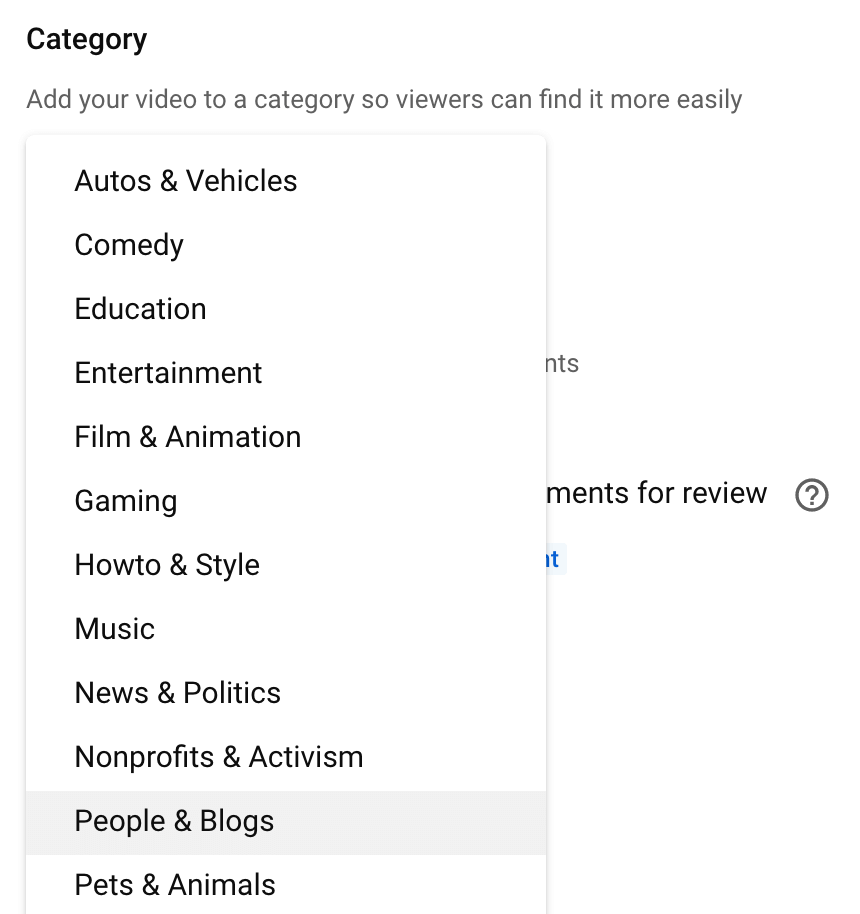
YouTube automatically chooses a category for your video. To add your video to a different category instead, open the drop-down menu and pick another option. Video categories don't have a big impact on SEO but you should still double-check to make sure your content is categorized correctly.
Comments and Ratings
As you publish more content on your YouTube channel, you'll get a better sense of how to approach comments. In most cases, holding potentially inappropriate comments for review is a good place to start. But if you find that inappropriate comments pass through the filter, you can check the Increase Strictness box or opt to Hold All Comments for Review.
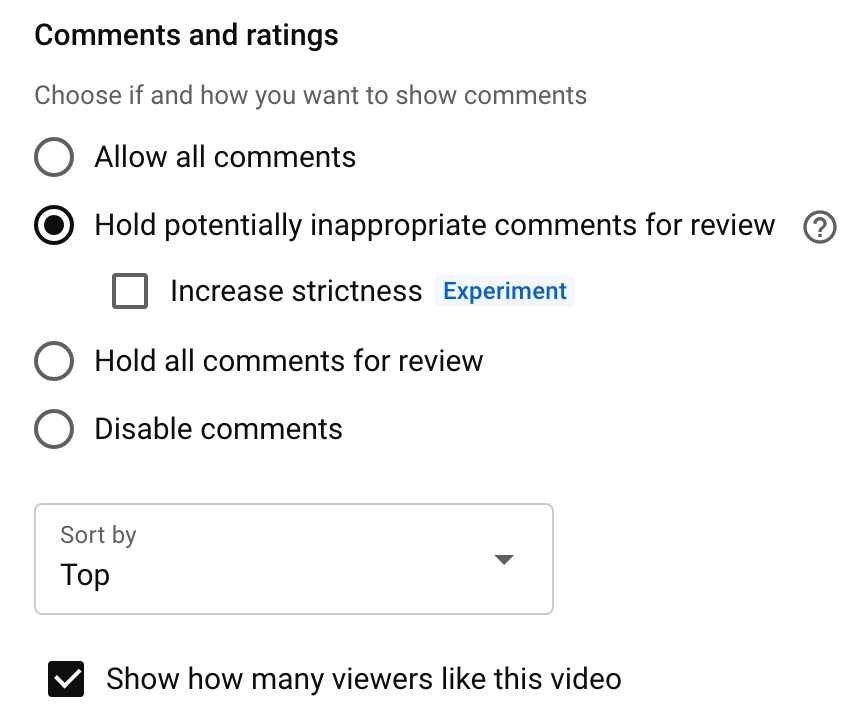
You can also choose whether YouTube shows a like count for your videos. Featuring a like counter may or may not make a difference to your engagement metrics. Consider experimenting with switching the like counter on and off to find the right approach for your channel. Then click the Next button to review video elements.
Subtitles
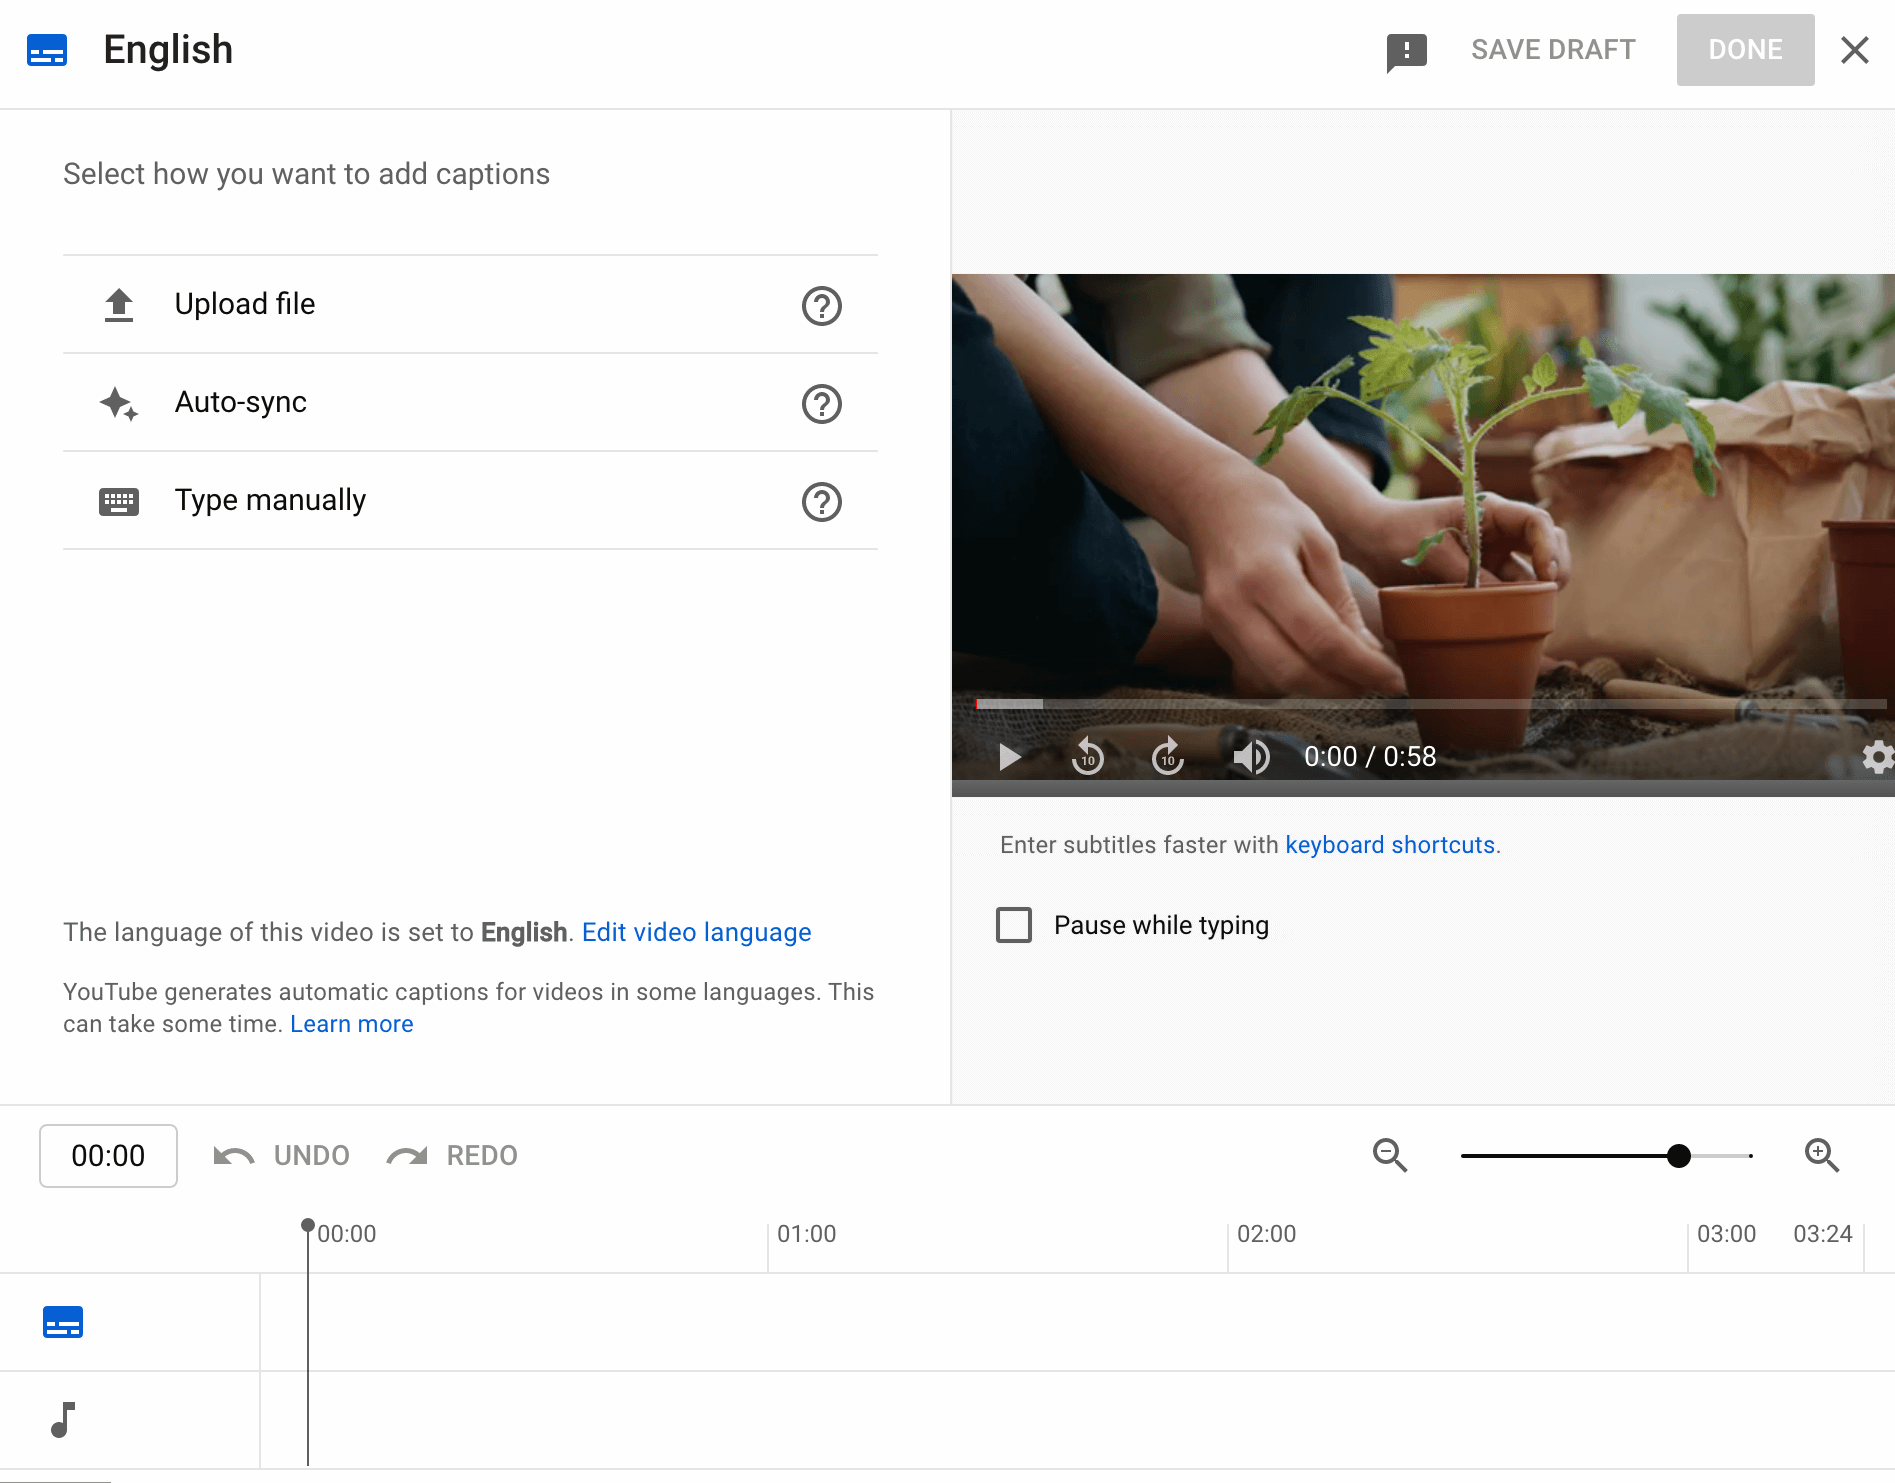
Adding captions is a great way to make your videos more accessible and allow for sound-free viewing. To add subtitles, click the Add link and choose a method. You can upload a caption file or type them manually.
Cards
Adding cards can also bring extra value to your video content. With cards, you can insert interactive elements into your videos, prompting viewers to check out linked resources.
All YouTube channels can add video, playlist, or channel cards. Once you join the YouTube Partner Program, you also get access to link cards, which let you link to external websites.
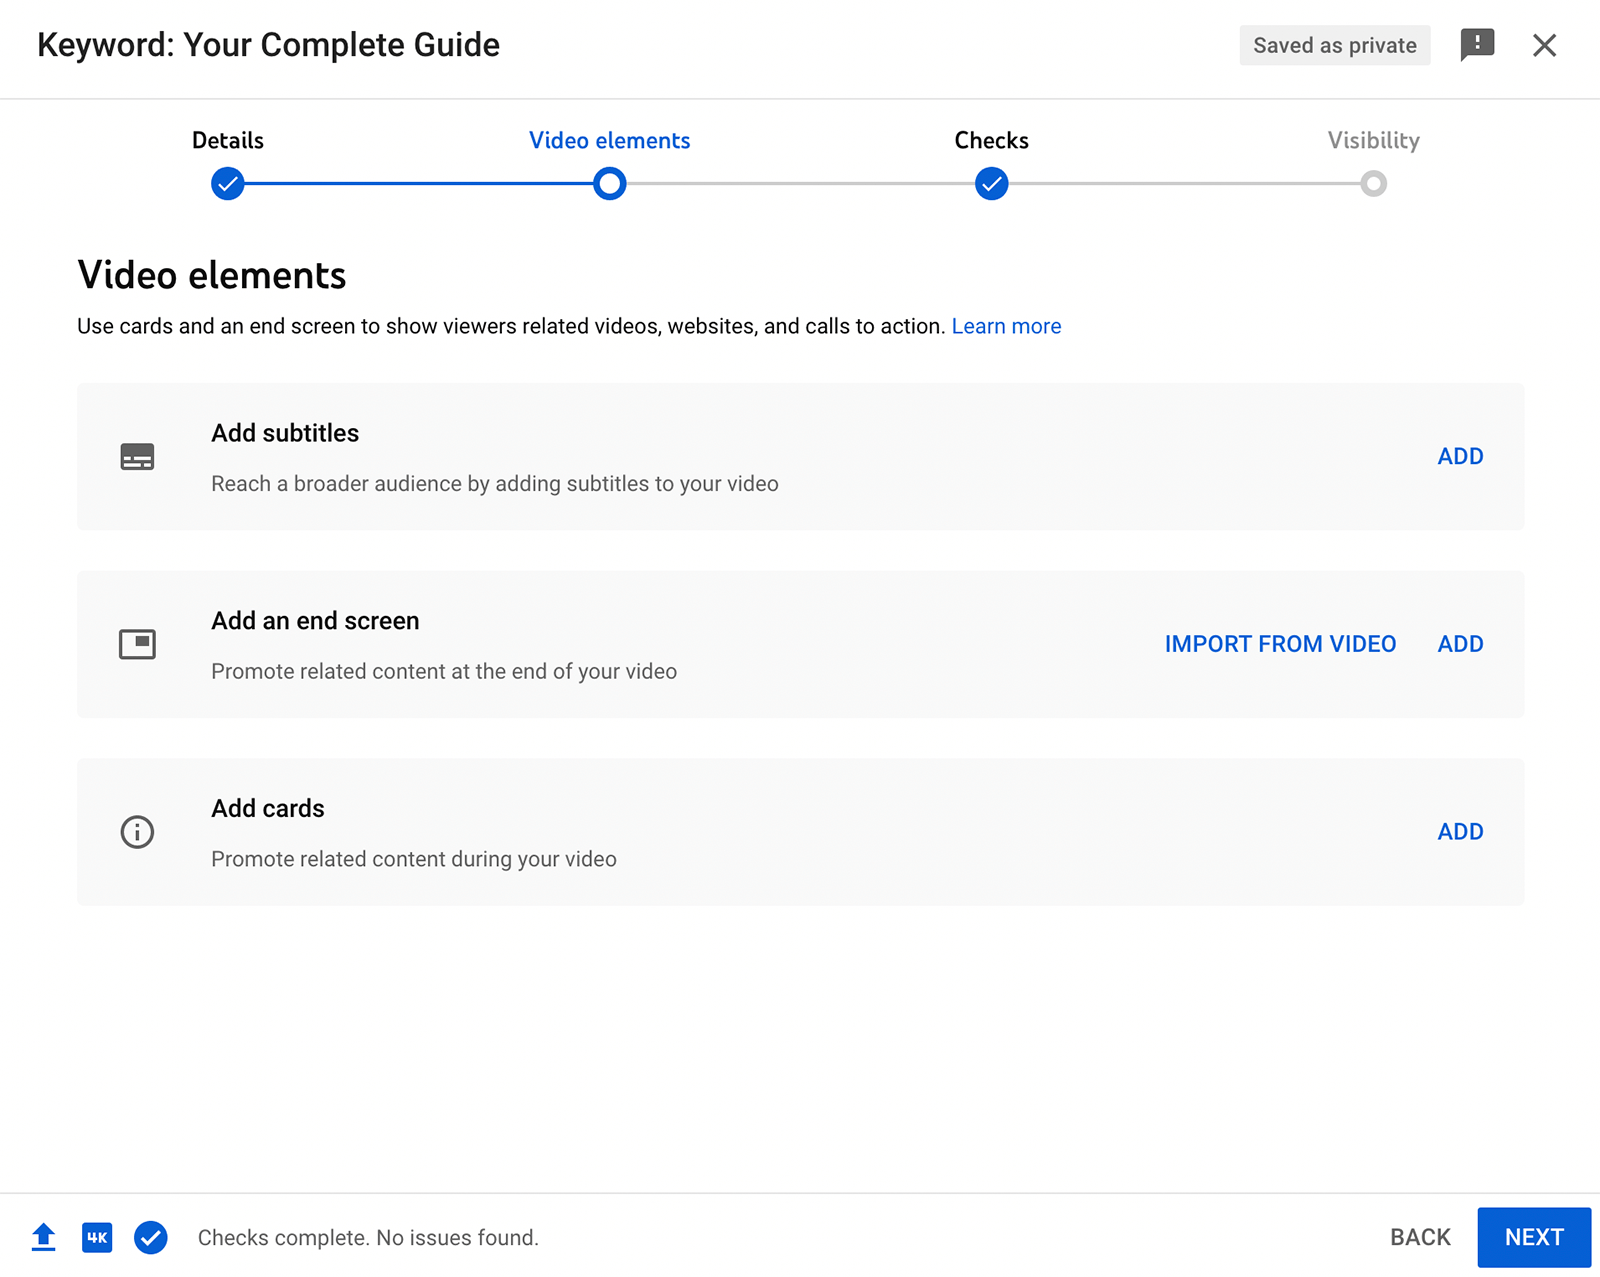
To create cards, click the Add link. Select the type of card you want to add and then select the channel, video, or playlist you want to link. You can choose from your channel's own library or connect to any other resources on YouTube.
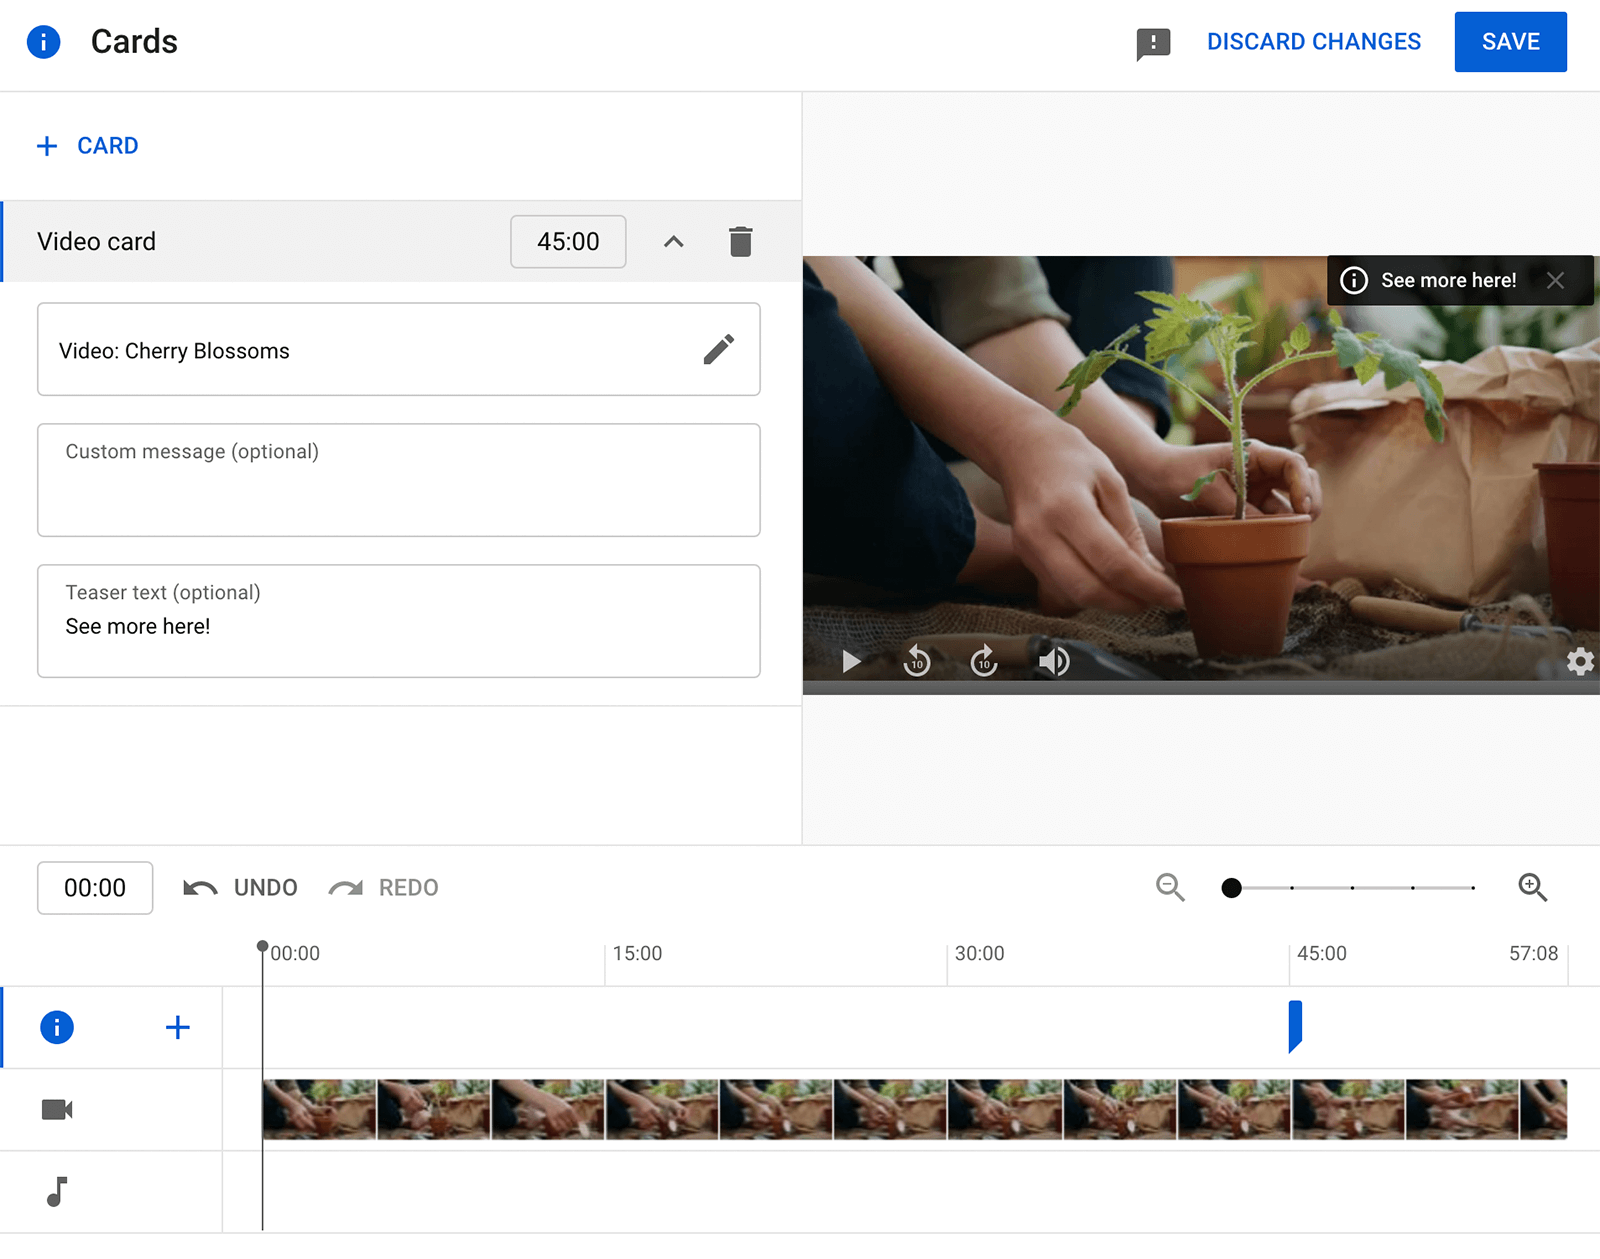
Write teaser text to encourage viewers to click through. Then set the timing when you want the card to appear. For example, you may want to display a card when the video mentions a relevant product or process. Continue to add more cards, and then click the Save button.
End Screen
Like cards, end screens give viewers more information or direct them toward additional resources. Instead of appearing at predetermined times throughout the video, however, end cards appear when the video concludes.
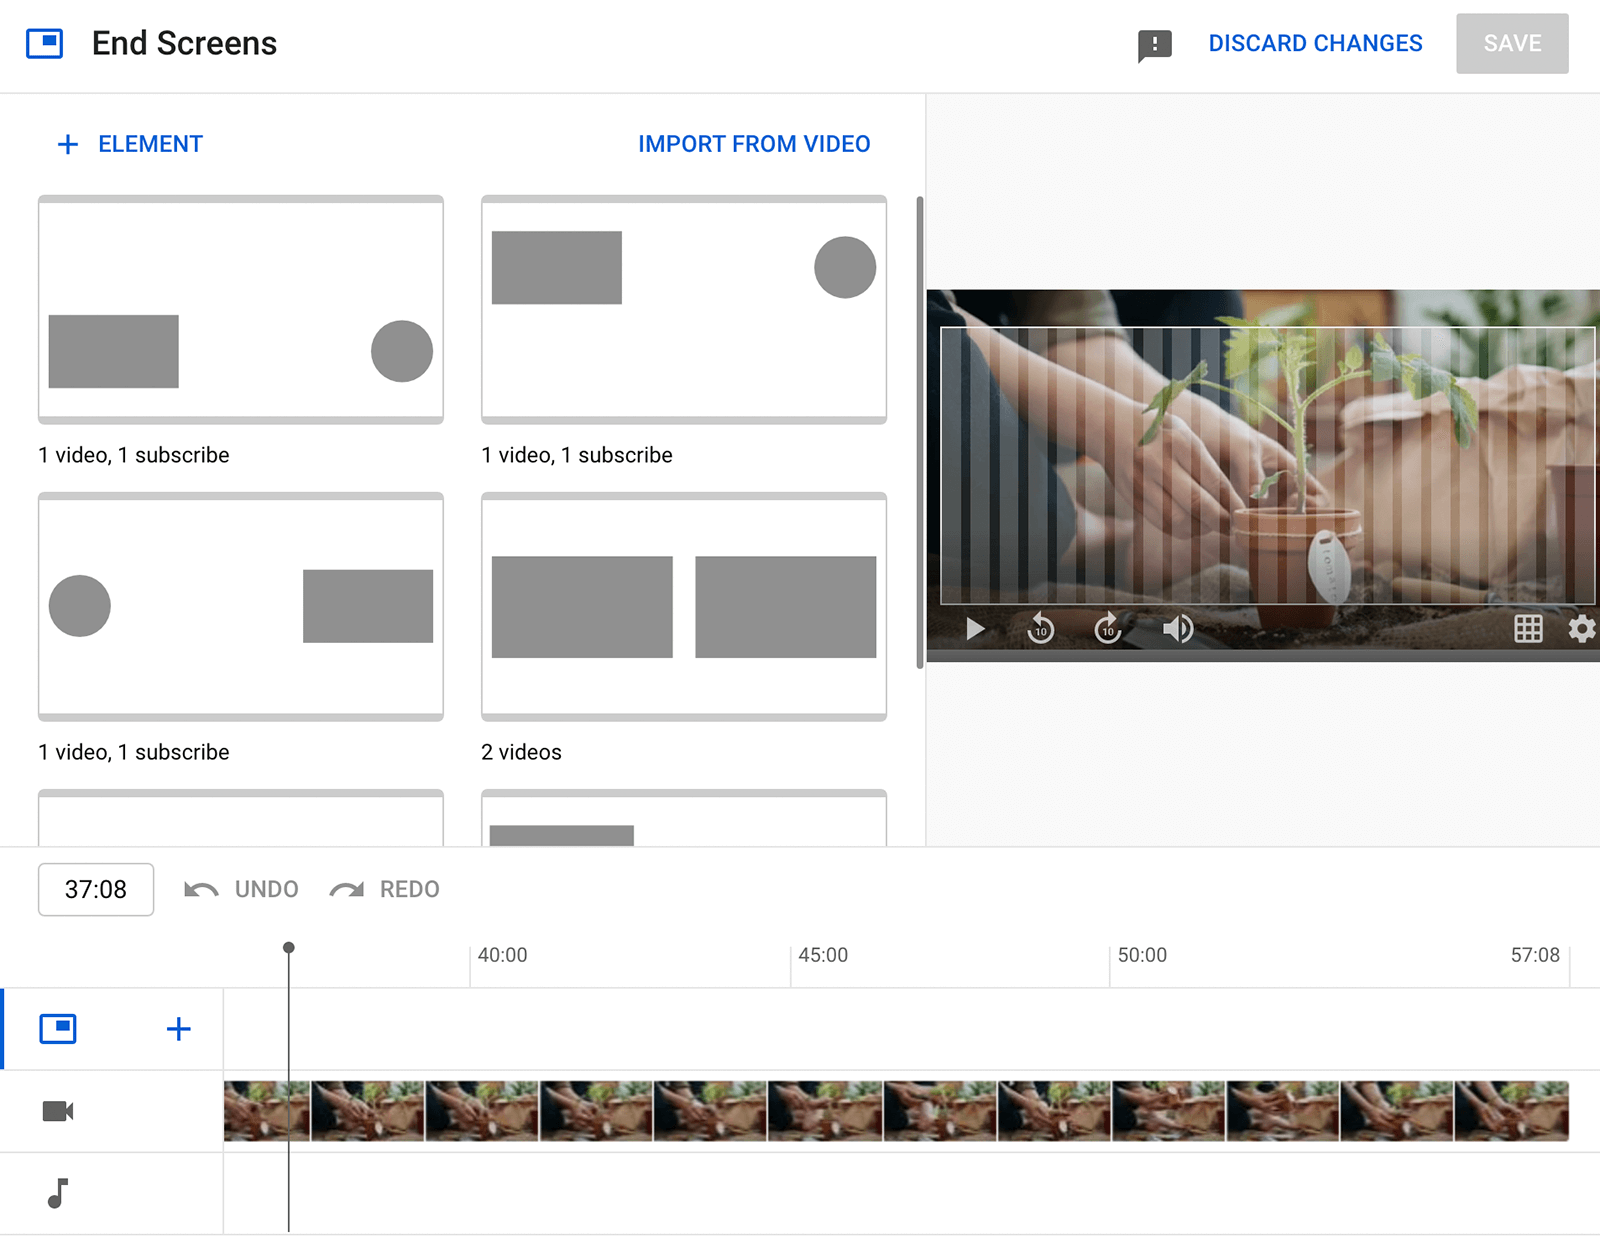
To create an end screen, click Add. Then choose a template for your end screen. You can highlight another video to drive more views or add a Subscribe button to grow your audience. You can also spotlight a playlist to help viewers find more relevant content.
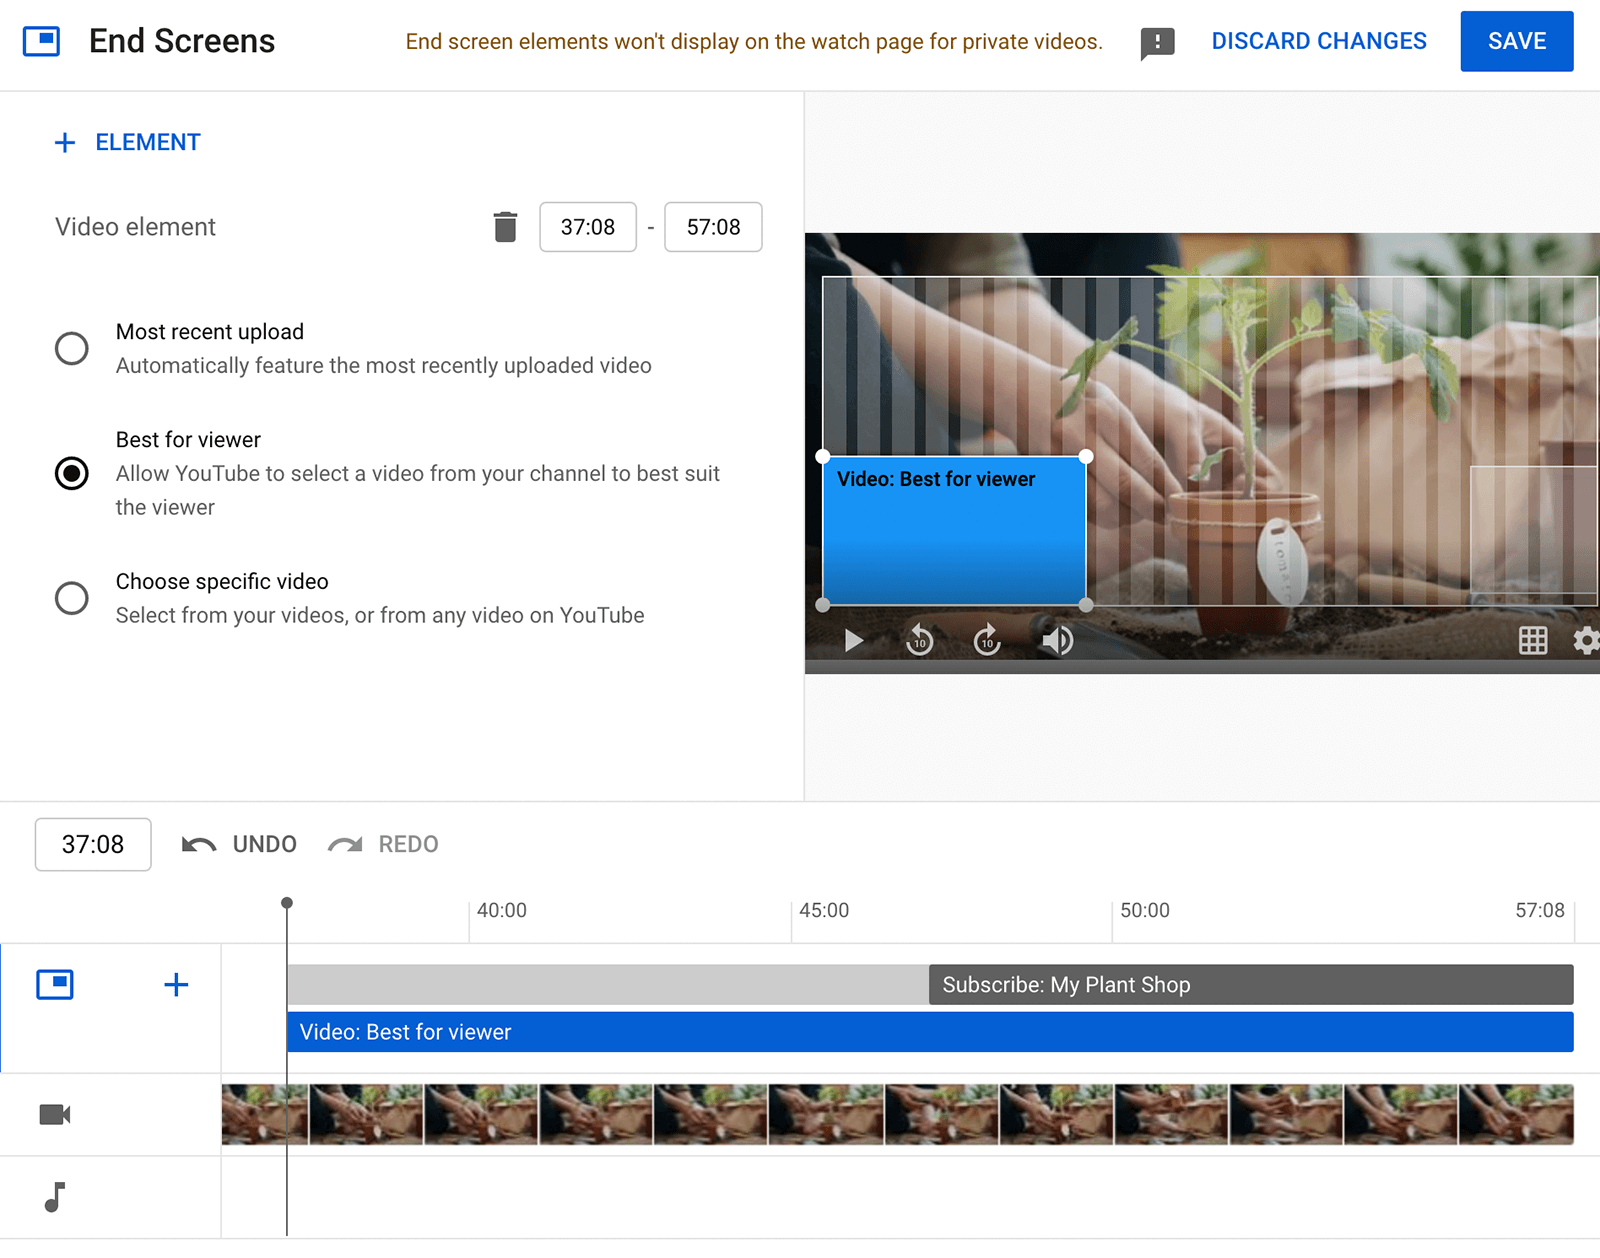
Once you choose a template, you can configure the elements. Adjust the timing so it aligns with your content and select the video or playlist you want to highlight. You can allow the YouTube algorithm to recommend the best video for each viewer or you can drive views for your most recent upload or a specific video.
Visibility
Click the Next button to confirm that there are no copyright issues with your video. Then click the Next button again to publish or schedule your video.
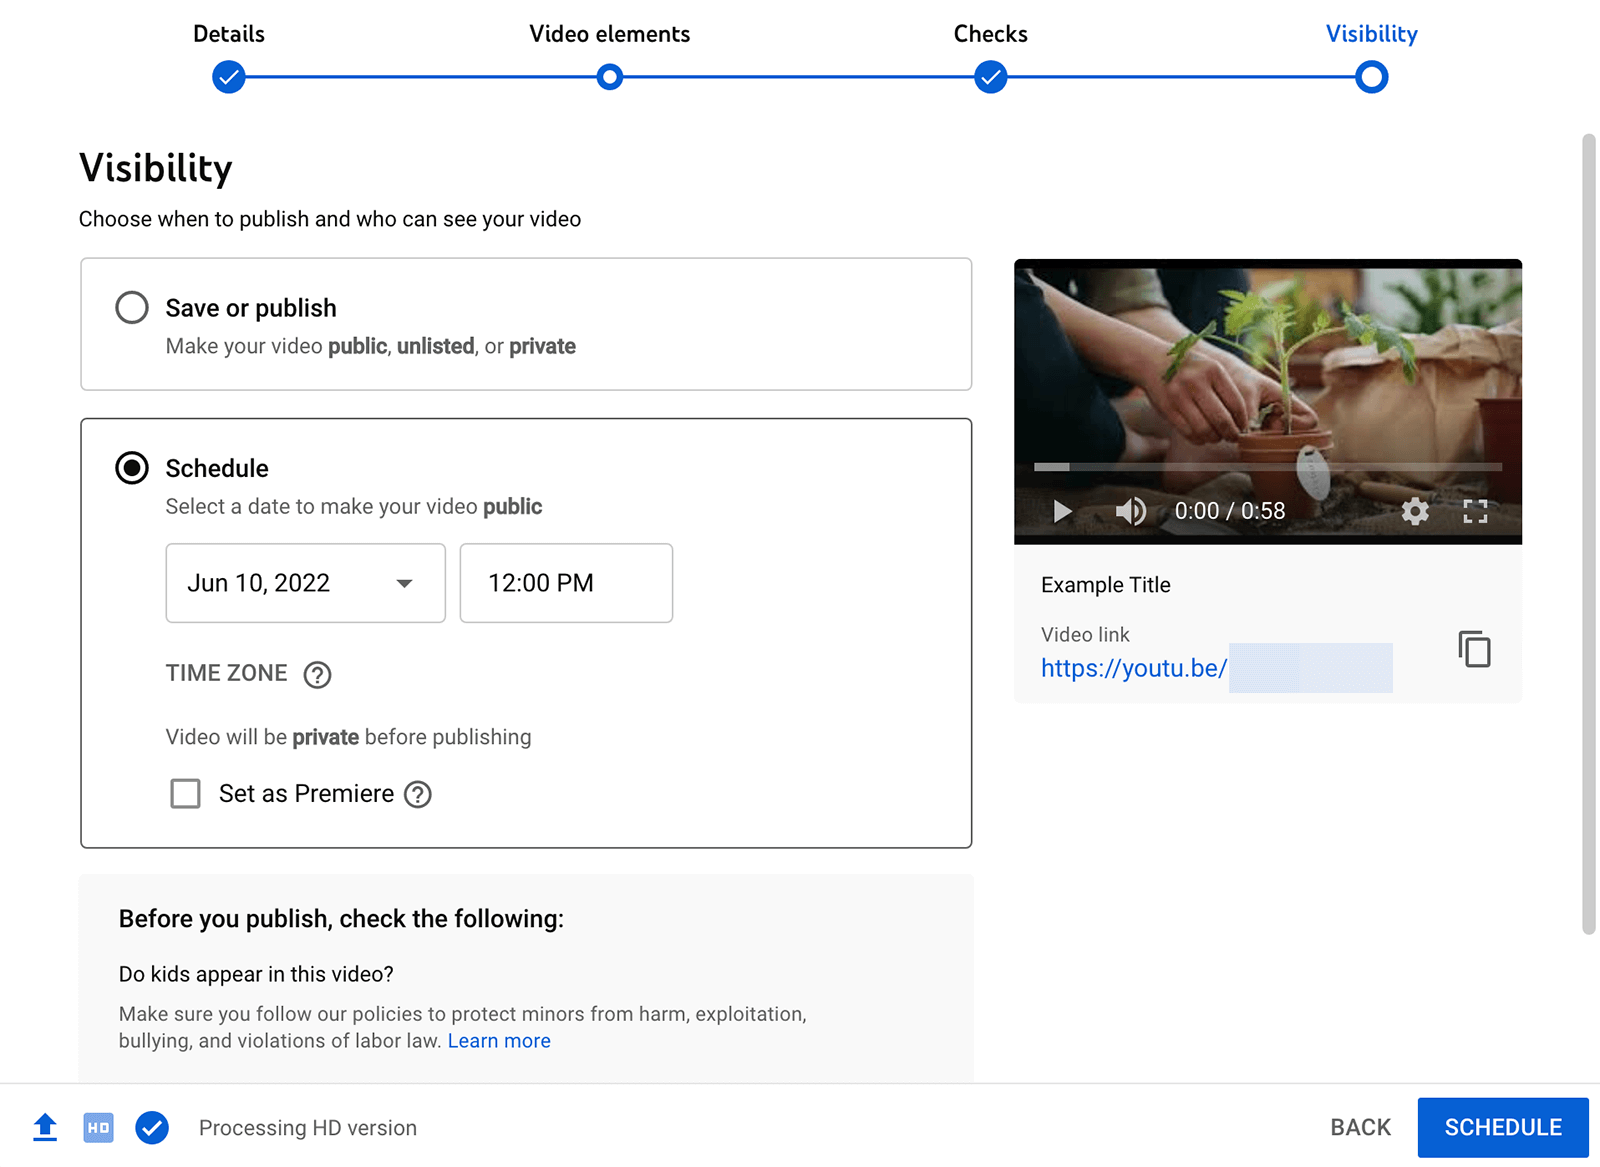
You can set the video to public, private, or unlisted and then publish it immediately. Alternatively, you can schedule a time to publish your video. If you opt to schedule content, it will remain private until the publication time.
#5: How to Report Copyright Infringement on YouTube
YouTube has a system in place to help protect your intellectual property and prevent other channels from using your content without permission. If you find that another channel has republished your content, it's important to determine whether it's fair use or copyright infringement.
Essentially, the fair use doctrine states that channels can reuse copyrighted material without permission in specific situations. Take a look at YouTube's fair use factors for more details on what typically constitutes fair use.
If you're certain that the reuse you spotted isn't fair use, you can submit a copyright takedown request. Note that submitting this request initiates a legal process so it's important to be sure that the reuse is copyright infringement.
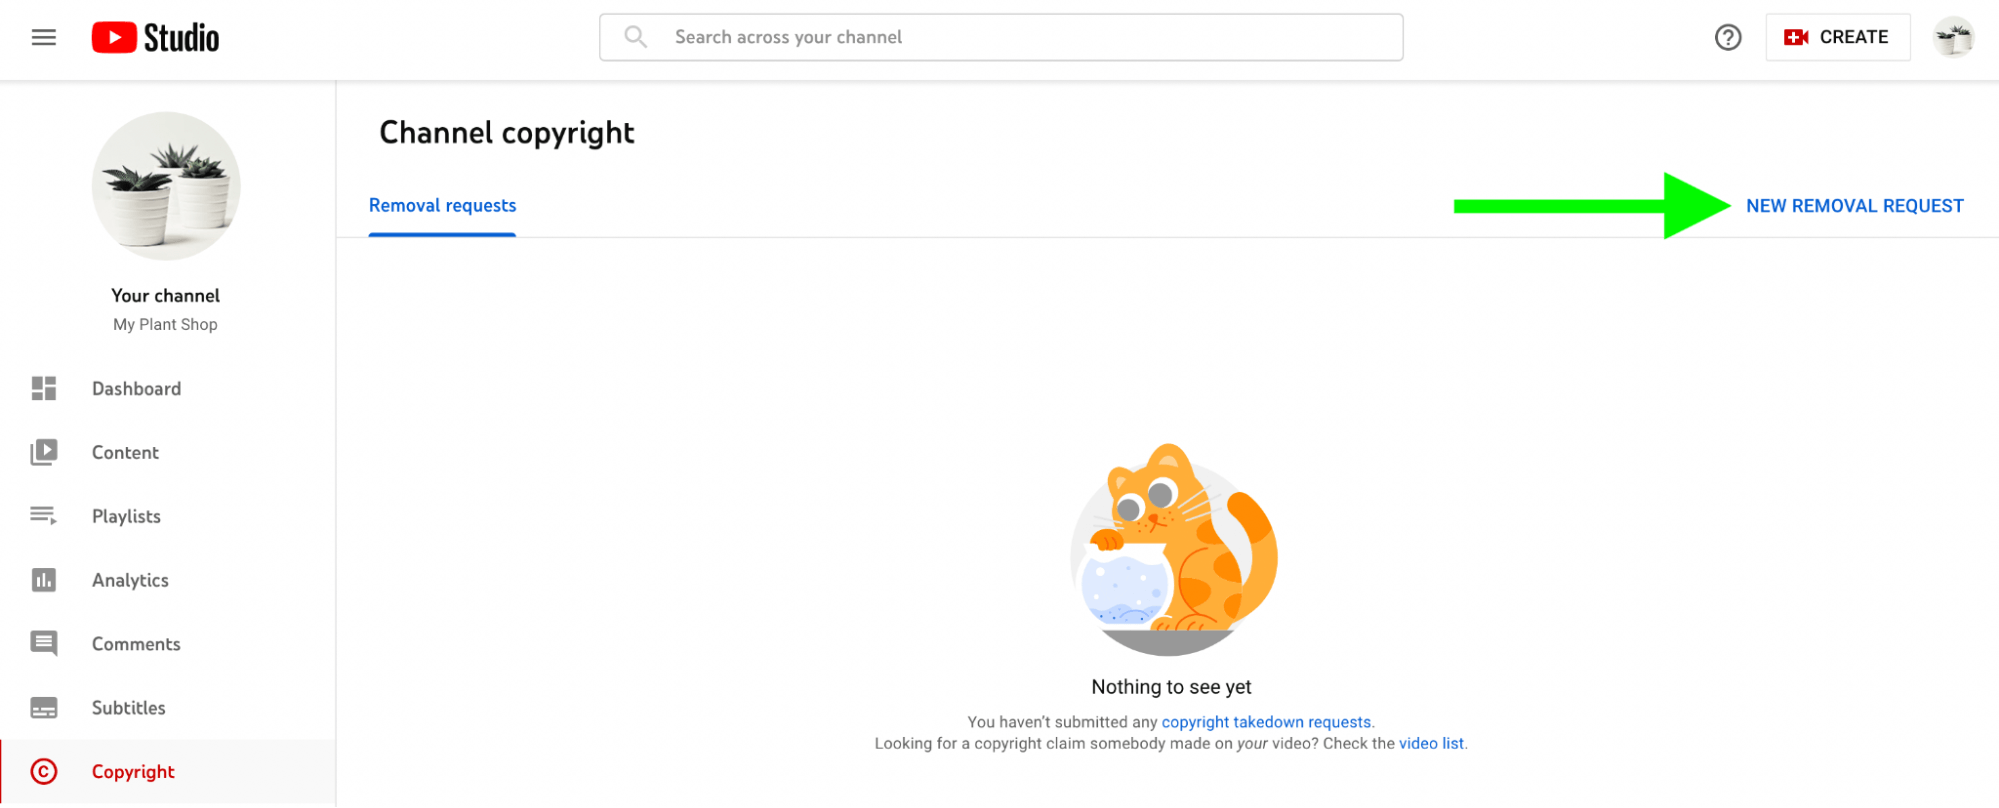
To start this legal process, open YouTube Studio and select the Copyright tab in the left-hand menu. Then click the New Removal Request link in the upper-right corner.
First, click the Type of Work drop-down menu to identify the kind of content the video reused without your permission. For example, it may reuse your video or song or it could show your artwork or performance.
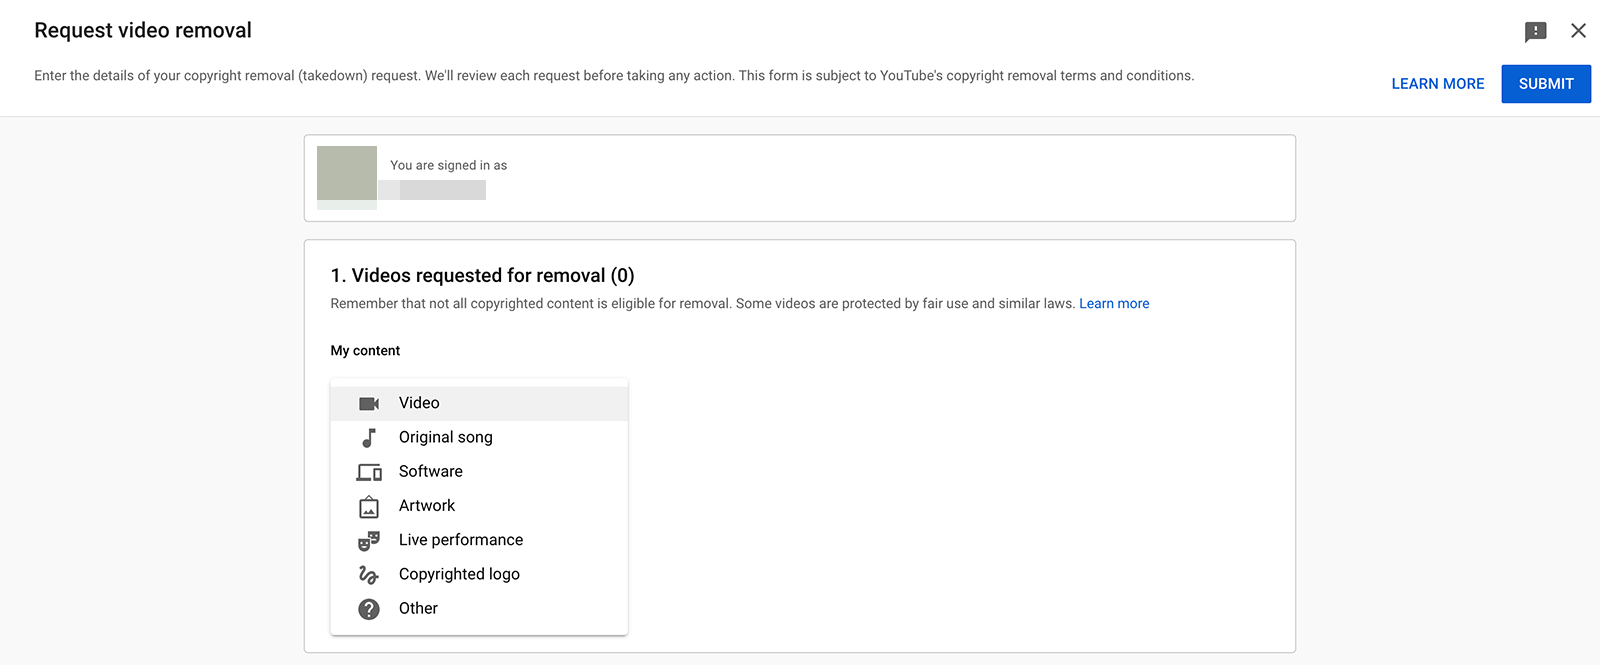
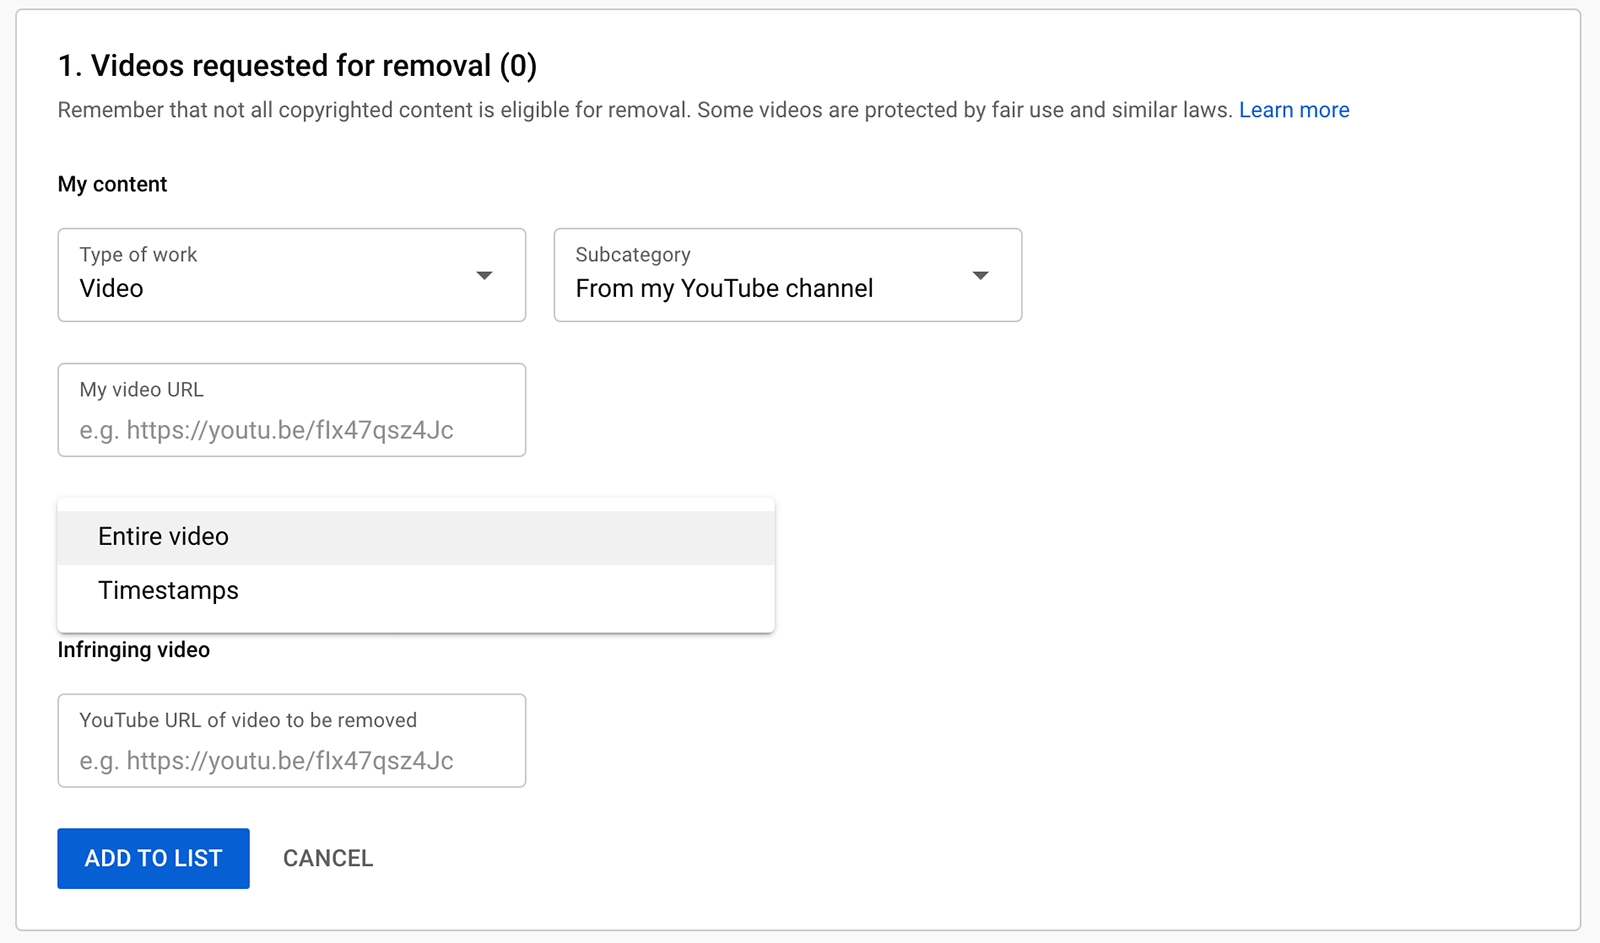
You can also specify whether the reused content came from your YouTube channel or outside of the platform. If you indicate that the content is a video from your YouTube channel, the system asks you for more information. Clarify whether the infringing video repurposed your entire video or provide the specific timestamps.
Add a link to the infringing video and your own original video. Then click the Add to List button. You can add multiple videos to your copyright takedown request.
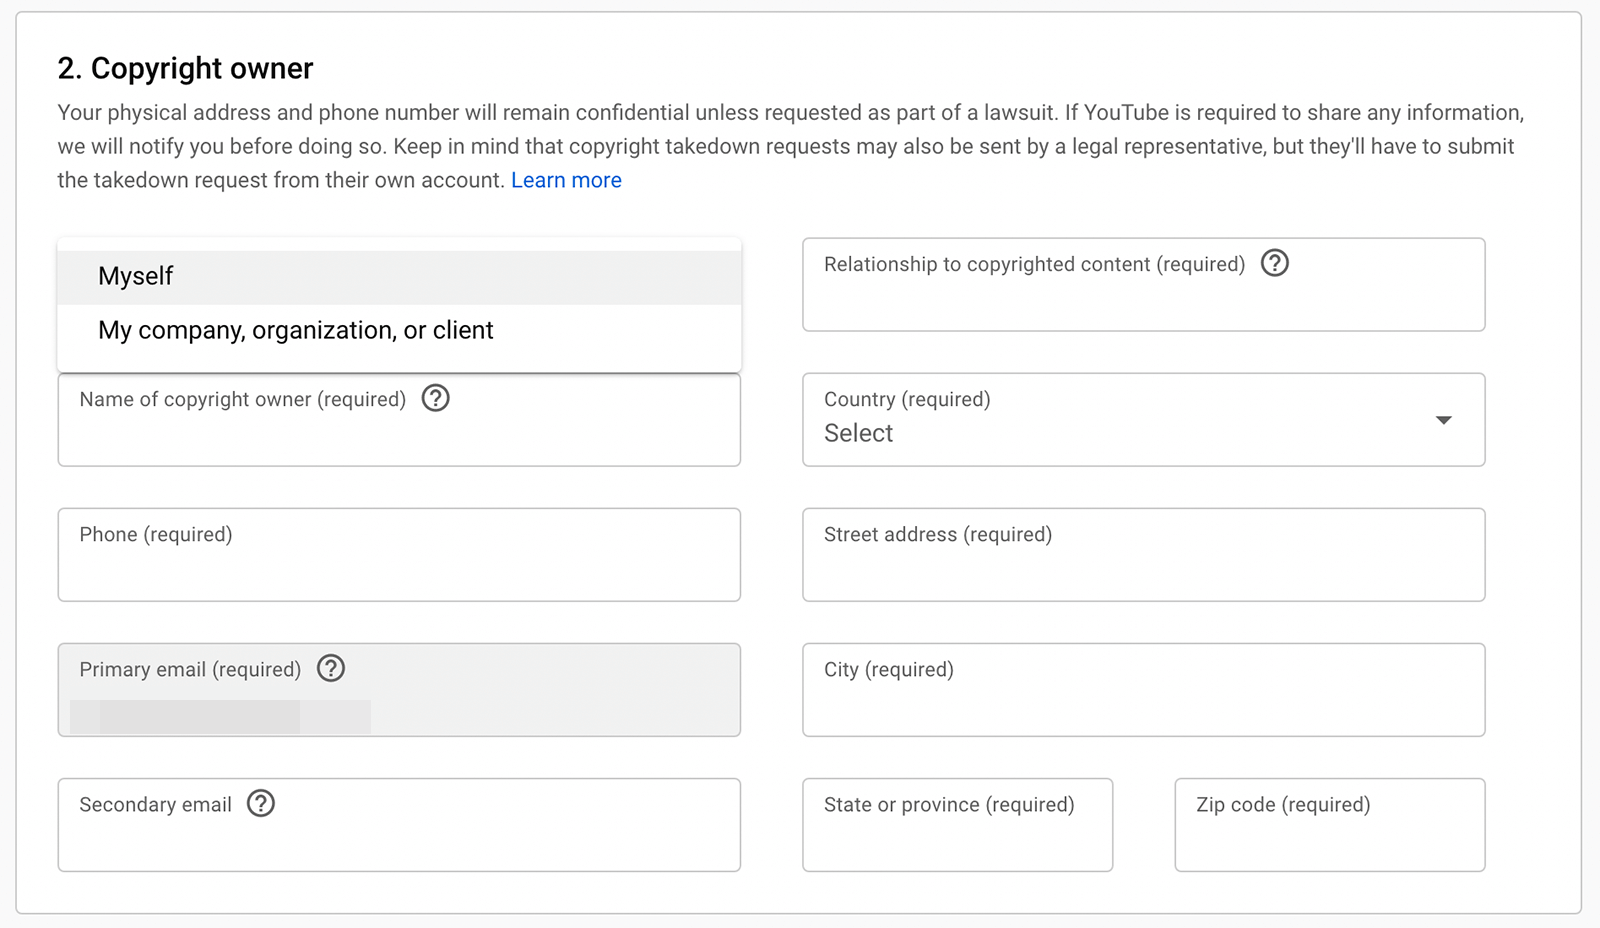
Next, provide contact information for the copyright owner. Indicate whether the copyright holder is you or your company. Then list the copyright holder's name, address, phone number, and email address.
Finally, choose a removal option. You can request immediate removal or give the channel 7 days to take down the video before getting a copyright strike. You can also ask YouTube to assist in preventing more copies of the videos from appearing on YouTube.

Confirm that you agree to the terms and sign the takedown request.
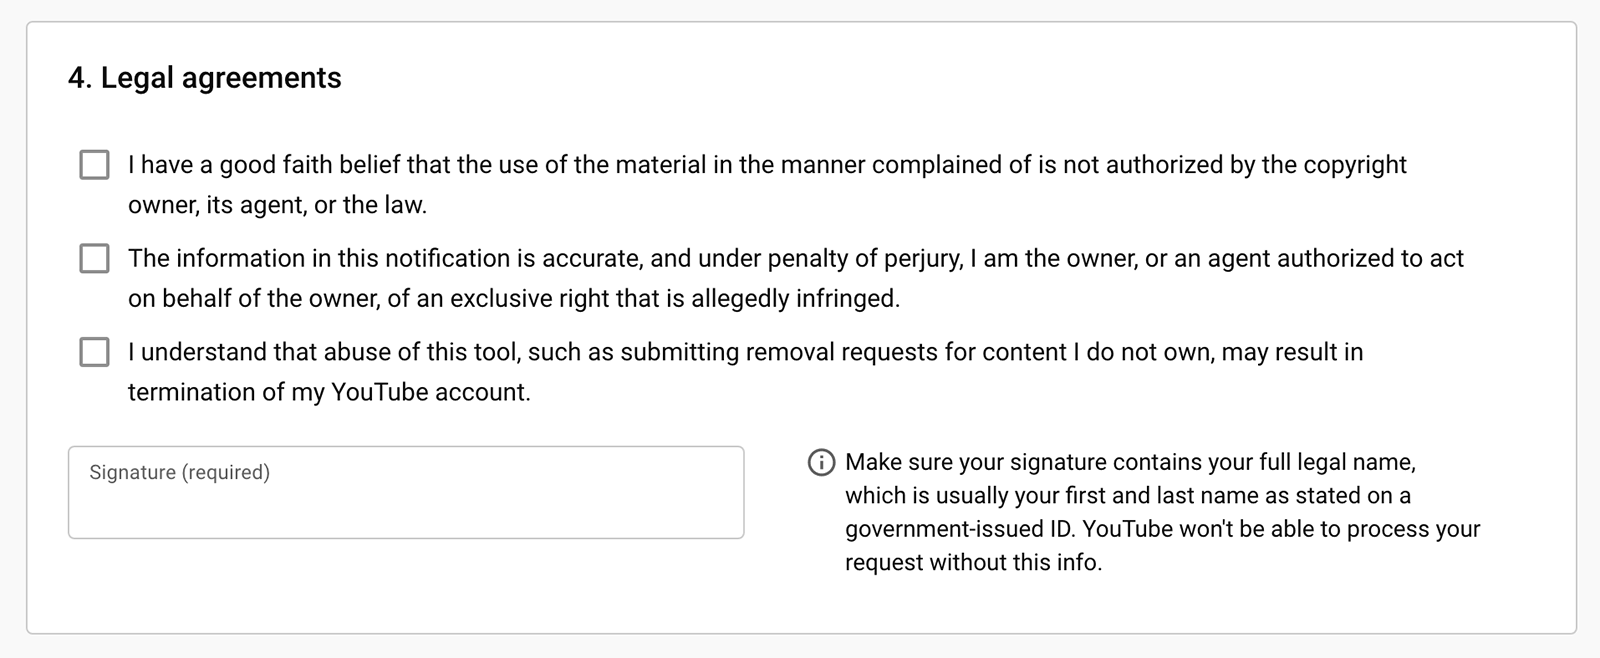
Then press the Submit button in the upper-right corner. You can monitor removal requests from the Copyright tab in YouTube Studio.
Conclusion
Once you've created a YouTube channel, you can start marketing your business. Take time to develop a strategy and an upload schedule so you can create content that appeals to your audience and helps you reach your marketing goals.
Get More Advice on YouTube Content:
- Find 15 tips and tactics for optimizing your YouTube video content at every stage of the video production process.
- Learn which factors help increase the likelihood that your video becomes discoverable on YouTube.
- Discover how your YouTube click-through rate (CTR) impacts video views and find six steps to improve your YouTube click-through rate.
Stay Up-to-Date: Get New Marketing Articles Delivered to You!
Don't miss out on upcoming social media marketing insights and strategies! Sign up to receive notifications when we publish new articles on Social Media Examiner. Our expertly crafted content will help you stay ahead of the curve and drive results for your business. Click the link below to sign up now and receive our annual report!
Attention Agency Owners, Brand Marketers, and Consultants

Introducing the Marketing Agency Show–our newest podcast designed to explore the struggles of agency marketers.
Join show host and agency owner, Brooke Sellas, as she interviews agency marketers and digs deep into their biggest challenges. Explore topics like navigating rough economic times, leveraging AI, service diversification, client acquisition, and much more.
Just pull up your favorite podcast app, search for Marketing Agency Show and start listening. Or click the button below for more information.

