Has your application for Instagram Shopping and product tagging been denied? Wondering where to turn?
In this article, you'll find step-by-step instructions to reapply for Instagram Shopping so you can enable product tagging.
Have You Been Denied for Instagram Shopping and Product Tagging?
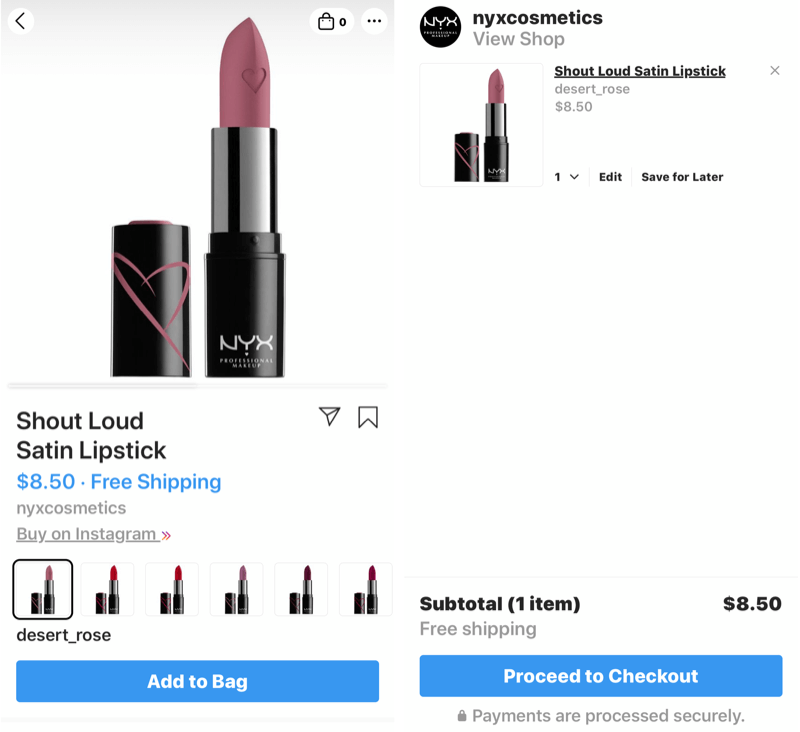
Instagram product tagging is an Instagram business account feature that allows you to tag products in posts and link them to your website so users can make purchases with just a few clicks.
About 2 years ago, Instagram rolled out product tagging exclusively to Shopify platform users in beta to test the idea and iron out kinks in the tech. Today, just about anyone who sells products on their website can apply for product tagging with Instagram. Users can browse products, save items they want to buy later, and purchase items, all within the app.
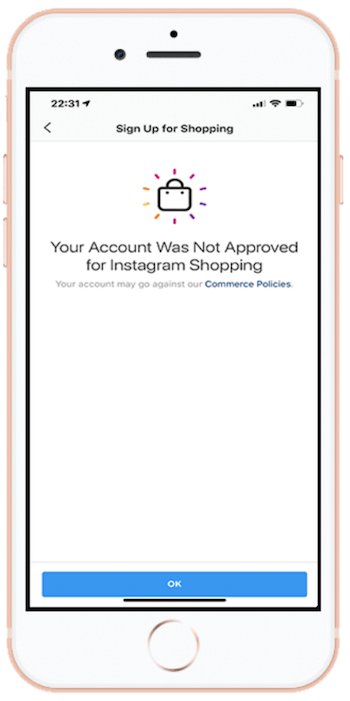
Instagram has come a long way in the eCommerce space, and for many businesses, denial for Instagram Shopping and product tagging hangs over them for months with no solution in sight. The problem with being denied is that there's really nowhere to review why you were denied or reach out for help. All you get is a default message from Instagram telling you that you've been denied and to “View Instagram's Commerce Policy or Contact Instagram to learn more.”
If you've been denied for product tagging, it's important to read Instagram policies and make sure you're in compliance with what they do and don't allow for product tagging because that will be the first place to gain insight as to why you were denied.
Instagram has extensive help materials for most situations users face; however, when it comes to setting up Instagram Shopping, tagging your products, and selling your items on the platform, the answers aren't always clear or easy to find, which leaves many people frustrated.
If you've struggled for hours or days to resubmit your account for approval and are still running into issues, here's a step-by-step solution for getting approved for product tagging on Instagram. Note that you must have a website where you sell your products for you to be approved for product tagging.
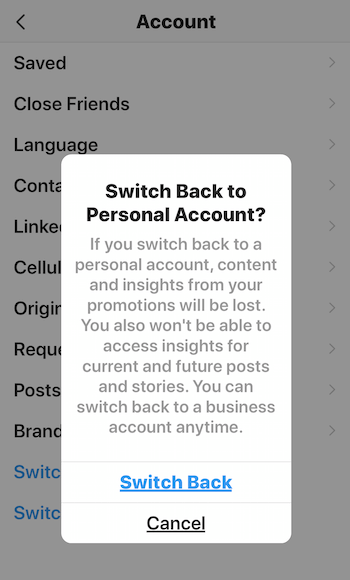
Warning: Before following these steps, be aware that you'll be temporarily switching your Instagram business account to a personal profile. When you do this, Instagram notes that “content and insights from your promotions will be lost. You also won't be able to access insights for current and future posts and stories. You can switch back to a business account anytime.” You'll need to weigh whether getting approval for Instagram Shopping is worth losing this data.
#1: Disconnect Your Instagram Account From Your Facebook Page and Business Manager
The first step is to start fresh by disconnecting your Instagram account from your Facebook page and Business Manager and changing your Instagram business account to a personal profile. Here's how.
3 Days of World-Class Training—Zero Travel!

Couldn't make it to Social Media Marketing World and AI Business World this year? Get all of the great content at a fraction of the price with a Virtual ticket.
That’s full access to recordings of every keynote, workshop, and session—the ones people travel thousands of miles to see. Don't wait. Get your Virtual ticket and enjoy actionable content that you can watch anytime, anywhere.
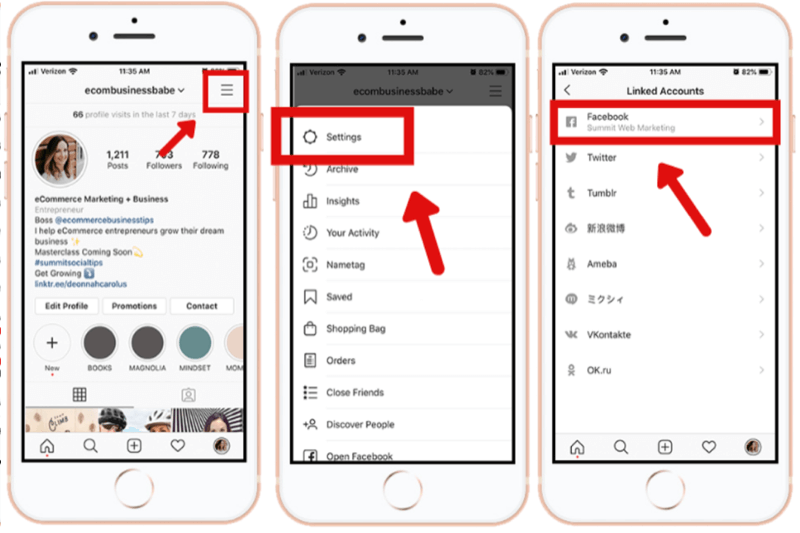
Disconnect Your Facebook Page From Your Instagram Account
To disconnect your Facebook page from your Instagram account, tap the top-right hamburger menu on your profile and navigate to Settings > Account > Linked Accounts > Facebook. Tap Unlink Account to disconnect your Facebook page.
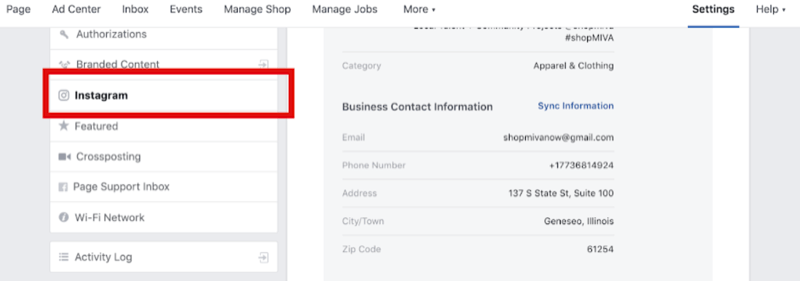
Disconnect Your Instagram Account in Your Facebook Page Settings
You also need to disconnect your Instagram profile from the Settings for your Facebook page.
To do this, open your Facebook page in your web browser and click Settings at the top of the screen. Then select Instagram in the left menu.
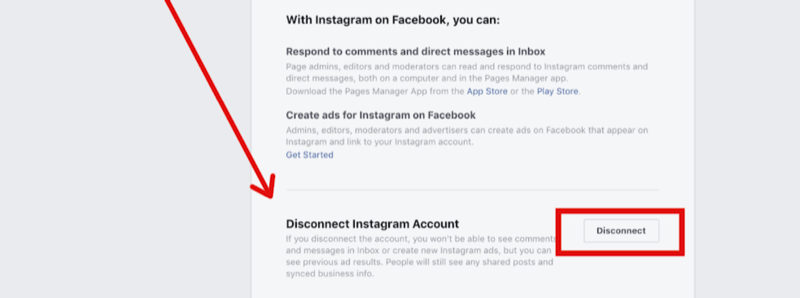
Scroll down the page and click the Disconnect button on the right.
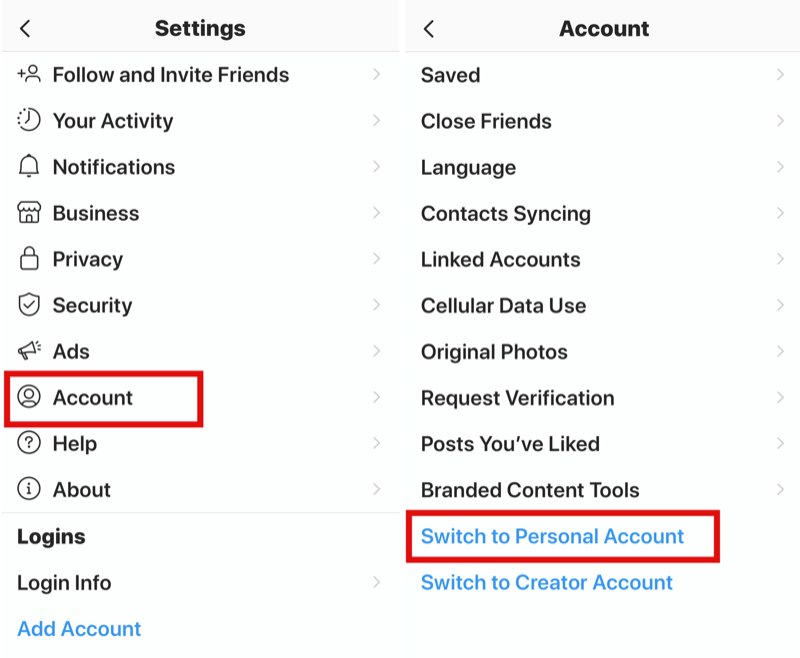
Switch Your Instagram Business Profile to a Personal Account
Now you need to switch your Instagram account to a personal profile in the Instagram app. As mentioned earlier, you'll lose some data when you complete this step.
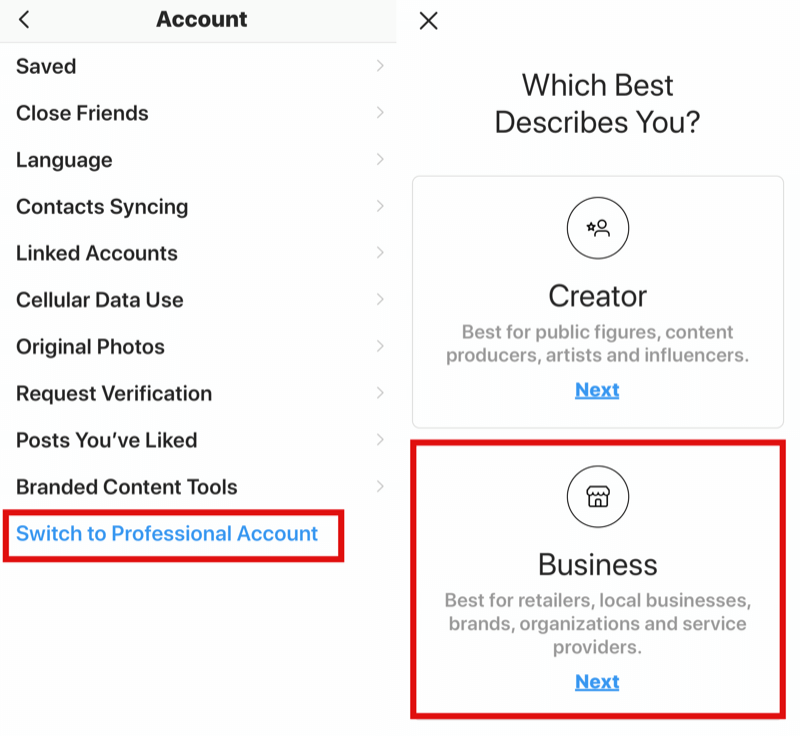
To switch account types in the Instagram app, tap the hamburger icon on your business profile, select Account, and tap Switch to Personal Account. Starting from scratch will reset everything as though you have never set this up before and erase everything you've done previously.
Remove Your Instagram Account From Facebook Business Manager
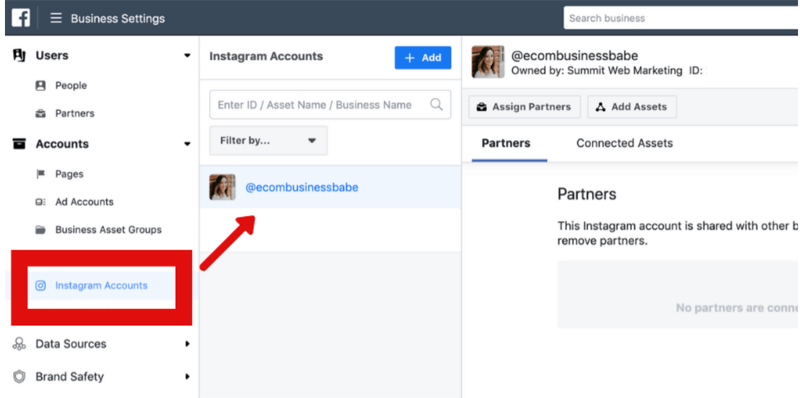
You also need to remove your Instagram account from Business Manager. To do this, open Business Manager and go to Business Settings. On the left side of the screen, navigate to Accounts > Instagram Accounts. Then click your Instagram account name and click Remove in the upper-right corner of the screen.
#2: Set Your Facebook Page Template to Shopping
Now make sure your Facebook business page is set to the correct template. Many Facebook page owners set up their Facebook business page as a general business page. However, if you're trying to get approved for Instagram product tagging, you have to use the Shopping template on your business page.
To do this, go to Settings for your Facebook page. In the left menu, select Templates and Tabs. On the right under Templates, select Shopping. If you have a different template selected, simply click the Edit button under the Templates section to switch it to Shopping.

#3: Set Your Instagram Profile Back to a Business Account
After a couple of days, open your Instagram profile and switch it back to a business account. However, don't reconnect your Facebook page yet; you'll reconnect Facebook in a later step.
Note: When you switch your Instagram profile back to a business account, Facebook will often automatically pull it back into your Business Manager. If this happens, don't worry. It won't prevent you from being approved for Instagram Shopping as long as you don't connect your Facebook account to your Instagram account just yet.
#4: Manually Set Up Your Product Catalog in Facebook Business Manager
The next step is to open Business Manager and manually create your product catalog.
There are many different ways to connect catalogs to your Business Manager, depending on what platform you use. Back in step #1 when you disconnected everything (Instagram from Business Manager and Facebook, and Facebook from Instagram), the same goes for any apps you have connecting your products on your website to your Facebook catalogs.
For example, if you use Shopify to sell your products, disconnect and delete your Facebook Shop app and Instagram Shopping app, and have nothing connected to your products that would automatically update a catalog inside of your Business Manager on Facebook.
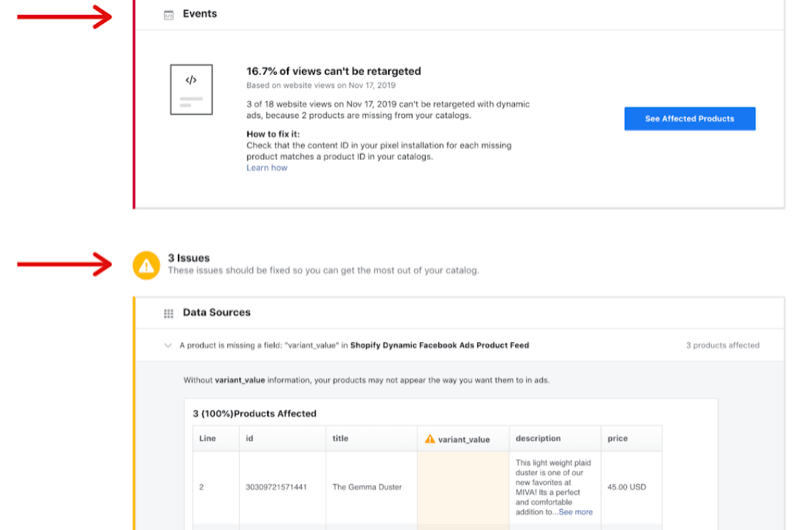
The reason you want to do it this way is that Instagram likes data and information displayed in a specific way when it comes to product tagging. To illustrate, Instagram doesn't like titles of products to display in all caps. Instagram will deny you for product tagging if you have your items listed this way.
Instagram also doesn't like links to other products in the product description and requires items to be listed and described as shown in the product image. If you have several sizes or color variations of your products that aren't filled out correctly or left empty on your website, Instagram can penalize you and deny you for product tagging.
Anything from the way you have your products listed; naming conventions; problems with pricing; and missing pricing, product variations, sizes, and colors can get you denied for product tagging over and over again.
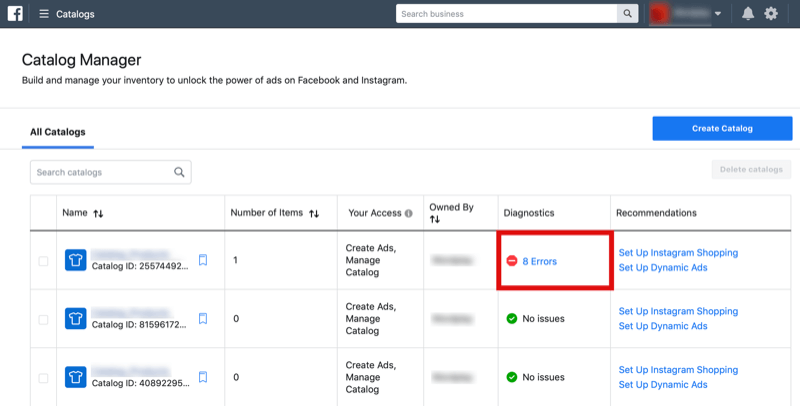
Note: If you imported your product catalog using an app that connects to your Facebook catalogs in Business Manager and you aren't sure if there are issues with your code, product listings, or other things that need to be fixed, you can look in Catalog Manager under Diagnostics.
Want to Unlock AI Marketing Breakthroughs?
If you’re like most of us, you are trying to figure out how to use AI in your marketing. Here's the solution: The AI Business Society—from your friends at Social Media Examiner.The AI Business Society is the place to discover how to apply AI in your work. When you join, you'll boost your productivity, unlock your creativity, and make connections with other marketers on a similar journey.
I'M READY TO BECOME AN AI-POWERED MARKETERThere, you'll find any issues that could be preventing your catalog from displaying properly and potential reasons why Instagram keeps denying you for product tagging.
This is why it's best in the beginning to just create a manual catalog of your best products so you can be sure all of the information in your catalog is correct and filled in properly before applying for product tagging in Instagram and potentially getting denied again.
Create a Facebook Catalog
To create a catalog manually, open Business Manager, navigate to Catalog Manager, and click Create Catalog. This article walks you through the setup process step by step.

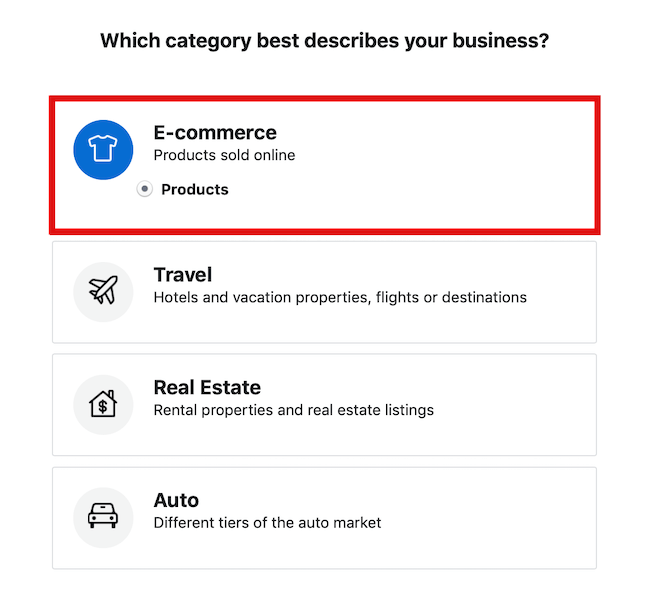
Make sure you select E-commerce as your business category.
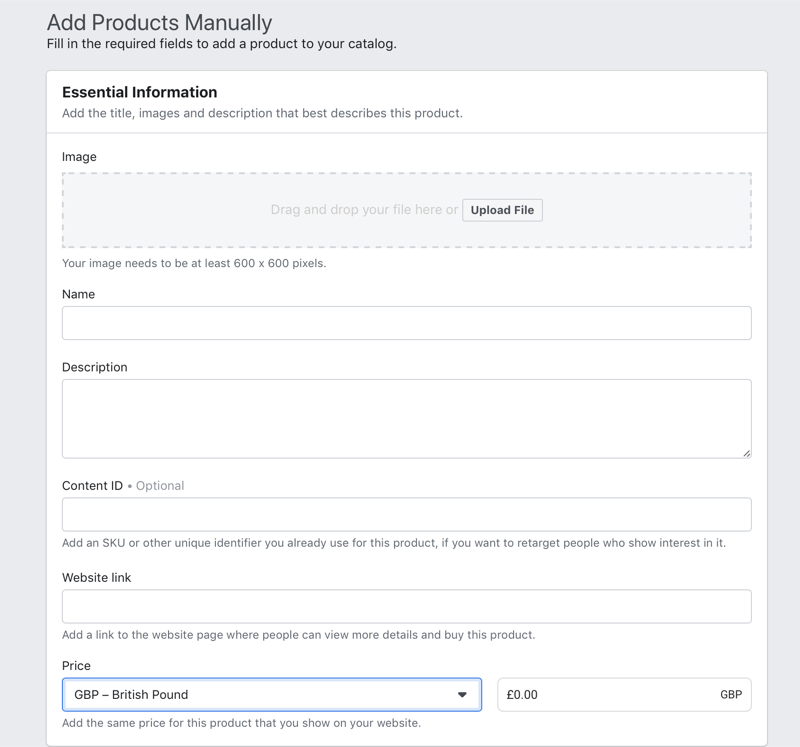
And choose the option to add your products manually.
Keep in mind that you must have a minimum of nine products in your Facebook shop (your product catalog) to be approved for Instagram product tagging. Size and color variations count as one product. So if you have four top-selling shirts in different sizes (small, medium, large) and two of each size, you would have 24 products.
If your online store has too many products to upload manually, think strategically about what you want in your Facebook and Instagram shop, and only upload items you want to start with. Efficiency is key.
#5: Set Up Commerce Manager Inside Facebook Business Manager
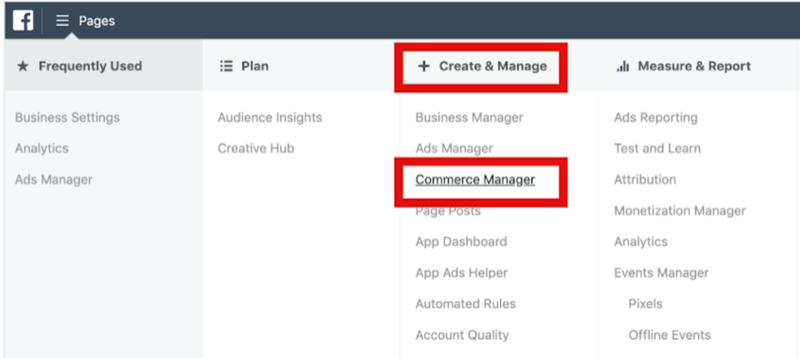
For your Facebook shop to start working and be approved for product tagging on Instagram, you need to set up Commerce Manager. Simply go into your Business Manager and click on Commerce Manager under the Create & Manage section.
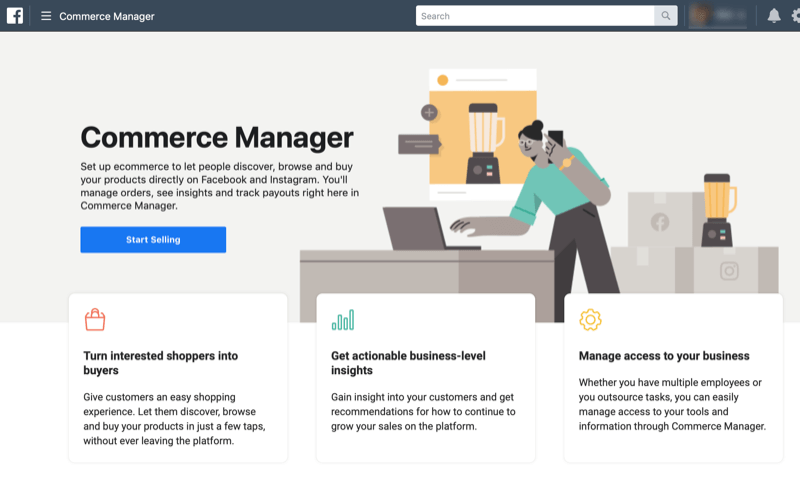
From there, follow the prompts. Be sure to validate your business when you set this up. Facebook will request your bank information, EIN, business address, and other important business details so Facebook knows your shop and products are real, and you're a legit eCommerce business.
#6: Connect Your Facebook Catalog to Your Facebook Shop
After you've manually created your Facebook catalog, you need to connect that catalog to your Facebook shop. To do this, go back into your catalog in Business Manager.
When you click on the catalog you want to use, you'll be brought to the Use Cases area of that specific catalog. This is where you'll connect your Facebook page to your new catalog. Simply follow the instructions under the Facebook Page Shop section.

Give it about 5–15 minutes for your catalog to start displaying on the Facebook Shop tab on your business page. If you aren't sure you did this step correctly, you can check your work by clicking the Shop tab on your business page. There you should see all of the products displayed from your catalog.
#7: Set Up a Shop Now Button on Your Facebook Business Page
Many people miss this step because there's nothing anywhere on the internet that tells you to have this button in place before applying for Instagram product tagging. All you do is add a button for shopping on your Facebook page under your header image. Complete this step once your catalog is displaying on your Facebook page.
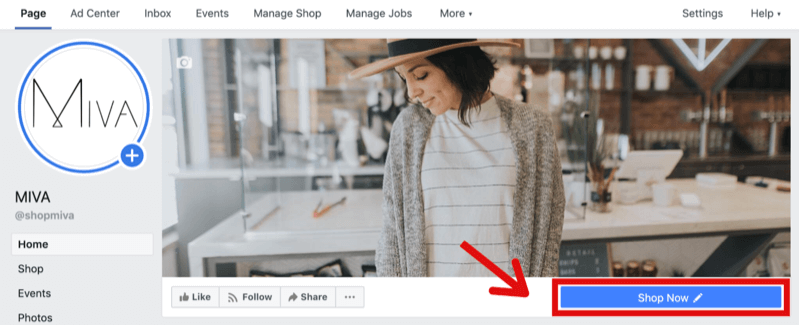
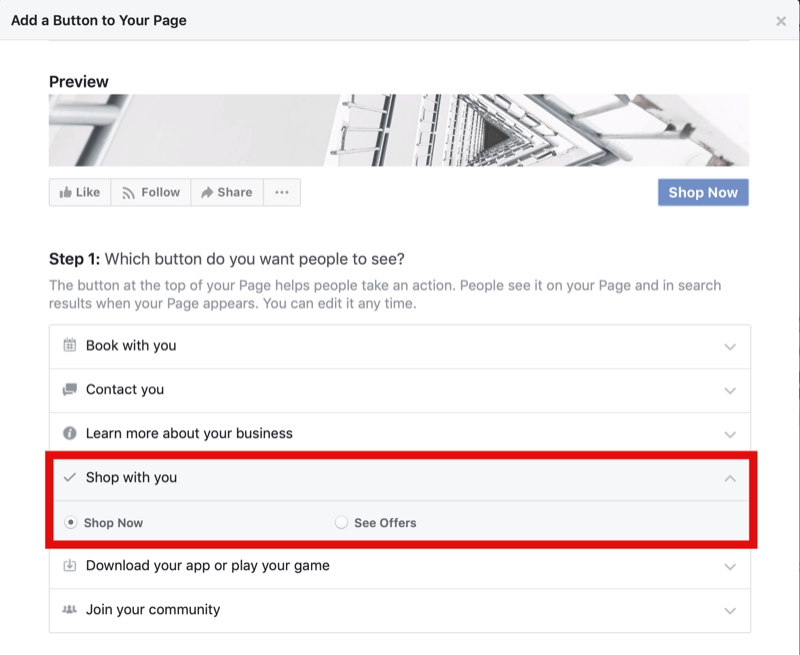
To add this button, open your Facebook page and click Add a Button or click your existing button. In the pop-up window, select Shop With You and then Shop Now.
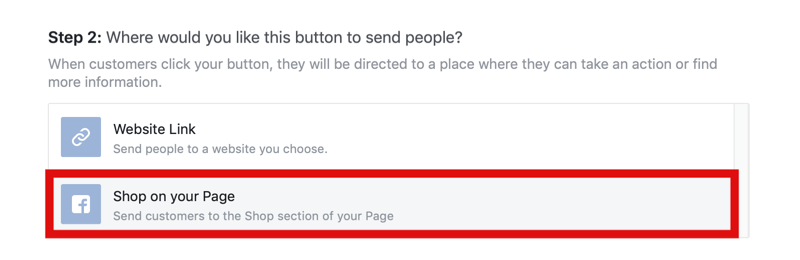
When prompted, Facebook will ask you if you want the button to direct users to shop on your website or shop from Facebook. It's important to select the Shop on Your Page option and not your website.
#8: Reconnect Your Facebook Page to Your Instagram Business Profile and Facebook Page Settings
Now you're ready to reconnect your Facebook page to your Instagram account. Before you do this, however, make sure you have the most recent version of the Instagram app installed on your mobile device. If you don't, you could be denied for product tagging again.
You'll need to make sure your account is reconnected to your Facebook page in two places in the Instagram app:
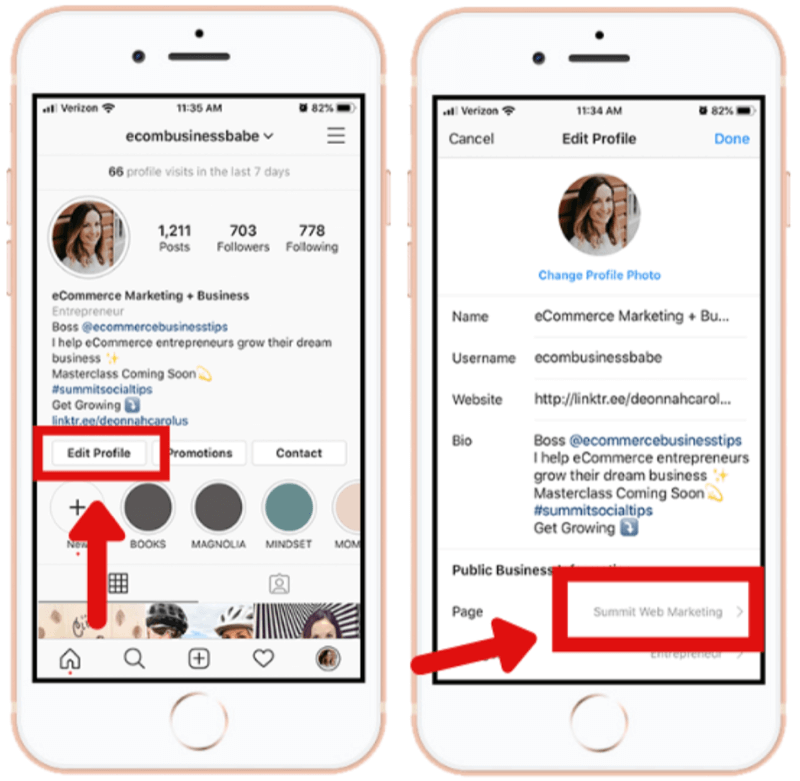
- In Settings > Account > Linked Accounts > Facebook
- In the Edit Profile section on your Instagram account profile screen
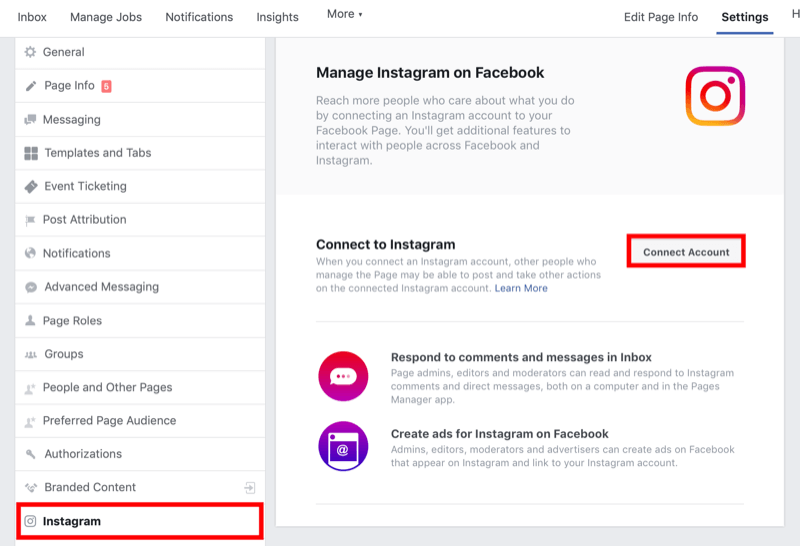
Next, reconnect your Instagram account to your Facebook page via Facebook. To do this, open your Facebook page in your web browser and click Settings. Select Instagram in the left navigation and click Connect Account on the right.
How You Know When You've Been Approved for Instagram Shopping
Reconnecting your Instagram account is the last step in the process of reapplying for Instagram Shopping. Now the waiting game begins. It can take a few hours to a few days, and in some cases, up to 2 weeks for Instagram to review and approve your account for product tagging. If you haven't heard back from Instagram after a couple of weeks, I would reach out to Facebook and see what the holdup is.
Another thing I've seen after completing the above steps is that some people will still see the Not Approved screen when they go to apply for shopping. If this is the case for you, you need to contact Facebook directly for assistance. Sometimes Instagram doesn't reset properly and will stay on this screen even after you've completed all of the appropriate steps you need to take to get approved.
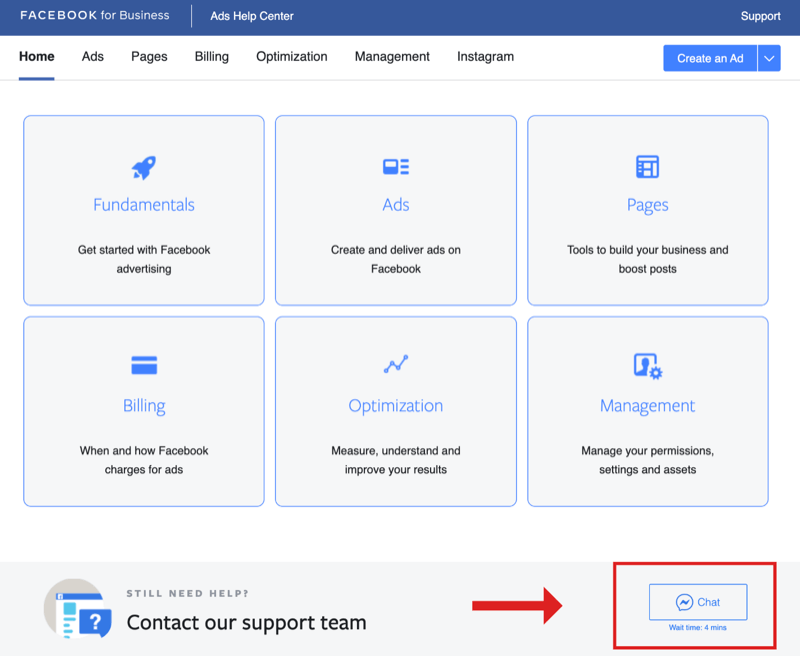
Facebook has great customer support. I recommend contacting support through their Messenger chat service. They're quick to respond and have approved, on the same day, many of my shop accounts that have run into this issue. You can contact Facebook support via Messenger here. Just scroll to the middle of the page and you'll find Chat Support. They should be able to review your account and send everything through the same day.
You'll know you've been approved for Instagram Shopping if you see a notification at the top of the business profile that says, “Start Tagging Now.”
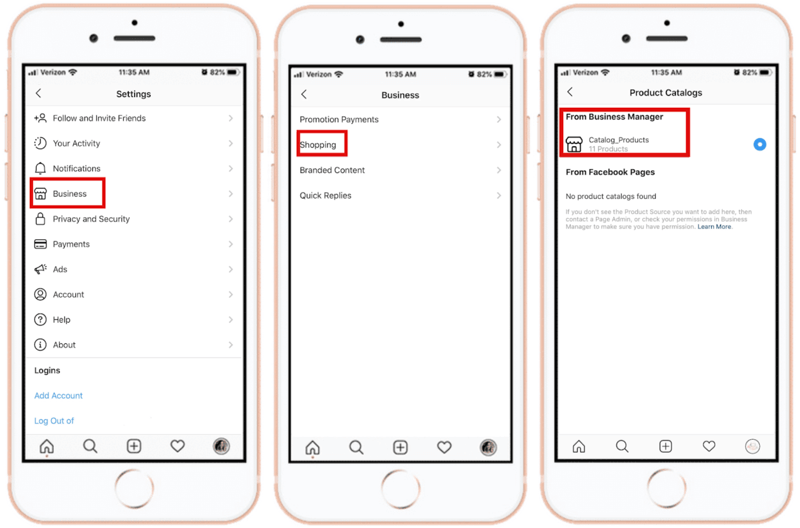
If you don't see this message, go to Settings > Business > Shopping and select the catalog you added products to and connect it to your Instagram account. Now you can create posts to start tagging your products.
Pro Tip: Once Instagram approves you for product tagging, make sure you connect the manual catalog first (in the event you kept any existing catalogs in your Business Manager). I've seen instances where accounts connected to a previously created catalog and the account owner was able to toggle between catalogs. However, I would avoid doing this right after you get approved and use your manual catalog first.
Conclusion
It's a hassle being denied by Instagram when trying to set up your Instagram storefront. Over 70% of shoppers now turn to Instagram for product discovery, to learn more about the brand that carries the products they purchase, and to follow to support their favorite brands.
If your application for Instagram Shopping has been denied and you're not sure where to turn, follow the step-by-step instructions above to reapply so you can enable product tagging on your account.
More articles on selling on Instagram:
- Discover four ways to showcase and promote your products on Instagram.
- Find out how to foster a shopper-friendly Instagram presence.
- Learn how to set up Instagram action buttons to let customers do business with you via your Instagram business profile.

Curious About How to Use AI?
Our newest show, AI Explored, might be just what you're looking for. It's for marketers, creators, and entrepreneurs who want to understand how to use AI in their business.
It's hosted by Michael Stelzner and explores this exciting new frontier in easy-to-understand terms.
Pull up your favorite podcast app and search for AI Explored. Or click the button below for more information.
