 Have you tried using a blog editorial calendar?
Do you have a central place to track blog topic ideas, manage writers and schedule publish dates?
Blogging is much easier when you have your content planned out. Knowing what you'll write about and when you'll publish it helps you stay on track.
In this article I'll share three editorial calendar tools that help you deliver better content in less time.
What Is a Blog Editorial Calendar?
A blog editorial calendar shows you all of your blog posts and where they are in the production process. It sounds simple enough–perhaps so simple you may think you don't need one. But an editorial calendar has a large impact on your overall organization and productivity.

Blog editorial calendars are especially useful if you're working with a team of writers. Knowing who is responsible for which article, whether an article is currently being written or waiting for approval and even whether it's published makes your system run smoothly.
There are a variety of editorial calendar tools at your disposal. In this article I'll tell you about three that include a range of functions to help you and your team manage content production.
#1: Customize Editorial Management
Edit Flow is a free plugin that allows you to create and manage your editorial calendar within WordPress. It offers a bounty of features including custom status, editorial comments, notifications and multi-user support.
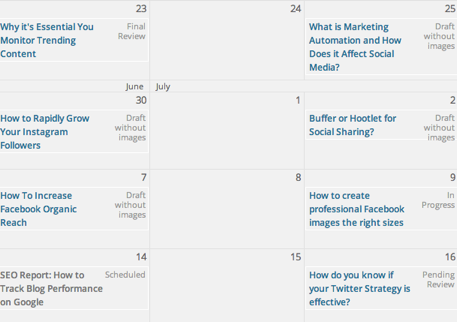
With Edit Flow, you can quickly view a snapshot of your planned content month-by-month and reorganize as necessary with the drag-and-drop feature. If you want to keep tabs on your calendar outside of WordPress, you can synchronize it with iCal or Google calendar.
Hover over any post on the editorial calendar and you can choose to Edit, Preview or Follow it, even if you aren't directly working on it.
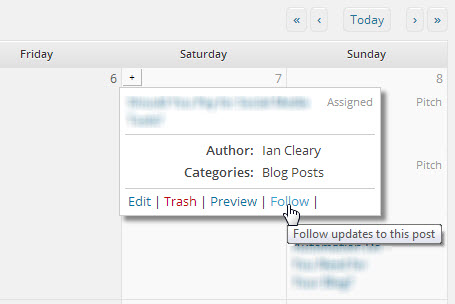
If you're working with a team, you can set up custom status reports to suit your content creation, moderation and publication workflow, then assign them to each post. For example, you can use status descriptions like Assigned, In Progress or Published so you'll know who's working on an article and where it is in the publishing process.
When you create a post, its assigned status is visible on the main editorial calendar.
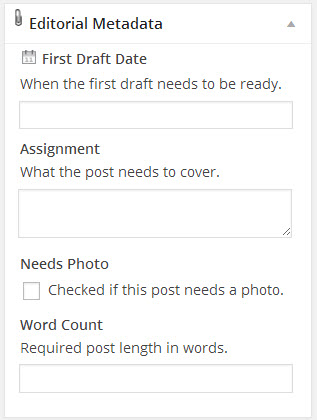
In addition to post status, you can create custom editorial comment fields based on your needs (e.g., dates, checkboxes, text fields, etc). As you assign content to team members, you can use these fields to include any notes to the author or another editor.
Get World-Class Marketing Training — All Year Long!
Are you facing doubt, uncertainty, or overwhelm? The Social Media Marketing Society can help.
Each month, you’ll receive training from trusted marketing experts, covering everything from AI to organic social marketing. When you join, you’ll also get immediate access to:
- A library of 100+ marketing trainings
- A community of like-minded marketers
- Monthly online community meetups
- Relevant news and trends updates
In some cases you may need to create a free-form comment box or you can choose to be more specific and define fields for all information you want to log about the post as it goes through each workflow stage.
For instance, you may want to add a field indicating the due date of a first draft or another field containing a link to the source for the feature article's image.
If you have a larger organization, you can create groups of users and enable the notification feature to make communication easier. For example, you could have a user group for editors and set up notifications so only those people get emails about post updates (e.g., a post is ready for review or is scheduled).
You don't have to go deep into WordPress to review Edit Flow.
When you log into WordPress, there's a dashboard showing you a high-level view of your blog's status. You can add a couple of Edit Flow widgets to your dashboard to view the status of all your posts or keep an eye on posts you're following.
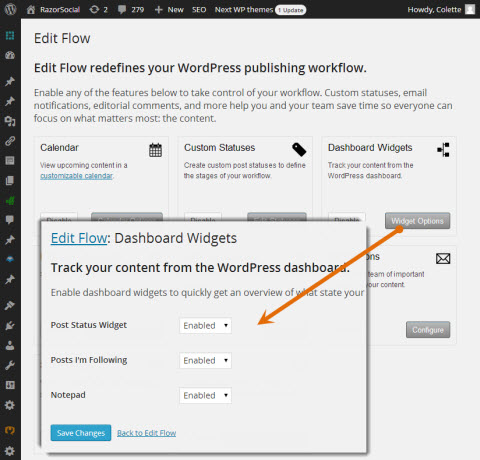
If you enable the Post Status widget, you can quickly see the status of your unpublished posts.
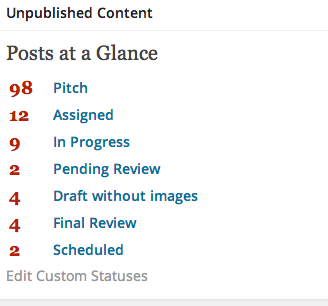
Edit Flow is simple to set up and is a really good way to organize your content production. Whether you're working alone or managing a team, it's useful to set up a workflow and track which stage your content is in.
#2: Include Social Sharing
CoSchedule is a paid blog editorial calendar ($10 per month). You can use CoSchedule as a web application (access it directly from the CoSchedule website) or you can use it within WordPress.
The advantage of the web application is ease of access. You can allow team members to manage and work within the calendar and application without giving them access to WordPress. (Of course, editors and authors will still need to access WordPress when writing blog posts.)
Like Edit Flow, CoSchedule shows you scheduled posts month-by-month, has a drag-and-drop feature, lets you sync with Google calendar and creates tasks and email notifications for team members. You can also assign team members a role that determines their access rights.
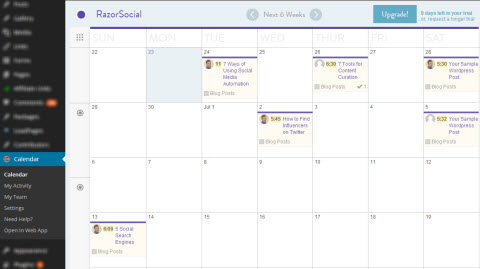
What's special about CoSchedule is it's social sharing option. You can schedule where and when to share your blog post content after it publishes. For example, you can automatically share your blog post to Twitter when it publishes, share it again three hours after that and again two days after that.
Any time you share content on your social profiles, it's important to keep track of how people are responding to it. When CoSchedule shares your content, it automatically uses shortened bit.ly links so you can see how many people are clicking.

Discover Proven Marketing Strategies and Tips
Want to go even deeper with your marketing? Check out the Social Media Marketing Podcast! Publishing weekly since 2012, the Social Media Marketing Podcast helps you navigate the constantly changing marketing jungle, with expert interviews from marketing pros.
But don’t let the name fool you. This show is about a lot more than just social media marketing. With over 600 episodes and millions of downloads each year, this show has been a trusted source for marketers for well over a decade.
If you use Google Analytics, CoSchedule can add tracking codes to your links so you can tell which links generated website traffic and what visitors did once they arrived on your website. If you don't use Google Analytics tracking, you can still add custom tracking codes to your links.
Are you ready to add posts to the calendar? When you have an idea for a post, go to the CoSchedule calendar, click on the pencil icon for the date you want to publish the post and select the New Blog Post option.
Fill in your initial idea for the content, a proposed publish date, assign it to an author, select a category and assign a status. When you click Add Post, it's added to your calendar.
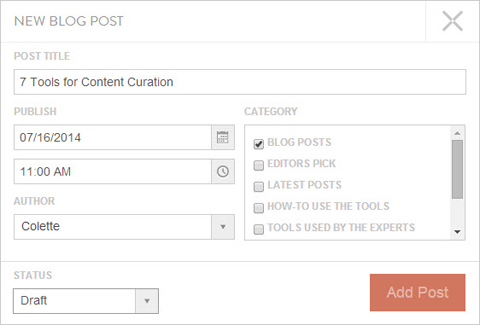
When you create an item, you can add comments and create tasks with or without due dates. For example, if a post is written, you can create a task for your editor to review it.
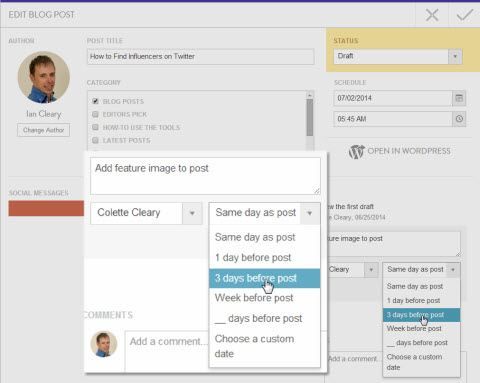
You can also schedule out your social sharing for the new post—even before the post is finished.
CoSchedule is a nice application with great functionality. I particularly like its social sharing capability because when you have a new blog post, sharing it once is generally not enough. With CoSchedule, you're much more likely to set up additional sharing times.
#3: Create and Manage Multiple Calendars
(This review was based on DivvyHQ Version 2.)
DivvyHQ is an online content planning and production tool for high-volume teams. It isn't tied to any blogging platform (not even WordPress), but it provides a range of editorial calendar functionality including the ability to create your content within the tool.
Like the other blog editorial calendar tools, DivvyHQ provides a calendar overview, team management and workflow assignment and tracking.
One difference you'll find in DivvyHQ is that you aren't limited to a single calendar. You can create several calendars and color-code them to keep them straight.
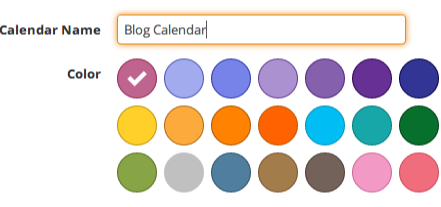
Each calendar has a drag-and-drop feature and gives a high-level view of your publishing schedule. You even have the option to filter calendar posts based on who's assigned to the post, etc.
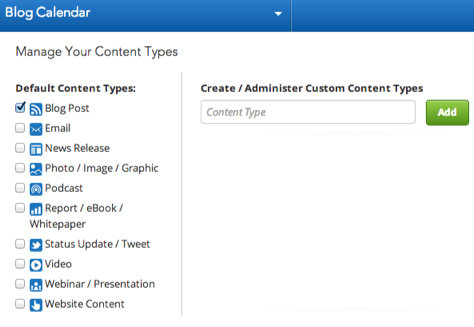
Your calendar can display different types content: email, reports, video and much more. When you create content, just click the appropriate box related to what you're writing.
Team management is easy, because like the other tools, you can assign members tasks, roles and permissions.
Add team members to the relevant calendar and define their roles (which also defines their permissions). You can assign people to more than one calendar. For example, a member may be a contributor for one calendar and an editor for another.
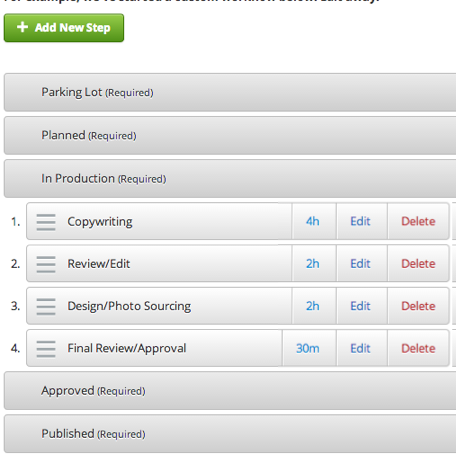
Each blog calendar—whether written by a single person or a team—has its own workflow covering everything from coming up with topic ideas right through to publishing a post. You can track that flow using either DivvyHQ's default workflow or creating your own.
The default workflow includes the Parking Lot (for ideas), Planned, In Production, Approved and Published.

If you want to create your own workflow, you can create workflow items and move them around with a simple drag and drop. As part of the workflow, you can define estimated times to complete each phase.
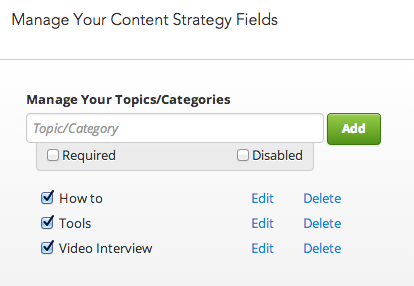
DivvyHQ's content management feature is fully customizable and allows you to add fields to your content to indicate things like the target audience, blog categories, etc.
To add new content to the schedule, select the date you want to assign your content to and select Add New Item.
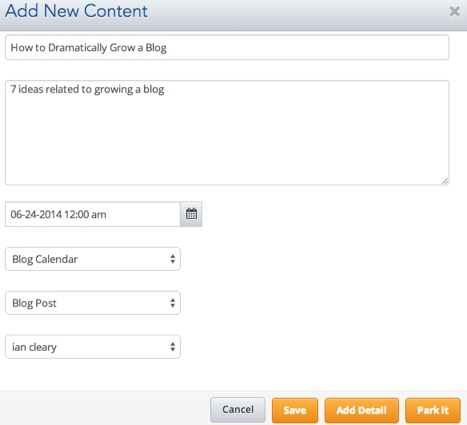
Type in the summary, choose a suggested publish date, assign the post to a calendar, choose the type of content (e.g., blog post, video, report, email) and assign a team member to be responsible for it. You can save this content, add more detail to it or park it.
If you want to create your post right now, click Add Detail and you'll see the full editor where you can start writing.
An important note about writing posts within DivvyHQ: While DivvyHQ offers a full editor, you can't publish directly to platforms such as WordPress. DivvyHQ is working on a new version that includes this function. Once it's released, you should be able to do all of your writing within the tool and publish to your preferred blog platform.
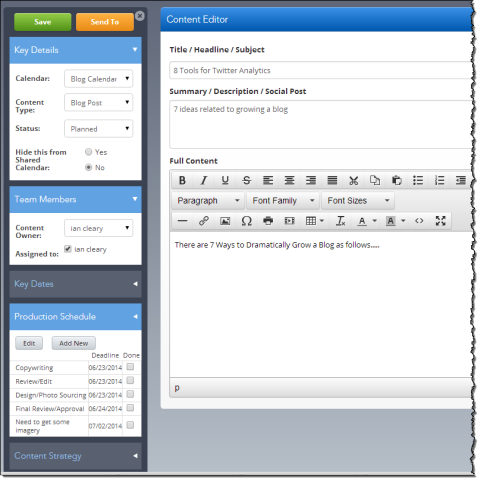
On the left side of the editor are various settings for the post (e.g., what calendar it belongs to, the content owner, who it's assigned to, etc.).
You can also see the production schedule and check off list items as posts move into production. If you've set up any extra fields in the Content Strategy section, you'll see them in the left toolbar as well.
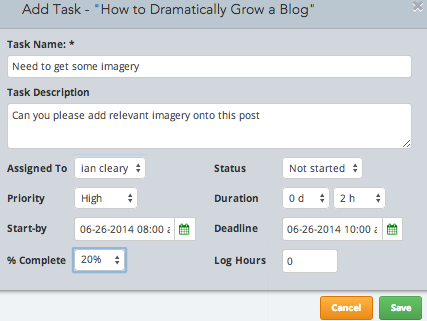
If you or a team member has specific tasks to do, you can add them with the Add Task option.
DivvyHQ is a nicely designed product with some great features. It is missing a few options, most notably not being able to publish directly to WordPress, no social sharing and no advanced reporting. But direct publishing and social sharing are coming very soon, so you can look forward to added value and usability.
Conclusion
No matter what size your writing team is, you need a blog editorial calendar tool to organize, track and plan your content. Workflow, team management, post ideas and creation all come together with the right tools.
What do you think? What blog editorial calendar tool do you use? What are the features you can't live without? We'd love to hear your comments and advice below.
Attention Agency Owners, Brand Marketers, and Consultants

Introducing the Marketing Agency Show–our newest podcast designed to explore the struggles of agency marketers.
Join show host and agency owner, Brooke Sellas, as she interviews agency marketers and digs deep into their biggest challenges. Explore topics like navigating rough economic times, leveraging AI, service diversification, client acquisition, and much more.
Just pull up your favorite podcast app, search for Marketing Agency Show and start listening. Or click the button below for more information.

