Need to do more with social video? Wondering how to increase the quality of your videos?
In this article, you'll discover practical tips to produce polished videos that perform well on social media.

#1: Look Better on Camera
I'm sure you've seen many social media videos where the person is looking down at the camera, which is the ultimate engagement killer. Here are a few tips to make sure you shine on camera.
Camera Position
If you want to look really bad on a webcam, look down at it.
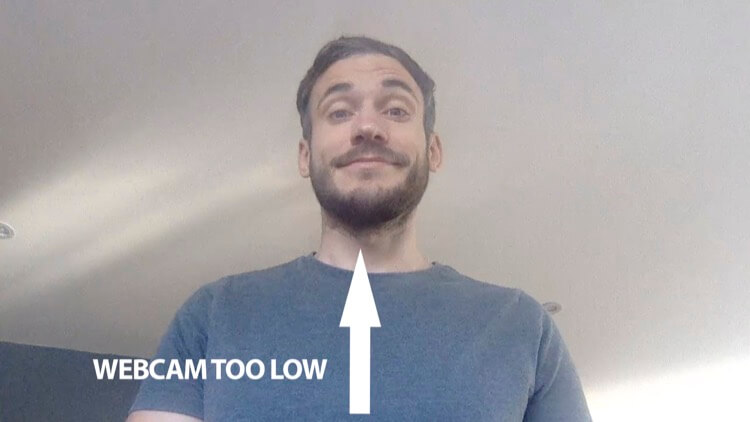
The fastest, most effective way to look better is to get your camera/webcam above your eye line, looking down slightly. This eliminates double chins and nasal hair. For laptops and mobile devices, looking up slightly means you're actually looking more at the user as they stare down at you. (It won't look as odd on desktops, at the same time.)
Lighting
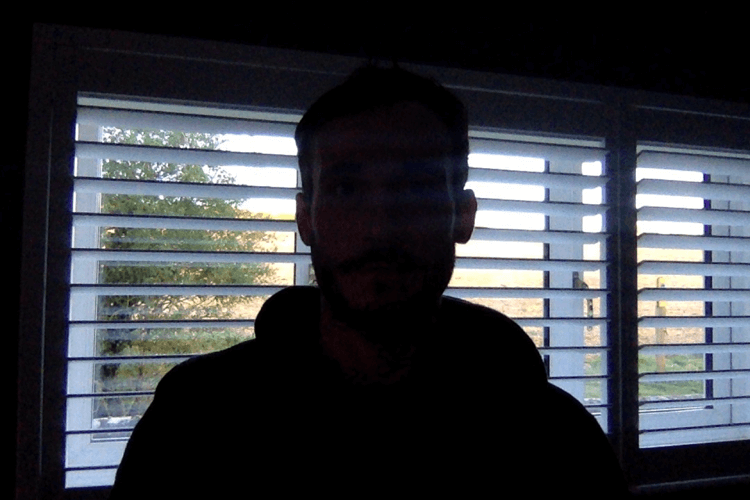
Make sure you're not filming your video with a window behind you because you'll end up in silhouette, like this:
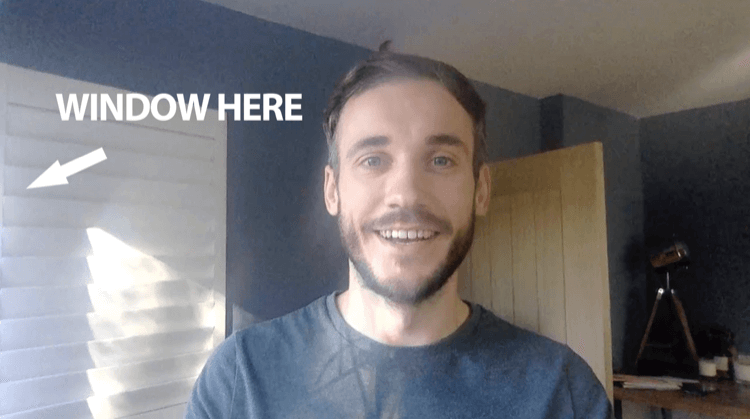
If you can't block out daylight and use your own lighting sources, film with a window to one side of you to take advantage of the soft natural light. This image shows how useful a window can be:
Three-point lighting (with a key light, fill light, and backlight) is an effective setup, but before you invest in a kit, see if you can work with what you already have on hand. I recommend getting the basics right with what you have first. Learning how to use new cameras and lighting equipment adds pressure so don't overwhelm yourself.
This video provides a good tutorial on how to set up your lighting to take your video production to the next level.
Ready to Supercharge Your Marketing Strategy?

Get expert training and an unbeatable conference experience when you attend Social Media Marketing World—from your friends at Social Media Examiner.
Broaden your reach, skyrocket your engagement, and grow your sales. Become the marketing hero your company or clients need!
🔥 Save $800 on an All-Access ticket. Sale Ends Friday! 🔥
GET THE DETAILSBackground
Filming do-it-yourself videos can let viewers see a little more behind the scenes than usual. If your marketing is slick in every other area, you can't let the quality slip here.
You can ruin the perception of your business in a split second with a video shot in a messy spare room or dirty kitchen. The wrong background can distract viewers and pull them out of the content, which will wreck your video.
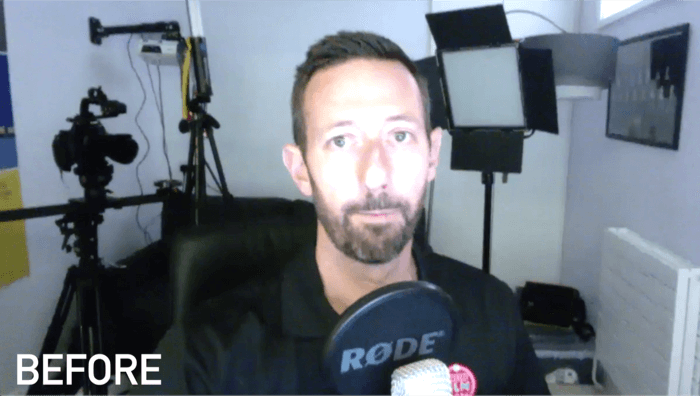
In this image, the clutter does the presenter no favors.
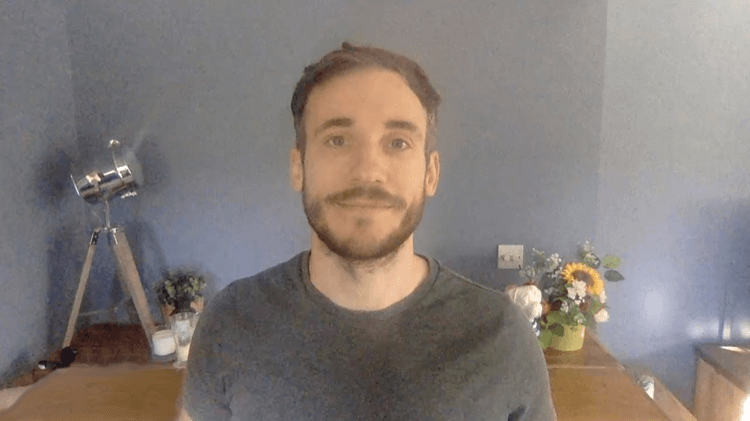
A better approach is to create a set or background that's clean, minimal, and tidy and helps to suggest visually what niche you're in. When in doubt, keep it simple and shoot on a plain wall.
Can you see the difference a better background makes?

#2: Improve Social Media Video Production Quality
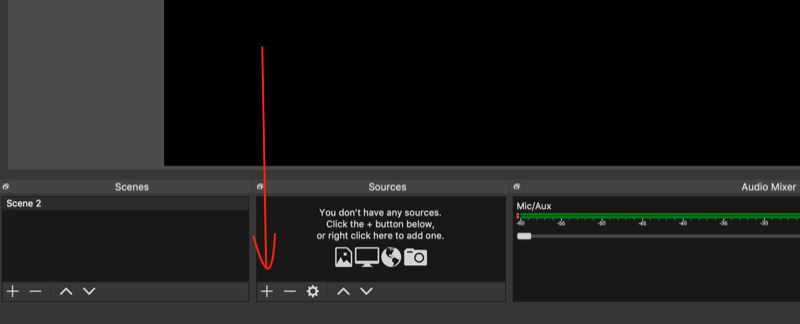
OBS is a free tool that allows you to film and record yourself from your computer's webcam, as well as go live. It lets you adjust the exposure, saturation, and contrast of your camera to make your images appear brighter and more aesthetically pleasing. It won't replace good lighting but it will help in most situations.
To set up your webcam with OBS, first download and install the software. Then click the + button under Sources to add a video source.
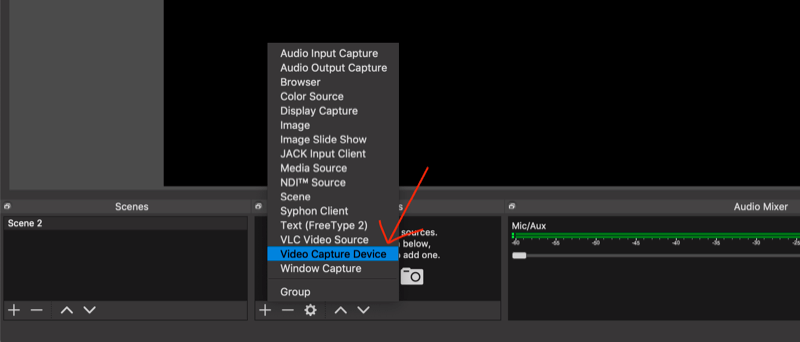
From the pop-up menu, select Video Capture Device.
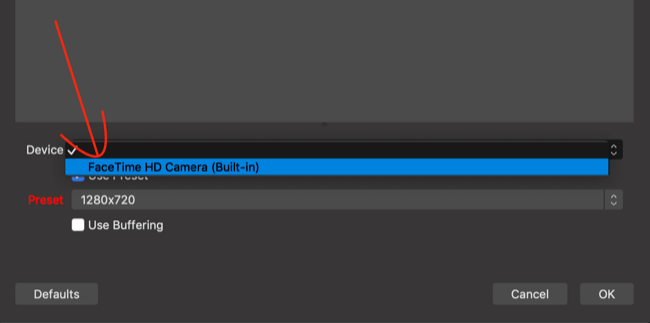
In the window that appears, select your camera/webcam from the Device list and click OK.
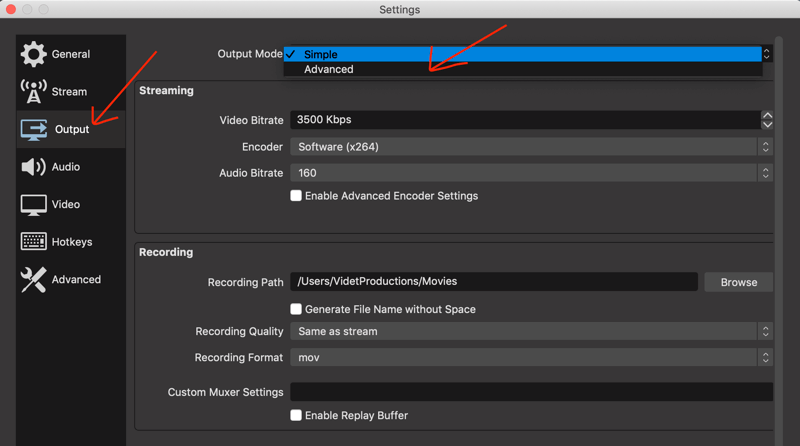
Next, you'll want to tweak some settings. Click Settings in the lower-right corner of the screen.
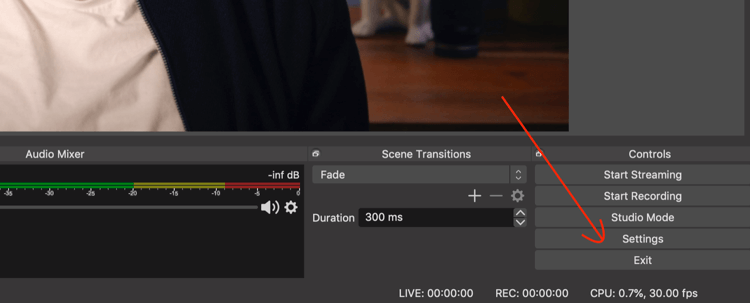
In the Settings window, select the Output tab on the left and choose Advanced from the Output Mode drop-down menu on the right.
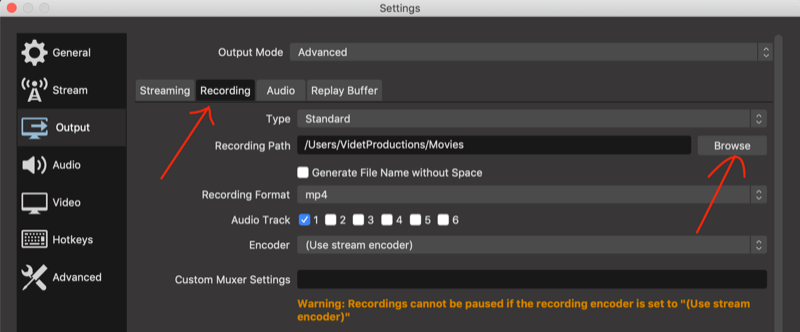
On the Recording tab, click Browse and select the location on your computer where you want to save your video. Also change the recording format to .mp4 (every social media platform will accept this).
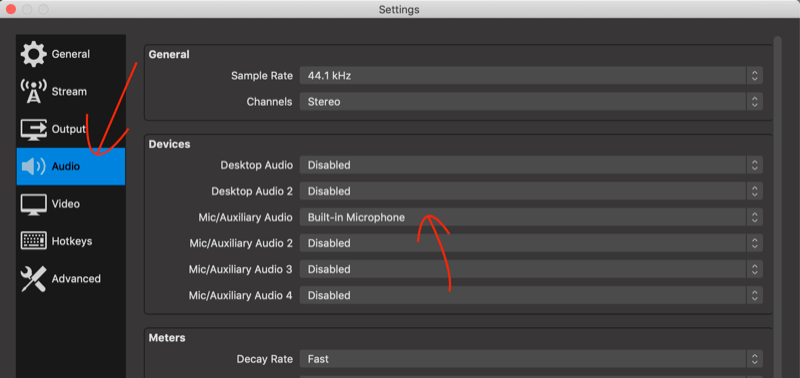
Now click the Audio tab on the left. From the Mic/Auxiliary Audio pop-up menu, choose your computer's mic or (ideally) an external mic. When you're finished, click Apply in the lower-left corner to save your changes and close the window.
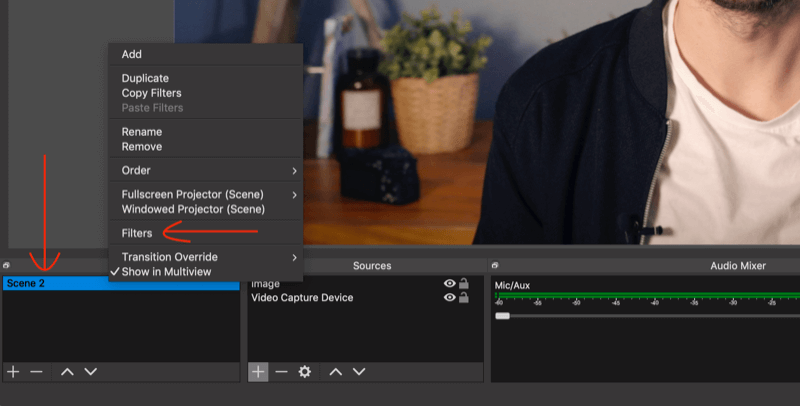
At the bottom left of the main screen, right-click on Scene and select Filters from the pop-up menu.
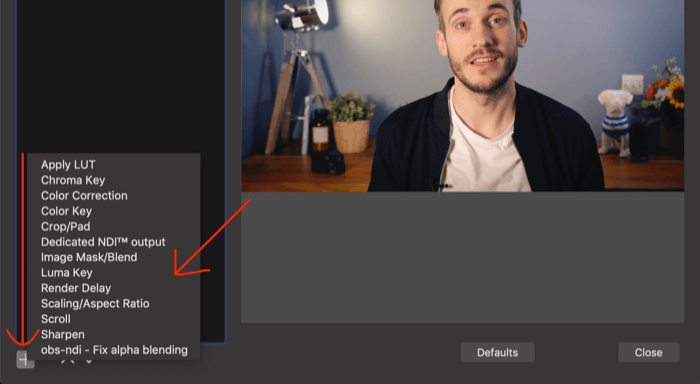
In the Filters window for the scene, click the + symbol to see the settings you can tweak to improve the look of your webcam. Sharpen it, apply color correction, and play around with the settings until you're happy. When you're done, click Close.
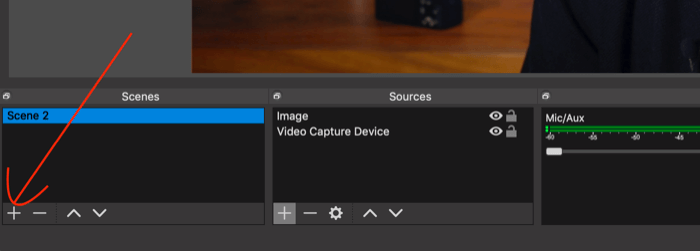
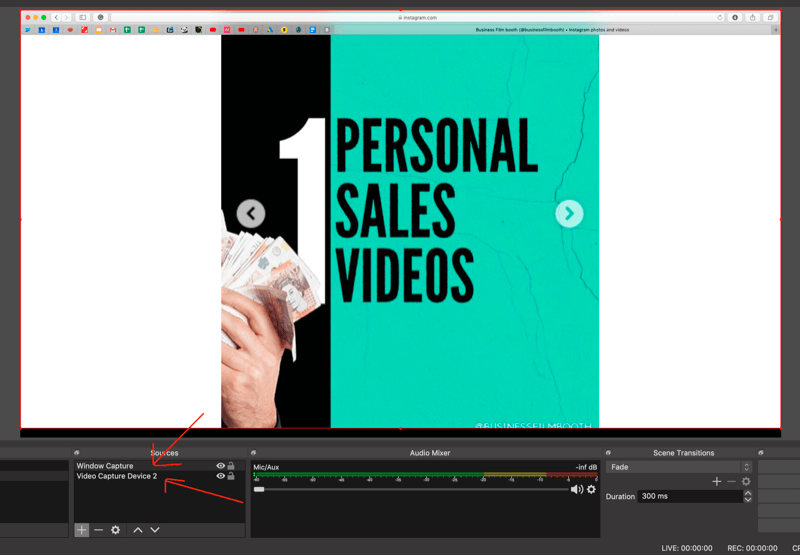
If you want to add slides to your recording, click the + button below Scenes and name your new scene “Slides.”
Now click the + button below Sources and select Window Capture.
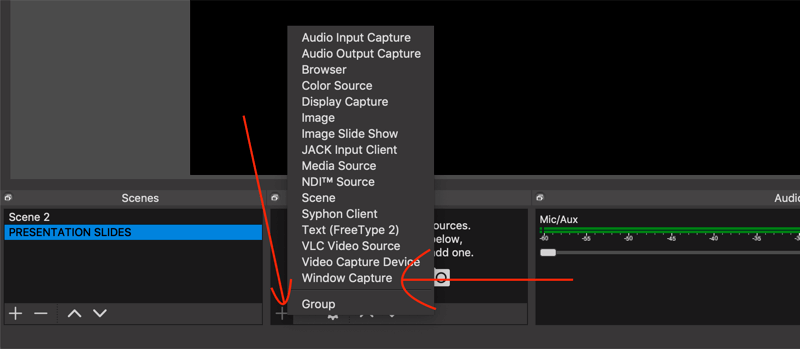
In the window that appears, choose the window in which your slide show is open on your computer.
Now it will be easy to switch between appearing on screen and showing your slides. Simply click on the scene you want to show.
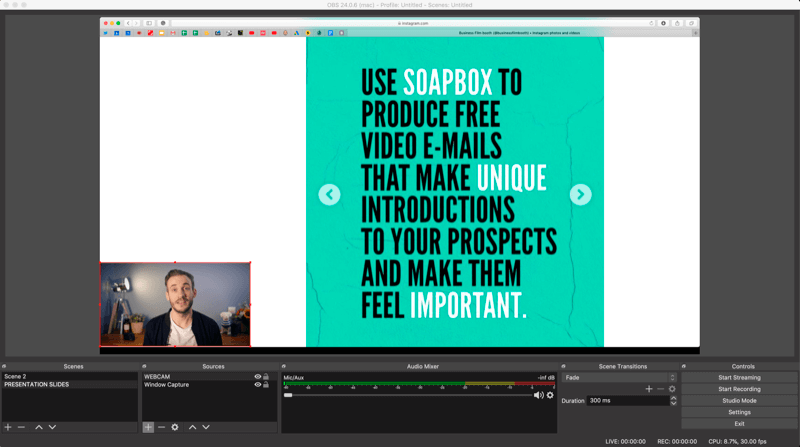
If you want to be on screen with your slides the whole time, add your slides to a new source and then resize the image by dragging the corners.
When you're ready to record your video, hit Start Recording in the lower-right corner of the screen.
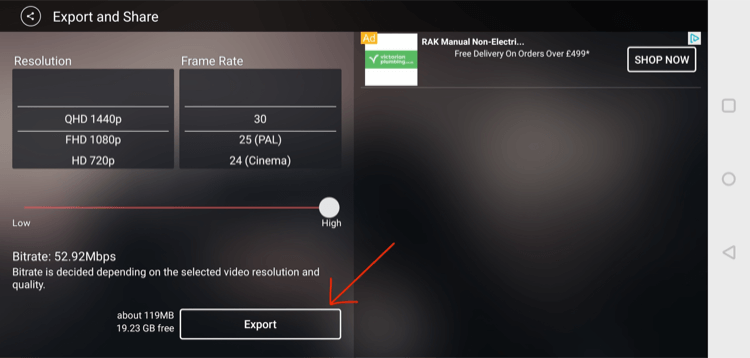
When you're finished recording, you might want to edit out the bits that didn't work or upload your video right away. However, before you do, you'll want to turn your finished product into a video that takes up 78% more space in the feed than the landscape video you're working with. That's what we discuss next.
#3: Occupy More Real Estate Per Social Media Video Post With Square Formatting
Traditionally, video was shot at a resolution of 1920 x 1080, or a 16:9 aspect ratio—a rectangle like you see on your TV or YouTube. Then Instagram came along and made things square, with a resolution of 1080 x 1080, or 1:1.
On social media, square video wins hands-down and performs best on all of the major platforms—LinkedIn, Instagram, Facebook, and Twitter. Here are a few reasons why the square format is so important:
- Square video takes up 78% more space in the mobile news feed than landscape video.
- Square video outperforms landscape video in views and engagement.
So how do you get square video if 1920 x 1080 is the default resolution on most cameras? I recommend filming your video in landscape format and then inserting it into a square frame. While you could try to blow up a landscape video in the edit to fit in a square, it may result in a loss of quality.
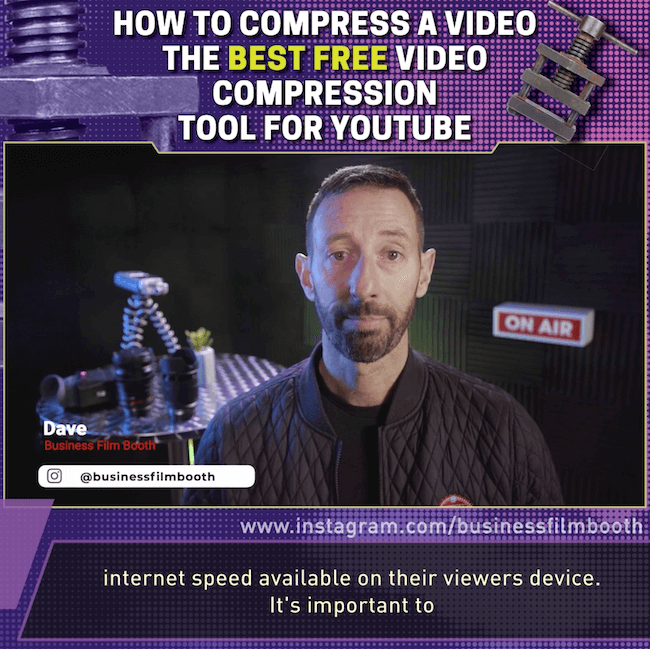
Here's an example of a frame for a 1920 x 1080 video. Frames can be branded and instantly boost the quality of your video as a result. Include the title of your content to grab more attention and display subtitles at the bottom (as discussed later in the article) so they don't get in the way of the content. Frames can grab attention better than anything else.
AI Is No Longer Optional for Marketers—Ready to Master It?
Join over a thousand forward-thinking marketers at AI Business World—a conference-in-a-conference at Social Media Marketing World.
Get two days of practical AI training where you'll discover:
✅ Systems that 3x your output—leaving time for strategy and creativity
✅ Proven strategies you can deploy right away—no guesswork, no wasted budget
Become the indispensable AI expert your company needs.
GET YOUR TICKETS—SAVE $300There are lots of options for making square videos, many of which are pretty complicated. In an ideal world, you'd have professional editing software but if you don't, here are two options that won't break the bank.
Clideo for Desktop
Clideo is an online video tool that makes it easy to resize video via your desktop. You can upload and resize a video (up to 60 seconds in length) for free. To remove the watermark, you'll need to upgrade to a paid plan for $9/month.
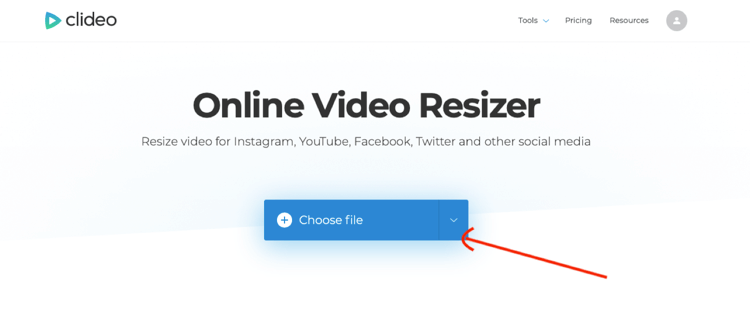
To resize your video, open the Online Video Resizer tool and click Choose File to upload your video.
After your video is uploaded, choose the social media network and square format you want to use (Instagram Feed Square – 1:1, for instance).
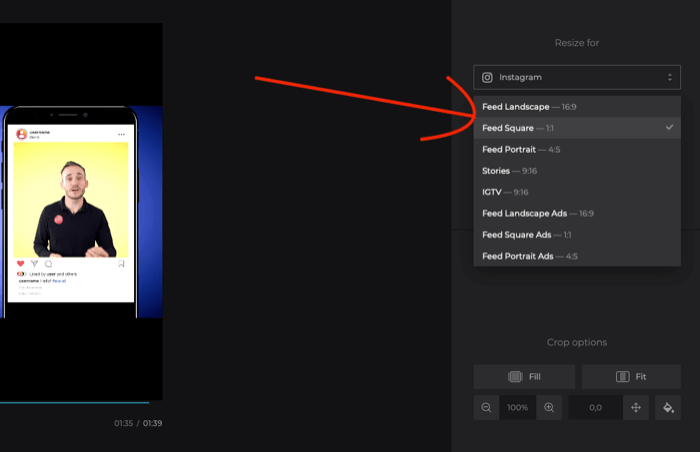
Next, click the paint can icon to select a background color. You can either click to select a color or insert your branded Hex code. Click the Resize button when you're done.
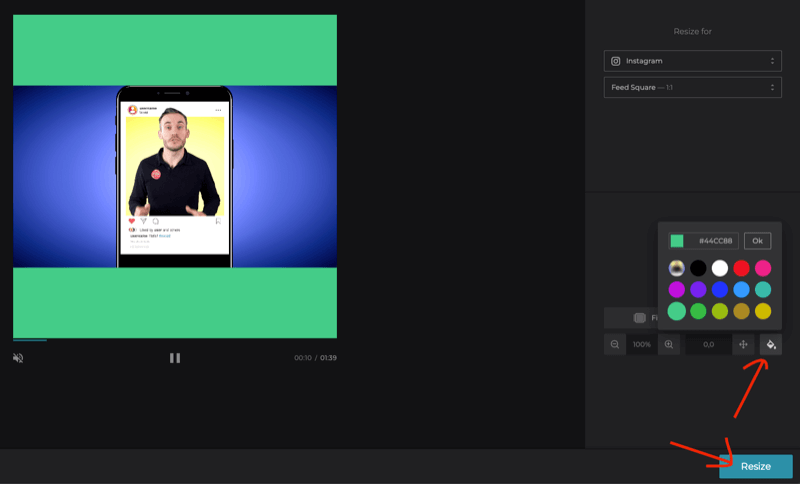
When Clideo finishes resizing your video, click Download to download it to your computer.
Now you'll need to add some text to the top of the video—I recommend adding the video title. You can do this in your editing software.
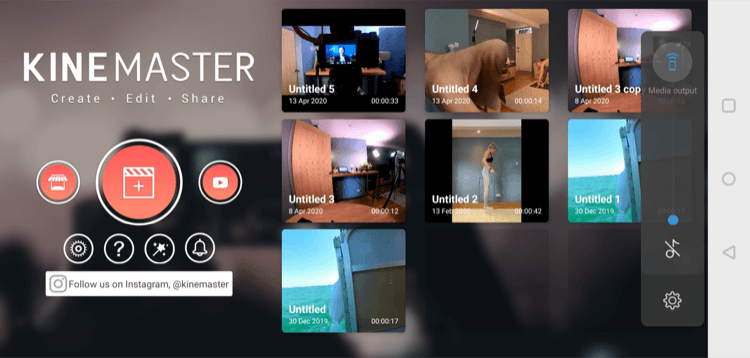
KineMaster for Mobile
KineMaster is a free mobile video editor available for iOS and Android. Upgrading to the premium plan ($3.49/month; $27.99/year) lets you remove the watermark and get access to premium assets.
After you install KineMaster on your mobile device, tap the + button.
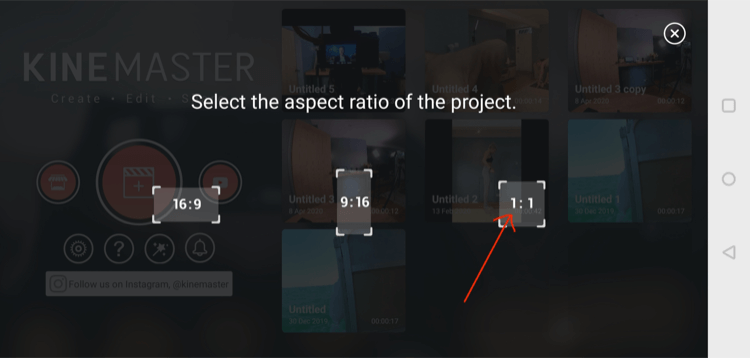
Then choose 1:1 as the aspect ratio.
On the project screen, tap Media on the right and choose the video you want to import from your camera roll.
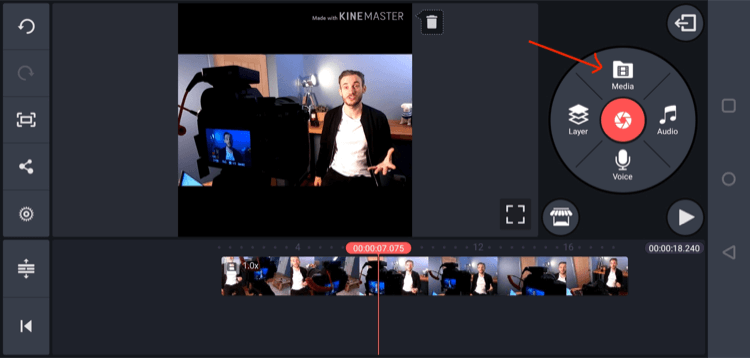
Then tap Layer and then Media.
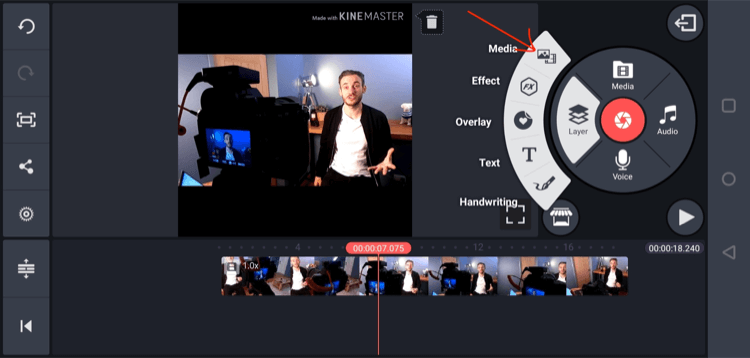
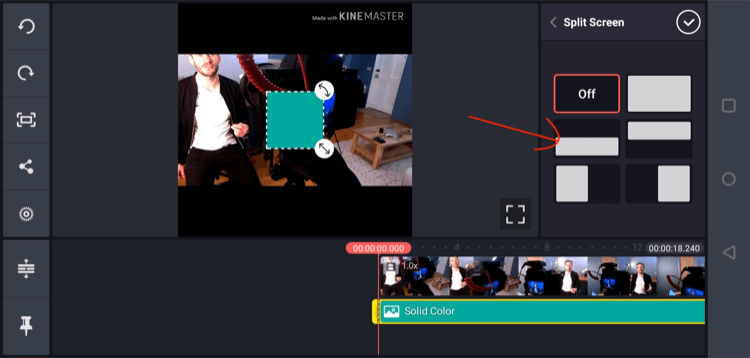
On the next screen, select Background.

Then choose the color you want to use as your background.

Resize the color so it sits at the top of the screen above the video. Then repeat the process to cover the bottom of the video.
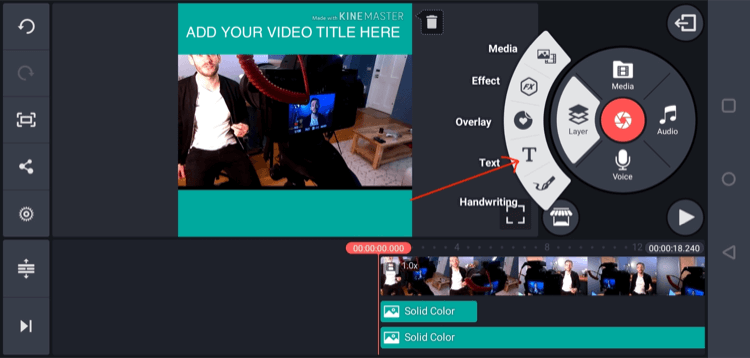
Next, tap Layer and then Text and add the title of your video at the top of the square.
When you're happy with your video, tap the arrow button at the top-right of the screen. On the next screen, tap Export to save the final video to your mobile device.
#4: Overcome Muted Social Media Video Plays With Subtitles
Now that you have your square video in a branded frame, the last step is to add subtitles to it. Subtitles are important because a large percentage of social media users watch video with the sound muted.
You have two options for adding subtitles to your video:
- Type them out manually in editing software and add them to your video.
- Add an SRT file to your video via software or a social media platform. An SRT file is a transcription of your video that's time-stamped. You can hire a third-party service to do the transcription.
Type Them Out Yourself in Editing Software and Add to a Video
- Pros: You can use your own branded fonts, make the subtitles look awesome, and resize and reposition them so they don't get hidden underneath play bars on different social media platforms.
- Cons: Even a short 2-minute video can take hours to type out. And if you're like me, typos happen and that's a lot of proofreading.
Add an SRT File to Your Video via Software or a Social Media Platform
If you drag the SRT file into your video via software, it will auto-sync to the correct time in the video.
- Pros: It's quick. You can drop the file into editing software and the subtitles will appear as if by magic.
- Cons: The subtitles will be small and ugly.
You can also add an SRT file to your video via the social media platform you uploaded it to. This will work on LinkedIn, Facebook, and any other platform that takes the files.
- Pros: You upload the video to your social media channel and then add the SRT file.
- Cons: If you want to upload the video to multiple platforms, it will take longer than if you simply included the subtitles in the video itself. The subtitles will also be small and won't look great.
How to Easily Add an SRT File to Your Video
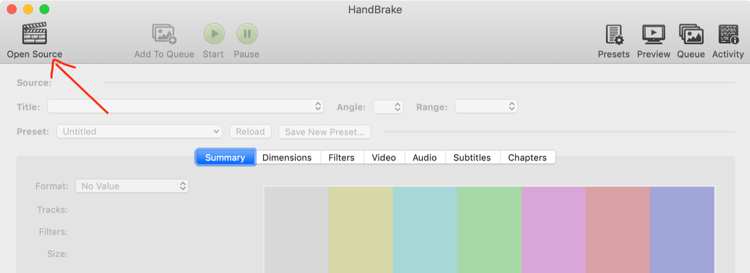
I've found the simplest way to add SRTs to a video on any computer is to use a tool like HandBrake, which is free compression software. Once you have your SRT file, here's how to add it to your video.
Start by downloading and installing HandBrake on your computer. Then click Open Source at the top right and find your square video file to import it.
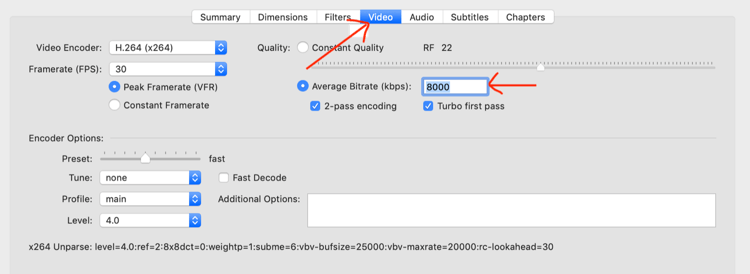
Next, click the Video tab and enter 8000 in the Average Bitrate field. This setting is for compression. Don't worry; you won't notice a drop in quality and it'll give you a smaller file that's fast to upload.
On the Dimensions tab, click Custom and make sure all of the boxes say “0.” If any of those boxes have a number other than 0, that's how much they'll crop your video. You don't want to cut anything off of your square.

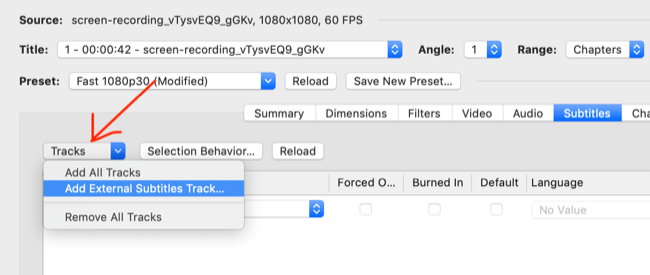
On the Subtitles tab, click Tracks and choose Add External Subtitles Track. Then select your SRT file and click Burned In.
Finally, click the green Start button at the top of the page. After a few moments, you should end up with a video that has large subtitles that take up the bottom of your square, like this:

If your subtitles feel like they slowly become out of sync with the video, it's because you shot your video at a different frame rate to what you've compressed. Most smartphone cameras and webcams will be set to 30p. If you shot in 25p, you'll need to export a file that's 30p before you get your SRT file. Alternatively, you can change the output in HandBrake to 25 on the Video tab.
Conclusion
There are millions of posts to social media platforms every minute, and that number is increasing. As a result, grabbing attention and holding it has become significantly harder.
You might be looking at video to help cut through the noise, but simply using the medium won't get your business traction anymore. Not only does your content need to rock but your execution and production must also match it.
Follow the tips above to look better on camera, improve your production quality, and get more visibility in social media feeds.
What do you think? Which of these techniques will you try when filming your next video? Do you have any other tips to improve production quality? Share your thoughts in the comments below.
More articles on marketing with video:
- Discover how to use short videos to turn prospects into customers.
- Explore how to develop an effective video marketing strategy.
- Learn how to create videos that sell.
Want to Unlock AI Marketing Breakthroughs?
If you’re like most of us, you are trying to figure out how to use AI in your marketing. Here's the solution: The AI Business Society—from your friends at Social Media Examiner.The AI Business Society is the place to discover how to apply AI in your work. When you join, you'll boost your productivity, unlock your creativity, and make connections with other marketers on a similar journey.
I'M READY TO BECOME AN AI-POWERED MARKETER