Have you ever updated content but the old images or descriptions are still there when you share that content on social platforms?
Wondering how to force Facebook, Twitter, and LinkedIn to clear their cached version of your content?
In this article, you'll find a step-by-step guide to clearing the cache of Facebook, Twitter, and LinkedIn so your content looks the way you want it to.
Why Would I Need to Clear My Cache on Facebook, Twitter, or LinkedIn?
As a busy social media marketing professional, you're creating, updating, and sharing new content daily, if not multiple times each day. If you've ever updated a headline, image, meta description, or fixed some typos for a piece of content, it can be a frustrating experience to discover that the old information is still being pulled up in the social snippet on Facebook, Twitter, and/or LinkedIn.
While summary cards boast a slew of benefits, they can also be a major pain in the neck for busy marketers who need to make changes to them. There are several reasons why you may need to edit summary cards, including:
- You've recently updated the content or featured image for the link you're sharing, and the summary card is pulling outdated information.
- The featured image for the post doesn't correlate with the message you're trying to send.
- There's a typo within the open graph tags for the headline or description, for example.
Fixing typos or image discrepancies within open graph tags is as simple as making changes to the backend of your site, like logging into WordPress and replacing the featured image for the post. However, even after you've saved those edits, that doesn't mean social media platforms will recognize them.
This is because social media utilizes a cache system (typically refreshing every 30 days) that stores a site's metadata to speed up future requests. The data stored in a cache can result from an earlier computation or a copy of data stored elsewhere, which means what's stored in the cache often isn't up to date. When you update a summary card, you'll need to update the cache as well.
What Are Facebook, Twitter, and LinkedIn Summary Cards?
Summary cards are the link previews that appear when you copy and paste a URL on Facebook, Twitter, or LinkedIn. The card displays a brief social snippet that describes the context of the content, as well as an image. Across all social platforms, summary cards help make content more engaging.

To populate a summary card, the social platform will scrape, or pull the information from, the open graph tags.
These tags can be set and modified within the backend of your site, as well as within Facebook's open graph debugger tool (more on that later in this post). To illustrate, here are all of the open graph tags on Facebook, which tell Facebook how to display your content.
- fb:pages—the numerical ID assigned to the Facebook page associated with the content
- og:url—the URL assigned to the content
- og:type—the kind of content being shared, such as a “video” or “article”
- og:title—the title of the piece of content (usually the headline of your post) as it was entered into the open graph tags
- og:locale—the region the data has been marked up in, displayed in the format language_territory (perhaps, the English_United States or en_us)
- og:image—the URL of the image chosen to be shared with the content
- og:description—a one- to two-sentence description of the content
- og:site_name— the name for the overall site if the content is part of a larger website
- og:updated_time—when the content was last updated
- article:published_time—when the content was published
Pro Tip: If you use WordPress, the free version of the Yoast plugin will let you update the description whenever you post a new article.
There are real advantages to keeping the social snippets on these summary cards up to date. To illustrate, according to Sprout Social, 58% of consumers prefer visual-first content. Twitter summary cards make your content stand out in the news feed, resulting in more engagement and increased traffic to the site you're promoting. Additionally, Twitter summary cards can include up to 200 characters to summarize your content, giving you more room to play than the 280 characters you started with.
Which AI Moves Actually Matter?
That's what every marketer is wrestling with now. New AI strategies, new tools, new takes every week — but no clarity. Most marketers and business owners are trying to figure out AI alone.The AI Business Society is your trusted guide. Get expert-led training you can put to work immediately. Plus a community of marketers sharing what's actually working.
I'M READY FOR REAL AI RESULTSNow that you understand the why behind clearing your cache, let's jump into the how.
#1: How to Clear Your Facebook Cache via the Sharing Debugger
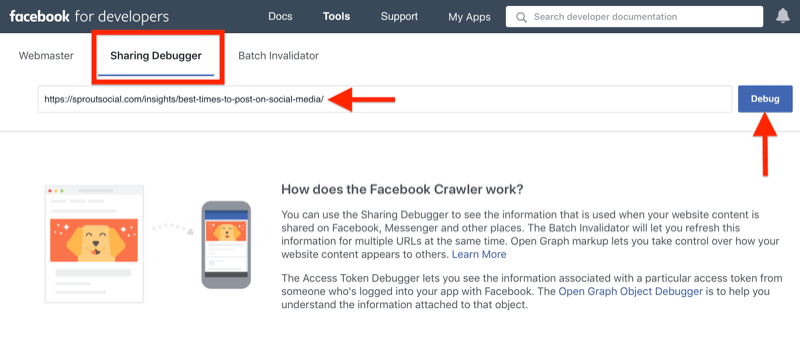
If the summary card for a link you're sharing is outdated or flawed in some way, Facebook has a convenient developer tool called the Sharing Debugger to fix it. This tool lets you see the data that's pulled when your website content is shared on Facebook, Messenger, and other places.
To access the tool, navigate to Facebook for Developers or click this link. The Sharing Debugger sits between the Webmaster and Batch Invalidator tools and will display as a basic text field to enter your desired URL.
Just paste your URL into the text field and click Debug.
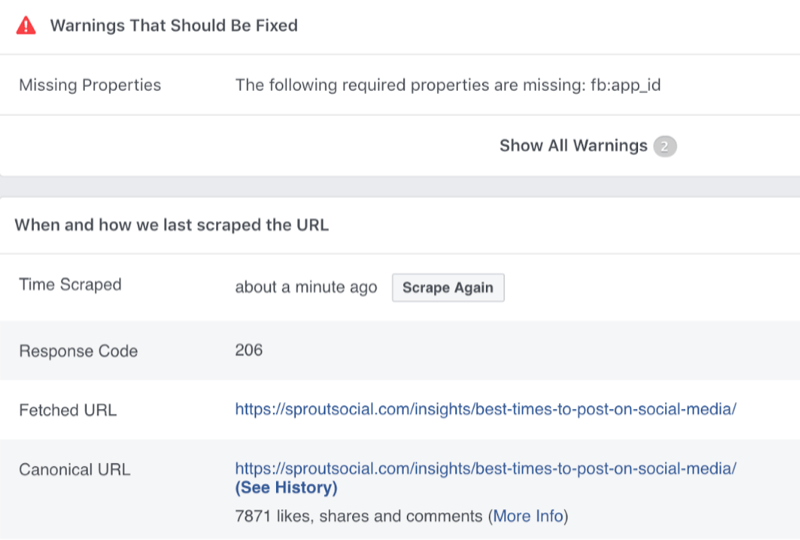
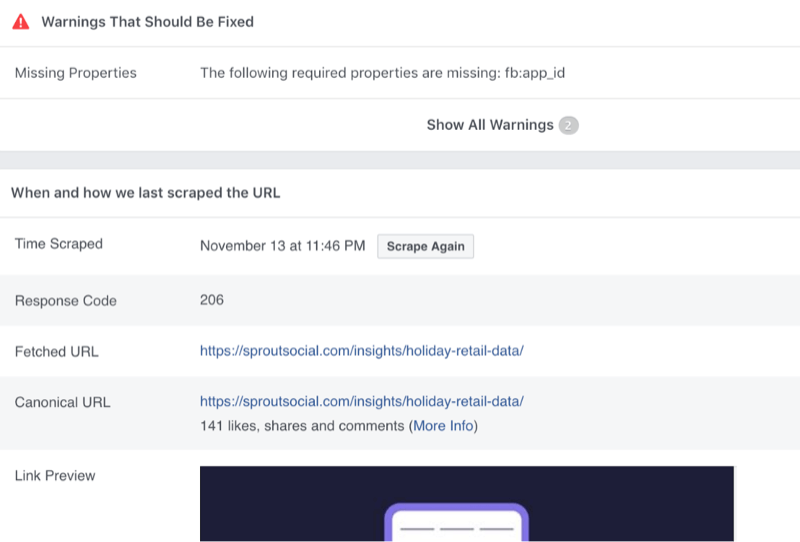
The tool will then pull all of the information stored in the cache for the URL. In addition to alerting you of any red flags—in this case, a missing Facebook app ID or the specific ID number assigned to each Facebook application to view Insights—the debugger will also display how and when the URL was last scraped by Facebook.
If you scroll down the page, you'll find the link preview for the URL, which shows how your updated summary card will look when displayed in the Facebook news feed.

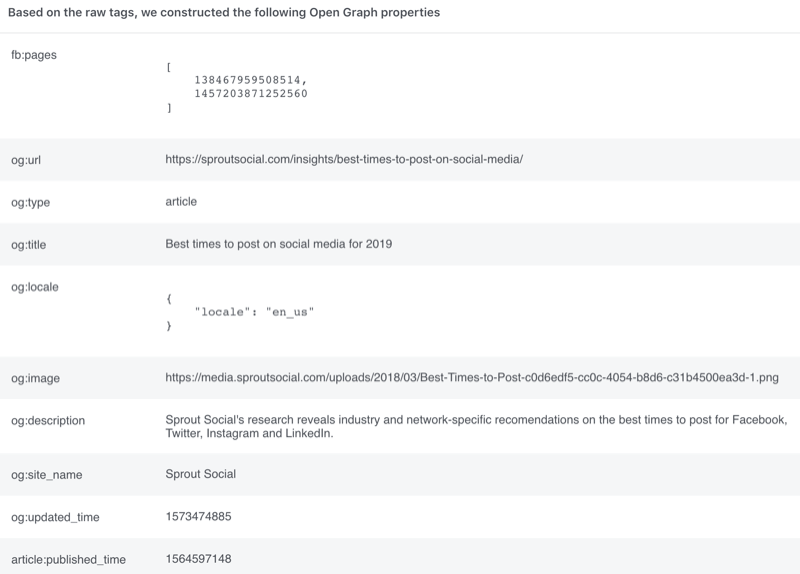
You'll also see all of the raw open graph tags that Facebook has for this link, as shown below.
If the information presented in the link preview is still outdated, click the Scrape Again button next to Time Scraped. This forces the social engine to reanalyze the data and pull the new information it was missing.
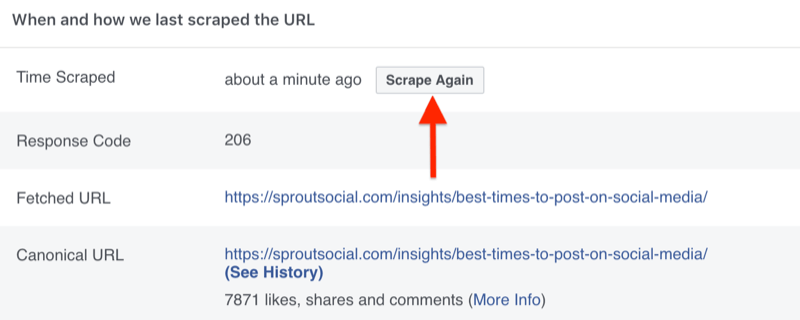
By re-scraping the site, you're effectively clearing any existing information for it within the cache. From here on out, Facebook will present the most up-to-date data when composing a summary card for the respective link.
How to Clear Your Facebook Cache for Multiple Links at Once
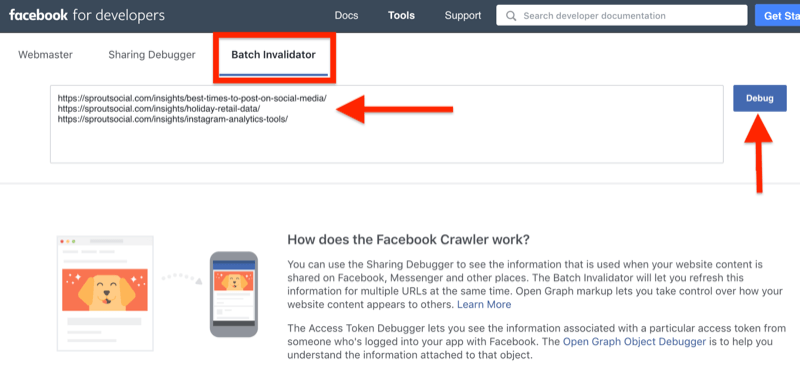
While you can follow the above steps multiple times to clear the cache for multiple links, that's not the most efficient method. For those of us crunched for time, the Batch Invalidator tool is a simple method of clearing the Facebook cache for multiple links at once. You can find this tool to the right of the Sharing Debugger.
The Batch Invalidator has the same basic text field as the Debugger tool but it allows you to enter as many URLs as necessary in a space-delimited list. To do this, simply paste in your first URL, press Enter, and then paste in your next URL. Repeat the process for as many links as you want to check. Then click Debug.
3 Days of World-Class Training—Zero Travel!

Couldn't make it to Social Media Marketing World and AI Business World this year? Get all of the great content at a fraction of the price with a Virtual ticket.
That’s full access to recordings of every keynote, workshop, and session—the ones people travel thousands of miles to see. Don't wait. Get your Virtual ticket and enjoy actionable content that you can watch anytime, anywhere.
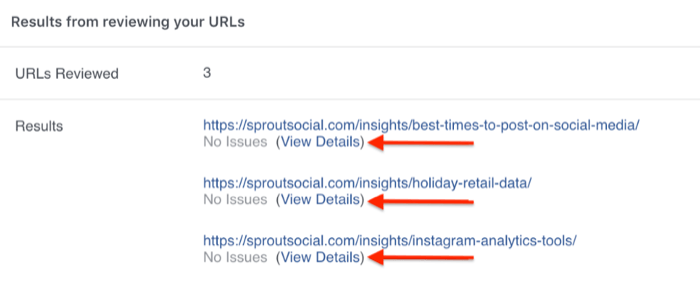
The Batch Invalidator then effectively “invalidates” or clears the cache entries for the URLs you've entered. In this case, no issues were found within the group of scraped links. But if there are issues, you can click on View Details next to any of the listed links to learn more about them.
This will bring you to the respective Sharing Debugger for the individual link you've selected. Here you'll be able to view all of the information for the URL, from the link preview to the open graph data, and even scrape the link again if necessary.
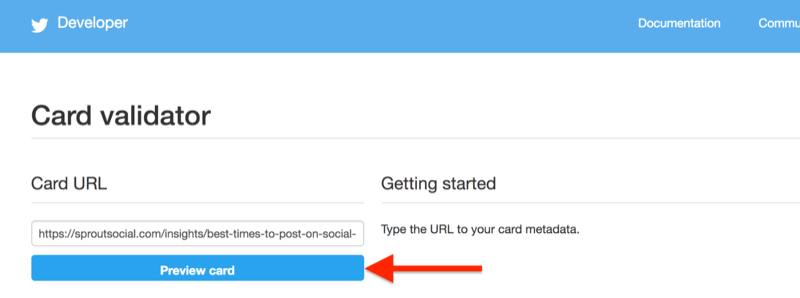
#2: How to Clear the Twitter Cache via the Card Validator Tool
Just as Facebook offers a specialized tool to re-scrape old links, Twitter has developed a similar tool that follows a comparable process.
To get started, head over to the Card Validator tool. Then enter the URL of your blog post and click Preview Card.
This will effectively clear the Twitter cache of any outdated data and repopulate the summary card with all updated information. The right side of the screen will preview the updated summary card to give you an idea of what your content will look like next time you share it to Twitter.
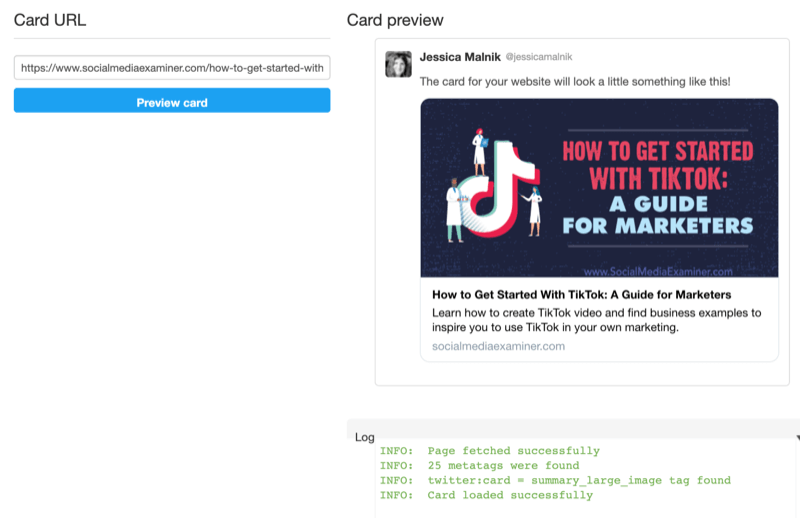
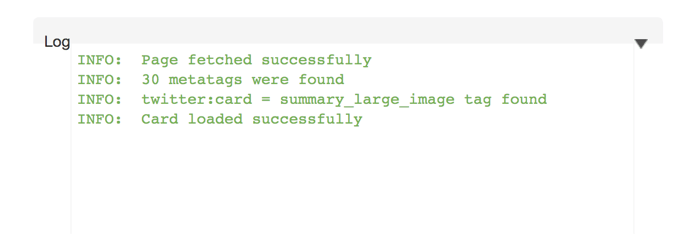
Below the preview is data called the Log. If there are any issues within the URL's metadata, the Card Validator tool will alert you to any issues within the open graph data. This process works similarly to Facebook's Debugger tool, discussed above.
#3: How to Clear the LinkedIn Cache via the Post Inspector Tool
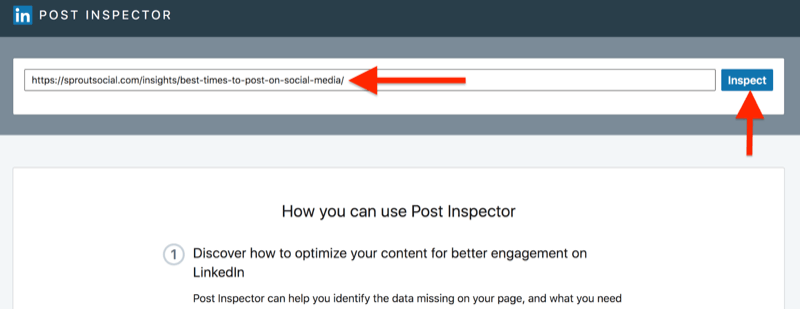
If LinkedIn is pulling outdated data for your post or page, you can use the platform's Post Inspector tool. Luckily, this tool follows nearly identical steps to clearing your cache for Facebook and Twitter.
First, make any edits to the post or page within WordPress or your CMS. Then head over to LinkedIn's Post Inspector tool and enter the desired URL into the text field on the top of the page. Then click Inspect.
The Post Inspector then effectively re-scrapes the site information and data the LinkedIn cache was holding for the URL. After the cache has been cleared, you'll see a preview of how the updated summary card will look.

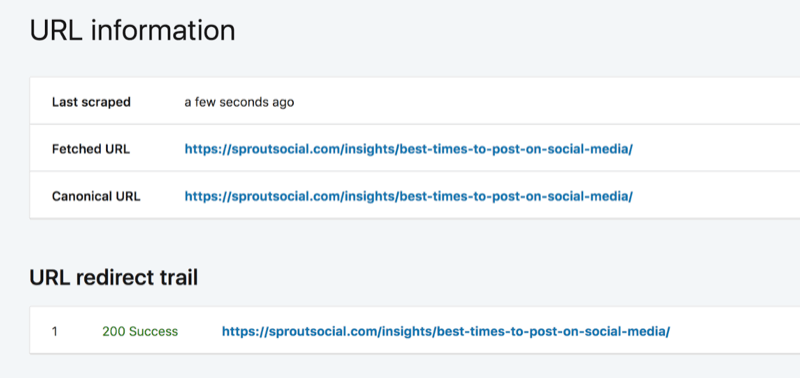
Scroll down below the link preview to see what URL information the Post Inspector has pulled. Like Facebook, this data shows the last time the link was scraped, as well as the unique canonical URL for that link. In addition, this tool notes any redirects you may have set up on your site, which can be helpful for SEO purposes.
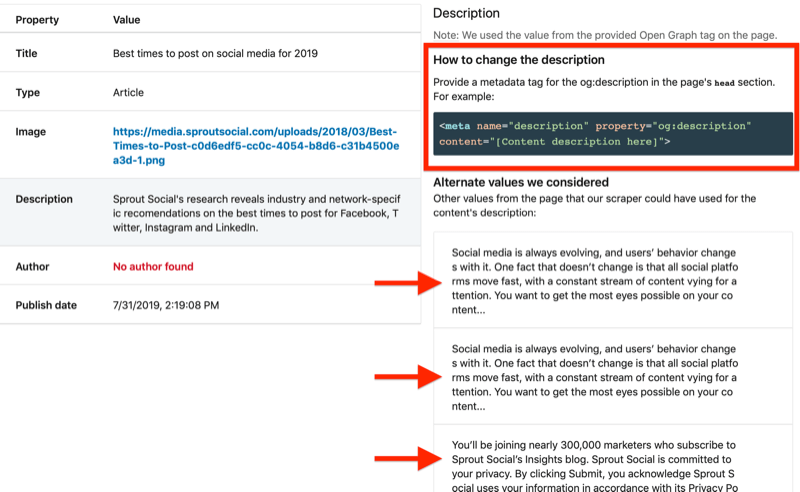
The LinkedIn Post Inspector will also display all of the metadata it has gathered for the link. This is a more tangible way to view your open graph tags like the title, type, and description of the content. Unlike Facebook and Twitter, you can click on any of the listed properties within the tool to learn more about how the value was selected and LinkedIn's suggestions for further optimizing it.
To examine the description of the content in the example, click the Description tag on the left, which was pulled from the open graph properties listed in the content's raw tags. In addition to explaining how to update that description, the tool also provides alternate descriptions pulled from the body of the content, as shown below.
Additional Benefits to Using LinkedIn's Post Inspector Tool
LinkedIn's Post Inspector tool is helpful not only for figuring out how to optimize your summary card titles, descriptions, and images, but also for getting intel on your competitors' content.
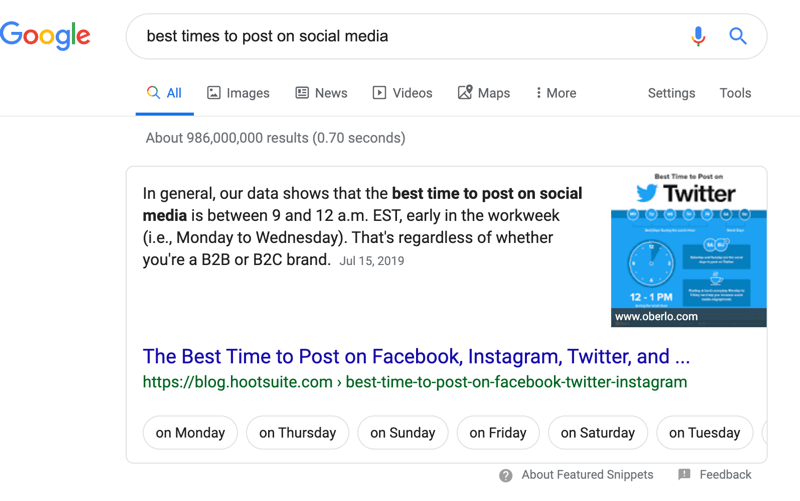
For the Sprout Social post, for instance, you can do a Google search for “best times to post on social media” to see if there's any content ranking above it. In this case, a Hootsuite post is ranking on page 1 and has secured the featured snippet.
Paste this Hootsuite link into LinkedIn's Post Inspector tool to get the social snippet information, as well as tips for how to optimize it. As you can see in the screenshot below, you can view the post title, new post title suggestions, and when this content was last updated.
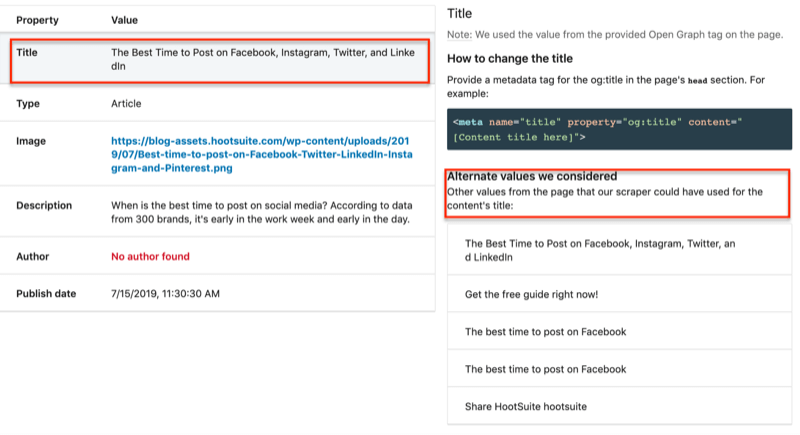
Pro Tip: If you add a link to this tool and notice that the post hasn't been updated in 6 months to a year, this is a good indicator to update your post.
In addition, when you click on the description, you can see additional description suggestions.

Instead of optimizing the Hootsuite post, you can use this information to optimize your own post to rank higher on Google.
Conclusion
Clearing the cache for your favorite social media platforms shouldn't be a nail-biting—or time-consuming—task. Following the steps outlined above will help you save tons of time when it comes to posting and sharing links on Facebook, Twitter, and LinkedIn.
What do you think? Have you bookmarked each cache clearing tool for the next time you need it? Will you use any of these tools to help optimize your meta content? Share your thoughts in the comments below.
More articles on social media marketing:
- Learn how to create content that attracts customers.
- Discover how to set up a social media content calendar.
- Find a step-by-step plan for developing a social media marketing strategy that really works.

Curious About How to Use AI?
Our newest show, AI Explored, might be just what you're looking for. It's for marketers, creators, and entrepreneurs who want to understand how to use AI in their business.
It's hosted by Michael Stelzner and explores this exciting new frontier in easy-to-understand terms.
Pull up your favorite podcast app and search for AI Explored. Or click the button below for more information.
