Do you want an easier way to plan, organize, and publish your social media content? Looking for a solution that doesn't cost a lot of money?
In this article, you'll discover how to set up an effective social media content calendar to plan and manage your posts. You'll also get suggestions for great tools to help you create and manage that content.
#1: Set Monthly Short-Term Goals to Reach Long-Term Goals
It’s important to set an end goal for every piece of content you share on social media so you can track what’s working, which types of content drive your bottom line, and which changes to make based on campaign performance.
For most social media marketers, goals fall into the categories of generating more leads and sales. If you work backward from your long-term goals, you can create short-term goals that will help you achieve them.
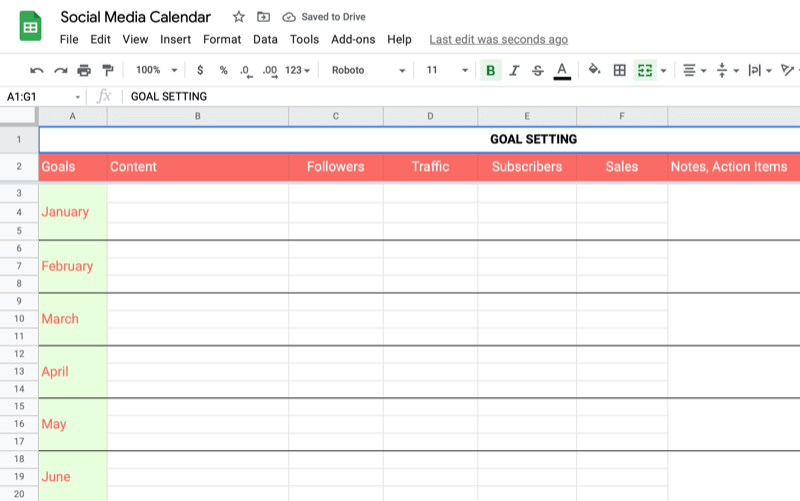
The key to short-term goals is to start small, be specific, and set a realistic timeframe to achieve each goal. At the end of each month, you want to be able to track your growth, see what worked, and set new goals for the future. Smaller goals generally fall into one of these categories:
- Content
- Followers
- Traffic
- Subscribers
- Sales
For each category, determine what you want to achieve on social media and then add it to a goal-setting spreadsheet.
#2: Outline Content Post Types and Post Categories for Each Social Channel
The purpose of a social media calendar is to provide a framework for sharing content that resonates with your audience and promotes your business. Before creating your calendar, plan content around specific campaigns and goals.
First, determine the types of content that make sense for your business and audience. Common categories include:
- Blog posts
- Quotes and motivational
- Product promotions
- Holidays
- User-generated content (UGC)
- Events and announcements
Depending on your business, your categories may look different and can be as broad or specific as you need. For instance, a health club might have categories like free trials, challenges, workout videos, workshops and clinics, recipes and nutrition, and others.
Once you’ve chosen your categories, create a separate spreadsheet to use as a working library so you can plan and gather the original content, products, events, and promotions you plan to share. It’s helpful to color-code each content type so you can easily differentiate them on the calendar.
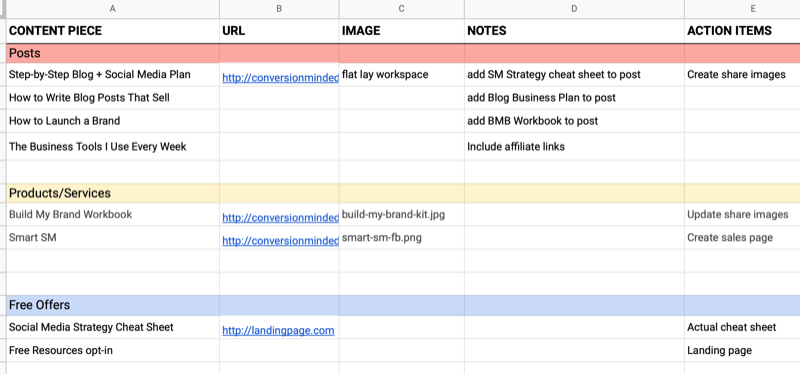
Include publishing dates, post descriptions, URLs, images, action items, campaigns, and any other details needed for your workflow. If you have weekly or monthly content themes, add a column to the left of the spreadsheet and include your theme.
Which AI Moves Actually Matter?
That's what every marketer is wrestling with now. New AI strategies, new tools, new takes every week — but no clarity. Most marketers and business owners are trying to figure out AI alone.The AI Business Society is your trusted guide. Get expert-led training you can put to work immediately. Plus a community of marketers sharing what's actually working.
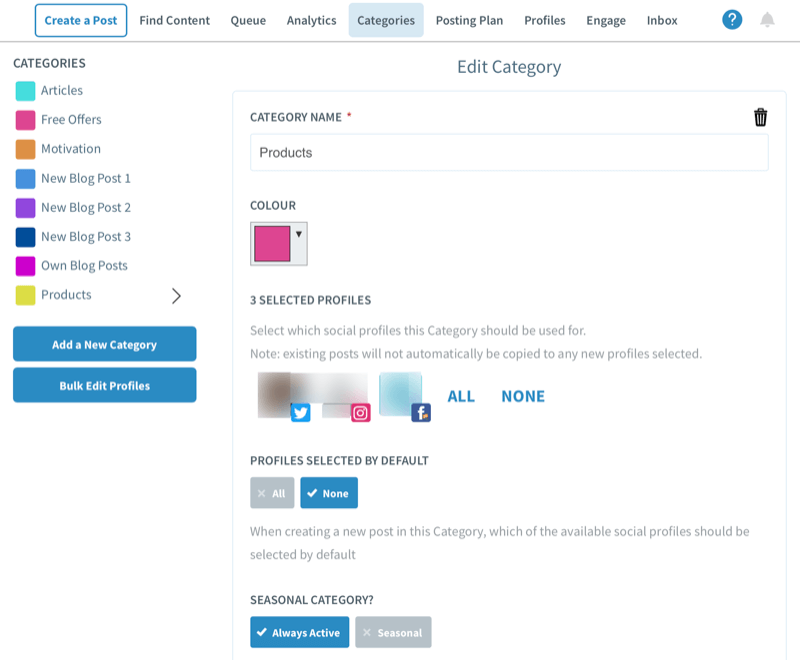
I'M READY FOR REAL AI RESULTSI recommend you manage UGC, RSS feeds, and Feedly subscriptions with a tool like SmarterQueue (shown below), and use your social media calendar to plan original content, images, and timely promotions that require extensive preparation and coordination. Use the same color codes for each category in your scheduling tool.
Plan your content on or before the first of each month. Throughout the week, create content, design images, manually share posts, and add them to your scheduling tools.
#3: Create or Customize Your Social Media Content Calendar Template
To create a social media calendar, you can either design it manually or download this social media calendar template to work from (navigate using the tabs at the bottom of the spreadsheet).
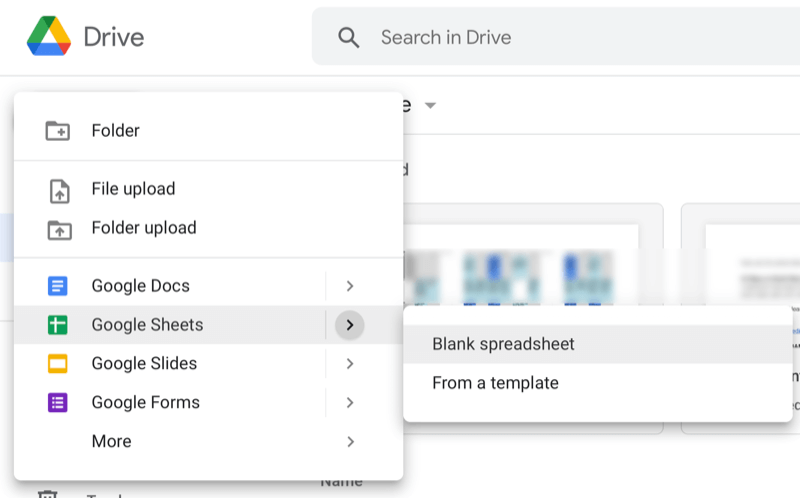
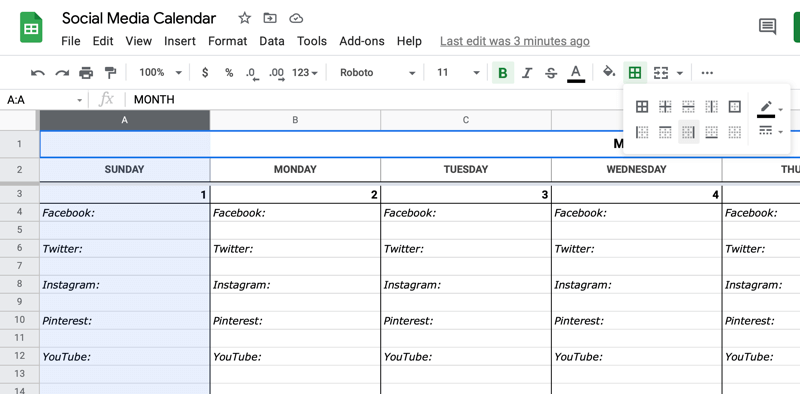
If you prefer to create your calendar manually, here's the process I used to create the template above. Log into Google Drive and click New to create a new spreadsheet. Click on the title to rename it.
Now you’re ready to customize your spreadsheet to create your calendar template. Because you’ll be working with seven columns (for the 7 days of the week), delete columns H-Z. Then select columns A-G and drag the right edge of the selection until the columns fill the screen.
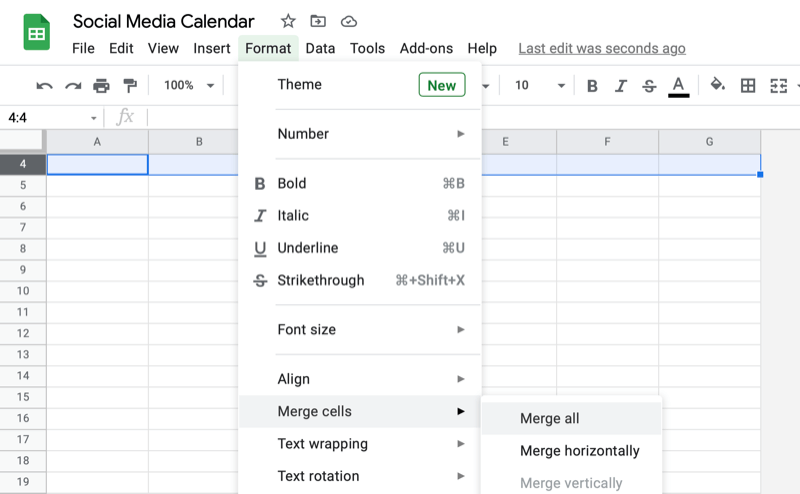
Next, highlight the cells in the first row and choose Format > Merge Cells > Merge All. Enter “Month” as a placeholder on your template. Customize the font style and center the text.
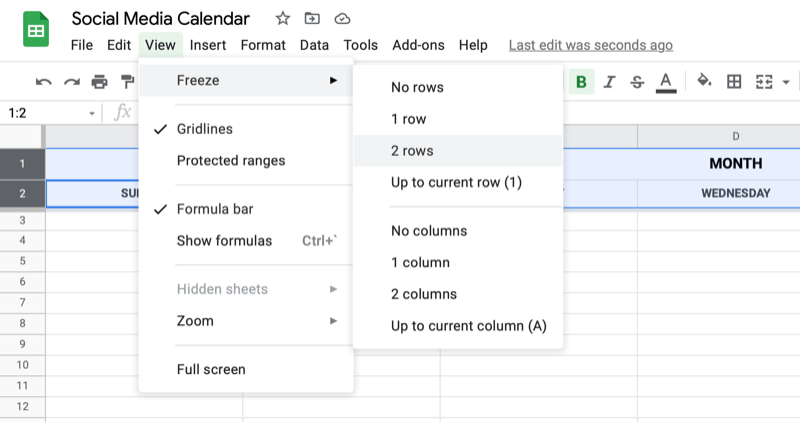
In the second row, enter the days of the week, beginning with Sunday. If you want, you can freeze these two rows so they remain in view at all times. To do this, highlight the two rows and choose View > Freeze > 2 Rows.
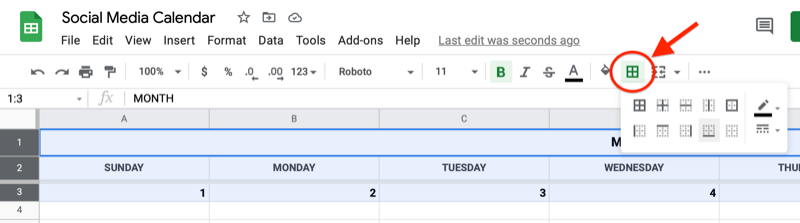
In the next row, enter calendar dates. Then select the top three rows and use the border tool (from the top toolbar) to add a bottom border.
3 Days of World-Class Training—Zero Travel!

Couldn't make it to Social Media Marketing World and AI Business World this year? Get all of the great content at a fraction of the price with a Virtual ticket.
That’s full access to recordings of every keynote, workshop, and session—the ones people travel thousands of miles to see. Don't wait. Get your Virtual ticket and enjoy actionable content that you can watch anytime, anywhere.
Under each date, add your social media profiles, leaving one or two rows between each profile to accommodate your posting frequency. Then select each column and add a right border.
Leave a few extra rows, and then add a bottom border to the last row in week one. When you’re done, copy week one, change the dates, and complete the calendar template.

#4: Plot Your Social Media Content in Your Social Media Calendar
Now that you’ve created your calendar framework, choose the specific days to share each piece of content. Using your color-coding scheme, add the content from your working library.
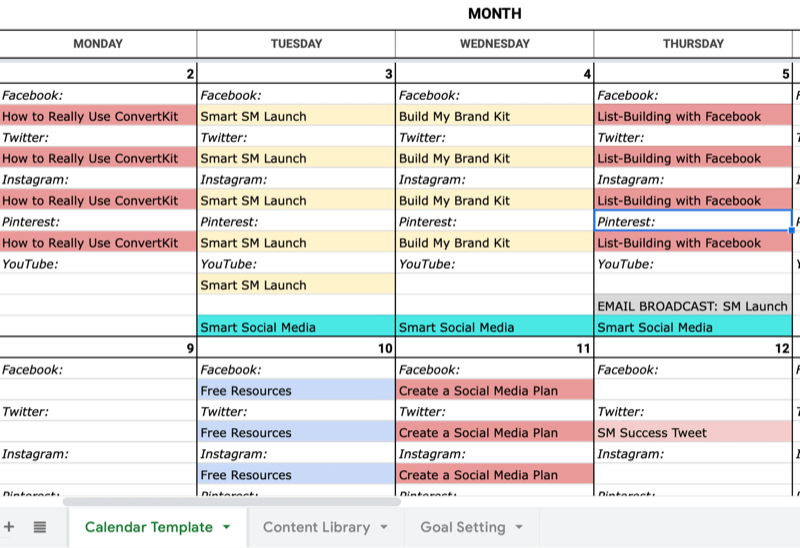
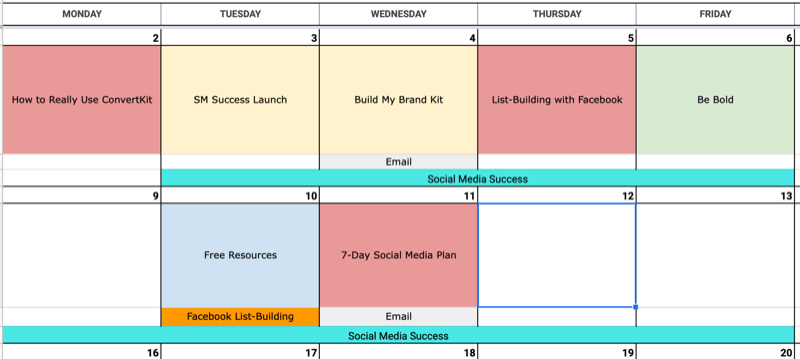
Customize the calendar to suit your posting frequency. For instance, you may want to include specific times you plan to share each post, or add email and other distribution channels. You might use the additional rows for each day to highlight important events and promotion dates.
If you regularly share the same content on each profile, you may find it helpful to use a simple color-blocked version of your calendar so you can quickly see what pieces of content you plan to share each day.
And if you publish a large volume of content each month, consider creating separate calendars for each social media profile.
#5: Create, Schedule, and Publish Your Social Media Posts Across Platforms
Now that you’ve planned out your content on your calendar, it’s time to research and gather your content, create blog posts, and design images. If you struggle to find the time to execute your social media plan and create the content you need, the tools below will help.
Build Content With PromoRepublic
PromoRepublic is a social media content-builder with thousands of templates created by designers, writers, and other industry professionals. This tool lets you create stunning visual content to post to Facebook, Instagram, Twitter, and LinkedIn with the click of a button.
Choose content from PromoRepublic’s extensive library of visuals. In a matter of seconds, you can publish posts that would normally take hours to brainstorm and create.
Design Graphics With RelayThat
RelayThat is a graphic design platform that makes it easy for non-designers to create beautiful images.
Use the one-click resize function to quickly choose a tall, wide, or square template. Then select a background and add your logo and text. The remix feature lets you rapidly change the position of your text until you find a layout you like.
Manage Content Creation With Trello
While your Google Docs calendar provides a framework for planning your content, Trello is a great visual tool for managing the content-creation process; it’s like a whiteboard for content.
In Trello, lists are categories and cards are individual pieces of content. You can move cards from list to list, color-code your cards to match your calendar, and add images and descriptions to your cards. Setting due dates for cards will automatically place them on the Trello calendar.
Even the free option is useful for businesses and organizations, and you can easily share boards among team members.
Schedule Content With SmarterQueue
SmarterQueue is a go-to scheduling tool, both for sharing evergreen content and UGC. It lets you share content from any feed, whether it’s a favorite source, RSS feed, Pinterest feed, Facebook feed, or competitor feed.
If you use Feedly, you can import your Feedly OPML file into SmarterQueue and arrange bookmarks in the left sidebar.
SmarterQueue is an evergreen scheduler and will automatically set your post to recycle. If you don’t want it to be re-added to your queue, select Don’t Recycle instead.
#6: Confirm That Your Social Media Posts Publish as Scheduled
Once you’ve planned the content you want to share each day on social media, it’s important to follow through and ensure that your content publishes when and where you need it.
Use a spreadsheet to track when and where you’ve shared content on each social media channel. The tracking sheet will also help coordinate content promotion with your team. Use notes to add tweet text and descriptions for each post.
The promotion spreadsheet is also helpful to keep track of older posts you’d like to share with any new social accounts.
Conclusion
Using a social media calendar will help you plan your content around smart social media goals and coordinate campaigns and blog content to achieve those goals. If you use the tools mentioned above to create and share high-quality posts at the right time on each channel, you’ll likely see better results from social media.
Remember to monitor each channel for engagement and reply to fans and followers daily. Check the analytics of each platform to see what pieces of content resonate with your audience and use that to inform future marketing campaigns.
Get More Advice on Social Media Marketing
- Create a social strategy that will guide you closer to your marketing goals.
- Use five low-cost ad strategies that convert.
- Structure marketing videos for success.

Curious About How to Use AI?
Our newest show, AI Explored, might be just what you're looking for. It's for marketers, creators, and entrepreneurs who want to understand how to use AI in their business.
It's hosted by Michael Stelzner and explores this exciting new frontier in easy-to-understand terms.
Pull up your favorite podcast app and search for AI Explored. Or click the button below for more information.
