Wish you could target only your high-value website traffic? Want better ROI on your Facebook ads?
In this article, you’ll learn how to refine your Facebook ads based on the amount of time people spend on your website and much more.
Why Website Engagement Matters for Facebook Ads
When you launch a website traffic campaign in Meta Ads Manager, Meta offers multiple optimization options to send traffic to your website, depending on your desired outcome.
If you want volume and link clicks, you would select the Link Clicks optimization option.
But in most cases, you’ll want to focus on quality over quantity by selecting the Landing Page Views optimization option at the ad set level.
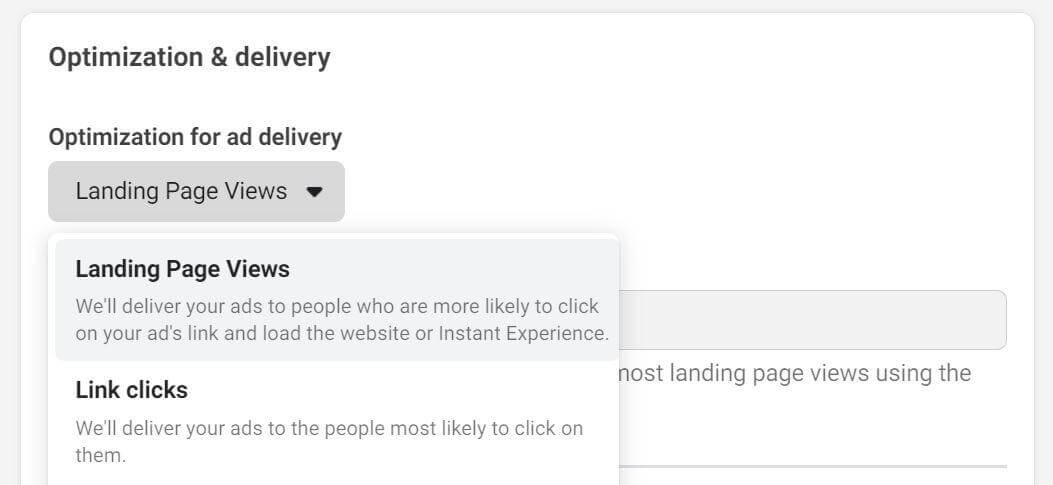
The Landing Page Views option tells the algorithm to focus on people who’ll click your ad and wait for your website to load, rather than people who tend to click a lot of links by accident or who haven't demonstrated interest in the type of content on the landing page itself.
Campaigns that optimize for landing page views report and optimize on the number of views that result from the ad, which can be problematic because reporting and optimization don’t consider true engagement during a website visit as a signal for ad delivery and optimization.
This means that engaged visits don’t directly positively impact the performance of your traffic campaign. If the user chooses to close your landing page after only a few seconds, leaves your website open without engaging, or spends only a few seconds reading your content, the algorithm doesn’t care. But you should.
If you take a closer look at external analytics tools like Google Analytics, you may see results similar to those below when running traffic campaigns on Meta:
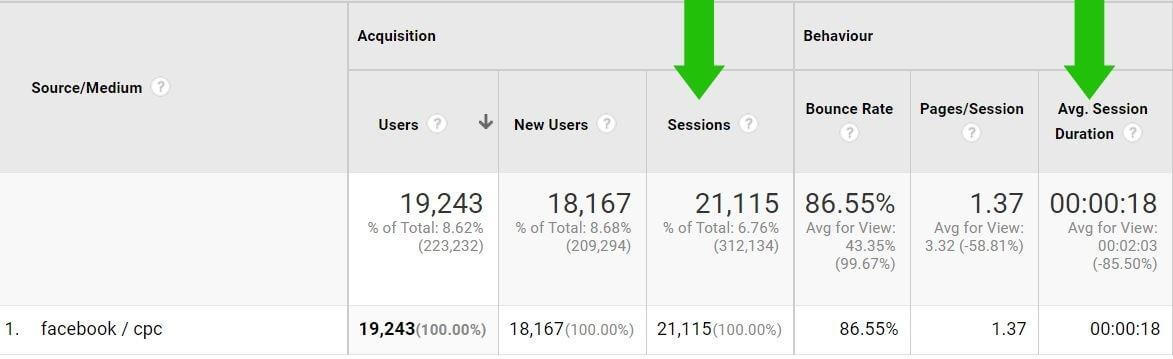
A lot of traffic (quantity) is coming from the Landing Page Views optimized traffic campaign but the average session duration is quite low (quality).
When a traffic campaign doesn’t generate the quality you want, you’ll need to find alternative ways to get better results.
Follow the steps below to take the Landing Page Views optimization one step further by combining Timer and Scroll Depth triggers in Google Tag Manager to fire an event tag in Meta Events Manager.
Note: This article assumes you have properly installed Google Tag Manager. If you haven’t, refer to this official Google Tag Manager help article to add Google Tag Manager to your website.
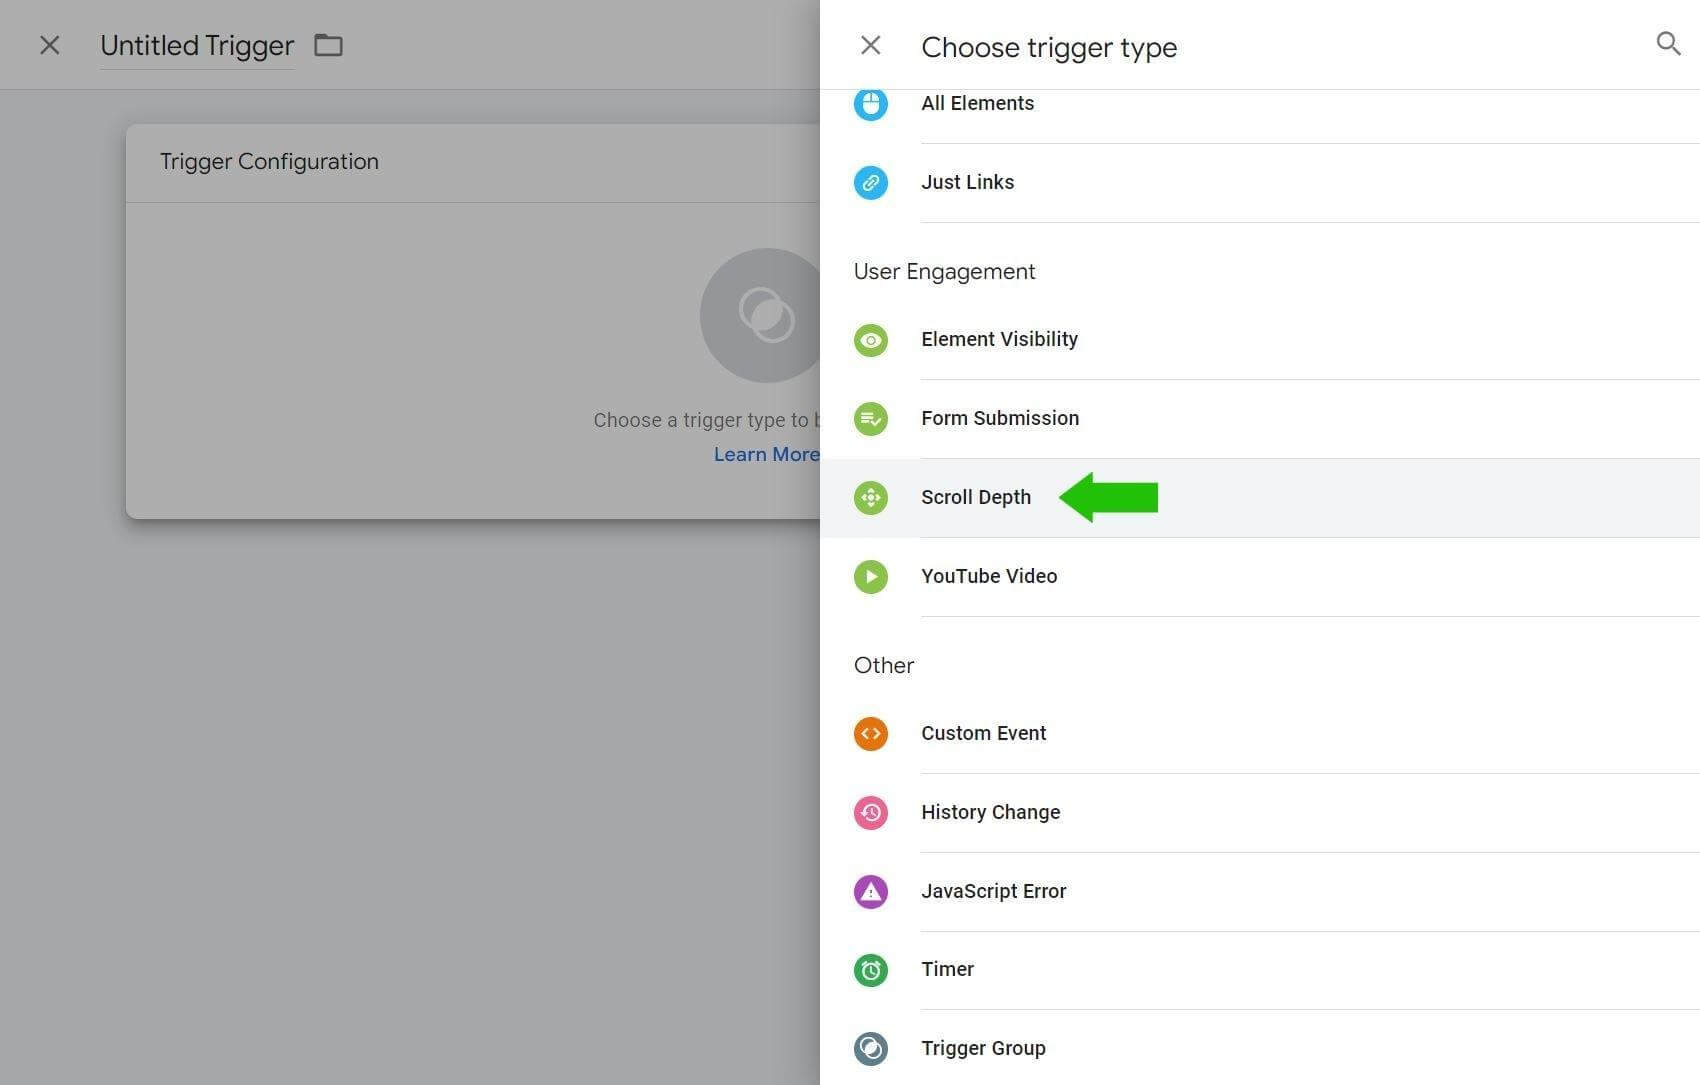
#1: How to Create a Scroll Depth Trigger in Google Tag Manager
When people visit your website pages, you want them to engage with your content. To identify true engagement, this trigger logs website visitors who actively scroll at least 50% down your page.
Which AI Moves Actually Matter?
That's what every marketer is wrestling with now. New AI strategies, new tools, new takes every week — but no clarity. Most marketers and business owners are trying to figure out AI alone.The AI Business Society is your trusted guide. Get expert-led training you can put to work immediately. Plus a community of marketers sharing what's actually working.
I'M READY FOR REAL AI RESULTSFirst, let’s create a Scroll Depth event trigger.
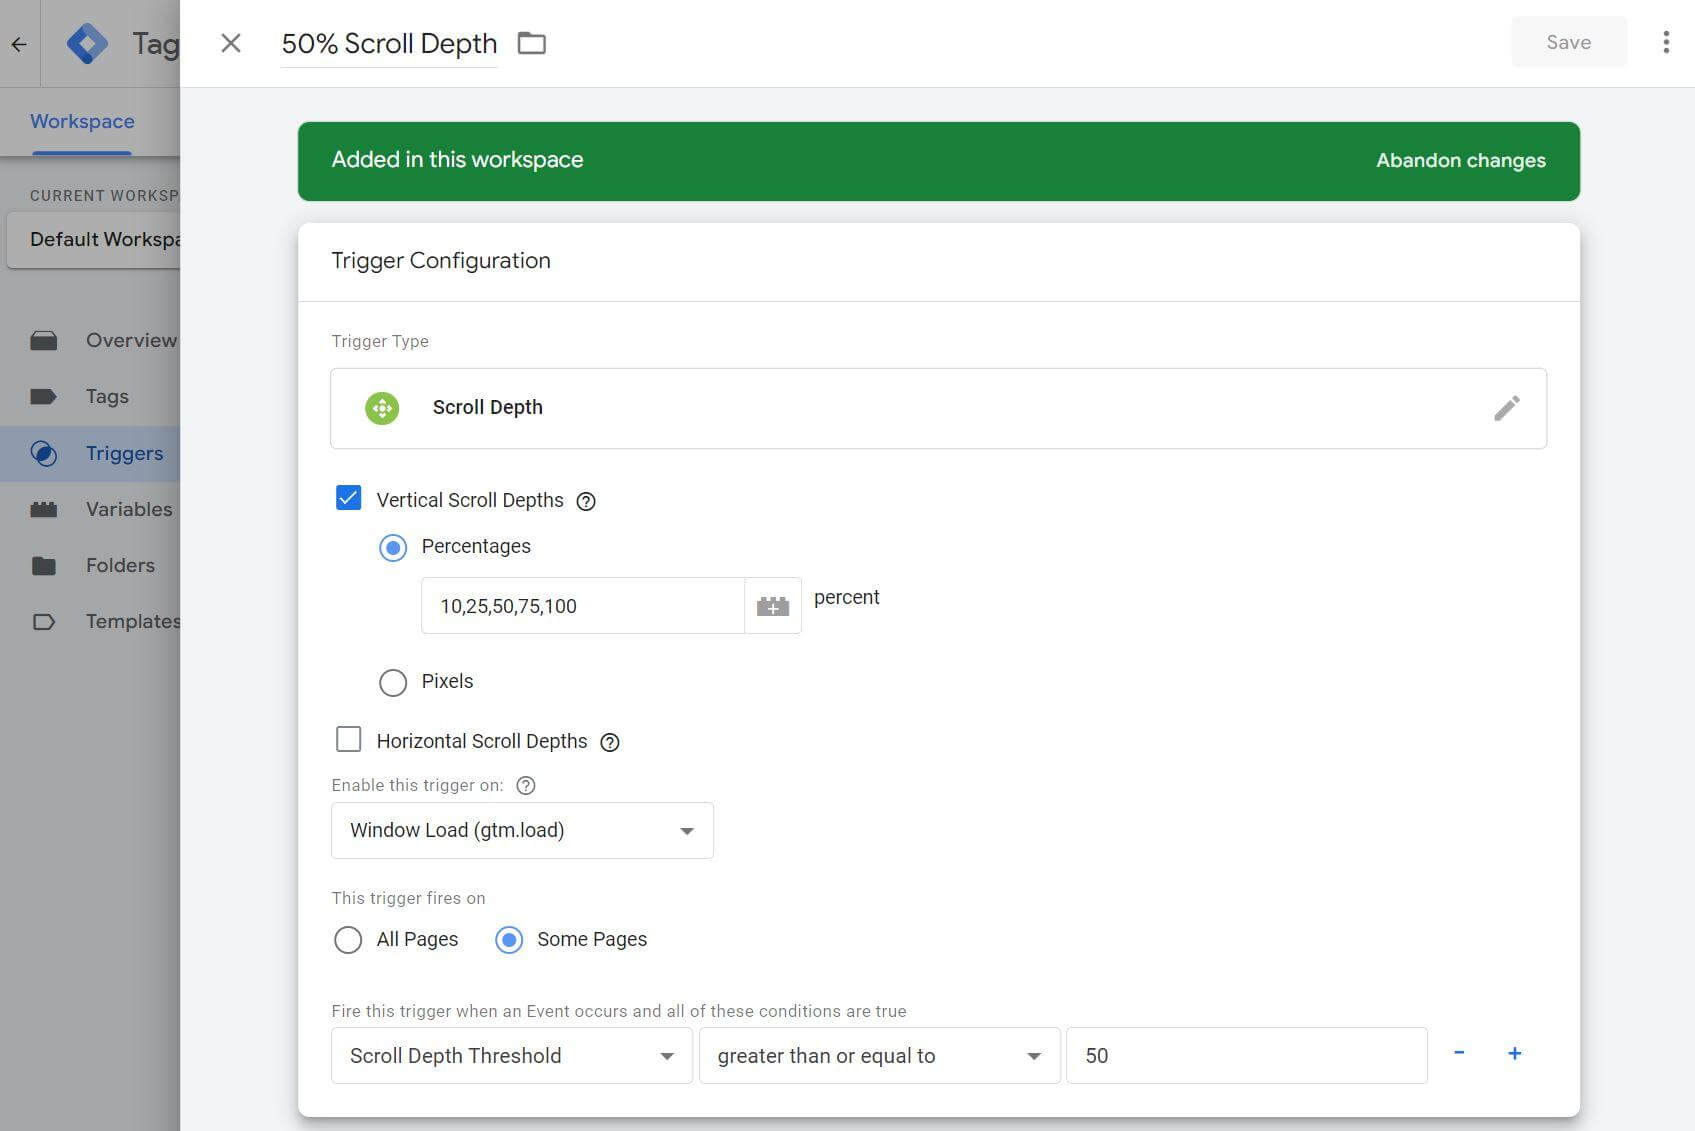
Open Google Tag Manger and navigate to the Triggers section, then click New. In the User Engagement section, select Scroll Depth.
Set the Vertical Scroll Depths field to the following percentages: 10, 25, 50, 75, 100.
Next, change the ‘This trigger fires on’ selection to Some Pages.
In the trigger conditions, set the first field to: Choose Built-In variable, then Scroll Depth Threshold. Set the Contains field to: greater than or equal to. Finally, set the third field to: 50.
Name the trigger 50% Scroll Depth, and click Save. This will return you to the Triggers overview page.
#2: Create a Timer Trigger in Google Tag Manager
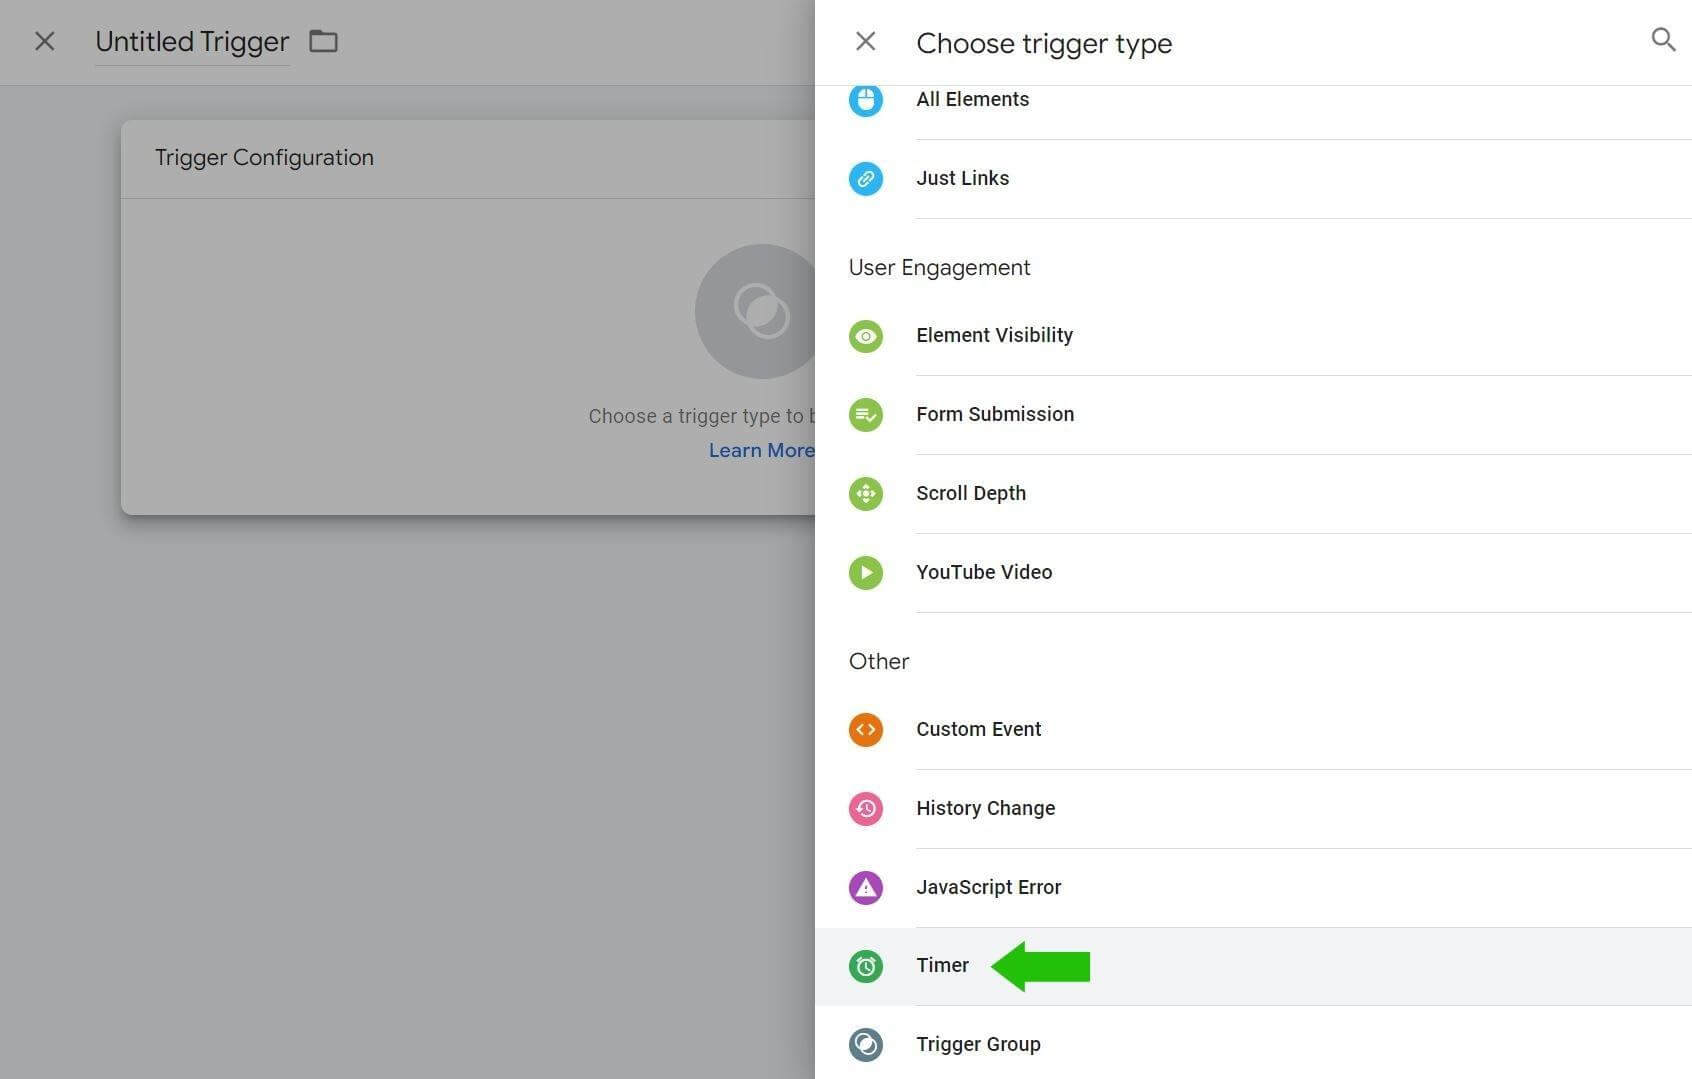
Now you're ready to create your Timer Trigger. Once again, click New to create a new trigger. In the Other section, select Timer.
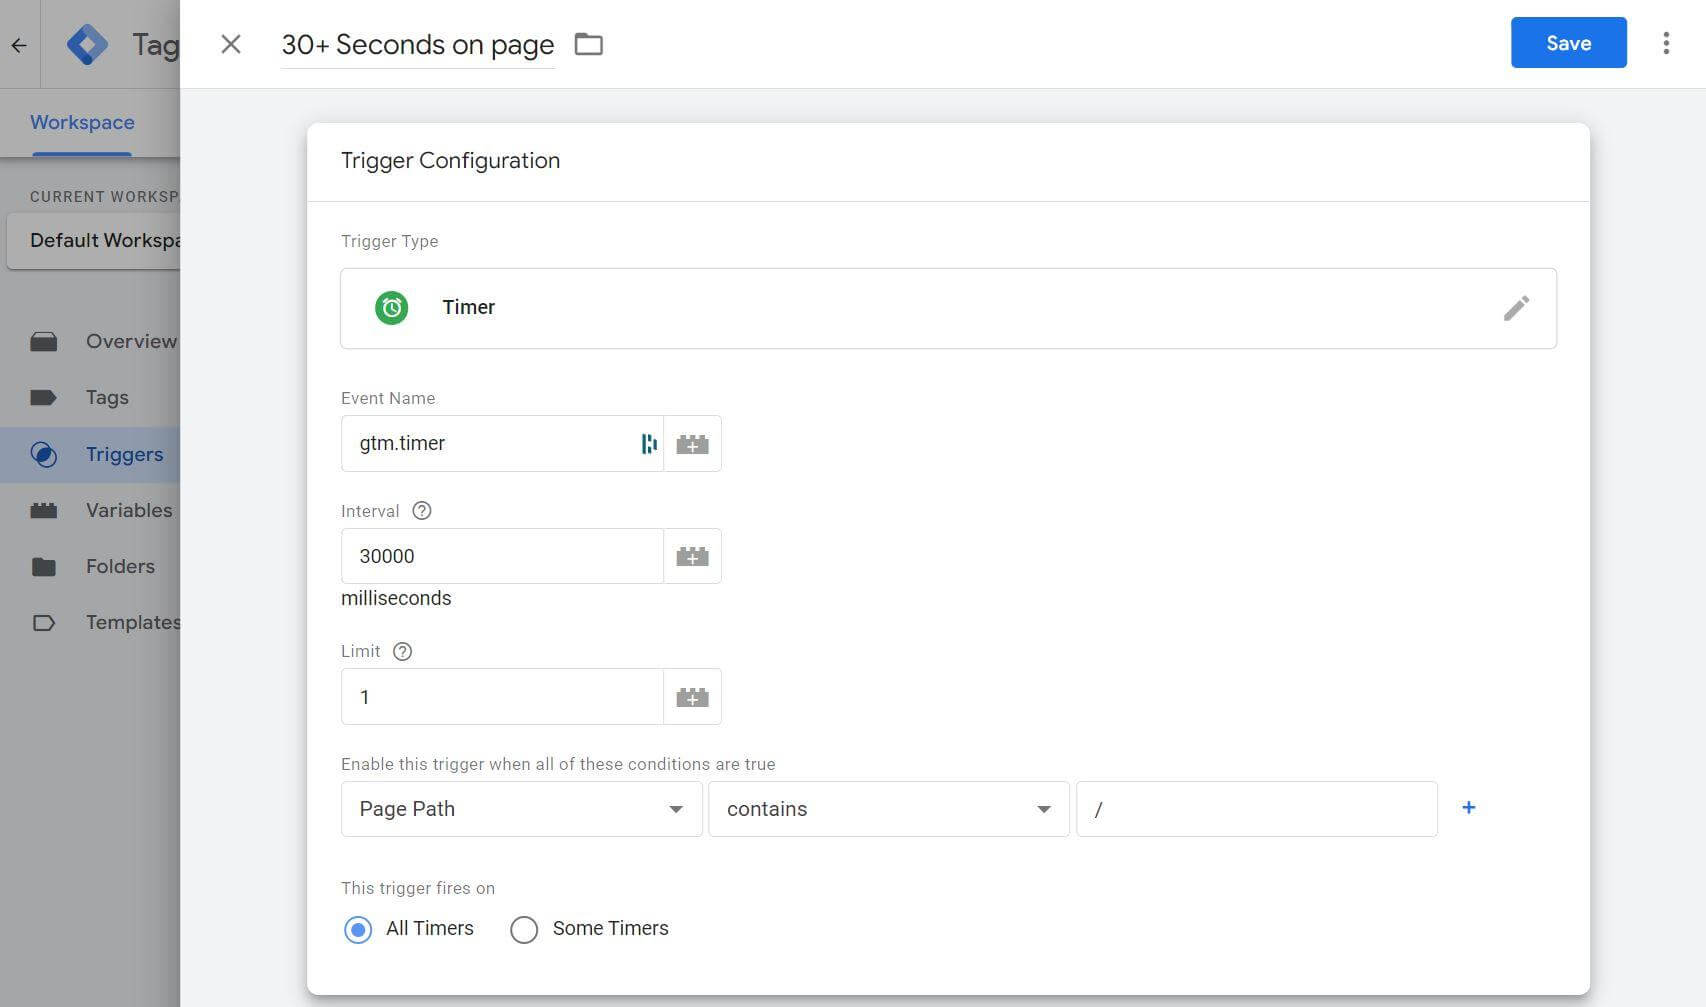
Set the interval timer to the ideal length based on your own website data. In this example, you are creating a trigger to identify people who spend at least 30 seconds on a page, so you’ll set the Interval to 30000 milliseconds.
Set the Limit to 1; this means event will fire a maximum of 1 time.
In the trigger conditions, set the first field to: Page Path. Set the second field to: Contains. Set the third field to: /.
Finally, set the trigger to fire on: All Timers.
Name the trigger 30+ Seconds on Page, and click Save. You will return you to the Triggers overview page.
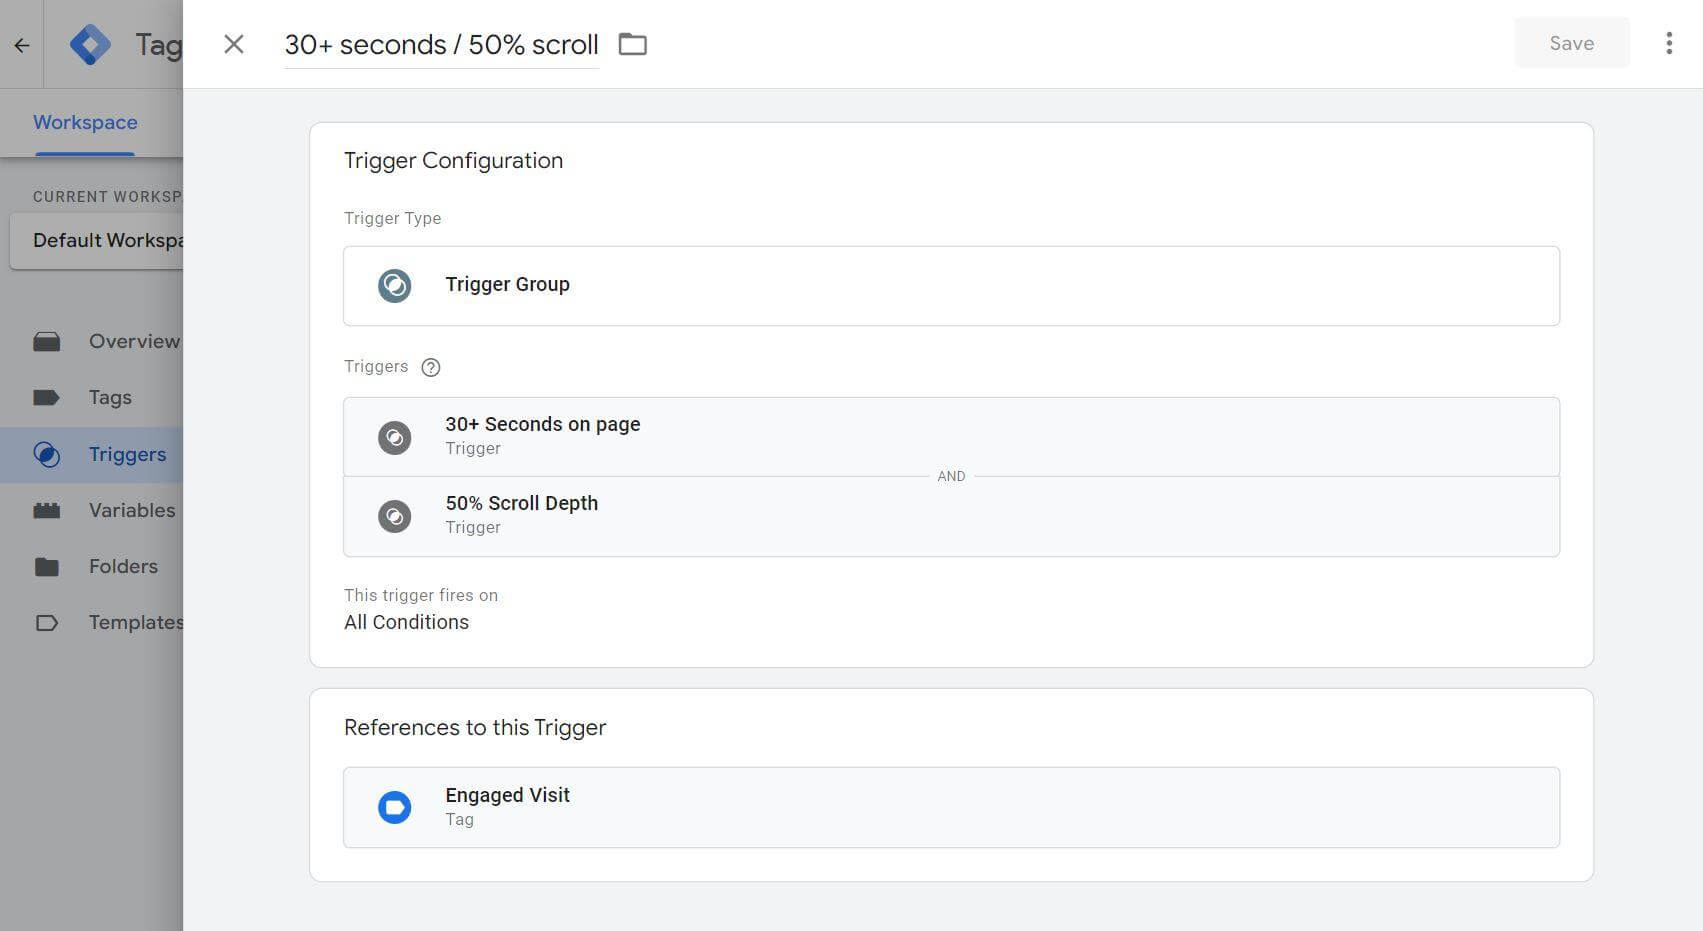
#3: Create a Trigger Group
Now that you’ve created two triggers that identify the engagement you’re looking for, you’re ready to combine them into a single trigger.
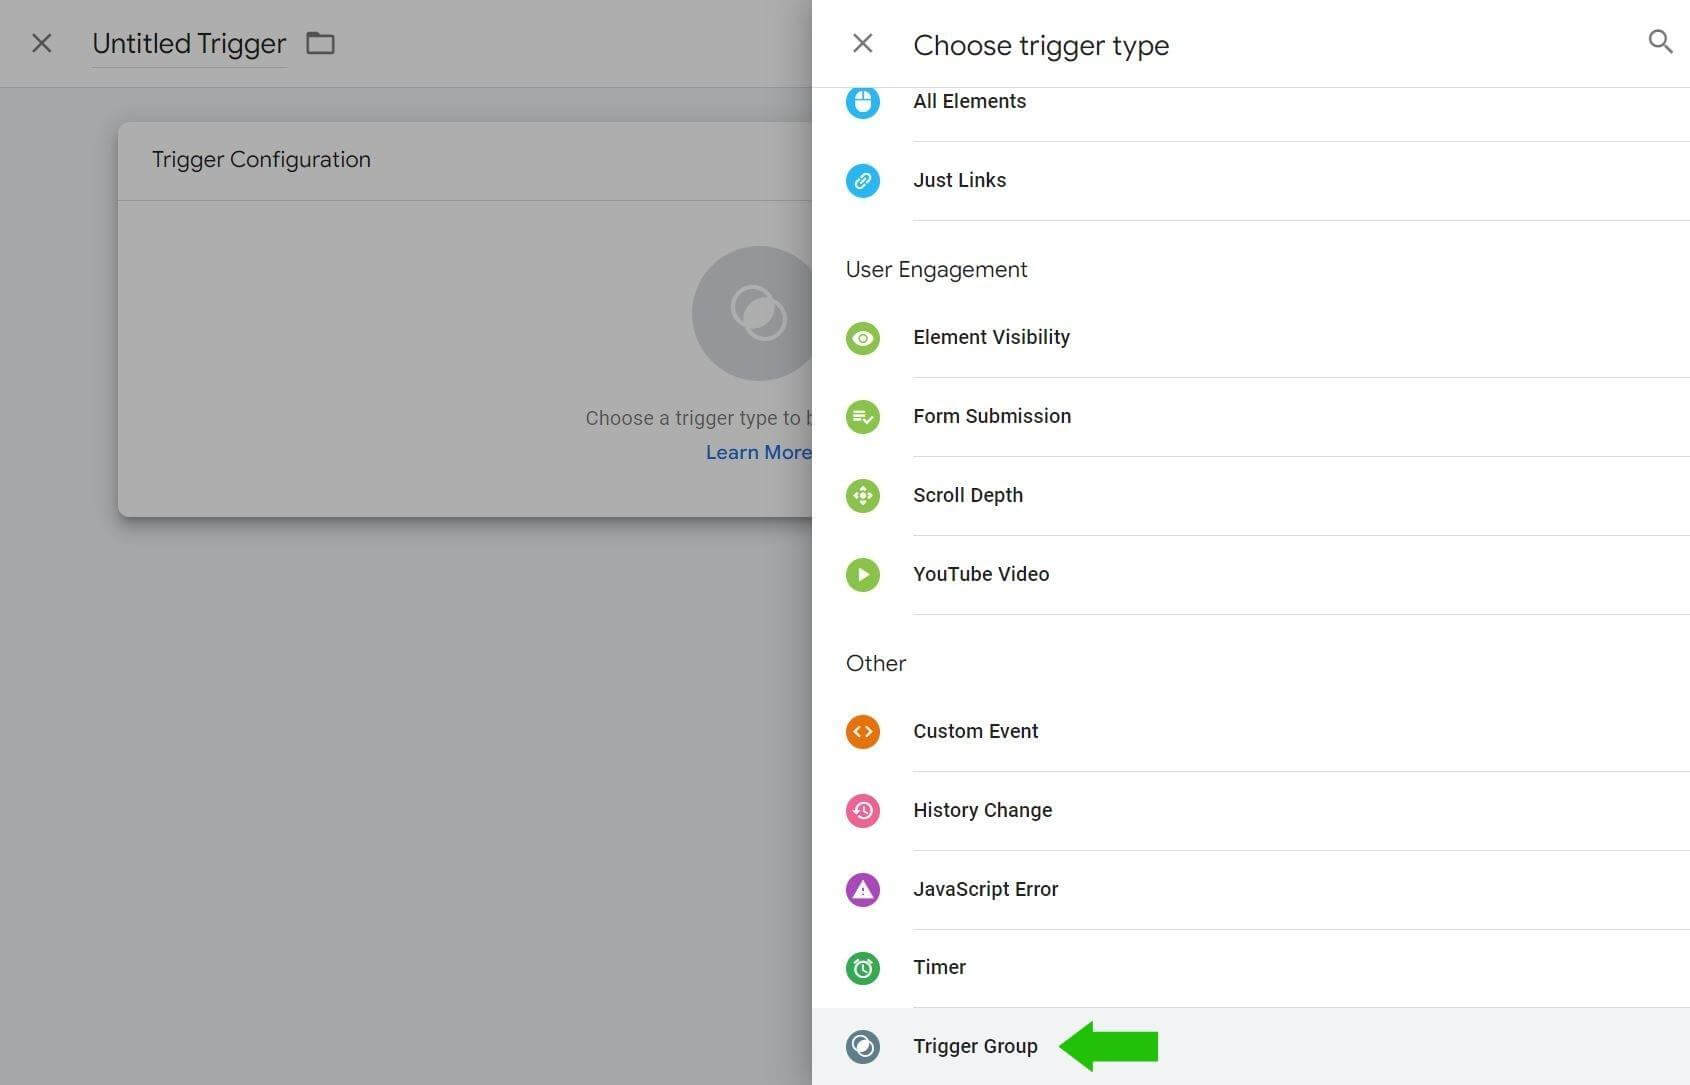
Click New to create a new trigger. In the Other section, select Trigger Group.
Click the Choose a Trigger box and select the 30+ Seconds on Page trigger, then click the blue + button and select the 50% Scroll Depth trigger.
Set the trigger conditions to: All Conditions.
Name the trigger group 30+ Seconds / 50% Scroll, and click Save.
#4: Install the Meta Pixel via Google Tag Manager
Before you send this custom tracking event to Meta, you need to install the Meta pixel code to your website using Google Tag Manager.
This setup is quick and easy. In a new browser tab, open the Events Manager in Meta Business Manager. Click Add Events and select From a New Website.
In the pop-up, click on the Install Code Manually button.
In the next window, click on the Copy Code button.
Return to Google Tag Manager and click on Tags, then click New.
Click on the Tag Configuration box and select the Custom HTML option.
Click into the empty HTML box and paste in the Meta pixel code.
3 Days of World-Class Training—Zero Travel!

Couldn't make it to Social Media Marketing World and AI Business World this year? Get all of the great content at a fraction of the price with a Virtual ticket.
That’s full access to recordings of every keynote, workshop, and session—the ones people travel thousands of miles to see. Don't wait. Get your Virtual ticket and enjoy actionable content that you can watch anytime, anywhere.
Click on the Triggering box and select All Pages.
Name the tag Meta Pixel, and click Save. This will return you to the Tags overview.
#5: Create the Custom Engagement Tracking Tag
From the Tags overview, click on New to create a second tag. Once again, click on the Tag Configuration box and select the Custom HTML option.
Type in the following custom tracking code to the HTML field:
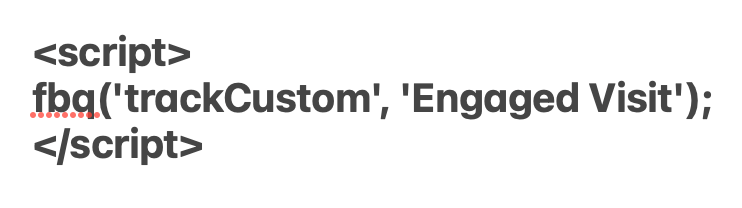
Next, click on the Triggering box and select your 30+ /50% Scroll trigger group.
Name the tag Engaged Visit, and click Save. This will also be the name of the event that appears in Meta Events Manager.
Click the blue Submit button. From the Publish and Create Version tab, enter Quality Visit tags + triggers, the click the blue Publish button.
#6: Verify Your Tag Implementation
Let’s test your setup. Open the Test Events interface in Meta Events Manager.
In a new browser tab, open your website. Scroll at least halfway down a page and stay on the page for at least 30 seconds.
Return to Meta Events Manager and open the Test Events tab.
After 30 seconds, you should see the engaged visit event appear in the results.
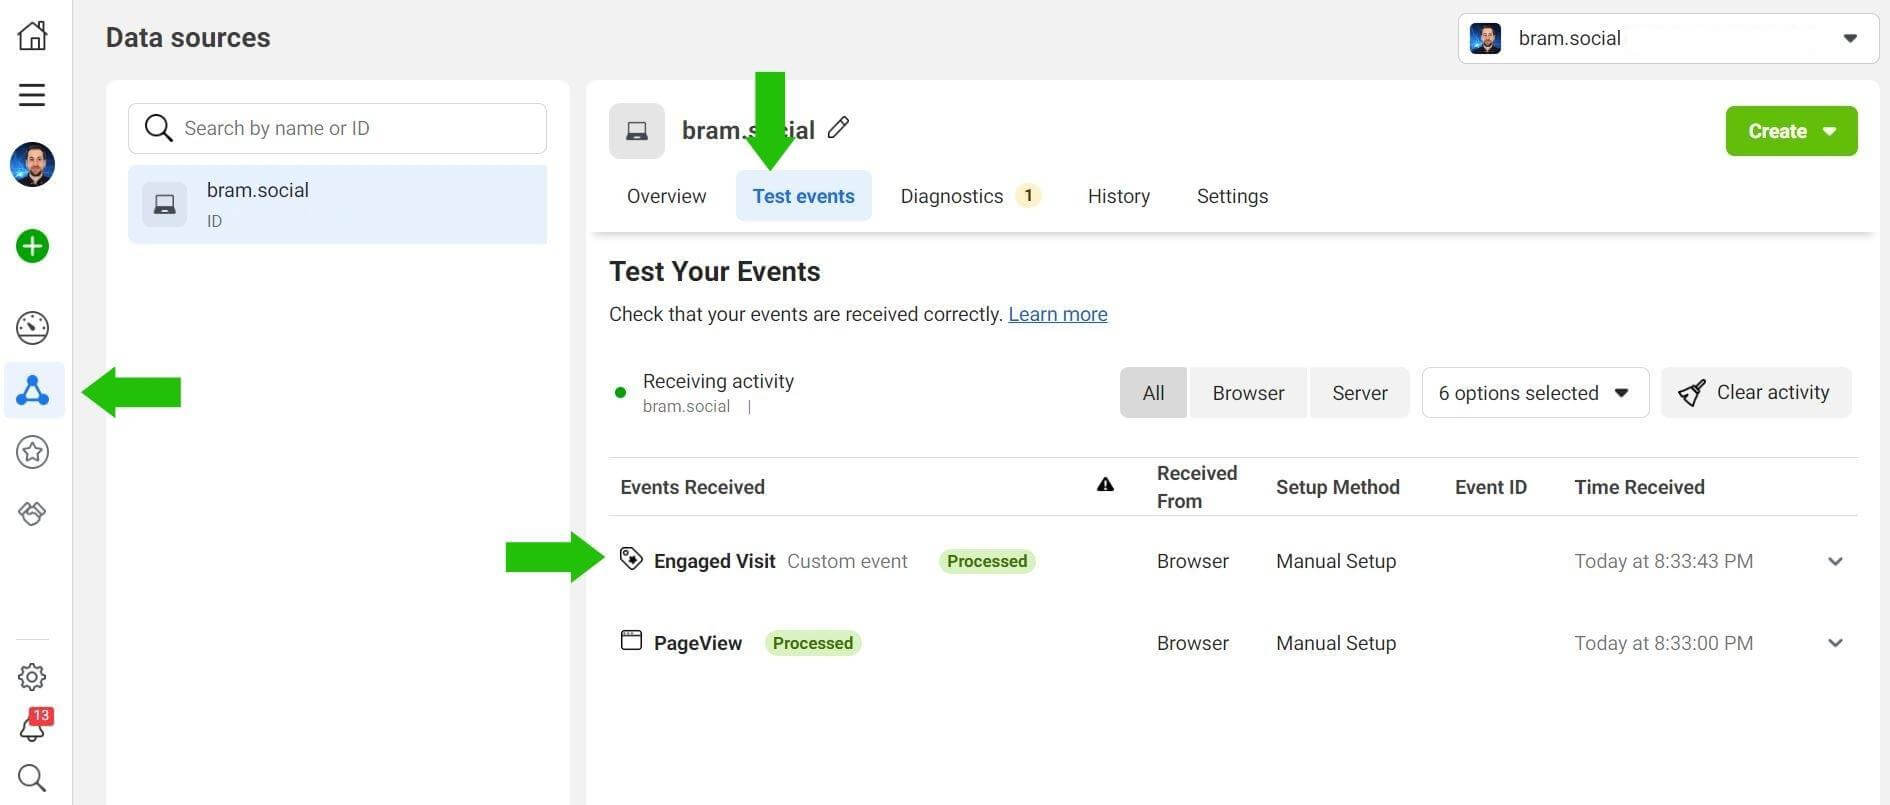
Congratulations! Your tag configuration in Google Tag Manager works.
#7: Set Up a Custom Conversion for Your Facebook Ads Campaign
Before you can use your newly created engagement tag in campaigns, you’ll need to set up a custom conversion.

In Events Manager and click Custom Conversions.
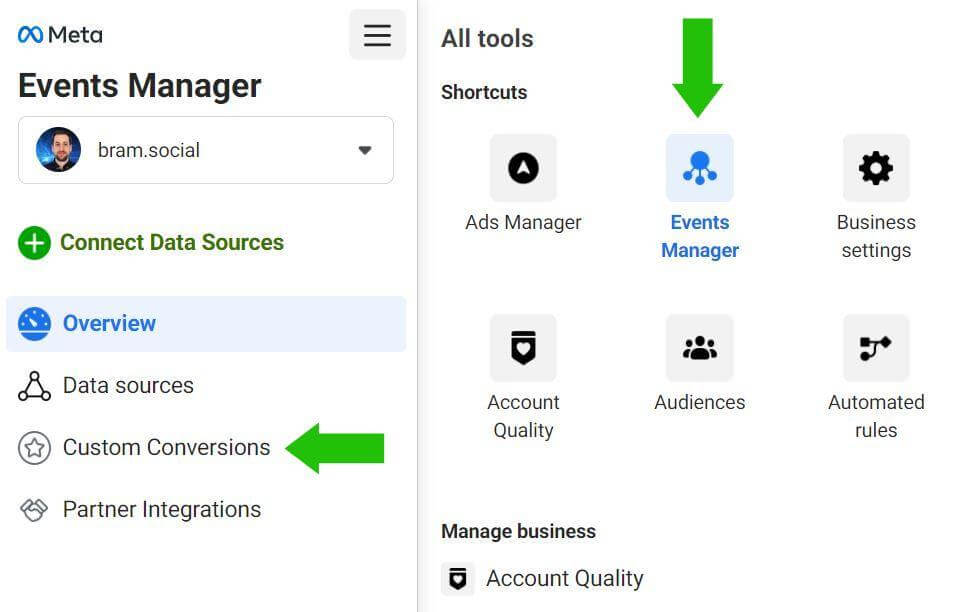
Next, click on the blue Create Custom Conversion button.
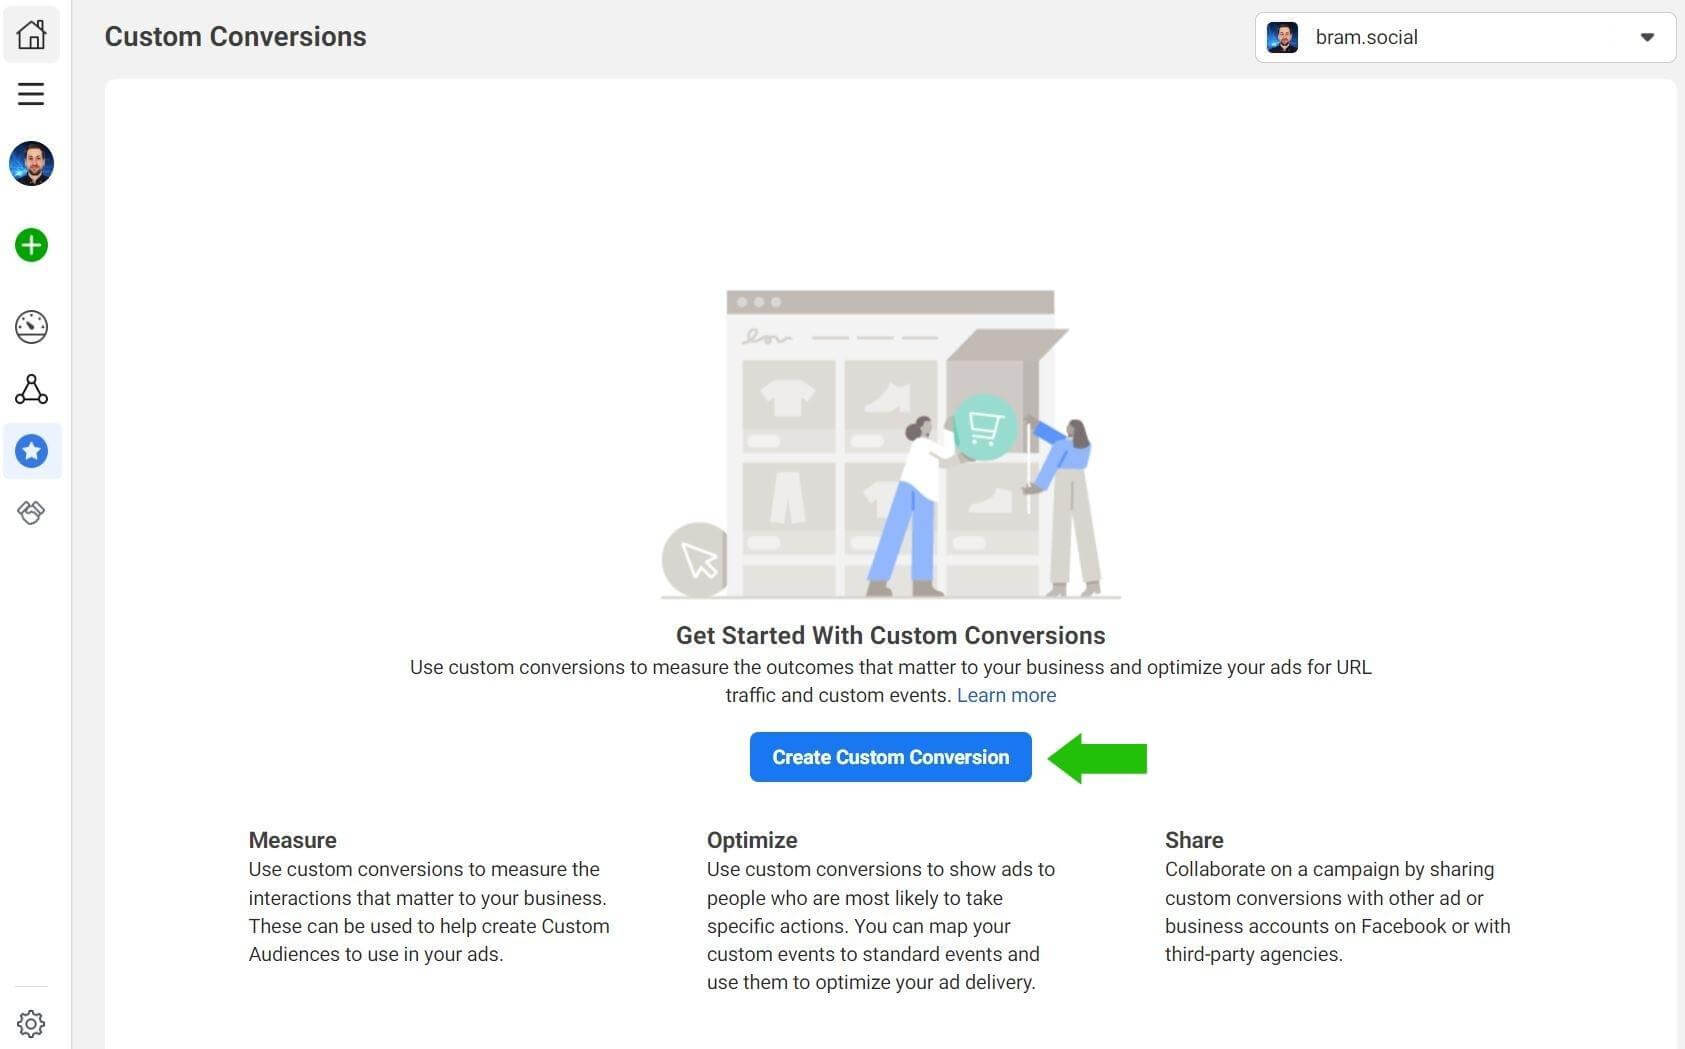
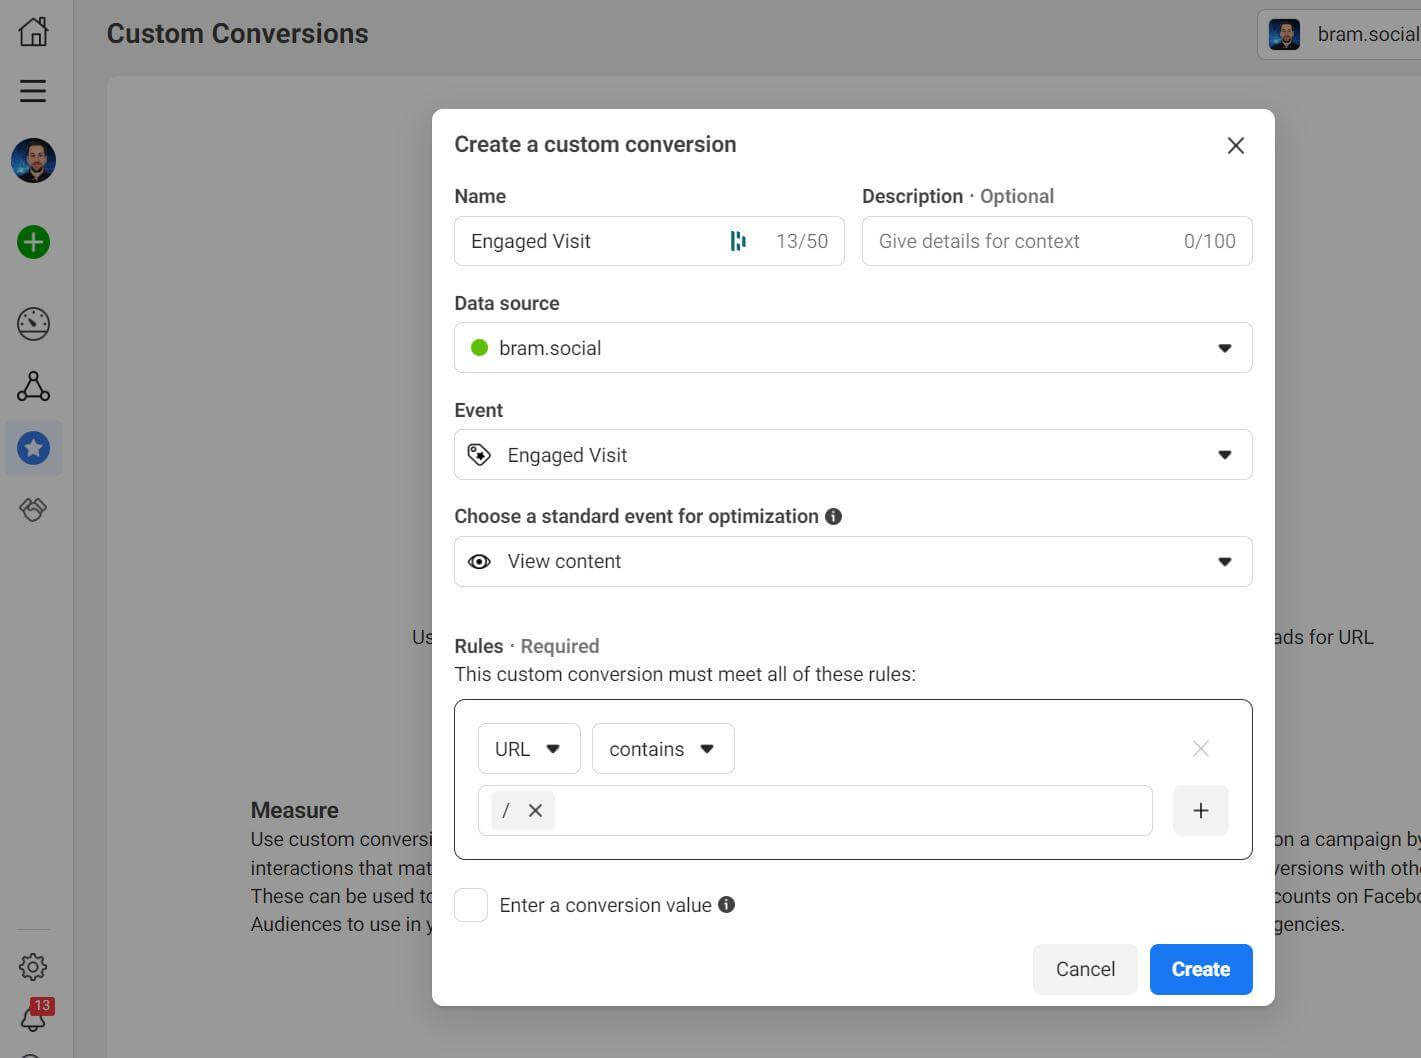
Name your new custom conversion Engaged Visit, and set the data source to your pixel and set the event to Engaged Visit; your Engaged Visit event may not show up for 24 hours.
Choose View Content as the standard event for optimization and add a trailing slash (/) in the URL so this custom conversion can fire on every page of your website.
Due to the iOS 14.5+ tracking limitations, you’ll also need to add the conversion to the Aggregated Event Measurement (AEM) list.
Open the Events Manager interface and click on Data Sources Overview, then Aggregated Event Measurements, and then Configure Web Events.
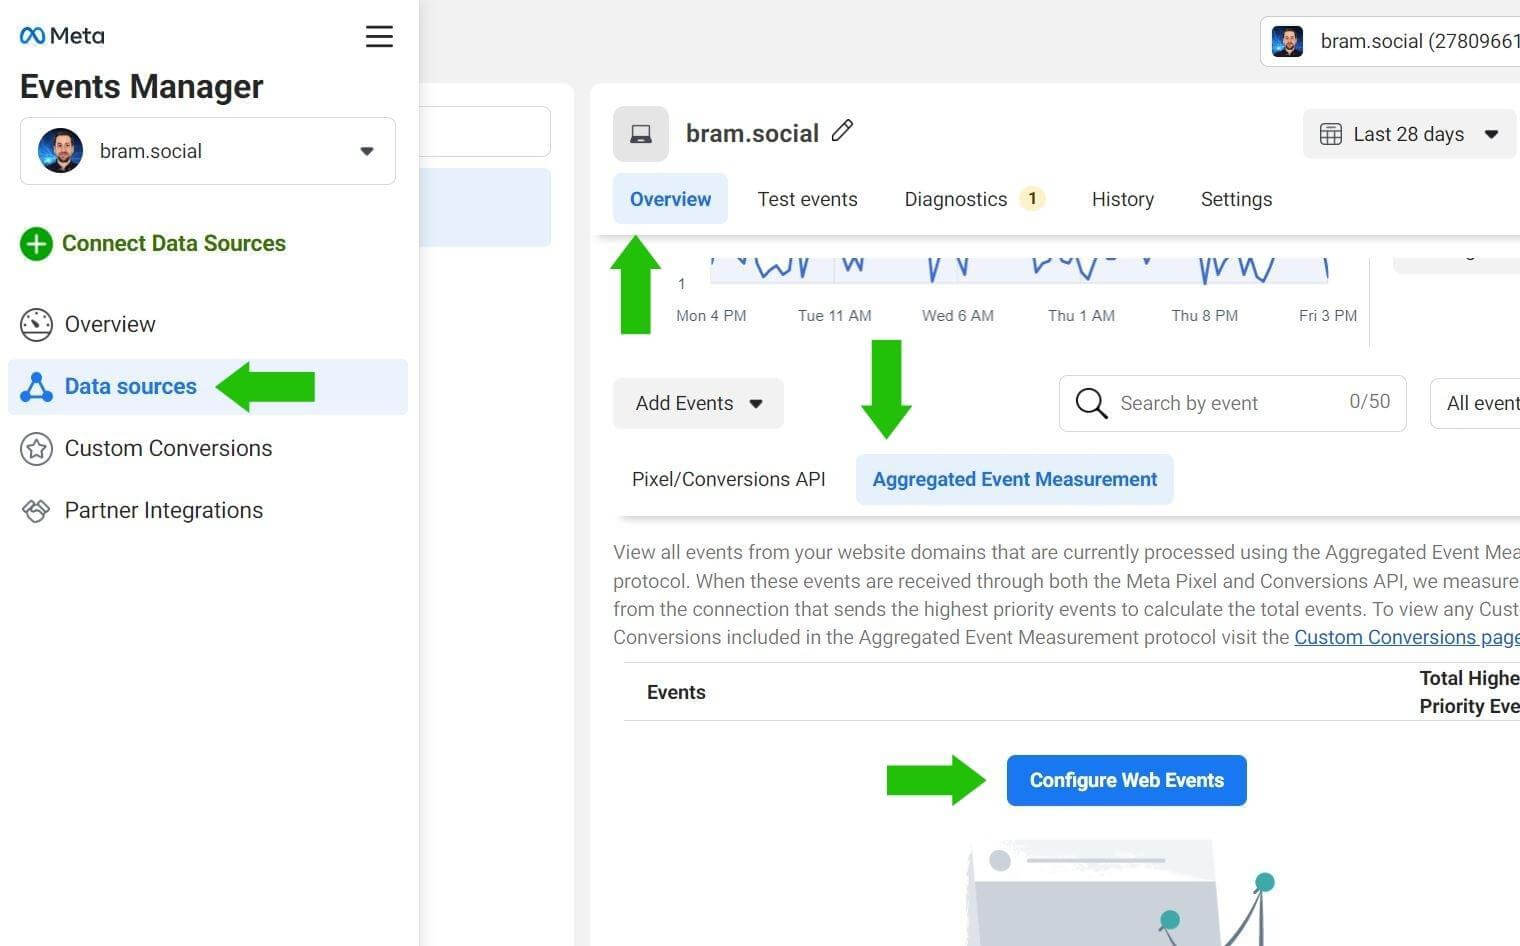
Next, click on Manage Events.
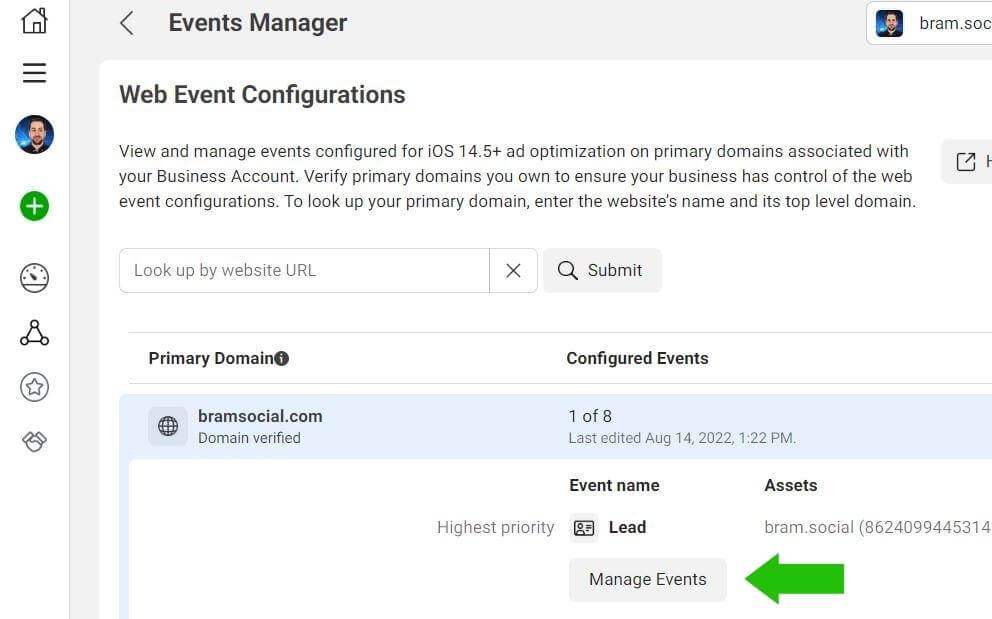
Now add the event to your list of eight AEM events. Most likely, you’ll want to add this in a lower position because it’s a micro-event.
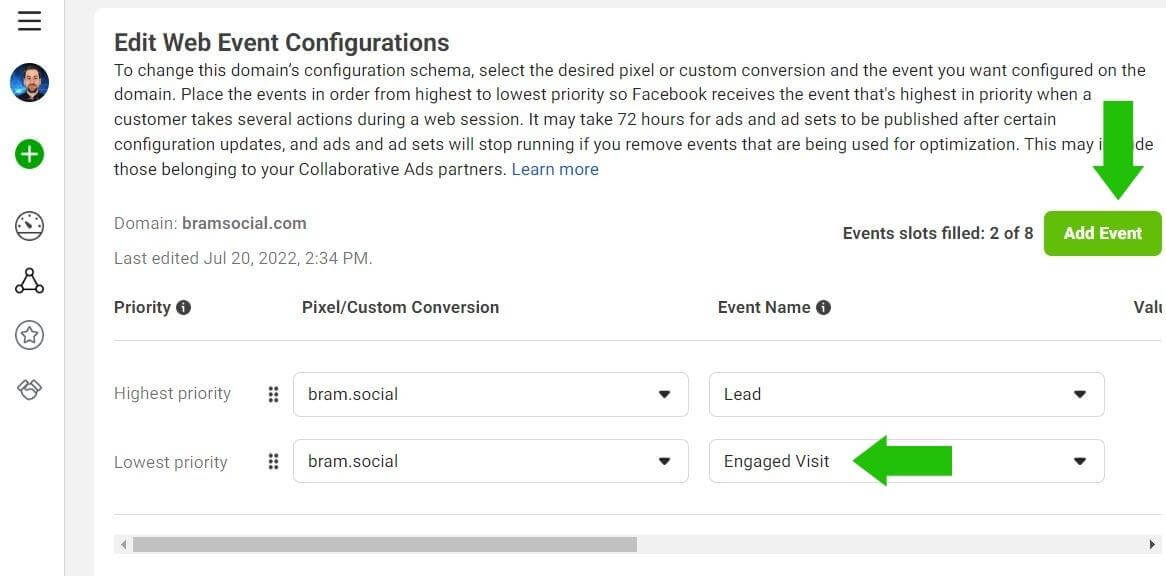
Add your Engaged Visit custom conversion to the list and save your changes.
#8: How to Use Your Custom Conversion Event In Your Facebook Ads Campaign
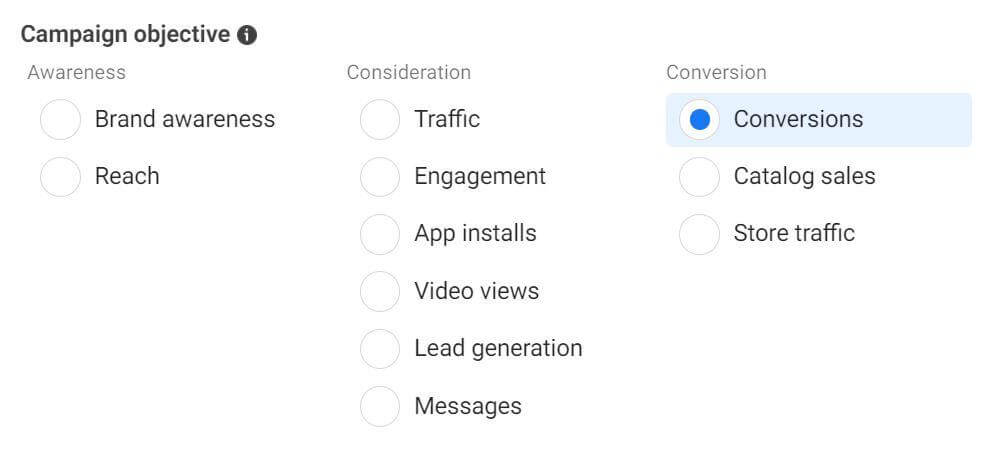
Create a new Facebook Ads Campaign and choose the Conversions objective.
At the ad set level, select the newly created custom conversion as the optimization event.
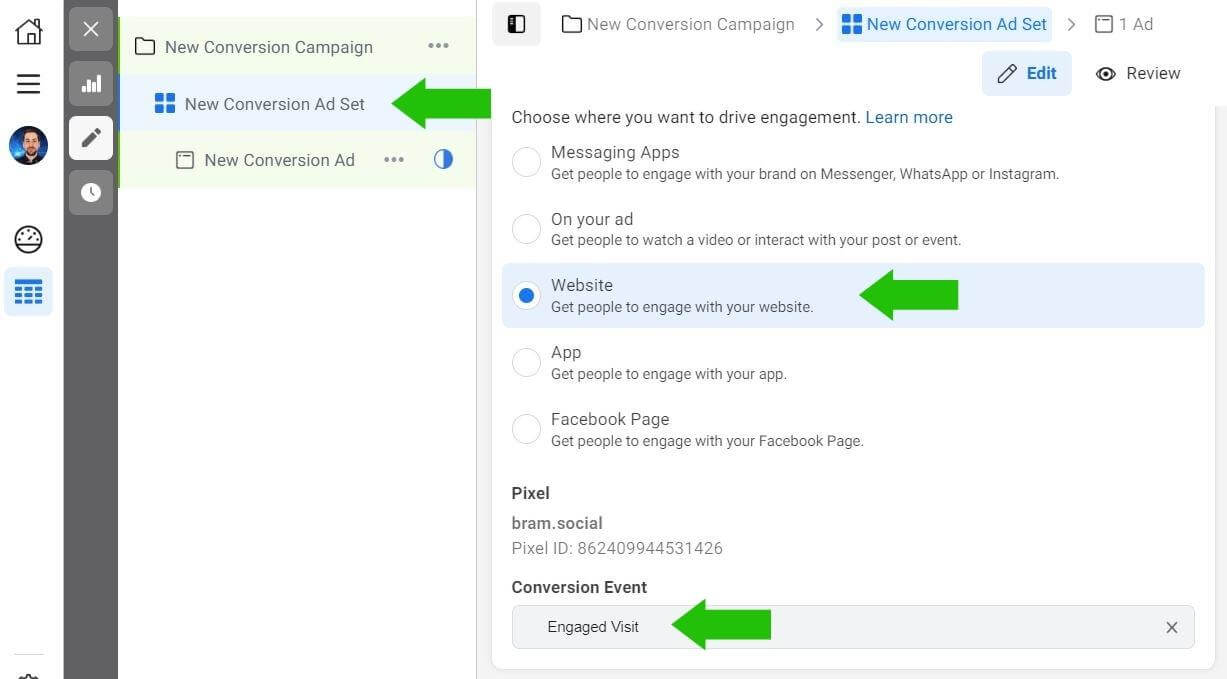
Your conversions campaign will now focus on and optimize for driving as many engaged visits as possible within your campaign’s budget.
Conclusion
Quality visits should always be the priority when driving traffic to your website. This isn’t about maximizing numbers, it’s about maximizing results.
This type of micro-conversion can help your business achieve quality above quantity, resulting in more leads and sales in the long term.
Creating ads that trigger people to click is the first step, but after that click, you need to convince the user to read your content and take a desired action. This is where systems and algorithms can help you maximize your desired results. You just need to feed those systems enough signals so they can find people most likely to be interested in your offer. Knowing your audience and what triggers them is key to using systems to help you find the best matching audience for your business.
Also, expect to see your cost per result increase, especially compared to optimizing for link clicks. Switching the optimization from traffic to conversions to generate engaged visits will decrease the number of results and increase the cost per result.
Don’t be alarmed by the increased cost. You’re now generating quality visits and eliminating the waste you were paying for before. Reducing waste will save you money in the long term and allow you to allocate budget efficiently for growing your business.
Get More Advice on Facebook Ads Marketing:
- Discover how to use the Facebook Ad Library to see how other brands are advertising on Facebook and Instagram.
- Find specific advice you can apply to attract new customers, package your offer and convert the customers you attract, and retarget people who don’t immediately convert.
- Learn how to choose the right Facebook and Instagram campaign objective to achieve your business goal and what to do if you started your campaign with the wrong objective.
Stay Up-to-Date: Get New Marketing Articles Delivered to You!
Don't miss out on upcoming social media marketing insights and strategies! Sign up to receive notifications when we publish new articles on Social Media Examiner. Our expertly crafted content will help you stay ahead of the curve and drive results for your business. Click the link below to sign up now and receive our annual report!

Curious About How to Use AI?
Our newest show, AI Explored, might be just what you're looking for. It's for marketers, creators, and entrepreneurs who want to understand how to use AI in their business.
It's hosted by Michael Stelzner and explores this exciting new frontier in easy-to-understand terms.
Pull up your favorite podcast app and search for AI Explored. Or click the button below for more information.
