Do you work with a social media team? Wondering how to create a social media content approval process?
In this article, you'll learn how to set up a workflow to manage, schedule, and publish pre-approved social media content.

#1: Share Social Media and Brand Assets With Your Team in One Place
Whether you're a rookie social media manager or veteran strategist, you know that having all of the information pertinent to your social media marketing is essential to your success. Collecting that information, however, can be a struggle.
Other departments may have their own content, holidays, events, and other important details you need to be aware of while tailoring your content to the company's goals and brand voice.
So how do you keep track of it all? Many free and paid tools can handle some or all parts of your social media workflow such as Sprout Social, SmarterQueue, and CoSchedule. For the sake of this article, I'm showing you how I use Airtable and Agorapulse.
Airtable allows you to collect general information such as links you frequently use, keywords, research, holidays, company events, team member information, documents, and links. You can also store assets like images or documents all in one convenient and interlinkable place. Step aside, Google Sheets!
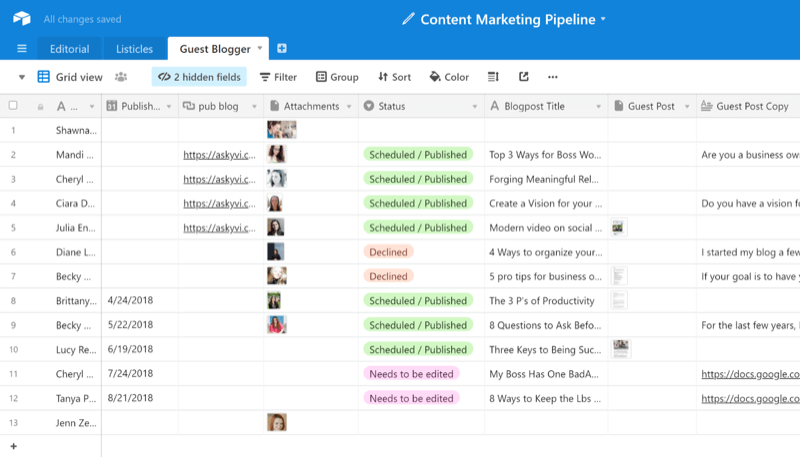
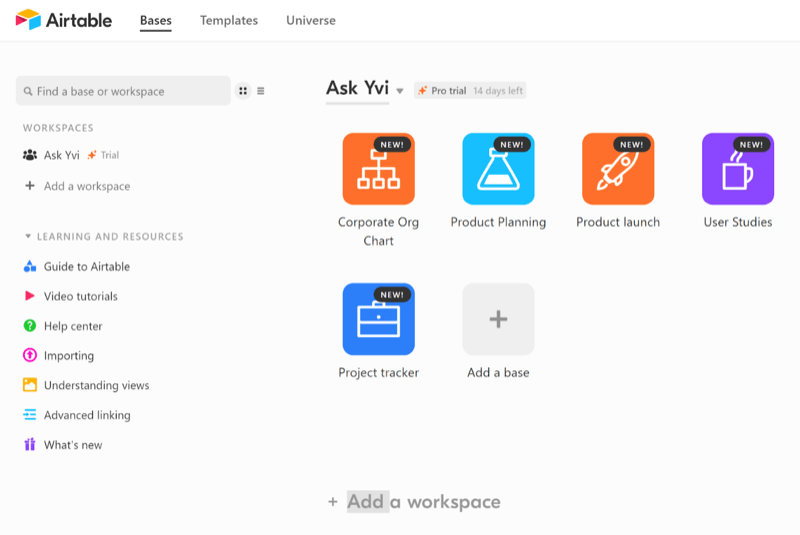
To get started with Airtable, sign up for an account. After the signup process is complete, you'll receive a 14-day free trial to Airtable Pro ($12/month). This allows you to take the advanced features for a spin but they're not necessary for this workflow. All of the steps and features mentioned here are available in the free version of Airtable.
When you set up your account, I recommend going through the workplace setup questions because that information is used to populate a handful of ready-to-go bases (that's what spreadsheets are called in Airtable) matching your answers.
Create a Form for Social Media Post Submissions
Airtable lets you build a form (connected to your spreadsheet) that employees can use to submit events, client testimonials, and topics they want to see while reducing the risk of information getting moved around or deleted.
To create a form for employees to use, open your spreadsheet and click the down arrow at the top left. From there, you can choose an existing view or generate a new layout.
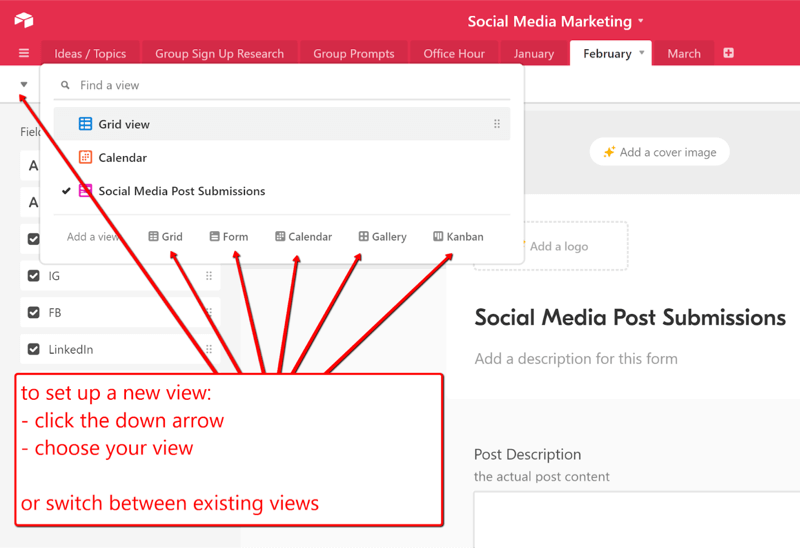
When you click Form, a new form opens, pre-populated with fields based on your grid view. However, you may not want to display all of those fields on the form. Fortunately, Airtable makes it easy to customize the view.
Get World-Class Marketing Training — All Year Long!
Are you facing doubt, uncertainty, or overwhelm? The Social Media Marketing Society can help.
Each month, you’ll receive training from trusted marketing experts, covering everything from AI to organic social marketing. When you join, you’ll also get immediate access to:
- A library of 100+ marketing trainings
- A community of like-minded marketers
- Monthly online community meetups
- Relevant news and trends updates
To hide a field (so it doesn't appear on the public form), simply drag and drop the field from the right side of the screen to the Fields list on the left. The Fields list is your holding pattern for items you don't want to show on the public form. The fields on the right are visible to the public.
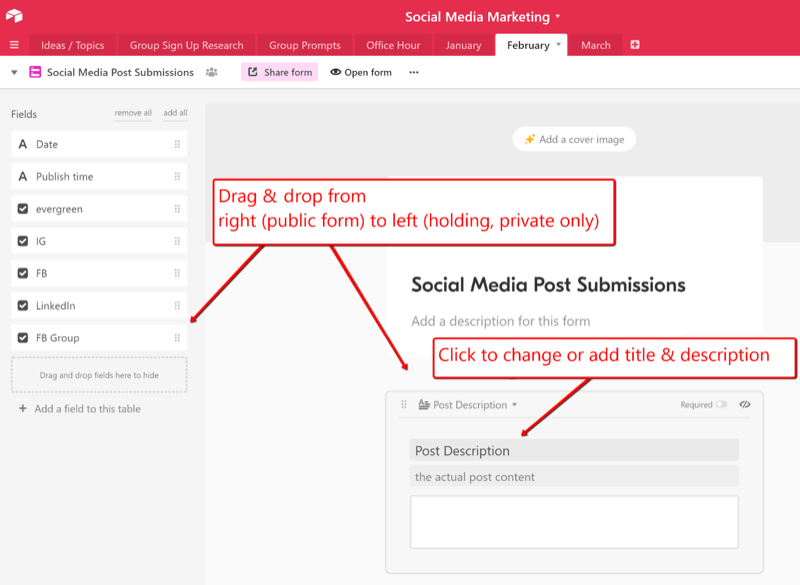
To change titles and add descriptions to fields, simply click on the content boxes on the right and make your changes.
Note: If you have a Pro account, you can add a cover image and logo to your form.
Share Your Spreadsheet With Collaborators
Your social media team can collaborate with others directly in the spreadsheet, categorizing posts, tracking metrics, and viewing the status of content.
To share your spreadsheet with collaborators, click the Share button at the top right of the page. In the window that appears, decide whether to invite the collaborator by email or link, and assign a permission level.
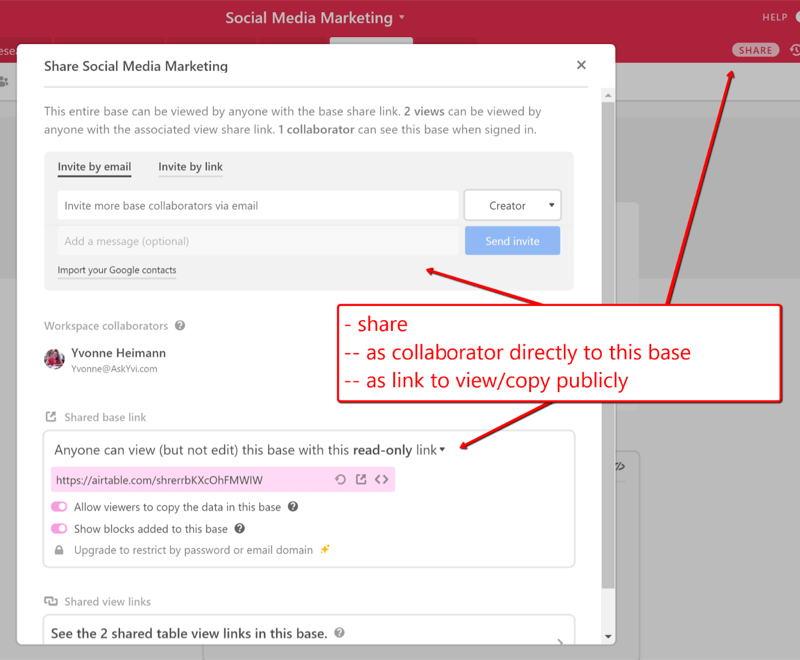
These are the permission levels you can choose from:
- Creator: Can fully configure and edit this base
- Editor: Can edit records and views, but can't configure tables or fields
- Commenter: Can comment on records
- Read-only: Can't edit or comment
Airtable also lets you create a shared link that anyone can use to view your spreadsheet and copy it.
This is how I can share my social media marketing Airtable template with you. Follow this link to access the template. Then click Copy Base at the top right and choose which workspace to add this base to.

Using an Airtable spreadsheet to collect assets and develop your social media content allows you to quickly view previous content at any time and understand your results with ease.
Pro Tip: Marking your evergreen content in Airtable makes it easy to always have content on hand, especially between date-specific topics, without having to search for it.
#2: Develop a Social Media Approval Process
Content approval should be a big part of your social media marketing workflow.
Want to post about a rising VIP on Twitter? Interviewing your CEO for a “meet and greet” on Facebook? Get it approved.
Even if you're the department head, there will be situations where you should get your content approved, especially when people outside the company are involved or when HR might take an issue with your post.
If you use Agorapulse to schedule your content, as discussed below, you can send your post for approval to any team member with access to your Agorapulse account. The post won't officially be scheduled until it passes through the approval process. Agorapulse offers a free 14-day trial (with optional 14-day free-trial extension) so you can give it a test run before you subscribe. Plans start at $99/month.
When you create a social media post in Agorapulse, you can submit it for review at the same time. When you get to the scheduling screen, instead of clicking the Schedule button, click Send for Approval and select the Agorapulse user who needs to approve it.
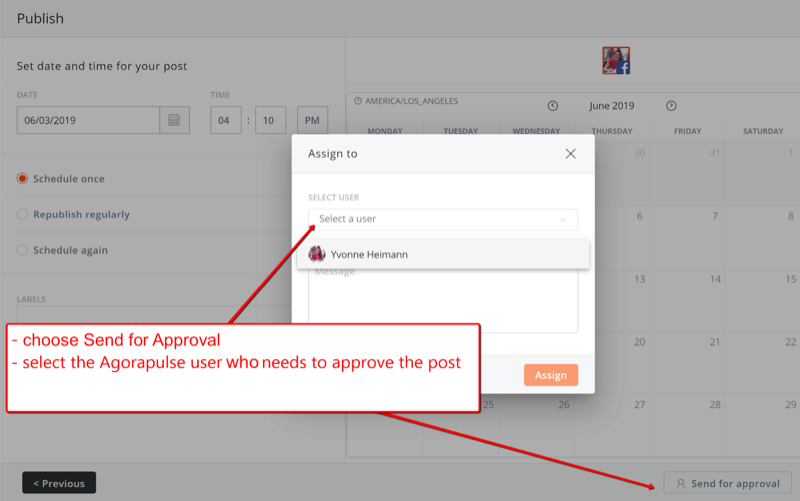
You can also submit any scheduled or queued posts for approval. Simply go into your calendar, open the queued post, and click Send for Approval.
Pro Tip: If a post still needs tweaking, send it for approval to yourself and then approve it once it's complete. The color-coding on the calendar will signal that something still needs to be done and you won't accidentally publish a half-finished post.
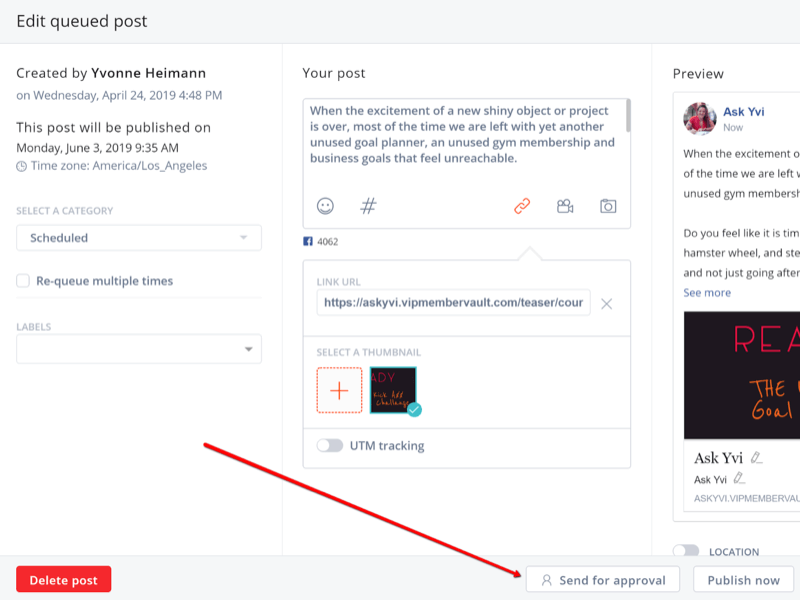
You also can get approval outside of your scheduling tool by emailing the other party or letting them sign off in your Airtable spreadsheet. Of course, this process isn't as streamlined as having the feature directly in your publishing tool, but it's definitely doable.
#3: Schedule Your Social Media Posts
As much as we love social media, everyone has a life so there's no question that scheduling software is a must.

Discover Proven Marketing Strategies and Tips
Want to go even deeper with your marketing? Check out the Social Media Marketing Podcast! Publishing weekly since 2012, the Social Media Marketing Podcast helps you navigate the constantly changing marketing jungle, with expert interviews from marketing pros.
But don’t let the name fool you. This show is about a lot more than just social media marketing. With over 600 episodes and millions of downloads each year, this show has been a trusted source for marketers for well over a decade.
To make the scheduling process as efficient as possible, ensure that the tool of your choice has a fully established workflow. It should be able to handle content creation, team involvement, approval processes, and reporting. You don't want to be jumping from one tool to another, wasting precious time that you could have been spending celebrating hitting your latest engagement milestone.
There are free schedulers out there but they typically only support one platform, offer no reporting, or require a paid upgrade to access important features. I promise you, though, the investment in a paid tool is worth it and will pay off in all the time you'll save.
Many of these programs have similar features so we'll use Agorapulse as an example. Having a tool that can handle content queues, repeat publishing, and regular scheduling will allow you to mix content seamlessly.
Set Up Content Queues
Before getting into setting up content queues, let's look at what they are and why they're such an advantage for your scheduling. Content queues are categories of posts such as:
- Blog posts
- YouTube videos
- Appearances
- Industry knowledge and shares
- Products
Setting up category queues and regularly filling them with fresh content allows you to have a constant stream of posts and content for your social media profiles.
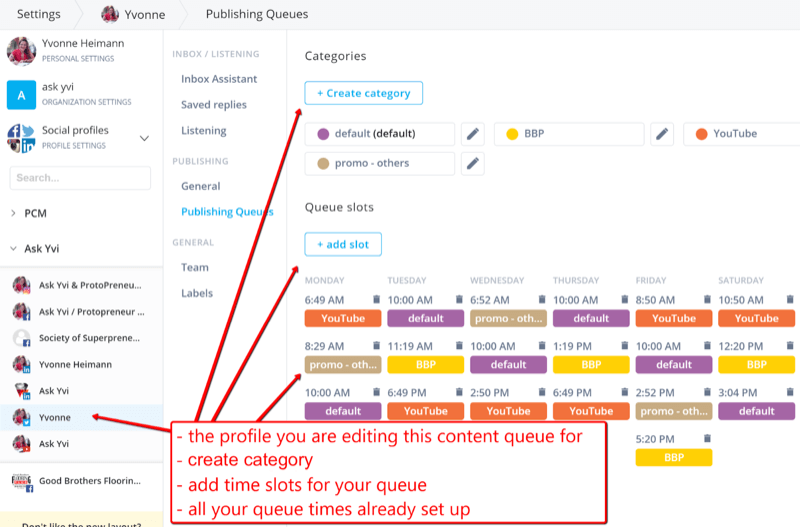
To set up content queues in Agorapulse, first choose the social media profile for which you want to set up scheduling queues. Then click on Publishing Lists in the left toolbar.
Next, open the Queued tab at the top of the page and click on the gear icon next to Categories.
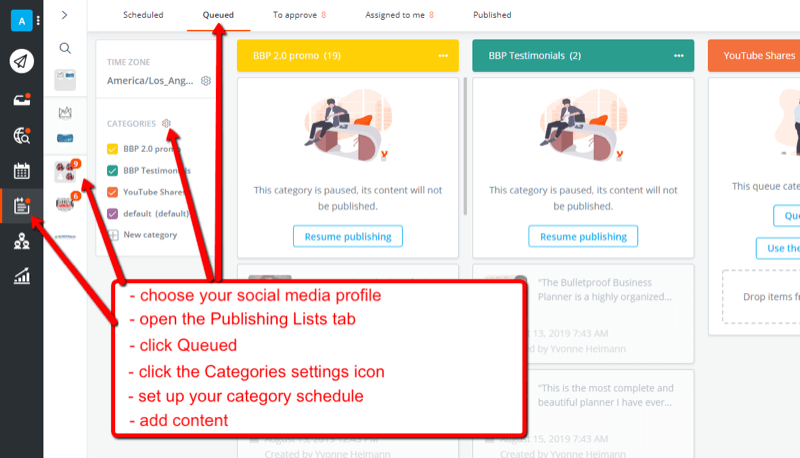
In the Settings pop-up window, click Publishing Queues. Then click Create Category and set up the categories you want to use.
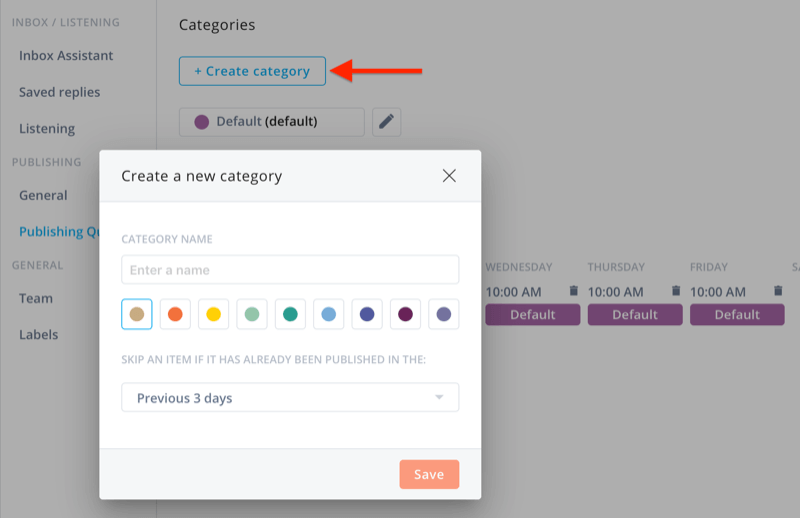
Next, click Add Slot and set up your queue time slots.
As an example, here are some of the categories and queue slots that I've set up.
Add Content to Your Queues
Once you've created your queue slots, start filling them with content.
You can maximize your efforts by creating content that doesn't have an expiration date such as:
- Industry studies
- Case studies
- Blog posts
- Customer reviews
- How-to videos on your YouTube channel
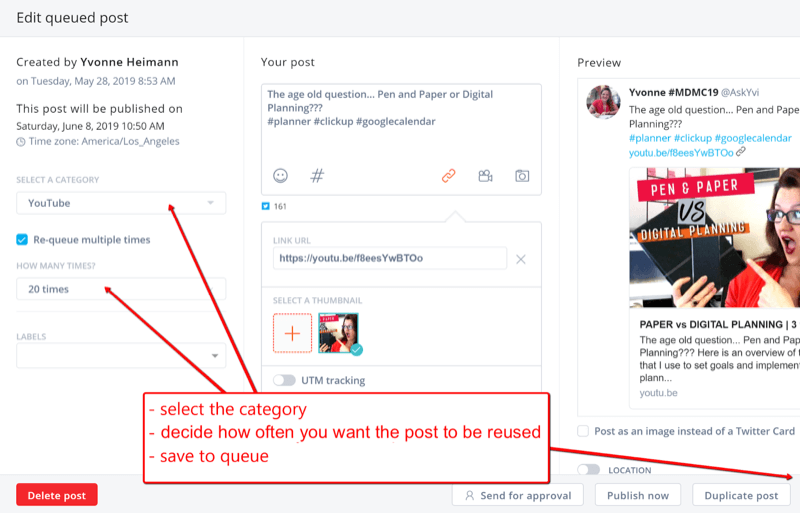
When you add evergreen content to your category queues in Agorapulse, schedule it to repeat multiple times to maximize its use. But pay close attention to how often the same post repeats on which platform.
To illustrate, a tweet can repeat daily if you typically post 10+ times a day on Twitter. The same post on Facebook should be repeated only once a month if you post once or twice a day on the platform.
Schedule Timely Content Manually
If you have timely, precisely targeted content, manually schedule it through the regular scheduling feature to ensure your posts make it into your followers' feeds in time.
This time-sensitive content could include:
- Holiday sales
- Upcoming events
- Product releases
- Giveaways
Batch-Upload Your Social Media Posts
Batch-uploading your social media posts is a huge timesaver. Rather than scheduling your posts one at a time, upload a month (or more) of content at a time.
The Airtable form I linked to earlier is designed to easily upload all of your posts into Agorapulse (or other schedulers) via a CSV file.
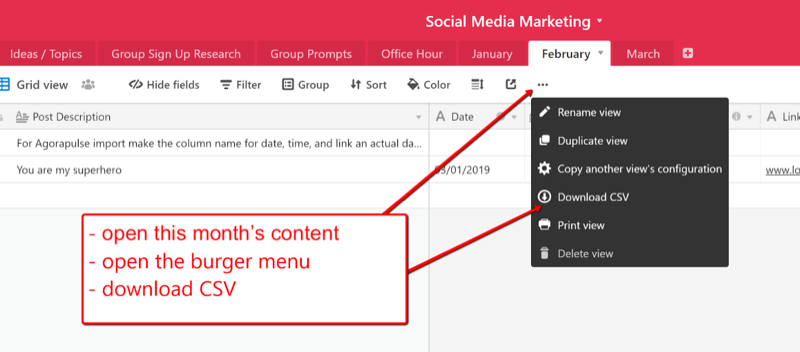
Once you have your content ready in Airtable, open the month you'd like to schedule. Then click the three-dot icon and choose Download CSV from the drop-down menu.
Now in Agorapulse, choose the account you want to schedule to and click the Publishing Calendar tab.
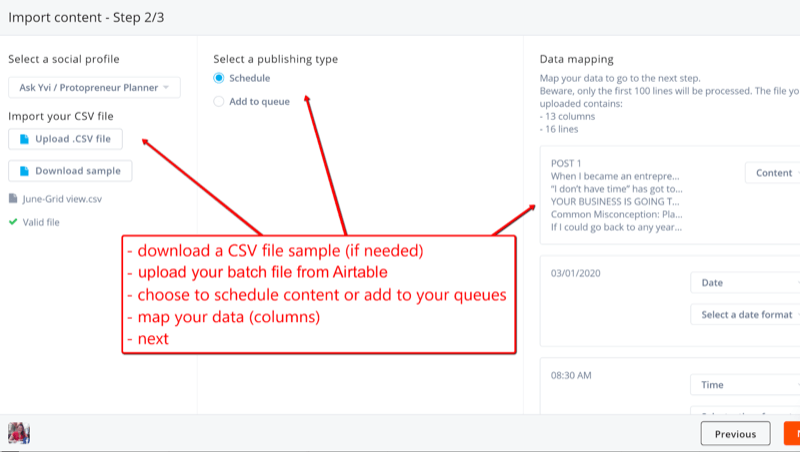
At the top right of the screen, click Publish and select Bulk Publishing from the drop-down menu. Then choose the option to import your posts from a CSV file and upload your file.
Once your CSV file is uploaded, map your content fields to tell Agorapulse what type of information is in each column of your file. This will ensure everything imports smoothly from the CSV file into Agorapulse.
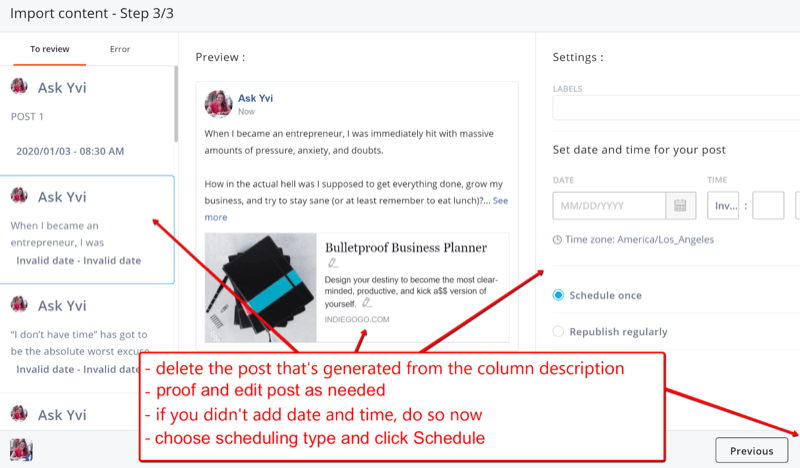
Now edit each of the posts as needed. If you didn't add a date and time, do so now. Finally, choose the scheduling type and click Schedule.
Pro Tip: Agorapulse is currently missing the Send for Approval feature when uploading in bulk, which can cause some confusion with approved posts. To work around this, I recommend following these steps:
- Add a queue called Send for Approval.
- Don't add any time for this queue.
- Bulk upload posts into the Send for Approval queue rather then its final queue.
- Edit and finalize your posts.
- Change Select a Category to the desired queue.
- Send for approval.
#4: Run Regular Social Media Reports to Analyze and Adjust Your Strategic Execution
Don't underestimate the impact of a good analytics report. A professional report allows you to see important content metrics such as which posts reached or surpassed your targeted results. This information helps you determine where you should double-down to get even more reach and where you need to change things for better results.
A monthly report isn't just for your higher-ups—it's also for you!
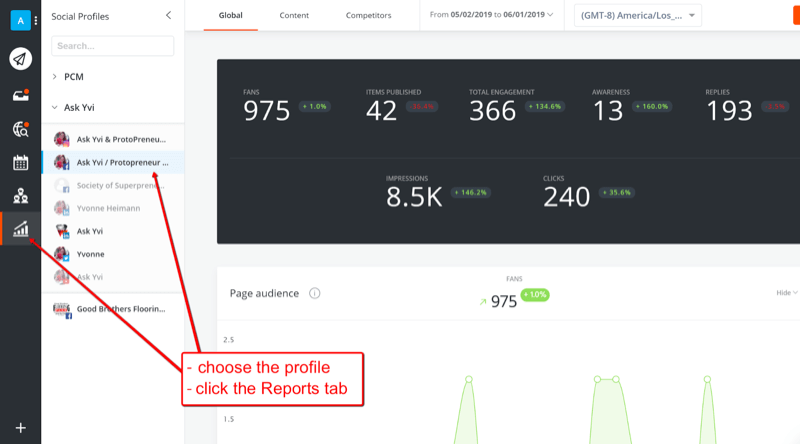
To access your reports in Agorapulse, click the Reports tab and select your profile.
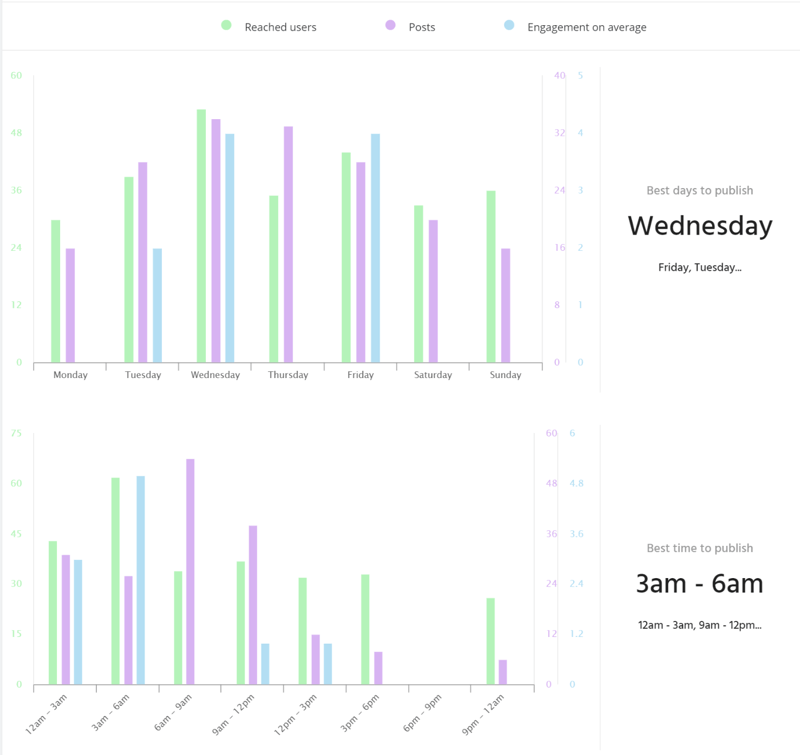
Agorapulse will help you discover when your followers are active and how you can adjust your posting schedule to reach them when they're online.
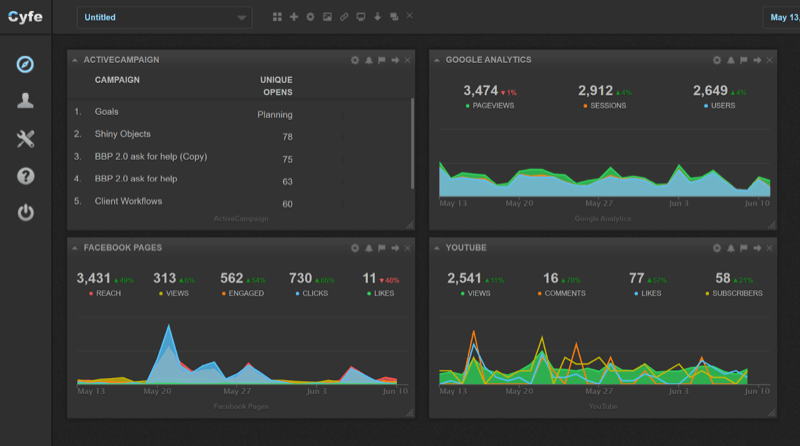
Maybe you want to go beyond just social media reporting. To visualize this, you might want to show how your content impacted website traffic or how your cross-promotion from Instagram to Facebook exceeded your estimates.
This is where dashboards like Cyfe (free and paid plans, starting at $29/month) and Google Data Studio (free) can come in handy.
Conclusion
Having a streamlined process for your social media marketing workflow will help you work more efficiently with a team, all while protecting you from publishing content that shouldn't be public knowledge or against company policy.
What do you think? Will you try this workflow for managing, approving, and publishing your social media content? Share your thoughts in the comments below.
More articles on social media marketing:
- Learn about 10 metrics worth tracking for your next marketing report.
- Find a step-by-step plan for developing a social media marketing strategy that works.
- Discover three tips for creating a social media policy for your employees.
Attention Agency Owners, Brand Marketers, and Consultants

Introducing the Marketing Agency Show–our newest podcast designed to explore the struggles of agency marketers.
Join show host and agency owner, Brooke Sellas, as she interviews agency marketers and digs deep into their biggest challenges. Explore topics like navigating rough economic times, leveraging AI, service diversification, client acquisition, and much more.
Just pull up your favorite podcast app, search for Marketing Agency Show and start listening. Or click the button below for more information.

