 Do you want to edit your social media images on the go?
Looking for easy-to-use smartphone apps to fine-tune your photos?
In this article, you'll discover seven mobile apps for editing and enhancing your visuals.
#1: Make Your Photos Pop With A Color Story
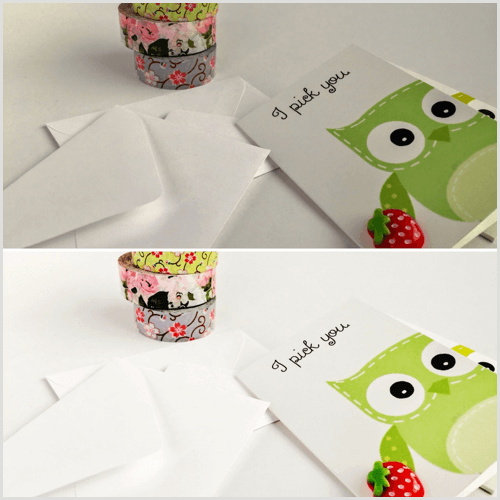
If you're looking for an easy-to-use photo editing app, A Color Story (available free for iOS and Android) has you covered. Choose from the app's large selection of filters to make your photos stand out. This app is especially useful for enhancing product photos, as shown in the example below.
In the free Essentials filter pack, the first four filters (Pop, Everyday, Sharp, and Lite Bright) do a superb job of brightening and whitening dull photos.

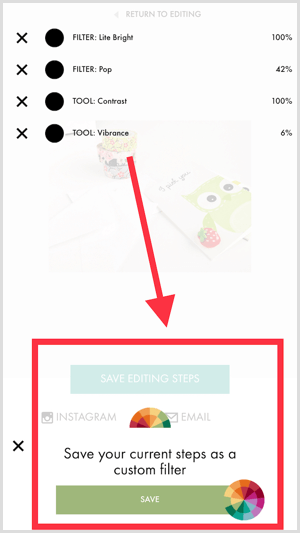
Drag the slider to adjust a filter's intensity. The app lets you apply multiple filters to a photo; just be careful not to lose the details along the way.
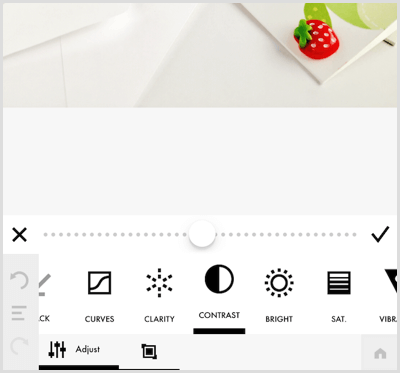
If you want more editing control, tap the wrench icon in the bottom toolbar. Use the Adjust and Crop & Frame options to edit individual aspects of your photo, such as clarity, contrast, brightness, saturation, and exposure.
One standout feature of the app is that it lets you save your editing steps to reuse for future edits, which will save time when batch-editing photos.
Which AI Moves Actually Matter?
That's what every marketer is wrestling with now. New AI strategies, new tools, new takes every week — but no clarity. Most marketers and business owners are trying to figure out AI alone.The AI Business Society is your trusted guide. Get expert-led training you can put to work immediately. Plus a community of marketers sharing what's actually working.
I'M READY FOR REAL AI RESULTSTip: At the time of this writing, you can also edit video clips of up to 1 minute the same way you edit photos.
#2: Edit Specific Areas of Your Images With Snapseed
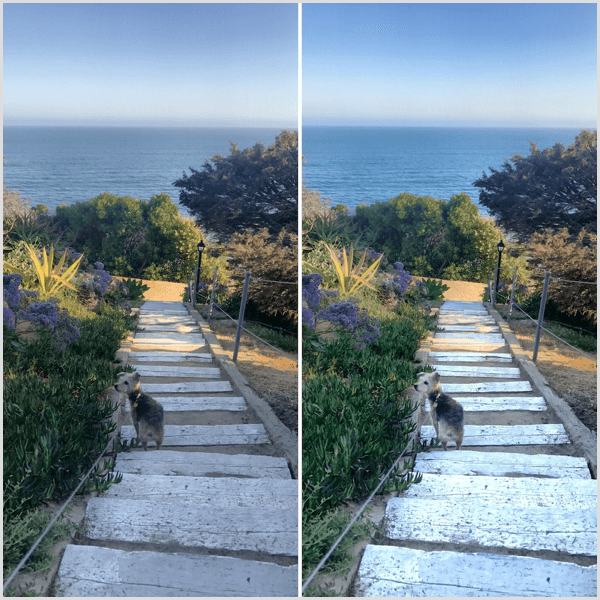
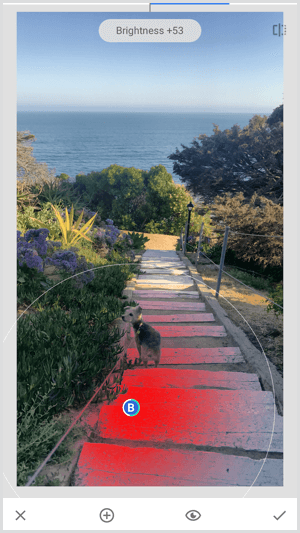
Want to brighten shadows or dark areas in your photo? Try the free Snapseed app (available for iOS and Android). Its Selective feature is exceptional for precise edits of individual areas of a photo. You can see the effect of this tool in these before and after images.
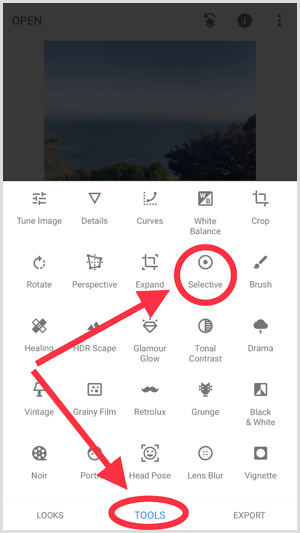
To use the Selective tool, tap Tools at the bottom of the screen and then tap Selective.
Now tap on the area you want to edit. A circle with the letter B will appear. Swipe up or down anywhere on the screen to select one of the four editing options: Brightness, Contrast, Saturation, and Structure. After you choose an option, swipe left or right to adjust the intensity of the edit.
If you want to edit multiple areas at once, tap the + sign at the bottom of the screen and then tap anywhere on the photo to add another adjustment point.
To change the size of the editing area, pinch the screen around the circle inward or outward with your index finger and thumb, as shown below.
#3: Capture Vibrant Outdoor Photos With ProCamera
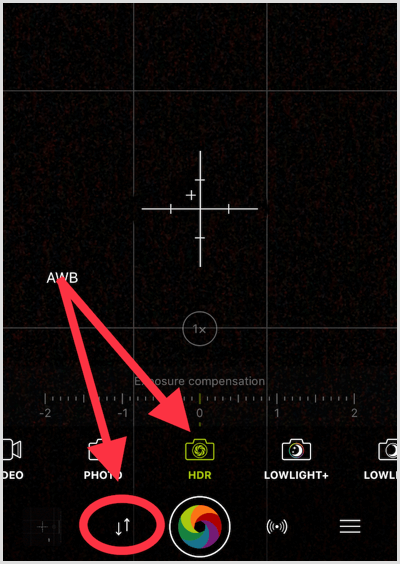
Travel and nature photos make excellent backgrounds for inspirational quotes. If you're outdoors on a sunny day, use the ProCamera app (available for $4.99 for iOS) to take some snaps of the scenery.
The app's HDR tool does a great job of balancing contrasts in light, as you can see in the right image below.

To select the HDR tool before you take a photo, tap the up and down arrows icon to the left of the shutter button.
Then swipe the slider left or right to adjust the exposure. When you tap the shutter button to take the picture, hold your smartphone as still as possible until the app finishes processing your photo. HDR photos will come out blurry if there is any movement from the camera or the objects in the scene.
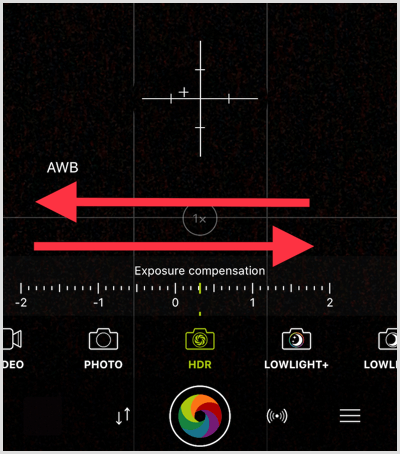
When the processing is complete, you can choose from four different filters: Dramatic, Natural, Vivid, and Black & White.
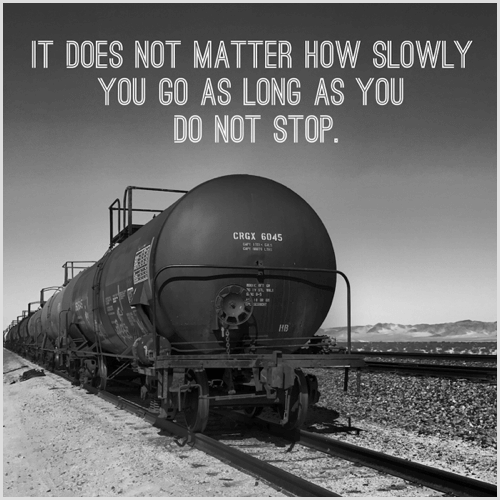
Tip: Use a simple text-on-photo app like Word Swag (available on iOS for $4.99 and Android for $3.99) to layer inspirational quotes on your eye-catching outdoor photos.
#4: Blur Distracting Backgrounds With Pixomatic
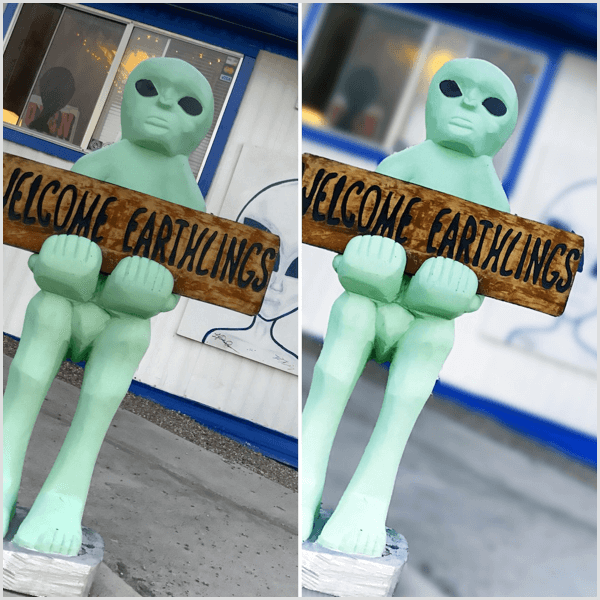
Have a great photo but the background is distracting or messy? Use an app like Pixomatic ($4.99 for iOS, free with in-app purchases for Android) to blur the image's background and give it that coveted DSLR look. The app lets you quickly outline your focal point so you can edit the background.
Blurring the background encourages the viewer to focus on the point of interest in the image.
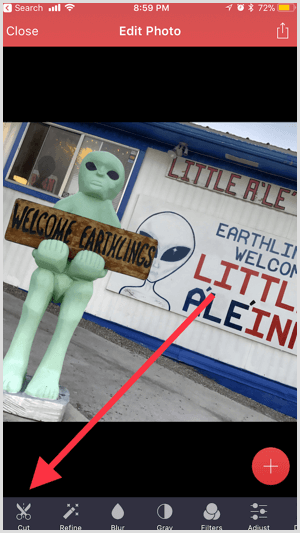
To blur the background of a photo, tap the Cut tool. You can then increase or decrease the size of the brush you'll use to outline your focal point.
3 Days of World-Class Training—Zero Travel!

Couldn't make it to Social Media Marketing World and AI Business World this year? Get all of the great content at a fraction of the price with a Virtual ticket.
That’s full access to recordings of every keynote, workshop, and session—the ones people travel thousands of miles to see. Don't wait. Get your Virtual ticket and enjoy actionable content that you can watch anytime, anywhere.
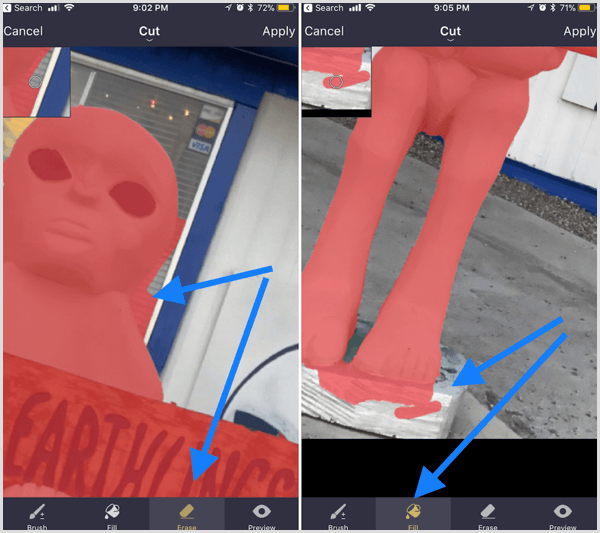
Trace around the focal point with your finger. It's okay to go outside of the focal point's outline if it's not too much; the edge of the focal point needs to be covered.

After the outline of the object is completely closed, tap Next.
If your focal point contrasts well with the background, you may get a clean cut with no need for additional edits. However, sometimes you need to fill in and erase areas around the object, as shown below. This is necessary for creating a blurred effect that looks natural.
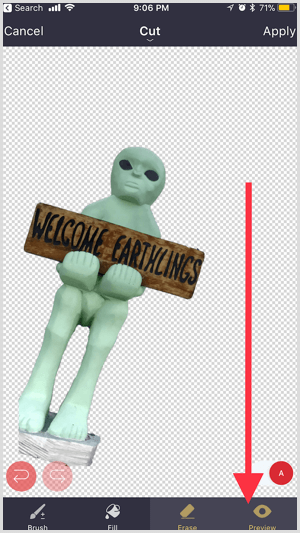
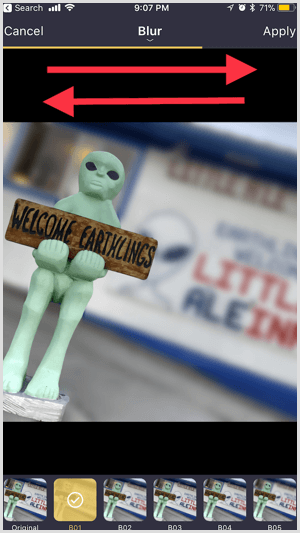
Tap Preview to make sure your cut completely covers the focal point. This isolates the object so you can see if it needs more editing. When you're finished, tap Apply.
Next, tap Blur and choose from a number of filters to blur the background of your image. Swipe the screen left or right to adjust the intensity of the blur.
Tip: When you save your image, also save the cut. The app will save the cut as a PNG file with a transparent background; you can find it in a folder on the search page of the app.
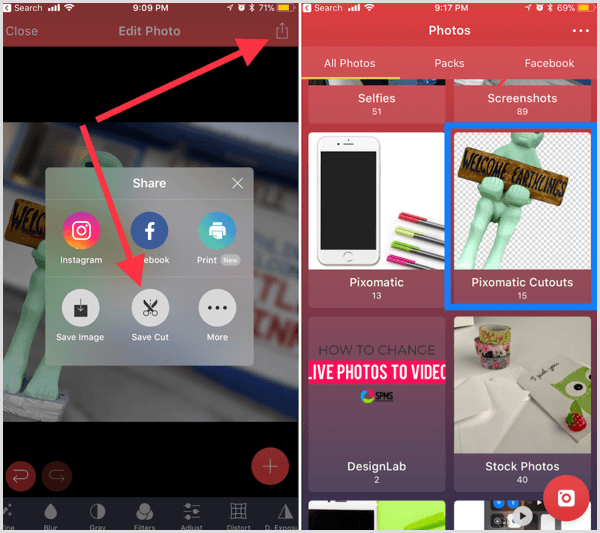
If you download this cut to your camera roll, you can layer it onto future image posts.

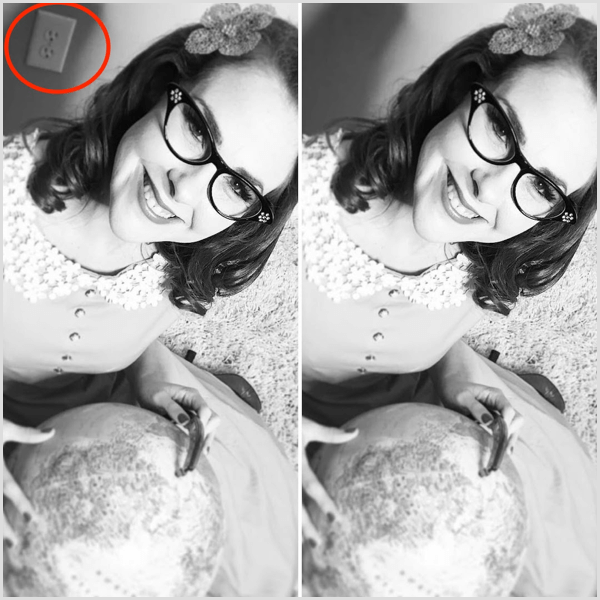
#5: Remove Unwanted Objects With TouchRetouch
How many times have you taken a great photo only to find an unwanted object in the background? Instead of trashing the photo or firing up Photoshop, use TouchRetouch (available for $1.99 for iOS and Android) to remove the object. For example, you might remove a distracting electrical outlet from the background, as shown below.
This video tutorial shows you how to use this app to remove objects cleanly without leaving behind traces of your edits.
Tip: If you're familiar with cloning, this app also provides that capability.
#6: Create Transparent Background Images With Magic Eraser
Want to remove a background completely from your image? Try the Magic Eraser app (available for free for iOS). It's a great way to remove backgrounds from logos and turn them into PNG files with transparent backgrounds.

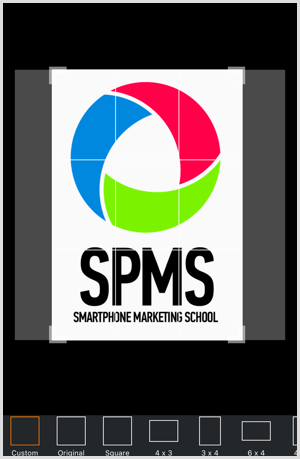
After you import your image into the app, drag the white corner handles to adjust the crop so you can remove excess background you don't want in the final edit. At the bottom of the screen, you can choose from specific aspect ratios. When you're finished, tap Done in the top-right corner.
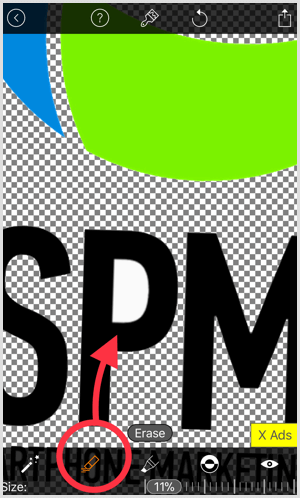
The magic wand icon in the bottom-left corner should already be selected. With this tool active, tap anywhere on the background that you want to remove. If your focal point contrasts well with the background, you'll most likely get a clean cut.
Swipe the slider at the bottom of the screen to adjust the intensity of the background extraction. If you want to undo an edit, tap the Undo icon at the top of the screen.
Tip: Tap the Preview icon in the bottom right to isolate your focal object to make it easier to detect edges you need to edit.
If you want to erase or fill parts of your focal point, use the tools at the bottom of the screen. Pinch with your fingers to zoom in and access more intricate details of the image.
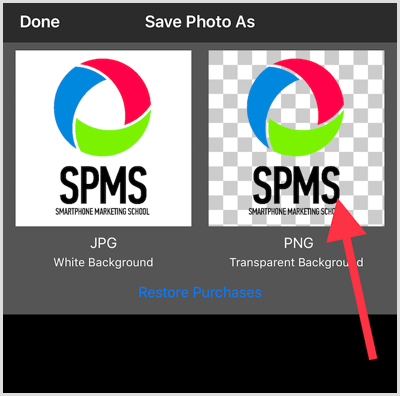
When you're finished making adjustments, tap the download icon at the top right to save your image as a PNG with a transparent background. If you're prompted to choose between low or high resolution, choose high.
#7: Optimize Image Sizes With the Image Size App
Edited smartphone images can be very large. If you post them without reducing their size, they can slow page load times on your website and social channels. To optimize the size of your smartphone photos, try the Image Size app (available for free for iOS and Android).
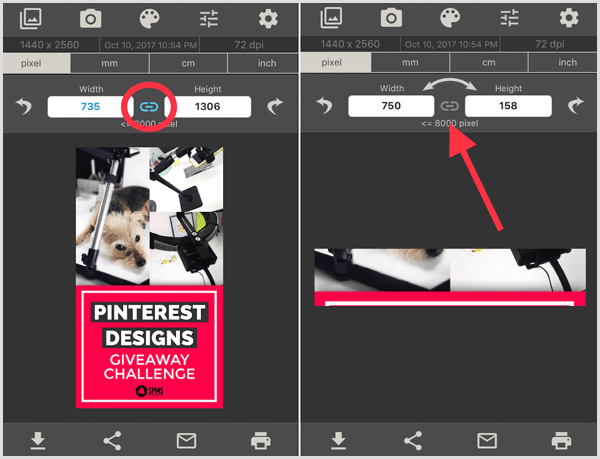
At the top of the screen, choose from four different types of measurement units: pixels, inches, mm, or cm.

After you choose a measurement unit, you can check the top of the screen to see your photo's original size.
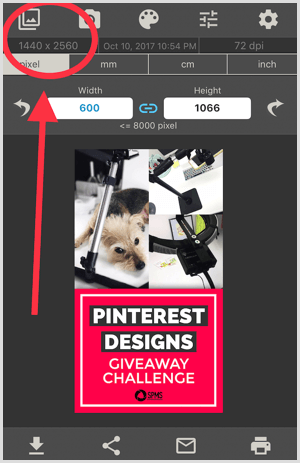
Next, type in the desired width for your image. If you want to use the same proportions as the original image, select the link icon (it's blue when active). If you need to resize your image to irregular dimensions, make sure the link icon is deselected.
Conclusion
As a busy marketer, finding easy ways to edit and produce quality images with your smartphone is a major timesaver. These seven apps provide unique features for enhancing your images on the go.
What do you think? Do you use any of these mobile apps to enhance your social media visuals? What must-have smartphone apps would you add to this list? Share your thoughts in the comments!

Curious About How to Use AI?
Our newest show, AI Explored, might be just what you're looking for. It's for marketers, creators, and entrepreneurs who want to understand how to use AI in their business.
It's hosted by Michael Stelzner and explores this exciting new frontier in easy-to-understand terms.
Pull up your favorite podcast app and search for AI Explored. Or click the button below for more information.
