Want to turn your Twitter followers into email newsletter subscribers? Have you heard of Revue?
In this article, you'll learn how to use Twitter Revue to create email newsletters your followers can subscribe to.
Why Use Twitter Revue for Newsletters?
Twitter has long been used by thought leaders, business owners, brands, authors, and content creators to spark a conversation about what's happening around the world and how it affects their industry. And now, that conversation is about to get deeper. Twitter has acquired Revue to give its members a way to build and share an easy-to-use newsletter—which is poetic since Revue was designed to make sending an email newsletter as “simple and enjoyable as Tweeting.”
The potential benefit of this acquisition is huge, as content creators can continue to share their short-form content on Twitter, leading to their long-form content on Revue, which can then be discussed in short-form back on Twitter—all in a nice, smooth interface. Additionally, Twitter and Revue offer content creators the possibility of being paid for their content.
Twitter's acquisition of Revue brings a lot of unique uses to business owners and content creators who share content with their community on Twitter. Some uses may include:
- Curating articles, podcasts, and video content from various sources easily and sharing in one post to Twitter or another integrated channel
- Content upgrades for multi-author events such as conferences and summits
- Content curation and notes, either paid or unpaid, for creators who host chats on Twitter or Clubhouse to be able to invite guests to continue the conversation
- A new format for delivering gift guides and driving traffic to affiliate offers
- Paid releases of art, books, poems, and other publications from writers and artists looking for a low-cost newsletter
- Fast delivery of an opt-in or another freebie to build your primary email list
So, let's dig into these new Twitter newsletters and how you can integrate them into your social media marketing strategy.
#1: Access and Set Up the Twitter Newsletter Feature With Revue
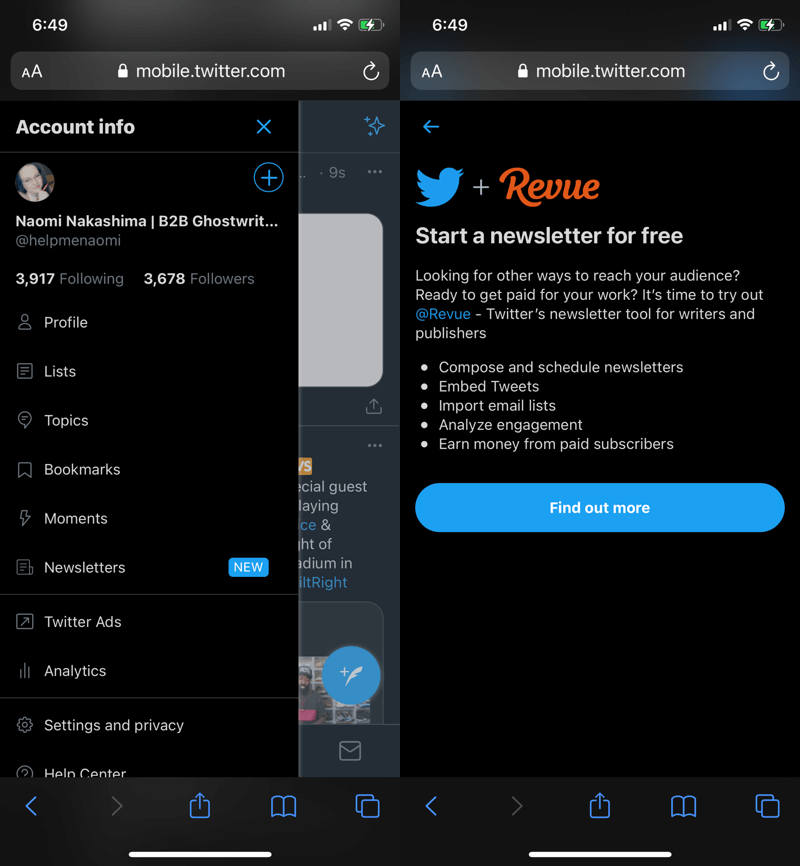
For right now, access to the Twitter Newsletter feature is only available through the web interface, not the apps—although you can reach it either through mobile or desktop. Log into your Twitter account and navigate to your profile menu and you'll see the highlighted entry for Newsletters.
Next, you'll be shown a short pop-up explaining the acquisition of Revue along with a list of some of the main benefits.
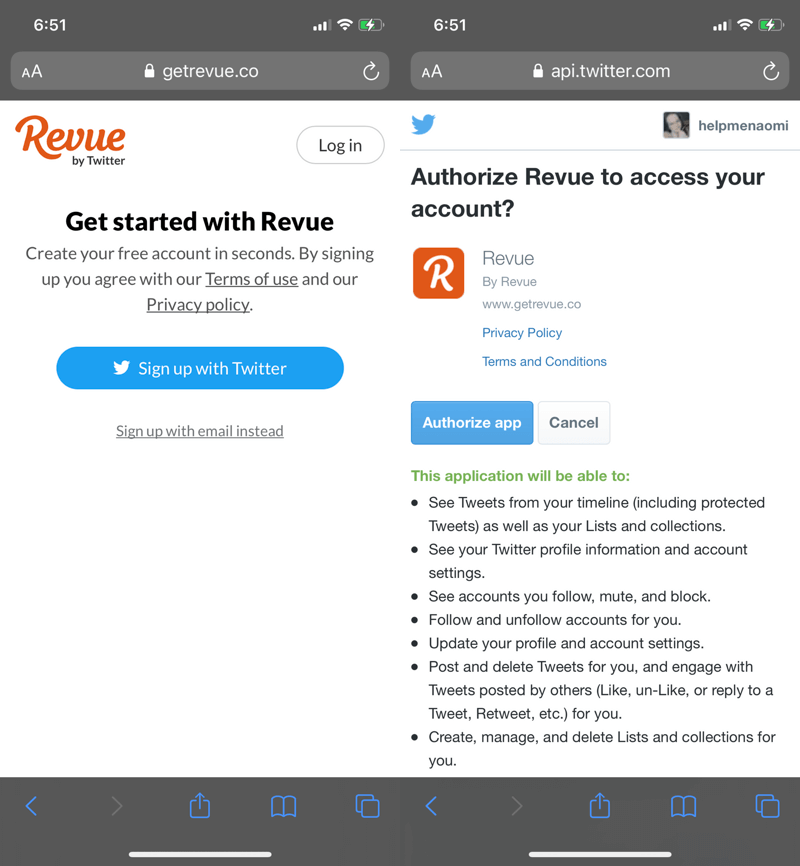
Signing up inside Revue is a fairly straightforward process. Tap on the link to sign up with Twitter, and then authorize the app on the next screen.
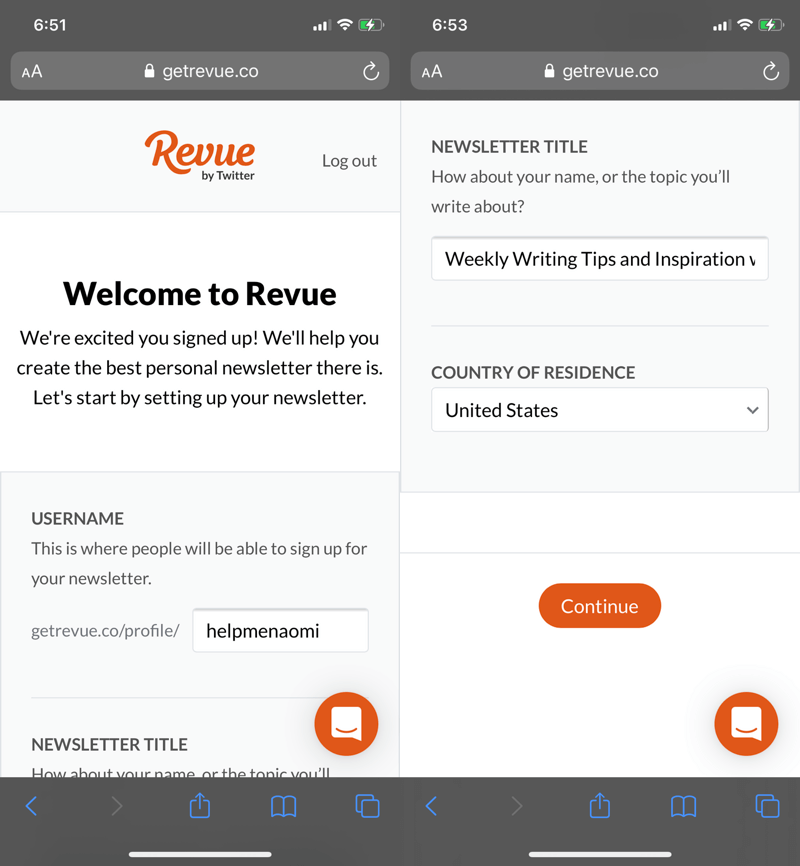
Finally, choose a username, set up your newsletter's title, and you're ready to personalize your newsletter with a few settings in Revue.
Get World-Class Marketing Training — All Year Long!
Are you facing doubt, uncertainty, or overwhelm? The Social Media Marketing Society can help.
Each month, you’ll receive training from trusted marketing experts, covering everything from AI to organic social marketing. When you join, you’ll also get immediate access to:
- A library of 100+ marketing trainings
- A community of like-minded marketers
- Monthly online community meetups
- Relevant news and trends updates
Profile
You can set up your profile, including your reply-to email address, your username, and the URL your profile will appear on.
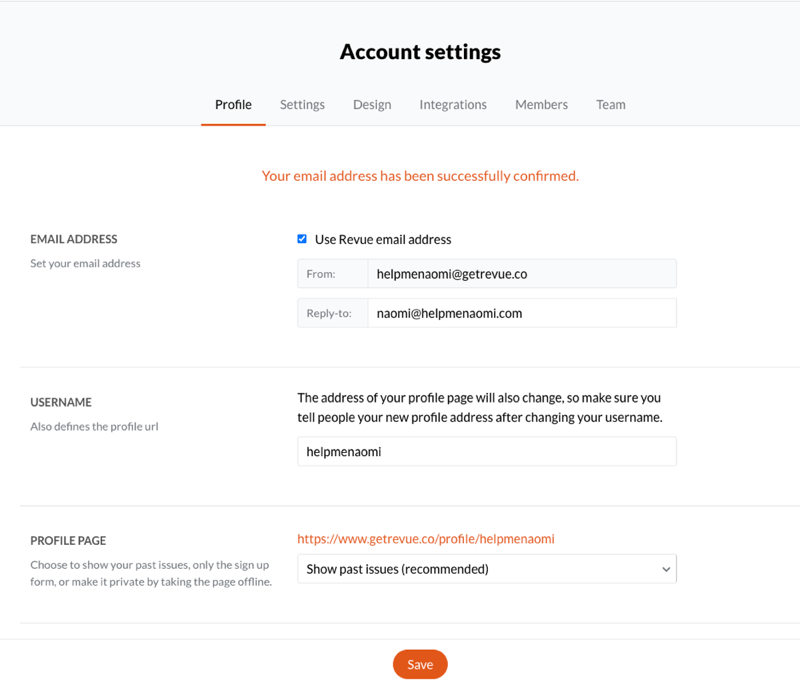
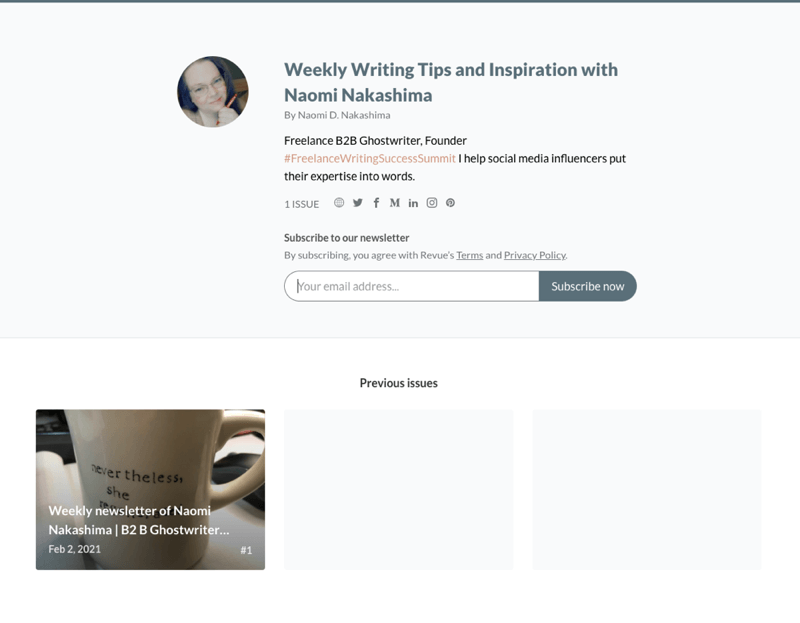
By default, your landing page will show your past issues so potential subscribers can have a peek at the type of content you publish.
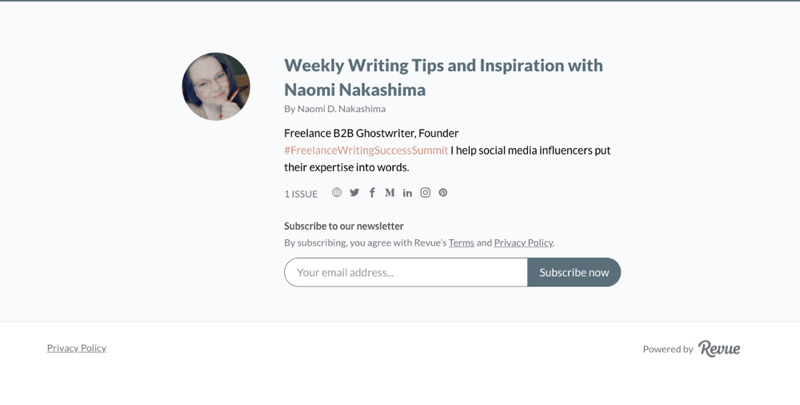
If you'd like to change this, you can do so by clicking on the drop-down menu in your profile and choosing to show only the signup form.

You can also set up your profile photo, title, welcome message, and the mailing address that will appear on your newsletter.
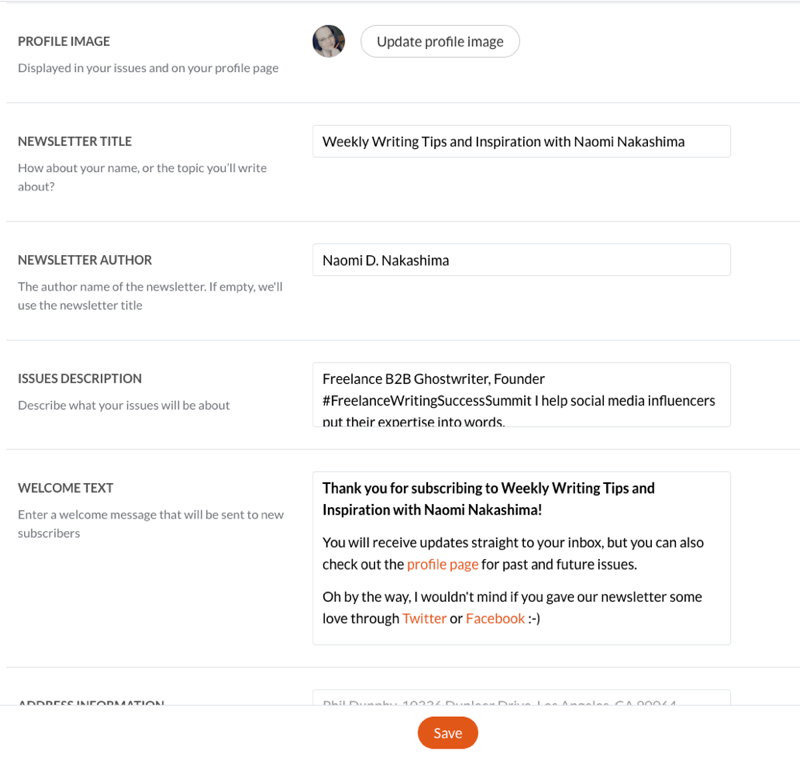
Your welcome message is the only automatic message that gets sent out to your subscribers—there are no other autoresponders or sequences to program. By default, this message will invite them to check out your profile page and follow you on Twitter and Facebook.
Settings
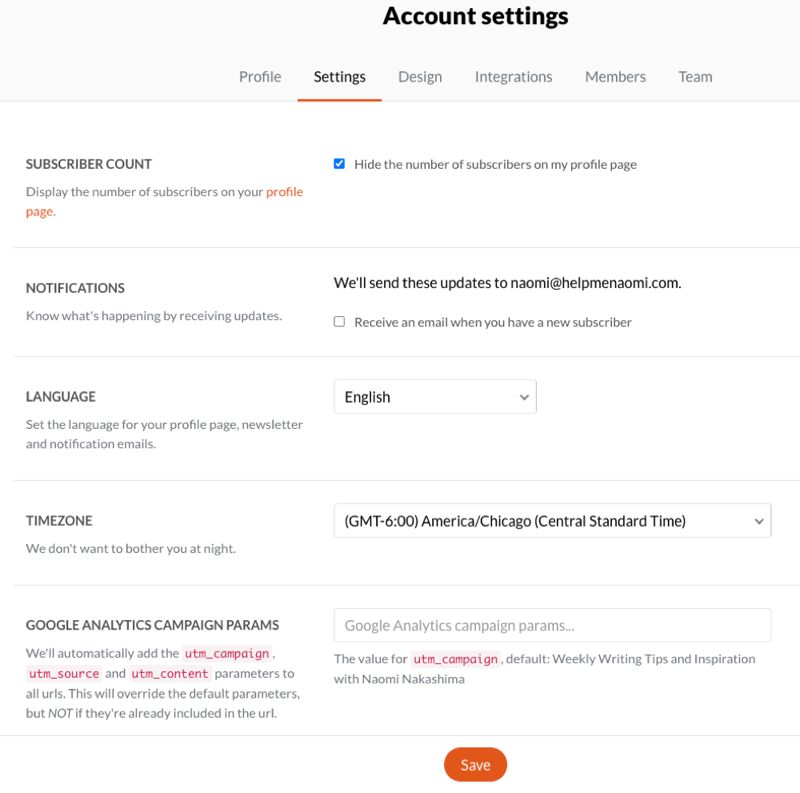
You can set up your notification settings, Google Analytics, and even a custom domain under the Settings tab in your Account Settings.
Design
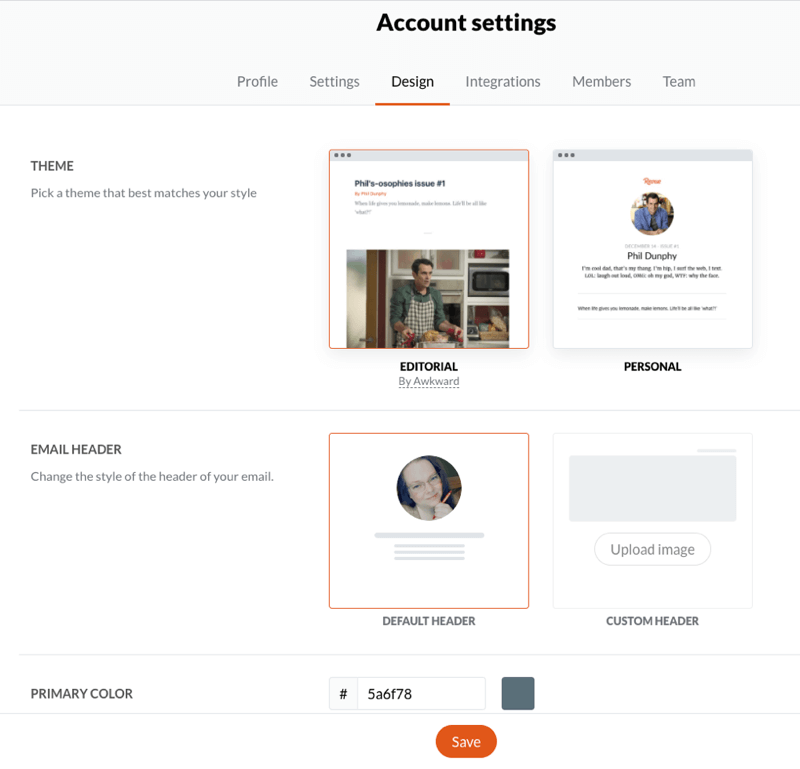
While there isn't a lot of customization available, you can tweak the look of your newsletter and add two custom colors—one primary and one secondary—inside the Design tab.
Members
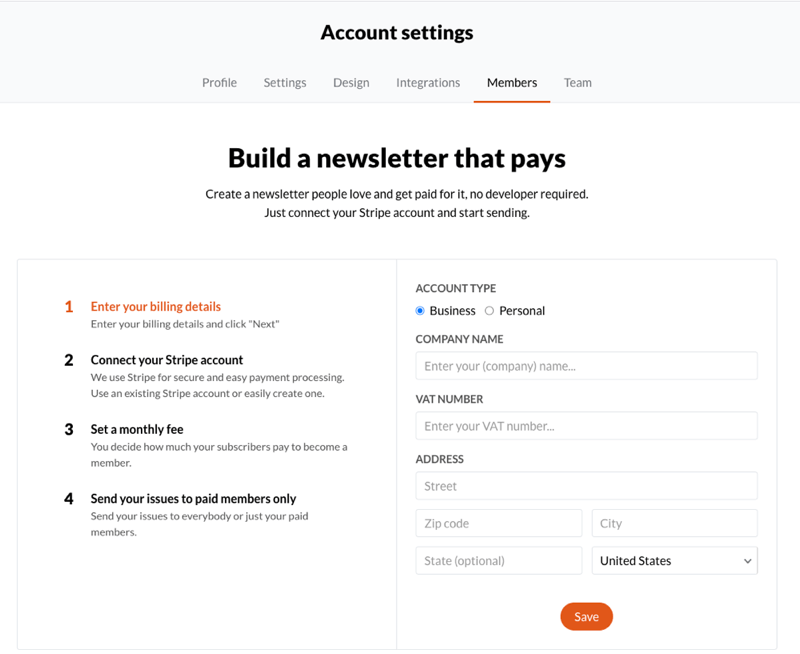
One of the unique aspects of Twitter's acquisition of Revue is the possibility of offering a paid tier of your newsletter. Once you integrate your Revue newsletter with your Stripe account, you can begin hiding some of your issues behind a paywall—choosing to send subscribers to either your full list or keeping them exclusive to your paid list.
Team
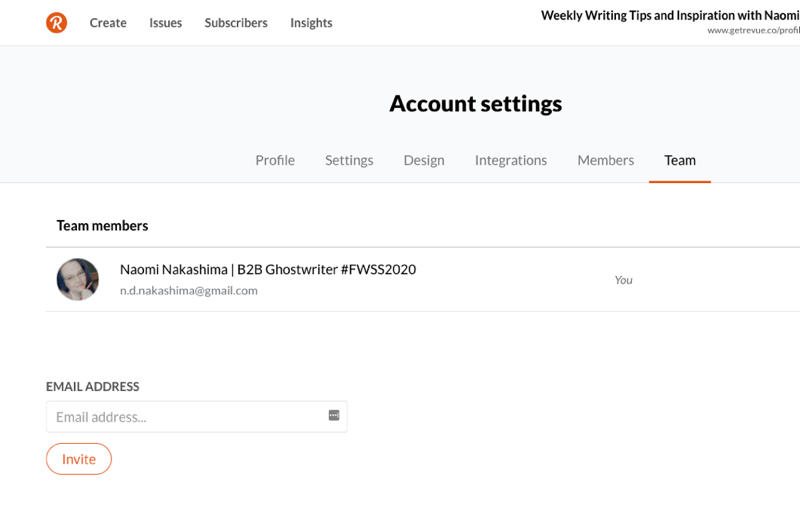
Finally, Revue allows you to invite team members to your account to help you manage your newsletters.
Now it's time to set up your first newsletter.
#2: Create a Twitter Newsletter Draft
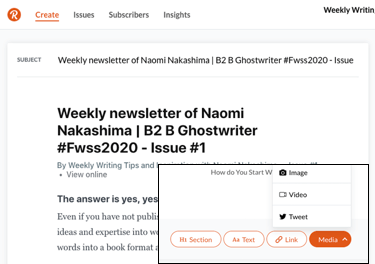
Tap on the Create Issue button to pull up your first draft. The subject of your newsletter will be prefilled with a default “Weekly newsletter of [your Twitter name here] #1”, which you can rename.
Along the bottom of the editor, there's a menu you can use to insert some basic elements of your newsletter such as headings, links, and media.
If you hover your cursor over any media element in your newsletter (or tap on the element if you're on mobile), a small menu comes up that allows you to adjust the formatting. You can also grab onto the crosshairs to drag that element up or down to reorder the elements within your newsletter.
Saving Sections for Future Issues
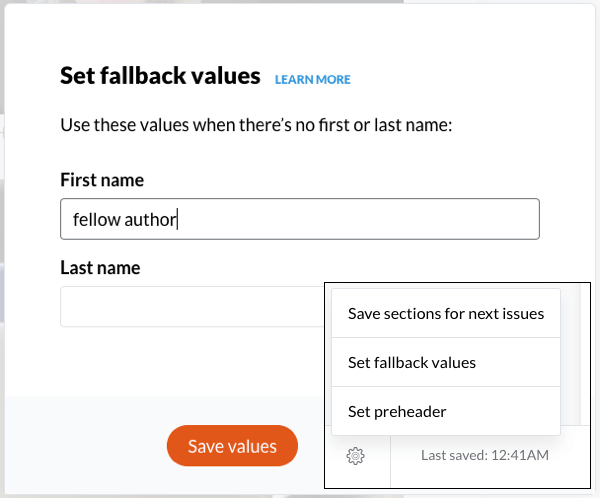
In the Settings menu, you'll see an option to save your sections for future use.
This is especially helpful if you like to divide your newsletters up into sections every week. By saving your sections, the next issue you create will load with the same headings open (the content inside each section is removed under the assumption that you'll be replacing it with updated content).
Email Personalization and Fallback Values
Like most email marketing service providers, Revue allows you to insert personalization by typing in your placeholders. For example, you can type in {{first_name}} wherever you want the subscriber's first name to appear, and type in {{last_name}} wherever you want the subscriber's last name to appear.
Of course, sometimes using personalization can come off as awkward if a subscriber hasn't entered in their first or last name. Having an email come to us that reads “Heya, {{first_name}}!” instead of “Heya, Naomi” is always a bit awkward and a reminder that the email is being sent out to the masses.
To help avoid these mishaps, you can program a fallback value, which will be used in place of any missing value. To set a fallback value, click on the setting icon in the lower left of the editor screen and enter a generic, friendly term that would work in place of a first name.
Setting Up Your Preheader
Next to the subject line, the preheader is one of the most important lines for your email. A preheader is the small (usually 100 characters or fewer) preview text that your subscribers will see before opening your email. It will show up in notifications and in the email app in the inbox.
In cases where you can't customize your preheader, most email service providers simply pull the first several characters out of the email and use that. The problem with these automatic preheaders is that code and disclaimers usually sit at the top of the email, which means your subscriber will be judging whether to open that email based on your subject line along with “Having trouble viewing this email?…”
Not exactly personable and compelling.
Revue allows you to customize your preheader by going to the Settings menu and selecting Set Preheader. Then type in your preheader and save your changes.

Discover Proven Marketing Strategies and Tips
Want to go even deeper with your marketing? Check out the Social Media Marketing Podcast! Publishing weekly since 2012, the Social Media Marketing Podcast helps you navigate the constantly changing marketing jungle, with expert interviews from marketing pros.
But don’t let the name fool you. This show is about a lot more than just social media marketing. With over 600 episodes and millions of downloads each year, this show has been a trusted source for marketers for well over a decade.
Tips for Writing Effective Preheaders
Your subscribers view your preheader at the same time they see your subject so you want to make sure that your preheader plays off of or enforces your subject line. Here are some tips for putting together effective preheaders:
Keep your preheader short and concise. Remember your preheader shares space with your subject line. I mentioned earlier that a preheader is usually fewer than 100 characters, but if you have a long subject line, your preheader might only show 30 characters or even fewer.
Asking a question is a great way to garner some engagement before your subscriber even opens the email. They may want to answer your question or check to see what you pose as the answer to that question. This is especially effective if the question relates directly to something they struggle with.
In lieu of a question, you can choose to include a call to action; something like “open to download your free guide” can work really well.
You can also use your preheader as an extension of the subject line. For example, you can start with the subject line, “How to Build Your Business on Social Media” and follow it up with the preheader, “All you need are two simple tools.” When they work together like this, it sets an expectation for what they'll get once they open the email. It lets them know that the answer to their question is easy, something most people will want to open their emails to find out.
Test your subject line/preheader combo by sending a test email to yourself first. If your preheader is cut off too early, try to see where you can cut out any words or use shorter words to get the same meaning across.
#3: Use Extensions and Integrations to Compose and Enhance Your Twitter Revue Newsletter
As well as adding elements directly into your newsletter through the editor, Revue has several integrations that allow you to add elements from your other channels.
The Chrome Extension Integration
First, you can use the Chrome Revue extension, available through the Chrome Webstore (there's also an extension available for Mozilla Firefox and Microsoft Edge).
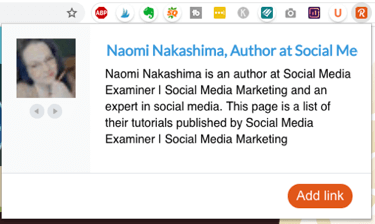
This extension allows you to add elements to your newsletter storage bin to be used in future issues. While on a website you want to save, click on the Revue icon to pull up a preview of the element and then click the Add Link button to save it to your account.
In this example, I'm using an earlier article I wrote that I want to recirculate back to my followers and potentially put in front of some new eyes. This is a good strategy when you want to draw on evergreen or older content that's still relevant.
Here are some other tips for curating content to go into your email using the browser extension:
The content you curate should be from a mix of sources, both you and other authors, that work together to answer your subscribers' needs. There's really no set ratio for other people's content to your own content. A healthy mix of both will help you build your credibility and increase the value you provide to your subscribers.
The content you curate should be from reputable sources you trust sending your subscribers to.
Be sure to add your perspective through comments or quotes on anything you've curated from other authors. This will help give your subscribers some context for why you're sending them each piece of content.
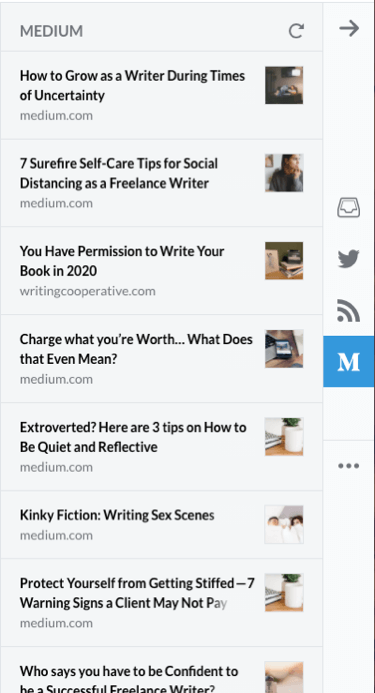
The item you add will appear in your account on the right-hand side of your editor screen in the My Items area.
To add it into your newsletter, you just need to drag it over into the newsletter. A light orange rectangle will highlight an area between any two elements where you can drop this new item.
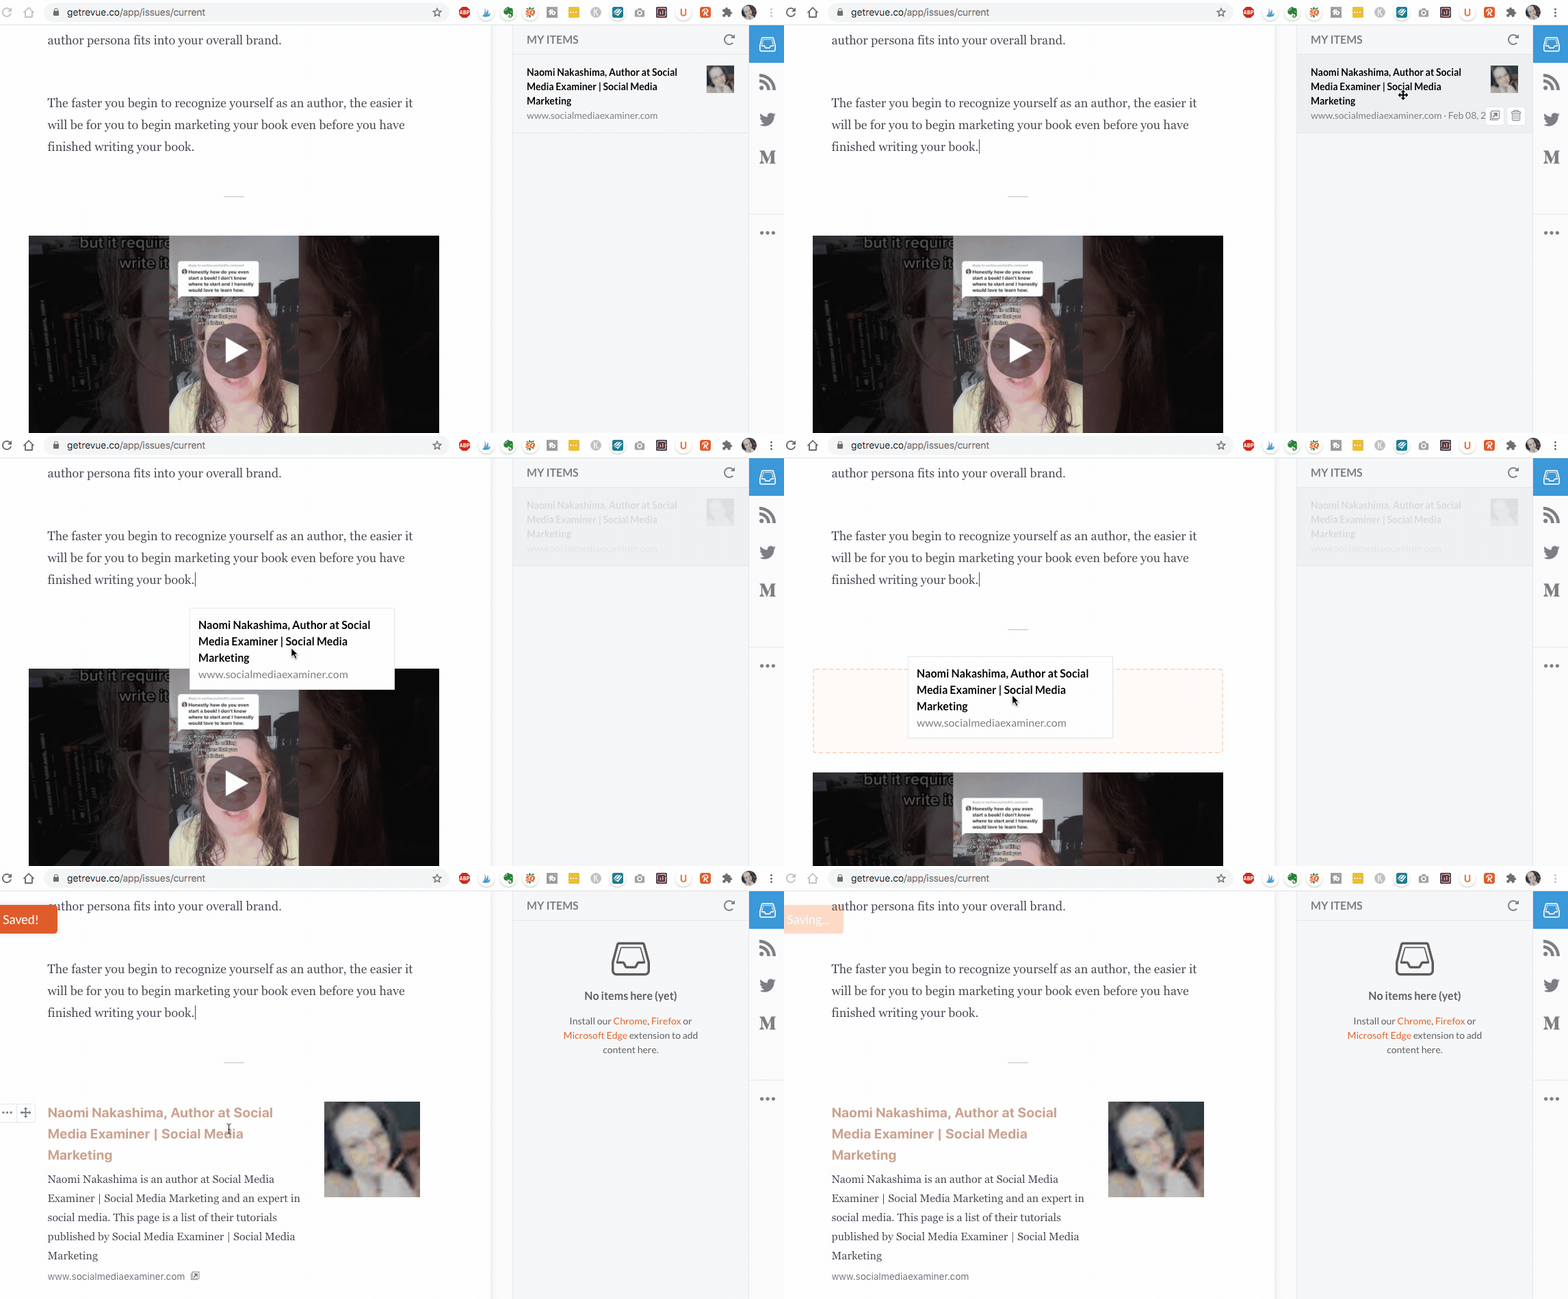
You can also tweak the layout of any element by tapping on the three dots in the upper left of the screen.
Once you add an item to your newsletter, it disappears from the menu on the right side so you only add it once. In fact, if you change your mind and choose to remove an element from your newsletter, it won't reappear in your sidebar. You'll need to navigate back to that article or content and add it via the browser extension for it to be usable again.
This also goes for items pulled in via your feeds. Once you pull in a tweet or a blog post, it disappears from the feed list in your sidebar. There's no way to drag it back over to your sidebar, and removing the item from your newsletter doesn't make it reappear within your feed items. You can navigate back to that feed and use the browser extension to add it back to your custom items, though.
I'd like to see a better way of changing my mind on content, especially from feeds. While it's not all that difficult to go back to my Medium blog or my website and find an article to manually add back into my items, for larger feeds that are updated more often (like Twitter), it can be hard to go back in and find the same tweet to add. And with the current setup, once you say “no” to a piece of content, you can't easily change your mind.
Other Integrations
In addition to the browser extension, Revue has 18 integrations, divided into 11 Sources and 7 Tools available to help you connect your Twitter newsletters to your other services and systems, including your other social channels, your website, Zapier, and Stripe.
When you connect your Revue account to a source such as your Twitter feed, your Facebook page, or your website's RSS feed, items from within those feeds will appear along the right side of your editor automatically. You can then pull any item from any connected source into any newsletter issue.
When you connect your Revue account to a tool, it allows you to share data from your newsletter to another source such as posting your newsletter issue to your LinkedIn profile or sending data to Stripe to offer a paid version. You can also extend your newsletter by adding it to your website or triggering a zap to integrate your data into another tool or system.
Once you've finished adding every element and you're happy with the newsletter, you can schedule or send that issue to your subscribers.
#4: Send or Schedule Your Twitter Revue Newsletter
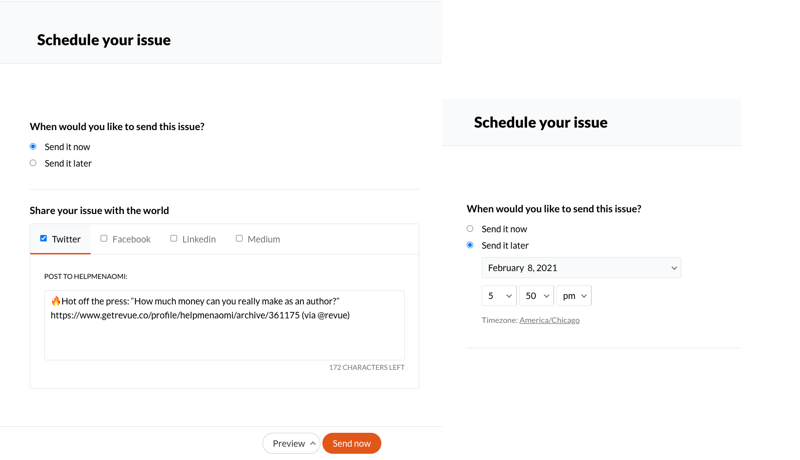
At the bottom right, you can preview, send, save, or schedule your newsletter.
When you choose to publish your newsletter, you'll also have the option to share it publicly to any connected channel, including Twitter, Facebook, LinkedIn, or as a draft to your Medium profile.
You can also choose to schedule your newsletter to post and publish at a future date and time.
When it comes to choosing an ideal publishing time for your newsletters, I would start by studying the analytics of your current email list. Choose the best day and time according to that, and then tweak your schedule as the analytics come out for your Twitter newsletters (covered in more detail a little later). People still use different channels in different ways, so trying to find one perfect day and time that would work on every single channel may prove to be a struggle.
 #5: Twitter Newsletter Analytics
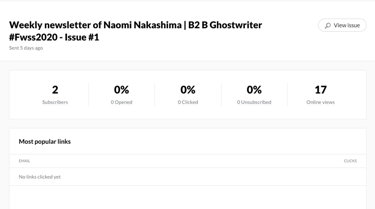
There are two areas where you can view and measure how well your newsletter is performing. First, you can view how each issue is performing by navigating to Issues.
There, you'll see a list of drafts and published issues. When you click on the individual analytics available, Revue shows you a report that includes both email and online insights.
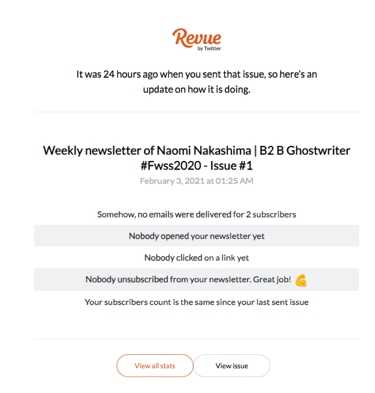 You'll also receive a report on the analytics emailed to you 24 hours after you publish your newsletter.
You can review how your newsletter is performing overall by navigating to the Insights link at the top of the screen. There, you'll see charts for performance, growth, and engagement.
Conclusion
Social media channels are constantly on the hunt for ways to make it easier for people to share their content, build and engage with their community, and earn income on their platforms, preferably while keeping everyone hanging out on that channel.
Because of the lack of autoresponders and other features, I wouldn't suggest using Twitter Newsletters as your main email newsletter service. Additionally, even with tools like Zapier and the integration with Stripe, Revue can't act as a customer relationship management (CRM) tool. There are no multi-email sequences or segmenting beyond paid and unpaid, and there's no option for importing or exporting your subscribers in bulk. However, this tool does grant a unique and easy-to-use method of building an email list and sharing your content with your community. And it has the bonus of helping you build out a new revenue stream.
How about you? Do you have any ideas for using this new feature in your marketing strategy? Let us know what you think in the comments below.
More articles on Email Newsletters:
- Learn to grow your email list with Facebook ads
- Find out how to grow your email list with an evergreen Facebook Messenger promotion.
- Discover how to grow your email list with a high-converting free offer.
Attention Agency Owners, Brand Marketers, and Consultants

Introducing the Marketing Agency Show–our newest podcast designed to explore the struggles of agency marketers.
Join show host and agency owner, Brooke Sellas, as she interviews agency marketers and digs deep into their biggest challenges. Explore topics like navigating rough economic times, leveraging AI, service diversification, client acquisition, and much more.
Just pull up your favorite podcast app, search for Marketing Agency Show and start listening. Or click the button below for more information.

