Did you know that Facebook automatically lets anybody see every video, picture, and status update you've ever posted?
Whether you're using Facebook for business or personal reasons, the good news is that new privacy settings enable you to change exactly who sees what within Facebook. And those changes impact every prior post you've ever made.
New Facebook Privacy Updates
Public outcry over Facebook's complicated privacy settings hit a peak in the spring of 2010. See this AP video below:
Facebook finally responded. Mark Zuckerberg, Facebook's CEO, describes the menu for their groundbreaking new privacy settings as the “Master Switch.” He promises, “we haven't removed anything in this update, we've just added a simple master switch to control all of your content at once.”
In just a few minutes, you can protect all the content you've ever posted, within the Facebook application at least. There's no perfect way to protect every bit of information online except not to post it at all, but in addition to the Master Switch controls, this post reveals Facebook's deepest privacy settings (called granular settings) so you can easily navigate this jungle and take control of your content.
Facebook Privacy Video Tutorial
Watch this video to take control of your Facebook privacy. Then follow the four steps below for added control.
https://www.youtube.com/watch?v=WnjH4n0-shA
Want more protection for your sensitive information?
Here are four more ways you can drill deep into your Facebook privacy settings:
#1: Disable Instant Personalizations
When you “like” or “share” a post anywhere online, Facebook puts it on your wall for you and your friends to see. It also automatically sends this information to outside sites such as Yelp and Pandora, among others. If you'd prefer to remain more private, do this:
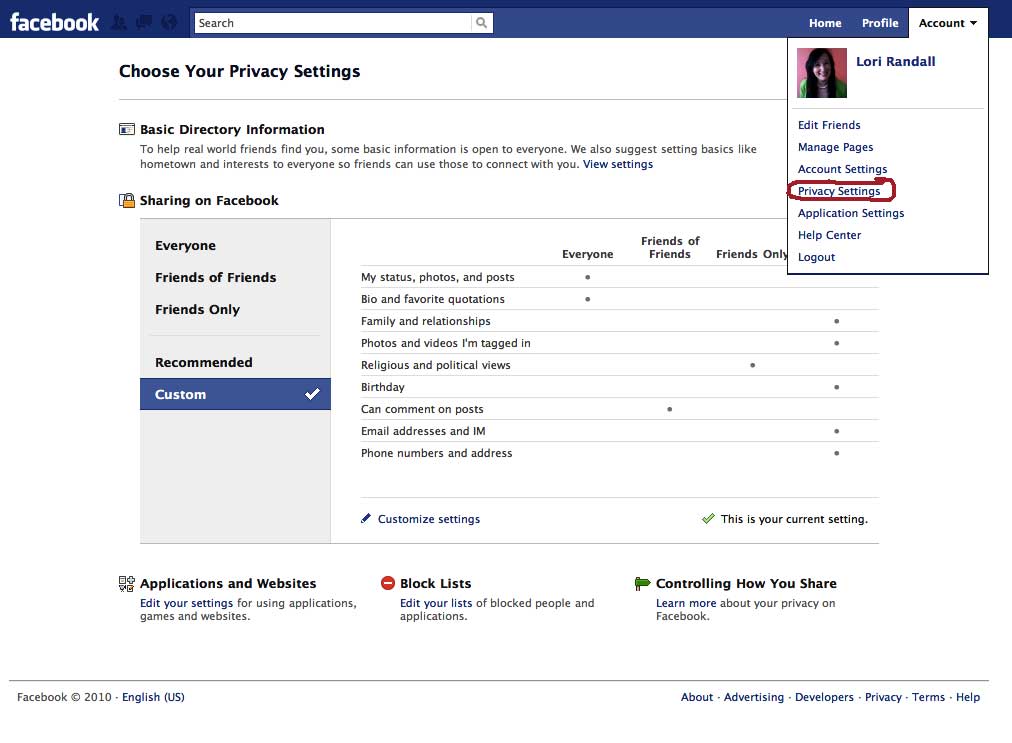
- Go to “Account.”
- Choose “Privacy Settings.”
- Choose “Applications and Websites.”
- Choose “Instant Personalization.”
- Click “Edit Settings.”
- Uncheck “Allow select partners…”
#2: Take a Fresh Look at Your Photos and Videos
I recently interviewed a woman who lost a job because her Facebook profile picture showed a tattoo. Another woman, a school teacher in Georgia, recently lost her job because her profile picture showed her holding a glass of wine. Both people thought their privacy settings were enough protection, but Facebook still indexes pictures so that outside sites can search for them.
What's the solution? Be more selective about your profile picture. And while you're at it, go through all photos and videos of you and untag those that you don't want to share. You can't control which photos or videos your friends post, but you can remove your tag from them! Here's how:
Get World-Class Marketing Training — All Year Long!
Are you facing doubt, uncertainty, or overwhelm? The Social Media Marketing Society can help.
Each month, you’ll receive training from trusted marketing experts, covering everything from AI to organic social marketing. When you join, you’ll also get immediate access to:
- A library of 100+ marketing trainings
- A community of like-minded marketers
- Monthly online community meetups
- Relevant news and trends updates
Go to your profile picture. Just under it, you'll see “View Photos of Me.” Click there and look at each photo. If you want to remove a tag, click “Remove Tag” by your name under the picture.

Repeat this process for videos—the link “View Videos of Me” is just under your profile picture also.
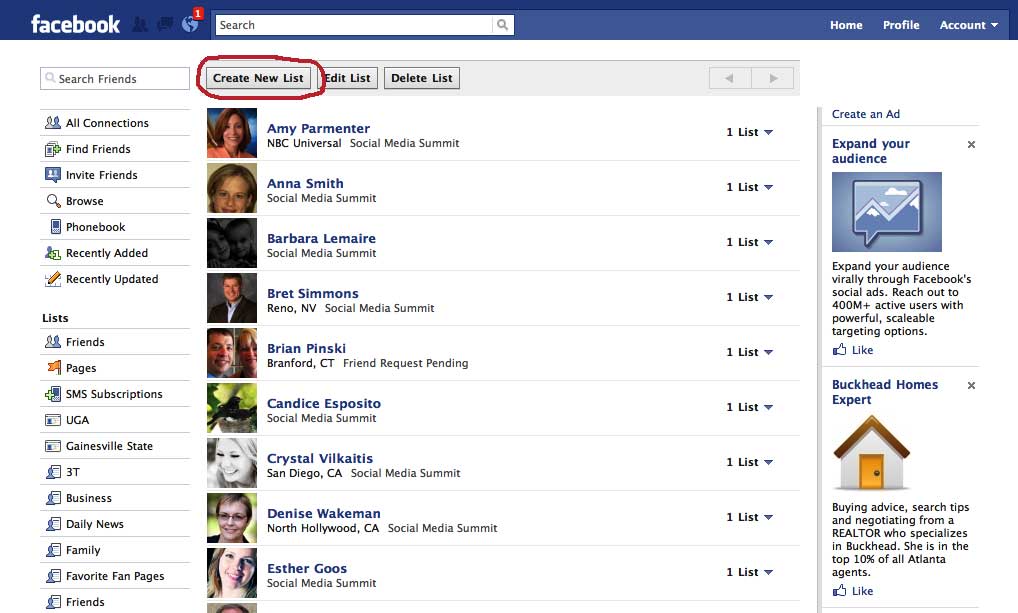
#3: Create Privacy Lists!
Facebook friend lists are one of the most powerful features they offer for communicating privately and with flexibility. Once you've created them, you can easily specify different privacy settings for each list. Only want family to see your child's birthday party pictures? No problem! You can designate only your “Family” list for that photo album and nobody else will be able to see it unless someone copies and pastes the code at the bottom. This is an example:
Discover Proven Marketing Strategies and Tips
Want to go even deeper with your marketing? Check out the Social Media Marketing Podcast! Publishing weekly since 2012, the Social Media Marketing Podcast helps you navigate the constantly changing marketing jungle, with expert interviews from marketing pros.
But don’t let the name fool you. This show is about a lot more than just social media marketing. With over 600 episodes and millions of downloads each year, this show has been a trusted source for marketers for well over a decade.

Here's how to create friend lists:
- Go to “Account” in the upper right-hand corner of your profile.
- Select “Edit Friends.” This will bring up an interactive menu with profile pics of your friends.
- Click on “Create New List” and get started! Many people create lists for family, friends, business, news, sports, and food, for example.
Creating friend lists for yourself will also give you the advantage of privacy in Facebook's newly customized Chat feature.
Unless these settings are customized or turned completely off, anybody can interrupt you while you're logged on and initiate a chat. Rather than ignore it or respond, I suggest going into the options and designating lists to block and lists of who can see when you're logged on and available to chat.
It's good to note here that Facebook never saves chat transcripts. Once a chat has concluded and the window is closed, any record of the chat is deleted. So if you want to have a record of your communications with someone on Facebook, I suggest writing messages instead.
Here's how to customize your chat privacy settings:
- Navigate to the bottom right corner of your profile and click on “Chat.”
- Select “Options” within the chat window that opens up.
- Designate whether you prefer to be “online” or “offline.”
- Select “Friend Lists.” Once there, you can select which lists you prefer to chat with and which you'd prefer to block.
Nice Trick: You can easily change these for when you're at work and when you're at home.
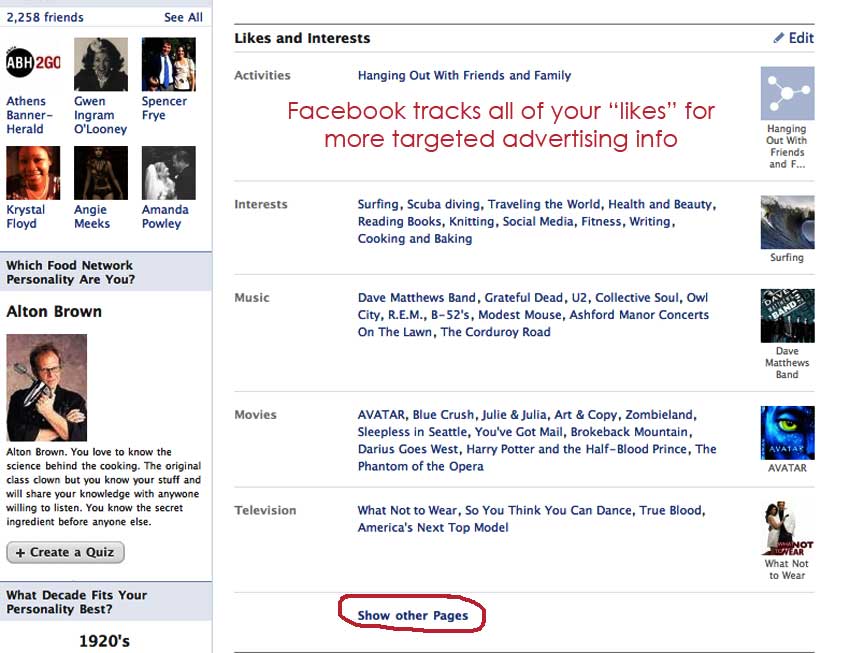
#4: Review the Pages You've Liked
Facebook is paying an increasing amount of attention to Fan and Community pages and is exploring ways to use this information for potential advertisers. They've started indexing this information with your profile for the first time, so now is a good time to review and possibly discard page affiliations that relate to sensitive or controversial subjects.
Here's how you to customize your “liked” pages:
- From your profile, click on your “Info” tab.
- Scroll down to the bottom of the “Pages” section, just above your “Contact Information.”
- Click on “Show Other Pages,” and a list of pages will show up.
- If applicable, click on “Show More Pages” to get a complete list.
(This next part is time-consuming, so I suggest you scan for the most important pages to unlike before you proceed, instead of going down the list of outdated pages.)
- Click on a page you no longer want to identify with.
- Once there, scroll to the bottom left corner and “unlike.”
You're done! Please note that you can only “like” up to 500 pages, so this is just good housekeeping if you plan to use Facebook for any length of time.
Congratulations if you've just worked through this tutorial!
You now have profile settings to be proud of and can share this information with others!
If you only have time for a few mouse clicks, please do yourself a favor and set your Master Switch settings to “Recommended” and you'll be much more protected than ever before, thanks to Facebook's new retroactive feature for privacy settings.
Please share this handy guide with your friends! What better use is there for a Facebook “like” button anyway?
Now you have a clearer understanding of how to navigate Facebook's new privacy settings. The Master Switch is a quick and convenient way to address lots of issues at one time; however, you can protect yourself and your professional branding better by also going into the deeper settings shown here.
So what do YOU think about Facebook's new privacy settings? Do you think this new Master Switch adequately addresses Facebook's privacy issues? Are you happy with your experience and just wish everyone would quit talking about it? Are you excited about using the more hidden settings? Please share your experiences and thoughts in the comments box below!
Attention Agency Owners, Brand Marketers, and Consultants
Introducing the Marketing Agency Show–our newest podcast designed to explore the struggles of agency marketers.
Join show host and agency owner, Brooke Sellas, as she interviews agency marketers and digs deep into their biggest challenges. Explore topics like navigating rough economic times, leveraging AI, service diversification, client acquisition, and much more.
Just pull up your favorite podcast app, search for Marketing Agency Show and start listening. Or click the button below for more information.