 Do you want a consistent look for your social media images?
Looking for tools that are easy to use?
Great-looking graphics are crucial to maintaining a consistent and quality brand image on social media.
In this article, you'll discover how to use three free tools to create the perfect social media images.
#1: Canva
Canva is a well-known and respected free online design tool, so that's where we'll start. While you can buy premium graphics and photos on Canva, the four-step process described in this article doesn't require you to pay anything. Happy days!
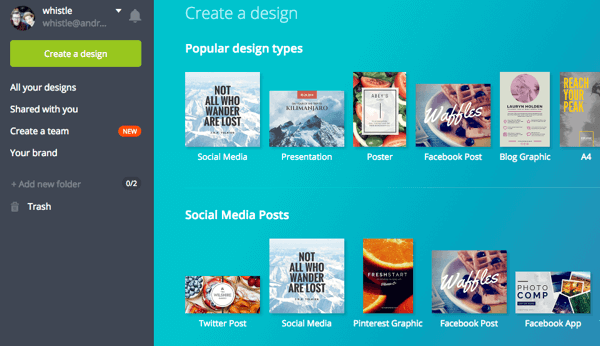
To get started, log in or sign up for Canva and you'll see the view below. Now you need to choose the canvas size (the size/type of graphic you want to make).
If you want to create a graphic for a specific platform, choose the most appropriate canvas. However, if you want a one-size-fits-all solution, select the Social Media option, which is simply 800 x 800 pixels. It will work well on all of the main platforms including Instagram, Facebook, LinkedIn, and Twitter desktop.
Choose a Background Photo
You need a great photo to set the scene. It's nice if the image is relevant, but to be honest, it doesn't matter too much. You just want something that's eye-catching.
You can search for photos on Canva, which will include some free and some premium photos that cost $1. There is, however, a Free Photos section, so look there first.
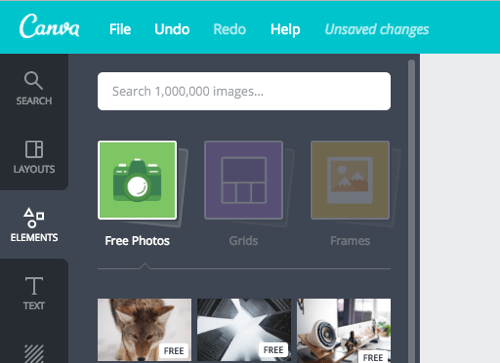
If you can't find any photos you like, some sites for finding good free images (not cheesy stock photos) include Gratisography and Unsplash. The image of the gorilla hands in the example is from Gratisography.
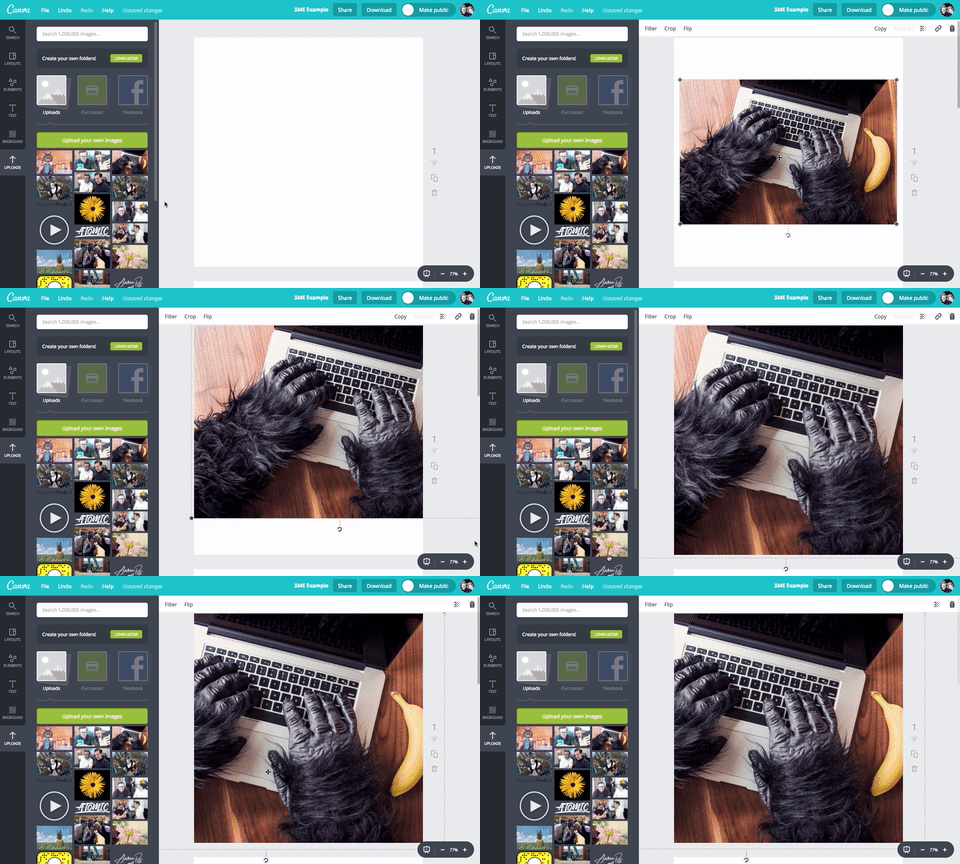
After you choose a photo for your background, either click the Upload Your Own Images button or simply drag your photo from your computer to the browser. Then resize the image by clicking and dragging outward from the corners so that the photo fills up the entire canvas.
Add a Color Overlay
Get World-Class Marketing Training — All Year Long!
Are you facing doubt, uncertainty, or overwhelm? The Social Media Marketing Society can help.
Each month, you’ll receive training from trusted marketing experts, covering everything from AI to organic social marketing. When you join, you’ll also get immediate access to:
- A library of 100+ marketing trainings
- A community of like-minded marketers
- Monthly online community meetups
- Relevant news and trends updates
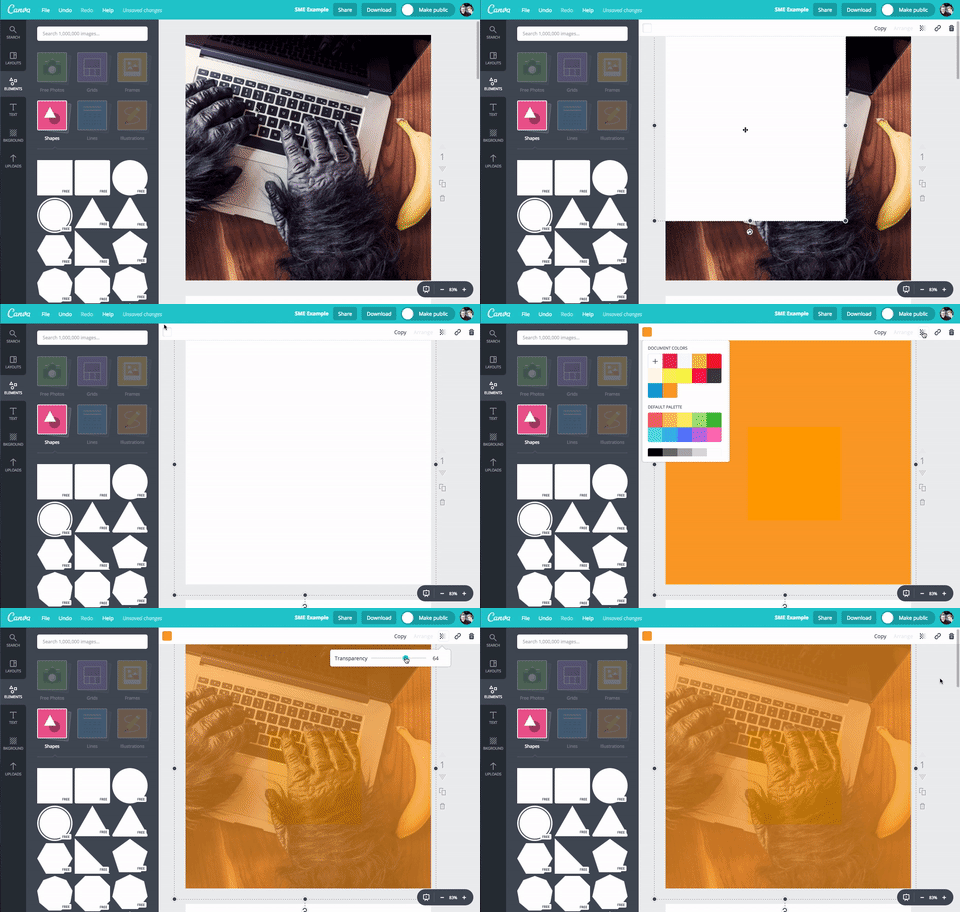
Now that you have your background, you want it to be in your brand colors. You can do that by putting a color overlay on it. It's important you know your brand color hex codes, which are “#” followed by six characters. The hex code for the orange in the example is #ff9900. Ask your designer if you don't know this code or use an online color picker tool to find out.
Next, create a box over the whole canvas, change the color of the box to one of your brand colors, and then turn down the transparency to around 50-70%, depending on the photo and the darkness of your brand color.
Include Text
Use your brand fonts to add text over your photo.
Here's a rule: ALWAYS USE WHITE TEXT.
Unless your brand color is really light (like yellow or cream), white text always looks a million times better on colored backgrounds. If you do have a light brand color, use a really dark gray or brown instead of 100% solid black; this will look much better.
Canva has some nice built-in features for laying out text. Simply click on one of the layouts to add text to the canvas. You'll want to resize the text box and center-align it if needed.
Click and highlight each element of the text box and change the font to your own brand font. Canva lets you use the whole Google Fonts range, which is great. You can upload your own non-Google font, but there's a charge for that.
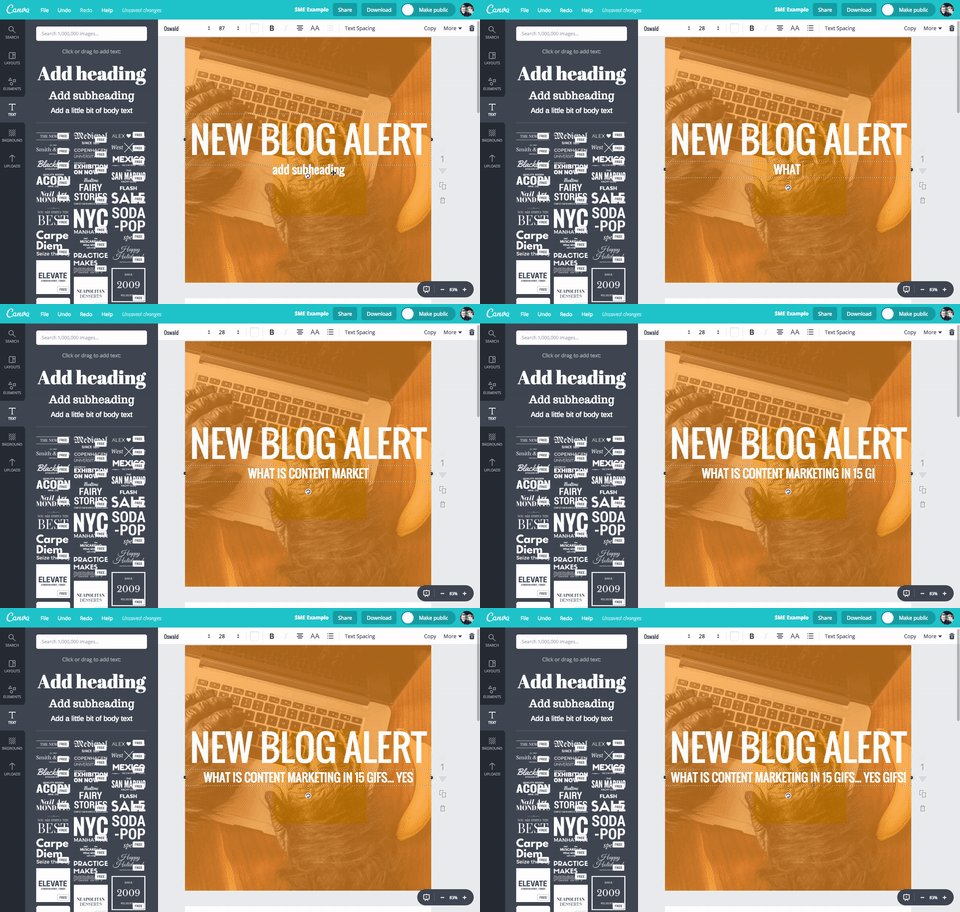
Simply change the text to say what you want and resize if needed. Try not to have too much text; short and punchy text performs much better.
Upload Your Logo
You want your logo in a format that works well on a colored background. If you don't have this, ask your designer. You at least need a PNG file that has a transparent background, or even better, a white version!
To upload your logo, click Uploads on the left and then click the Upload Your Own Images button to choose your file or simply drag it in from your computer.
Add the logo to your design at the bottom under the text, and if you fancy, add your website address using the text feature. And voilà, you're done. It's time to download that beauty!
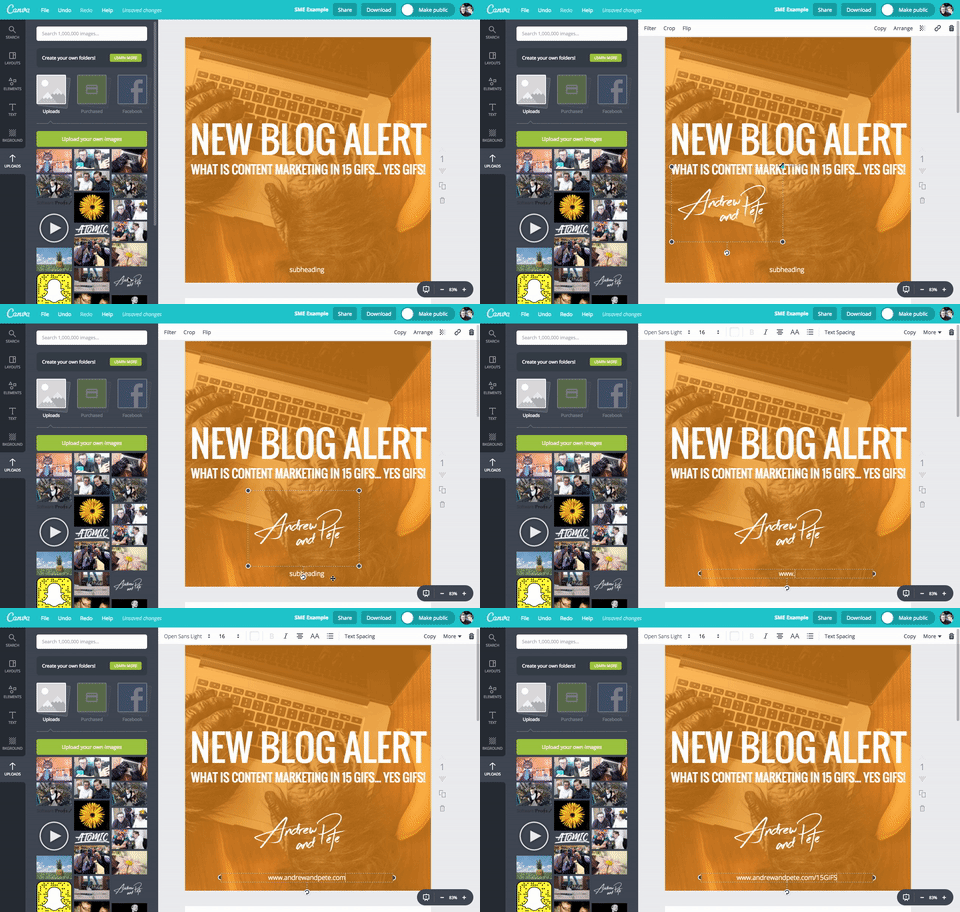
Click on the Download button in the top-right corner to download your image as a PNG, JPEG, or PDF. If you're sharing your image on social media, PNG is best. If the image is for your website (perhaps a blog image), JPEG may be best. Only download in PDF for flyers, brochures, and things you're planning to print.
#2: DesignBold
DesignBold is very similar to Canva, but it has a couple of different features and template styles (making it a nice alternative if you're seeing lots of other people using your favorite Canva template). There's a premium membership for added features, but for this tutorial, you don't need to upgrade. You'll be starting from a blank canvas to create your image.
Log into or sign up for DesignBold and you'll see the view below. Now you'll need to choose the canvas size (the size/type of graphic you want to make).
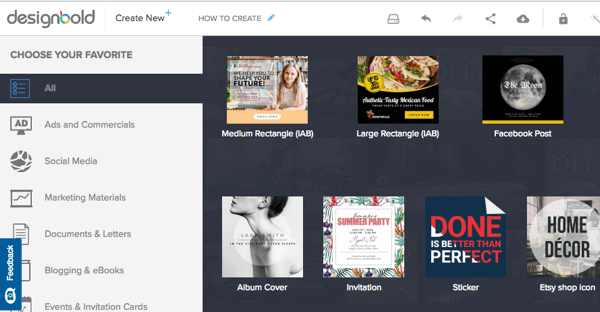
Again, if you want to create a graphic for a specific platform, choose the applicable canvas. Select the Social Media option, which is 800 x 800 pixels, for a one-size-fits-all solution. This works well on all of the main platforms including Facebook, Instagram, LinkedIn, and Twitter desktop.
Choose a Background Photo
To make the graphic more visually appealing, choose a fantastic photo for the background. Bold photography is great for this purpose, so find a stunning photo to set the scene. It's nice if the photo is relevant, but it doesn't matter too much. You just want something that's eye-catching.
You can search for free photos on DesignBold or buy credits for premium photos.
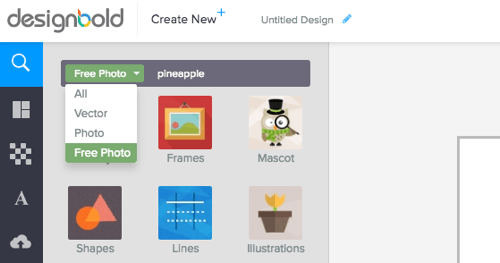
If you don't find any photos you like, you can find good free images at sites like Gratisography and Unsplash. If you want to use your own photos, click the upload icon and then click Upload Your Images.
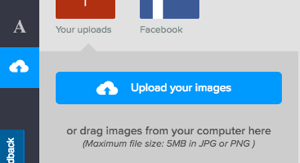
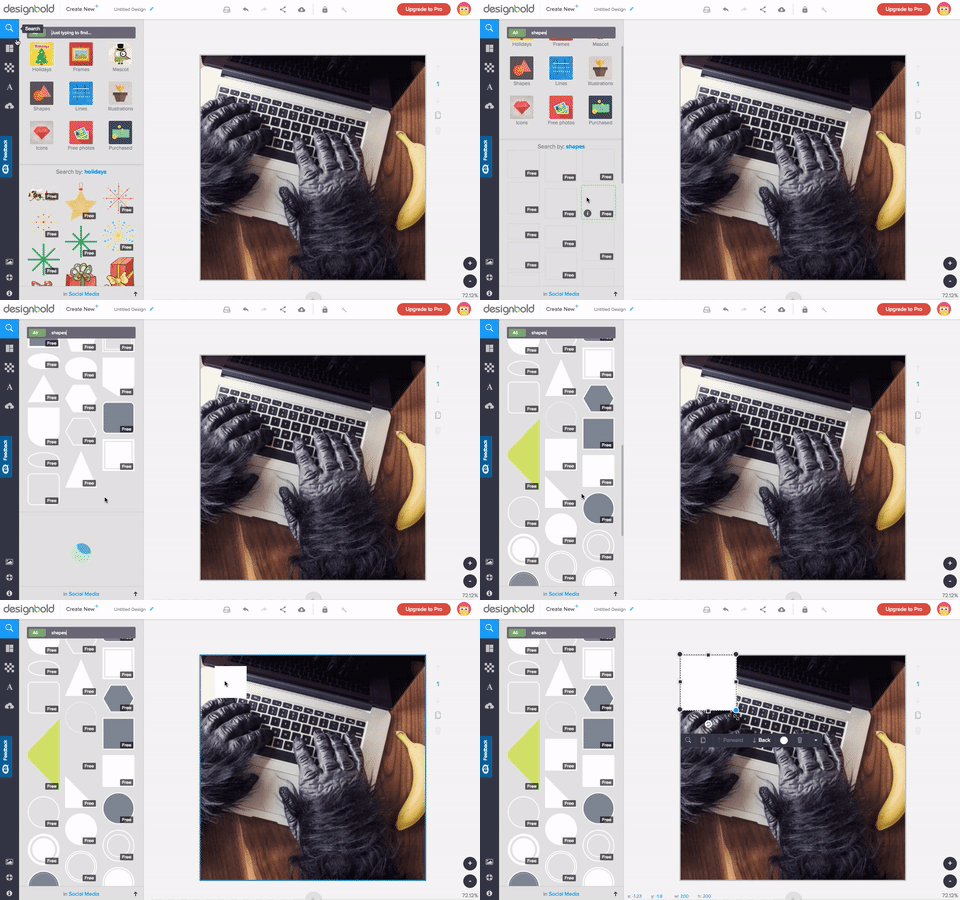
Once you add your photo, click and drag from the corners out so that it takes up the entire canvas.
Add a Color Overlay
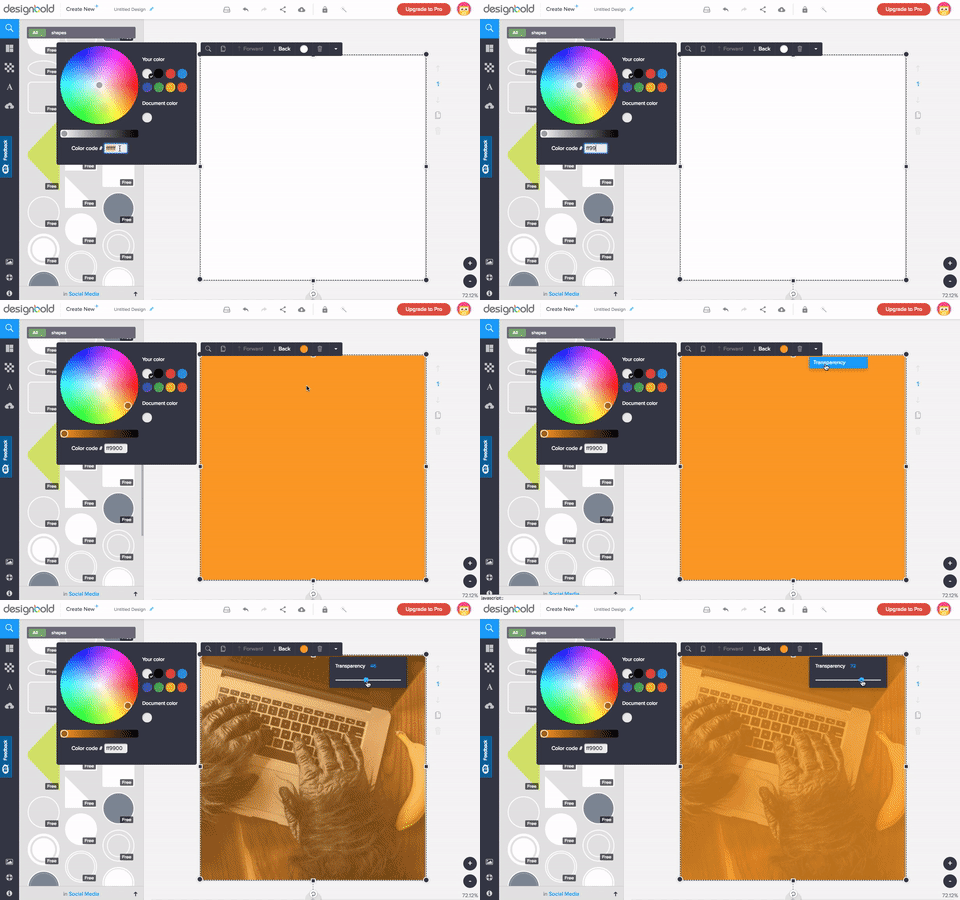
You want to add your brand colors to the graphic by using a color overlay. You'll need your brand color hex codes, which are “#” followed by six characters. Ask your designer if you don't know them or use an online color picker tool to find out.
Now create a box over the whole canvas.
Then change the color of the box to one of your brand colors and turn down the transparency to around 50-70%, depending on the photo and the darkness of your brand color.
Include Text
Now it's time to add the text in your own brand fonts. Click on the text icon and start typing away.
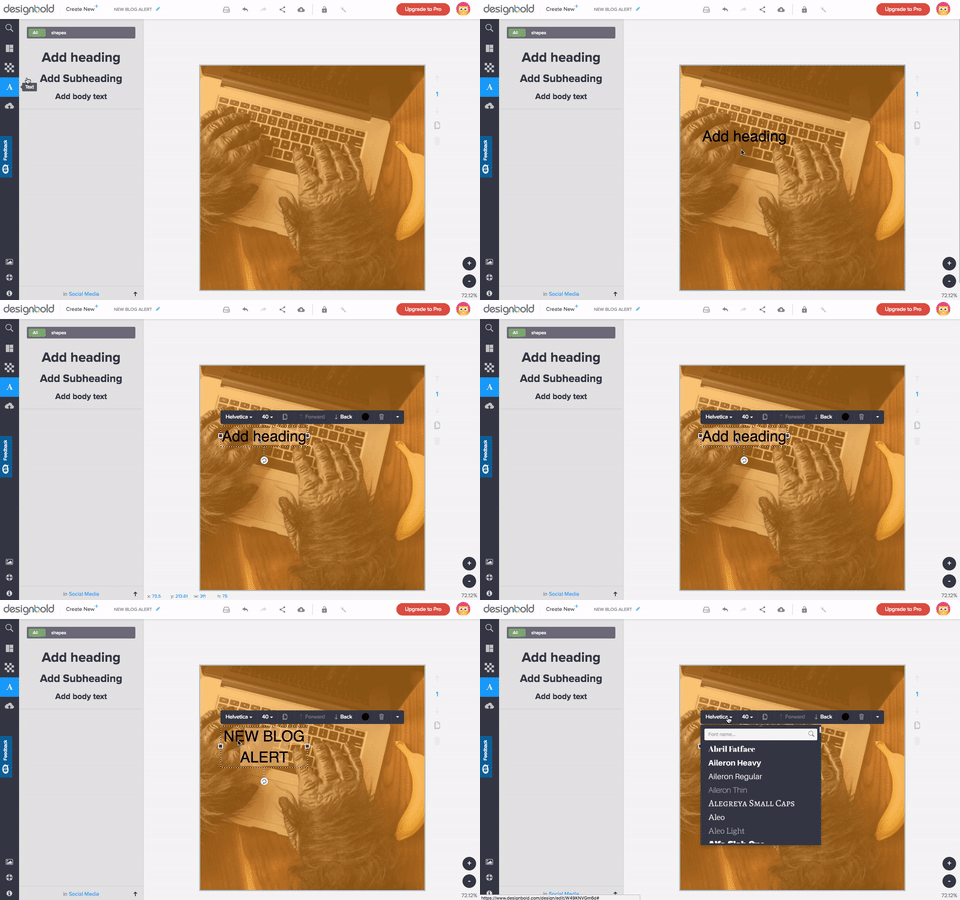
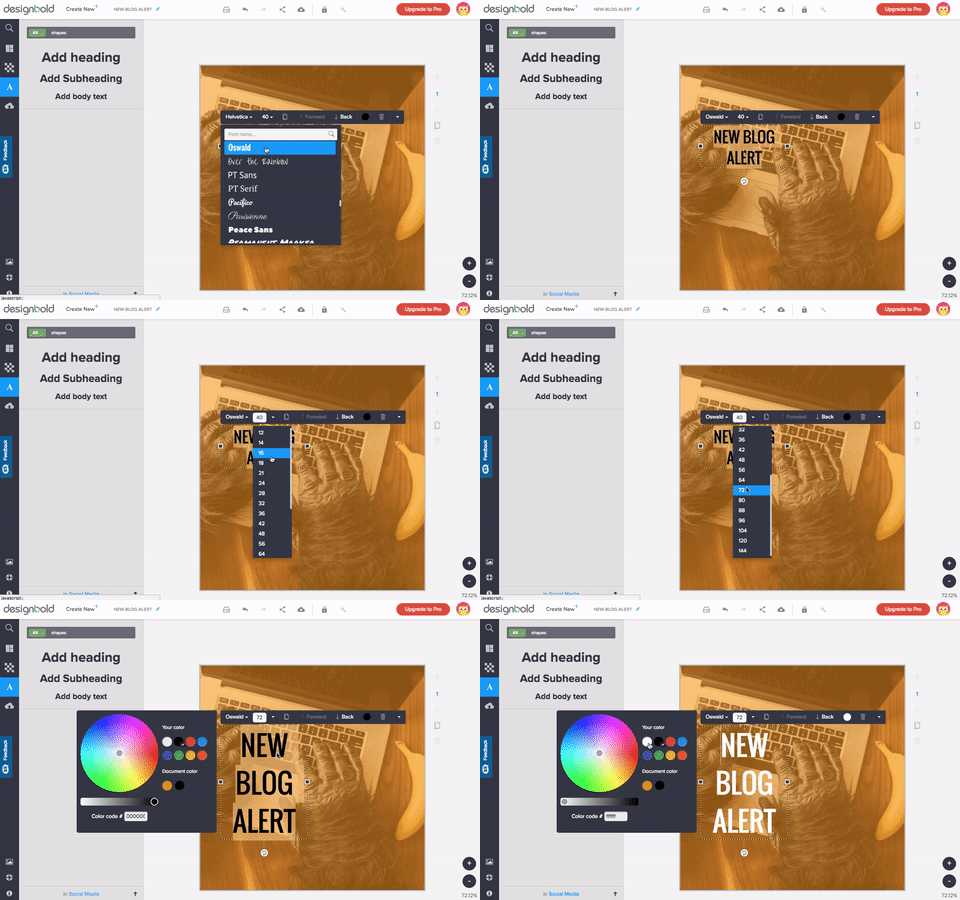
Then click and highlight the text box and change the type to your own brand font. Coming soon, you'll be able to add your own custom fonts if you have a premium plan.
Simply change the text to say what you want to say and resize. Remember, big and bold text always gets more attention, so keep it concise!

Discover Proven Marketing Strategies and Tips
Want to go even deeper with your marketing? Check out the Social Media Marketing Podcast! Publishing weekly since 2012, the Social Media Marketing Podcast helps you navigate the constantly changing marketing jungle, with expert interviews from marketing pros.
But don’t let the name fool you. This show is about a lot more than just social media marketing. With over 600 episodes and millions of downloads each year, this show has been a trusted source for marketers for well over a decade.
Upload Your Logo
Logo format is important on a colored background. Ask your designer if you need help with this. At the least, you need a PNG that has a transparent background or preferably a white version.
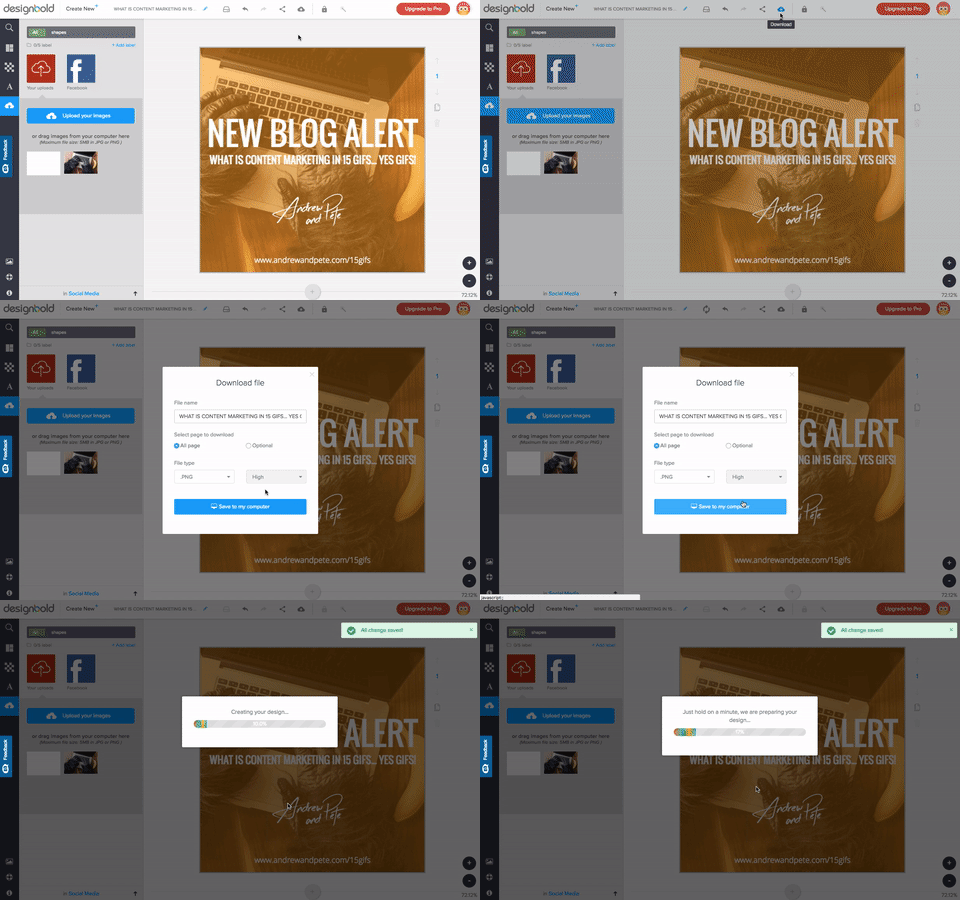
To upload your logo, click on the upload icon on the left and then click the Upload Your Images button to choose your file.
Add your logo to your design under the text, and if you'd like, use the text feature to add your website address. Nice work. It's time to download your new graphic.
Click on the Download icon in the top header. You'll have the option to download your graphic as a PNG, JPEG, or PDF.
PNG is best if you're sharing your image on social media. If the image is a blog image or is for your website, JPEG may be best. Flyers, brochures, and things for print need a PDF download.
#3: Google Slides
Google Slides is free as part of Google Drive when you sign up for a free Google account. It's essentially a simplified, cloud-based version of Microsoft PowerPoint.
Slides is ridiculously simple to use and great for collaboration, as multiple people can work on the same document together in real time. You can download your final graphics in PDF, PNG, JPEG, and even Microsoft PowerPoint file formats.
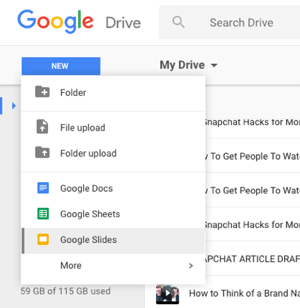
To get started, log into Google Drive, click New in the top-left corner, and select Google Slides.
To make your canvas the size you need, select File > Page Setup. In the pop-up box, select Custom, then Pixels, and type in the required size.
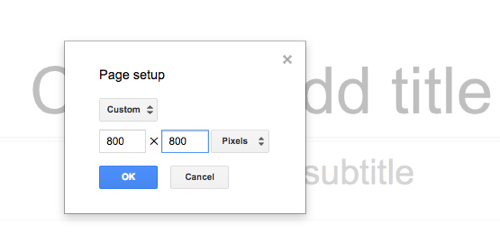
To create a platform specific graphic, find out the size you need and type it in. For a one-size-fits-all solution, go square, which will work well on all of the main platforms including LinkedIn, Instagram, Facebook, and Twitter desktop.
Choose a Background Photo
Now add a photo background to set the scene. If you need to find a good free image (not a cheesy stock photo), try Gratisography or Unsplash. You can drag your image into Slides or click on the Image icon to upload it.

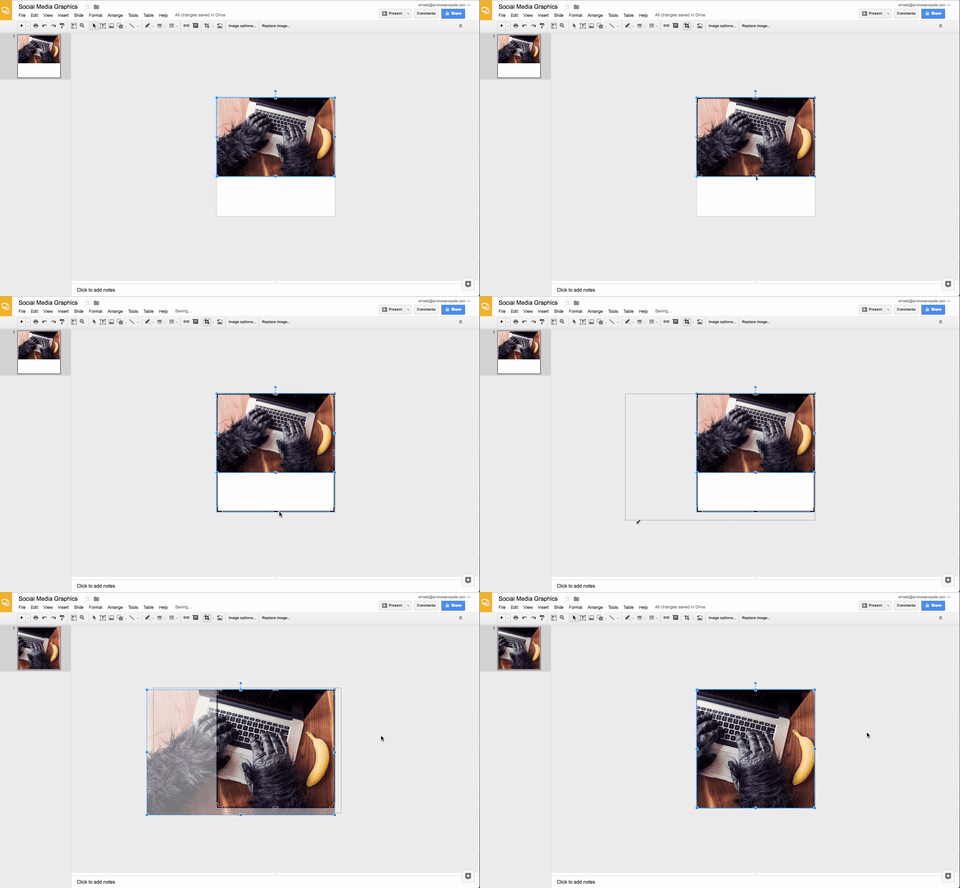
Once you've added your photo for the background, click and drag from the corners out to ensure the photo takes up the entire canvas. You may want to use the Crop feature to crop the photo all the way to the edges. Look out for the red guidelines, which flash up as you reach the edges, to help you crop it perfectly. If the photo is really big, you may want to zoom out first.
Add a Color Overlay
Now that you've got your background, you need to put your brand color overlay on it, which will make it easier to read the text. If you don't know your brand color codes, ask your designer or use an online color picker.
Create a box over the whole canvas.
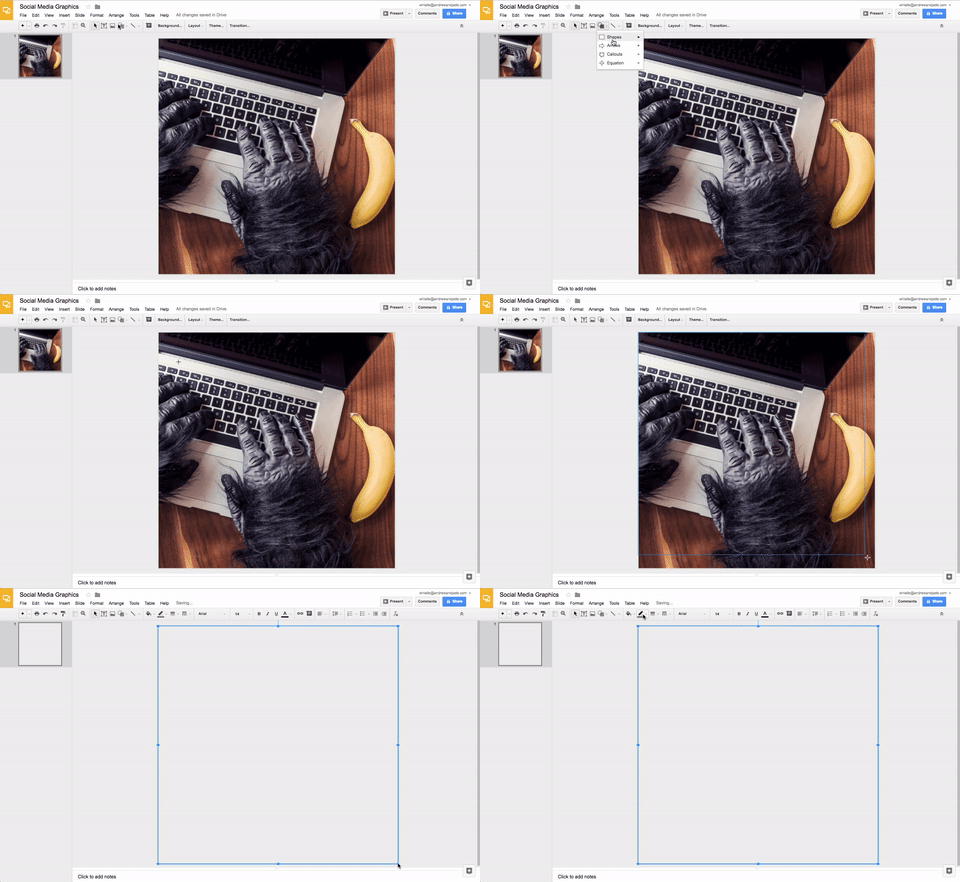
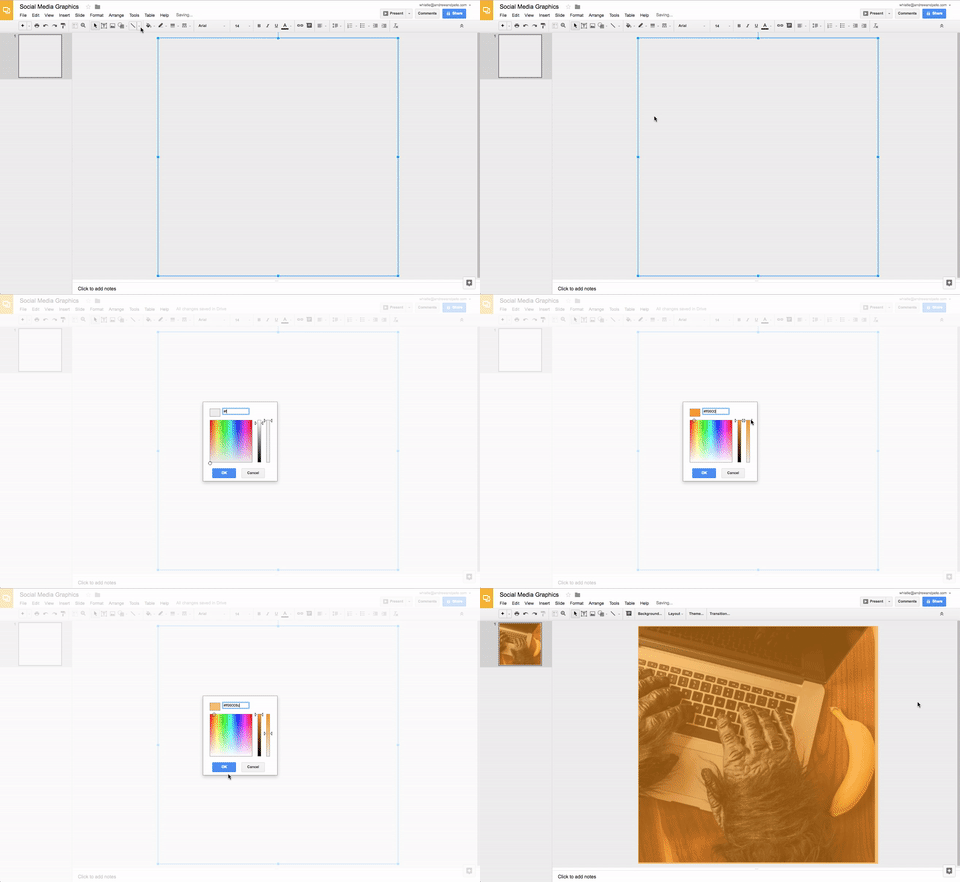
Change the color of the box to one of your brand colors. Then turn down the transparency to around 50-70%, depending on the photo and the darkness of your brand color. It should now look like this:
Include Text
The next step is to add your text. The most legible color of text to have on a colored or photo background is white.
Unless your brand color is super light (like yellow or cream), white text always looks much better on colored backgrounds. If you do have a light brand color, use a really dark gray or brown instead of 100% solid black; it will look tons better.
To add text, click on the T icon and create a text box to write in. Then simply change the text to say what you want to say and resize it to fit. Try not to use too much text; short, punchy, large, bold text always performs much better.
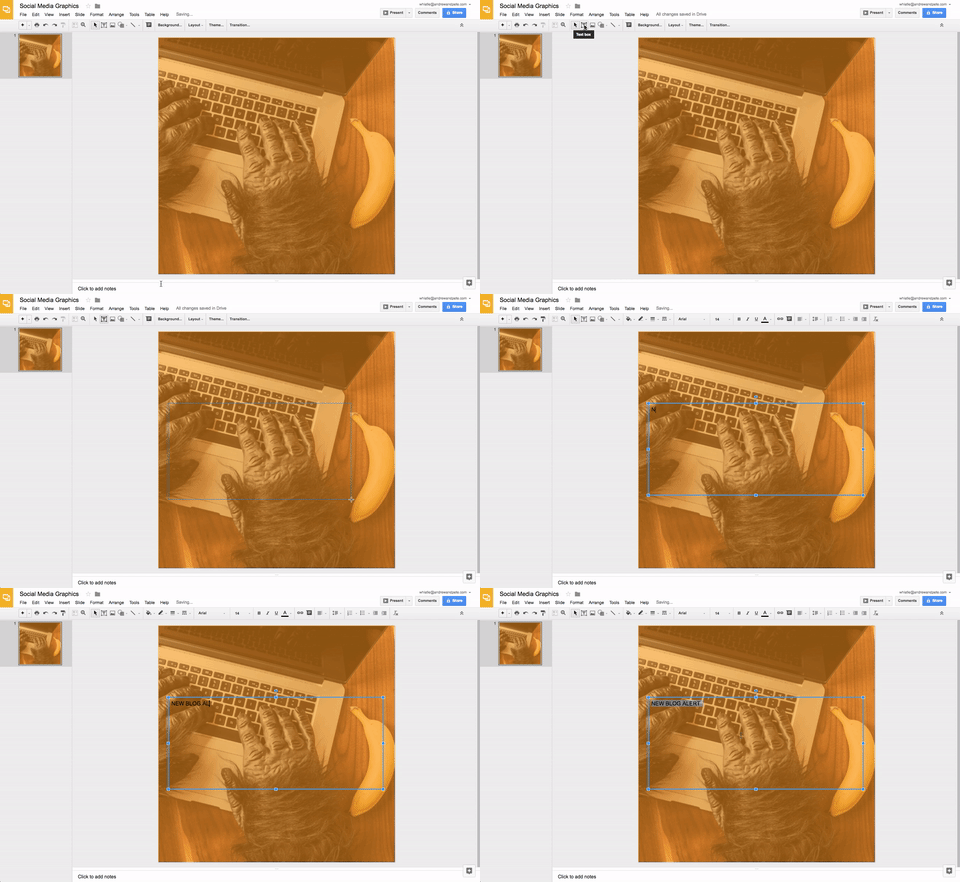
Now click and highlight the text and change the font to your own brand font. Slides allows you to use the whole Google Fonts range, which is great. Unfortunately, you can't upload your own fonts to use.
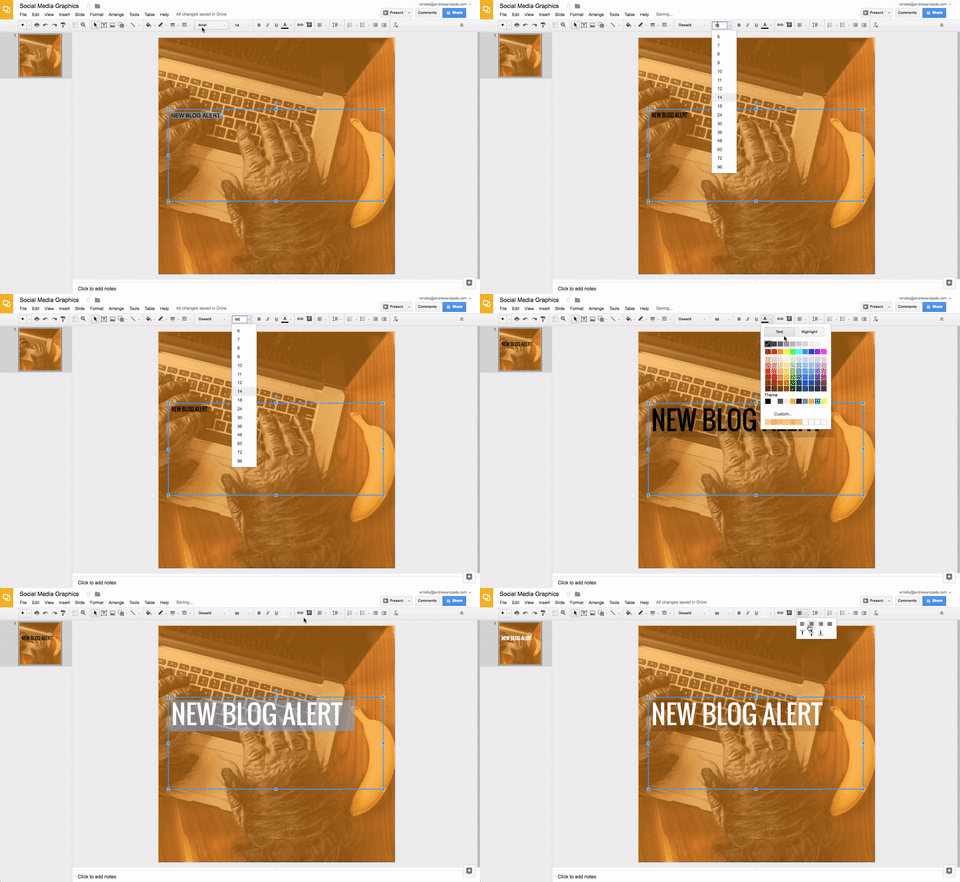
If you right-click on the text box and choose Center on Page > Horizontal, the text box will center-align itself on the page.
Upload Your Logo
Make sure you have your logo in a format that works well on a colored background or ask your design for files. If you don't have this, ask your designer. A white version is best, but you at least need a PNG that has a transparent background.
You can click and drag your logo into Slides really easily or click on the Image icon to add in your logo.
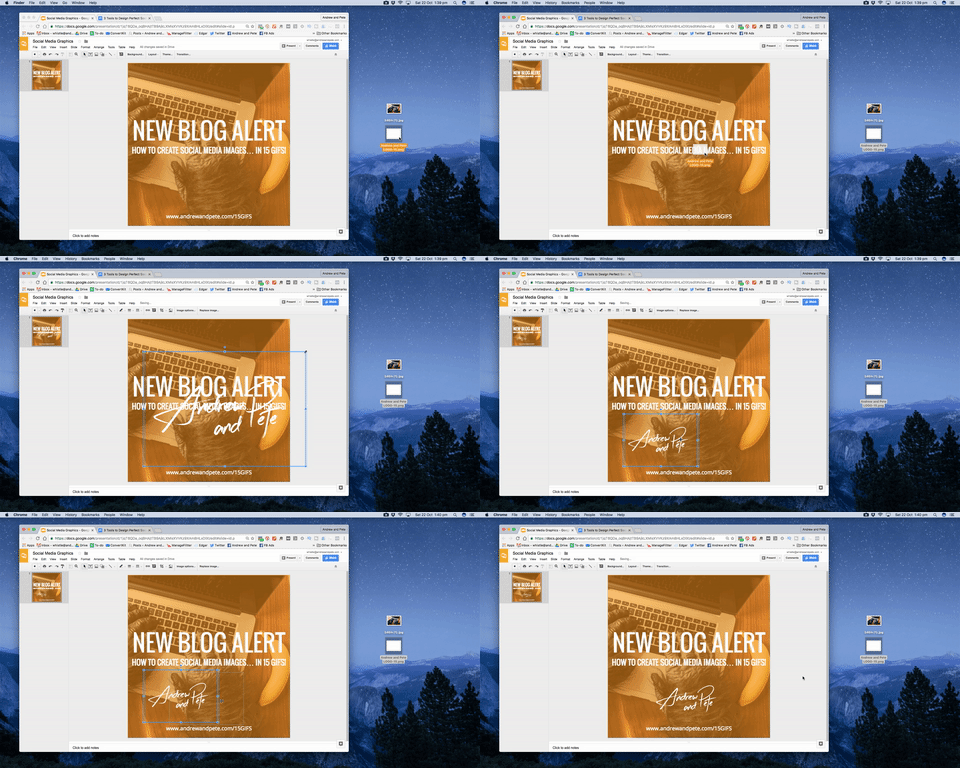
Add the logo to your design at the bottom under the text. Use the text feature if you want to get fancy and add your website address. That's all there is to it. Now it's time to download your image.
Simply choose File > Download As > PNG Image and it will download to your computer. Depending on how you plan to use the graphic you created, you may want to choose different options when downloading.
For sharing on social media, PNG is best, and JPEG may be best if the image is for your website, such as a blog image. Choose PDF for flyers, brochures, and things for print.
Bonus Design Tips
Use white text. Just to reiterate (because it's so important), you should use white text whenever the background is colored or a photo or both (in this case). Lighter background colors are the only exception.
Align everything. And we mean everything. If it's text, make sure it's all centered on the page properly or all left/right-aligned, for example. If you put an image onto a design, make sure it's aligned to something. Finally, make sure the gap around an image or text box is always equally spaced from all sides of the graphic.
Use charcoal, not black. If you want to use a black (#000000) background or black text on a design, use a lighter shade of black (e.g., #191919). It will look much softer.
Use the same fonts consistently. To keep your brand recognizable, be consistent with your fonts and don't use too many. Use a dedicated font for your headings, subheadings, and paragraph text. One clear script font is always nice to have too. If they're Google fonts, your job becomes easier when you design across different platforms.
Create a swipe file. Create a file on your computer or in a tool like Evernote for design inspiration. If you see a design you like, take a screenshot of it and add it to the file. Then next time you need to design something, you'll have some inspiration to get your creative juices flowing.
Conclusion
We get it, you're not a designer… and what you create yourself might not be at the high-quality standard you need for credibility.
This foolproof four-step process will help you create amazing social media graphics that are on brand and look great. Each of the tools is free to use and it's up to you to choose which one is best for you.
Yes, there are other ways of designing graphics, but this tutorial is for people who have zero eye for design. All you have to do is copy what we've shown you and you can't go wrong! This method is perfect for creating social media graphics and quotes to promote blogs, upcoming webinars or events, new offers, and more.
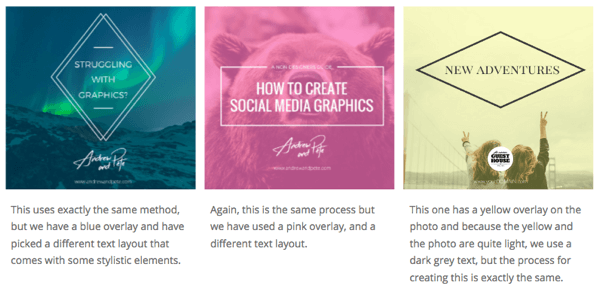
In true art show style, here are some other types of graphic designs you can create with these tools. We're looking forward to seeing your awesome graphics!
What do you think? What types of social media graphics do you create? What are your favorite design tools? Please share your thoughts in the comments below.
Attention Agency Owners, Brand Marketers, and Consultants

Introducing the Marketing Agency Show–our newest podcast designed to explore the struggles of agency marketers.
Join show host and agency owner, Brooke Sellas, as she interviews agency marketers and digs deep into their biggest challenges. Explore topics like navigating rough economic times, leveraging AI, service diversification, client acquisition, and much more.
Just pull up your favorite podcast app, search for Marketing Agency Show and start listening. Or click the button below for more information.

