Are you drowning in social media tasks?
Do you need better tools to help you manage your social media marketing?
Automating some of the more repetitive tasks related to social media can help you be more productive and efficient with the execution of your social media strategy.
To save you time and improve your marketing efforts, I’ll show you three social media tools that will deliver your content efficiently.
#1: Be More Efficient on Facebook
Post Planner, an independent application you install within Facebook, is designed to help you deliver content to your Facebook Page effectively. The app offers paid plans and a free trial. We’ve used the free trial for the demonstration below.
Features:
- Automate publishing of selected content to your Facebook Page based on a time schedule that you predetermine.
- Identify trending content to add to your queue.
- Add your blog feed and publish your new posts automatically.
- Crowdsource content from other Post Planner users. If a Post Planner user creates a folder containing content from the top Facebook experts, this folder is available to other Post Planner users to select content from.
- View the latest content from your favorite Facebook Pages, Twitter accounts or blogs from within Post Planner and add articles, tweets or posts to your queue.
- View simple analytics that show you the percentage of people who liked your post, clicked it or commented on it.
- Target your posts based on a selection of details such as gender, age group and level of education and save the target for future use. Link the targeting to a time zone and Post Planner will adjust the publish time.
- Post Planner provides a database of thousands of updates you can search to find ideas for your status updates.
- Upload a bulk file of posts.
Setup
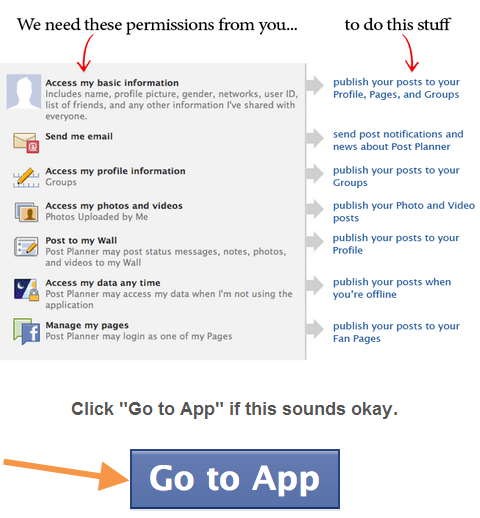
Go to Post Planner and select ‘Sign in with Facebook’ then ‘Go to App’ and grant permission to let Post Planner publish on your behalf.
Here’s an example of how Post Planner will look when you initially login.
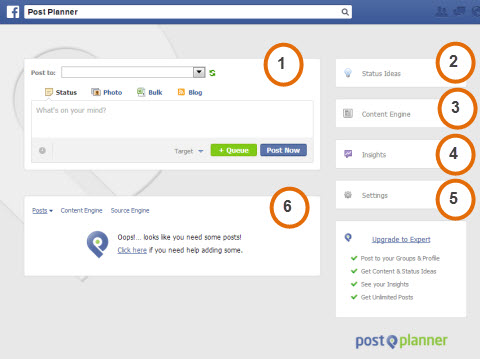
‘Post to’ is where you type in content to post. Choose from:
- Status: Post a simple text-only message or include a link to content.
- Photo: Upload a photo to share on Facebook.
- Bulk: Upload a file of multiple posts to automatically schedule them.
- Blog: Add your blog feed so content from your blog is automatically shared (this is a paid feature).
When you want to share content, click ‘Post Now’ or ‘+ Queue’. ‘+ Queue’ will automatically place your post to publish in the next available time slot within your preconfigured schedule.
‘Status Ideas’ will show you a list of suggested status updates based on brands, seasons, calls to action, etc. Choose a status and add to your queue if you need help finding something to say.

Use ‘Content Engine’ to store and search your favorite content sources in Post Planner.
For example:
Get World-Class Marketing Training — All Year Long!
Are you facing doubt, uncertainty, or overwhelm? The Social Media Marketing Society can help.
Each month, you’ll receive training from trusted marketing experts, covering everything from AI to organic social marketing. When you join, you’ll also get immediate access to:
- A library of 100+ marketing trainings
- A community of like-minded marketers
- Monthly online community meetups
- Relevant news and trends updates
- Store keywords in ‘Get Trending Feed’ to find and share popular content.
- Add the feeds from Facebook Pages, Twitter or blogs that you like and trust. Read new content from within Post Planner and add it to your queue with one click.
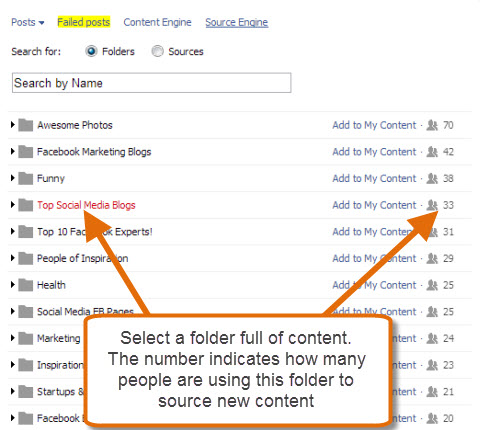
- When a Post Planner user creates a folder of content sources, the folder and its content are made available to other users. Add any folder to your content queue and view all of the content from these experts or add specific blogs from the folder.
You can display content in chronological order or by most likes or most shares of the content.
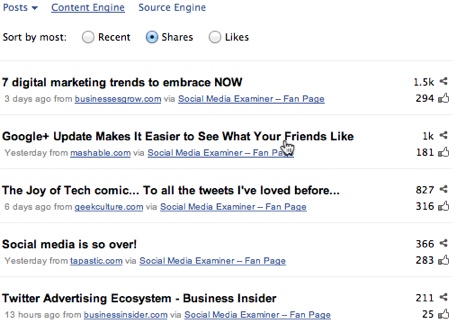
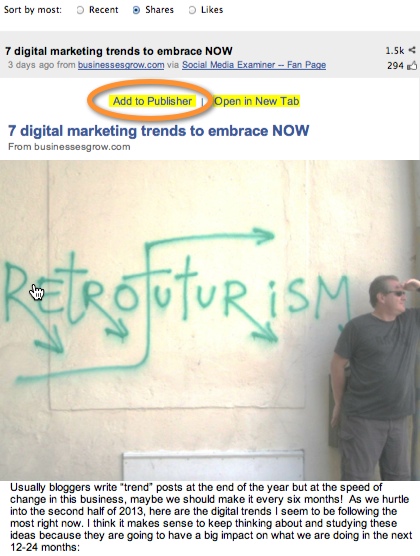
Click on a piece of content to read it within Post Planner and when you’re happy that it’s good for your audience, click on ‘Add to Publisher’ to place it in your queue.
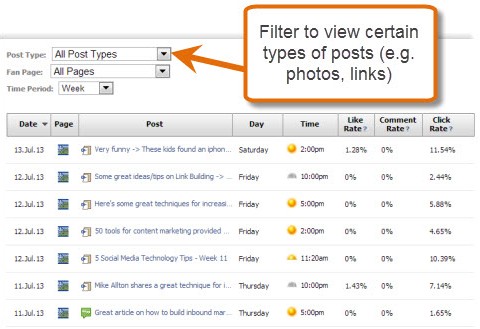
Click on ‘Insights’ to view simple analytics on content you share. For every post, you can view the time and date it was posted and the percentage rate of likes, comments and clicks the post generated. You can also filter by different types of posts that you published.
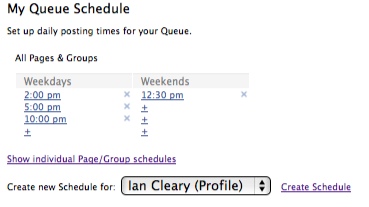
‘Settings’ is where you configure your preferences for Post Planner. Enter details such as your time zone, define the queue schedule for sending out your posts, add team members, create Pages lists, etc. If you manage multiple Facebook Pages, you can group them into lists so you can post a single piece of content to multiple Pages at the same time.
Benefits
Post Planner helps you:
- Quickly find content specifically for your Facebook Page(s).
- Easily add content to your queue.
- Auto-schedule your posting based on predefined times.
- Track what content is working or not working.
- Find ideas for content to share when you’re stuck!
Summary
To be successful on Facebook, you need to post great content consistently. Post Planner helps you find and share this content, which can save you a significant amount of time.
#2: Automate Repetitive Tasks Between Platforms and Apps
Zapier will automate tasks between online services. For example, when a new video is uploaded to your YouTube channel, Zapier will send out a tweet. The app offers a standard free service and paid premium plans. We’ve used the free trial for this demonstration.
Zapier currently works with over 200 online services and more services are added regularly.
Features:
- Automate trigger events (Zaps) between supported services so that if a particular event happens with one service, an action is performed on another service.
- Set up multiple Zaps for multiple services.
- Customize what gets included in the trigger: For example, select specific fields of a form to be copied to a trigger action.
Setup
Sign up for Zapier by providing your basic details.

Once you’re signed up, you’re ready to set up some automation, otherwise known as a Zap.
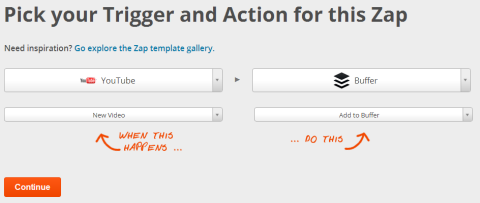
First specify the source of the trigger. In this example, we’ll use YouTube and define the action that springs the trigger as a new video uploaded to your channel.
Next specify the online service that is triggered and the event you want to execute. In this case, when a new video is added, you want details added to your Buffer queue so it can be posted to one or more of your social channels.
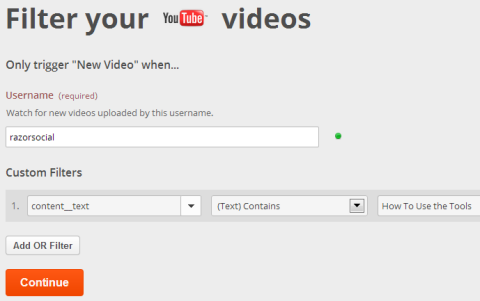
Next, connect to your YouTube and Buffer accounts. You’ll be asked if you want to filter the videos, which lets you include all videos or only videos of a specific type or that include specific keywords.
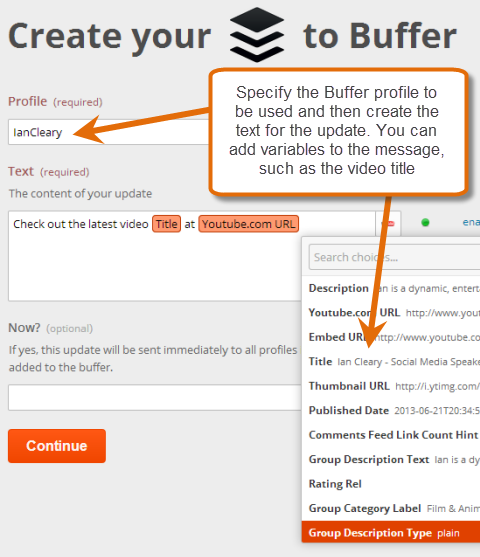
When you connect your Buffer account, you’ll need to specify which social media profiles the content will be sent to before you configure the message. Your messages can simply include text or you can add variable placeholders that will be replaced by text.
Discover Proven Marketing Strategies and Tips
Want to go even deeper with your marketing? Check out the Social Media Marketing Podcast! Publishing weekly since 2012, the Social Media Marketing Podcast helps you navigate the constantly changing marketing jungle, with expert interviews from marketing pros.
But don’t let the name fool you. This show is about a lot more than just social media marketing. With over 600 episodes and millions of downloads each year, this show has been a trusted source for marketers for well over a decade.
We added ‘Title Text’ and ‘Group Player URL’, which means that when Buffer sends out the message it will include the title of the video, which is taken from YouTube, with a link to the video.
To test your Zap and make sure it works the way you want before you enable it, select a video from your YouTube channel and send it to Buffer.
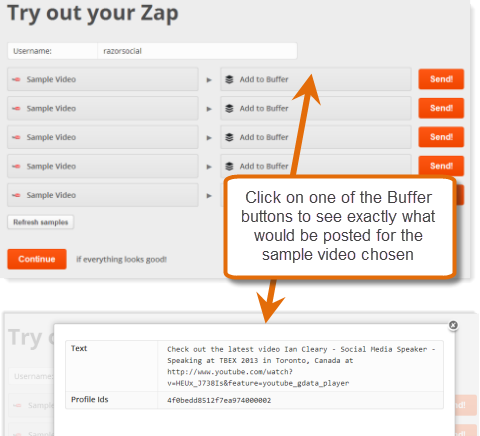
If you’re happy with the results, name your Zap and enable it.
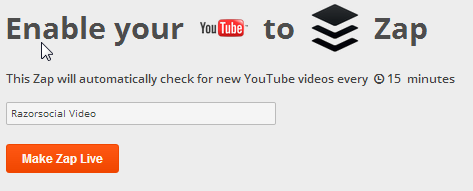
Now, anytime a video is added to your channel it will be sent to Buffer and Buffer will add it to your queue.
Other Examples
Create your own Zaps or use one of the thousands of Zaps that are fully configured.
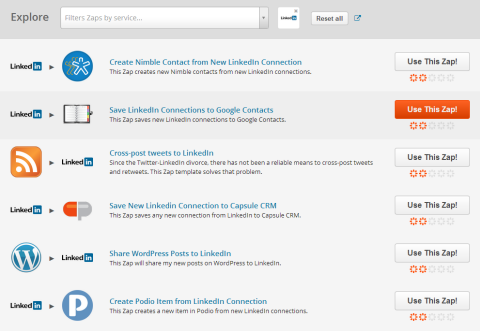
The following are other examples of Zaps you could consider setting up:
- When someone mentions a particular keyword or group of keywords on Twitter, Add Tweets to a Google Docs Row and review them at a time that is suitable for you.
- If you use Wufoo forms to collect email addresses, set up a Zap to add them directly into your AWeber account.
- Set up a zap to tweet about new entries to your blog.
- Create a podcast RSS feed by dropping an MP3 file into a Dropbox directory.
Summary
It makes sense to replace repetitive tasks with some automation. Zapier supports a broad range of services and Zaps will save you time and ensure that no task gets forgotten.
#3: Distribute New Blog Posts
When you publish a new blog post, you want to send it out to your social networks. Dlvr.it allows you to do this automatically and provides good analytics in the bargain. The app offers free and paid versions.
Features
- Automatically post your blog articles to Twitter, Facebook, Google+ (business page), App.net, Tumblr, StatusNet, Delicious and RSS feed.
- If you have multiple authors writing blog posts, set dlvr.it to submit specific post to an appropriate account based on the author. For example, post a new article to the relevant author’s Twitter account.
- Embed a Top Posts widget on your website to showcase the most popular content that was shared out through dlvr.it.
- Track clicks on any links you send out through dlvr.it.
- Dlvr.it will automatically add hashtags to the content you send out.
Setup
Sign up for the free trial with your name and email address.
To create your first ‘Route’, click on the ‘+ Add Route’ button, then the ‘+add’ button in the Sources menu to enter details of the ‘Source’ where dlvr.it will pick up content from.
You can use three places as a source:
- Standard RSS feed from your blog.
- Dlvr.it email. Dlvr.it will create an email address and when you send information to this email address, the content will automatically be sent out to the channel you set up.
- Twitter RSS feed. Monitor a feed of filtered content from Twitter and retweet this content automatically.
We’ll use the Standard RSS feed in this example. To post your blog articles to your social networks, enter the address of the feed for your blog, then click ‘Save’.
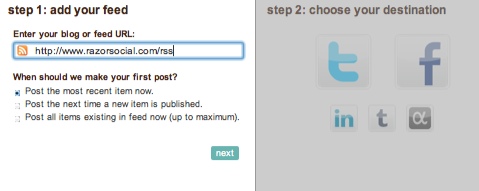
Now, click the ‘+add’ button in the Destinations menu to tell dlvr.it where to post your content. We chose Twitter.
Now, when you publish a new blog post, it will automatically post to your Twitter account.

Configure Sources and Routes
There are various filter options. Here are some of the important ones:
- By default, dlvr.it will pick up any new content from your source feed, but you can configure it to pick up select posts. In the example below, dlvr.it will only pick up posts that have ‘news’ in the title.

You can configure what content and what posts are picked up.
- Add tracking codes to the links you share so you can review them with analytics tools such as Google Analytics.
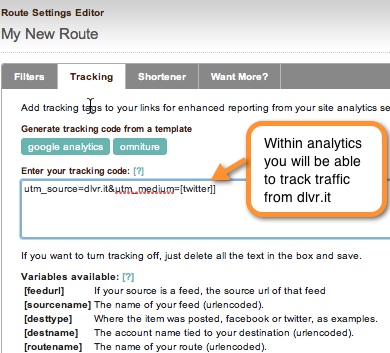
A tracking code will help you drill down on traffic with an analytics tool.
- Replace the default dlvr.it link shortener with another shortening service such as bitly, goo.gl, or your own branded custom link shortener.
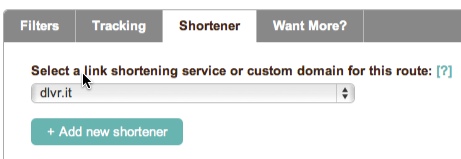
Replace the default dlvr.it URL shortener with your choice of shortening service.
The paid versions of dlvr.it allow you to:
- Specify how often dlvr.it checks your queue for new content.
- Limit the amount of posts dlvr.it makes during an update period or during a day.
- Add text to the start or end of every feed post. For example, add ‘New Post’ before the title of every new blog article published from your RSS feed.
- Specify a posting schedule that works for you instead of posting immediately.
- Add location tags so that platforms such as Twitter will display location-specific information.
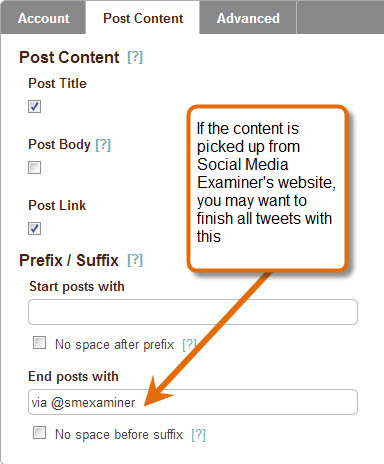
Configure Destinations
When you configure a destination, you can specify how the content appears. For example, include the title and a link to the content and mention that the content comes from Social Media Examiner by adding ‘via @smexaminer’ to all posts sent out.
The advanced options allow you to:
- Post content as a retweet when you share content from a blog that's not yours.
- Automate hashtag placement based on categories you assign to your blog article.
- Choose how dlvr.it handles blank spaces found when it's constructing an update.
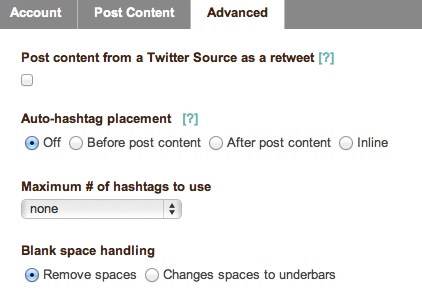
Dlvr.it assigns hashtags to your posts automatically.
Analytics
Dlvr.it provides good analytics to show how many people clicked on your content and where those people are from. You can also see which content got the most clicks.
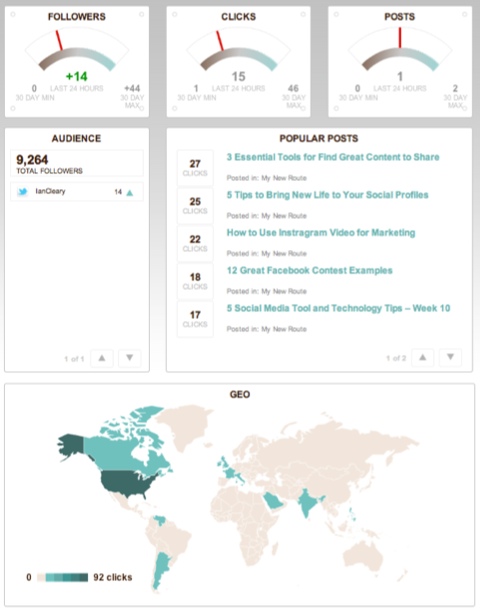
The analytics can also be broken down by ‘routes’ so you can test multiple routes for performance.
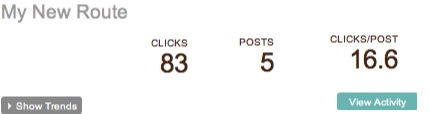
Summary
Dlvr.it will ensure that your blog content is sent out automatically to your social channels and the analytics will let you see which content is most popular with your social network connections.
Final Comments
Full automation of social media is never advisable, but automation of some tasks can save time and free you up for content creation, market research and overall engagement.
What do you think? Have you considered automating some of your social tasks? Have you used any of the tools above? Are there other tools you would recommend? Please leave your questions and comments in the box below.
Attention Agency Owners, Brand Marketers, and Consultants

Introducing the Marketing Agency Show–our newest podcast designed to explore the struggles of agency marketers.
Join show host and agency owner, Brooke Sellas, as she interviews agency marketers and digs deep into their biggest challenges. Explore topics like navigating rough economic times, leveraging AI, service diversification, client acquisition, and much more.
Just pull up your favorite podcast app, search for Marketing Agency Show and start listening. Or click the button below for more information.