Do you need to create professional-looking images for your social media marketing? Looking for mobile and desktop tools to help?
In this article, you'll discover three affordable image design tools for marketers.
#1: Create the Perfectly Sized Image for Every Social Network
Over (available for iOS and Android) is a powerful image tool that lets you create stunning graphics in minutes. It's available in both free and paid versions ($99.99/year for iOS and $39.99/year for Android, both with a 7-day free trial). The features in the free version are more than sufficient for creating attractive social media images.
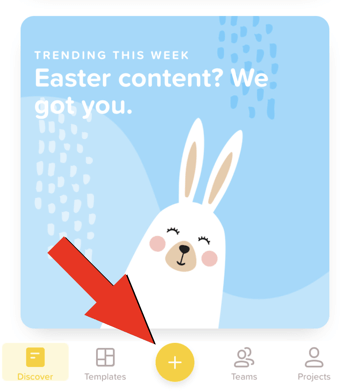
After you install Over on your mobile device, launch the app and tap the + button to create a new project. If you have the paid version of the app, you can choose one of the featured layouts or design your own background. This walkthrough will focus on options available in the free version of Over.
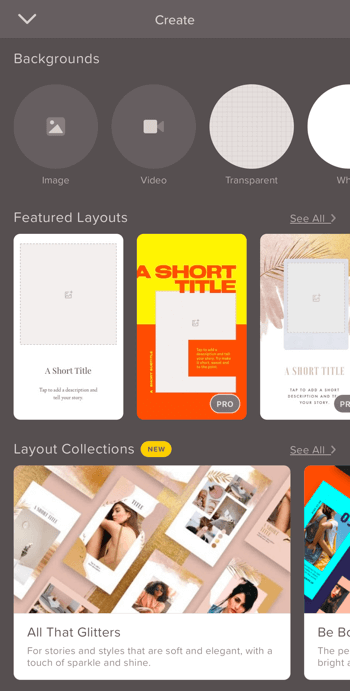
When your new project opens, select a background for your design. You can choose an image or video from your camera roll or opt for a transparent, white, or black canvas. A transparent background will give you the most versatility.
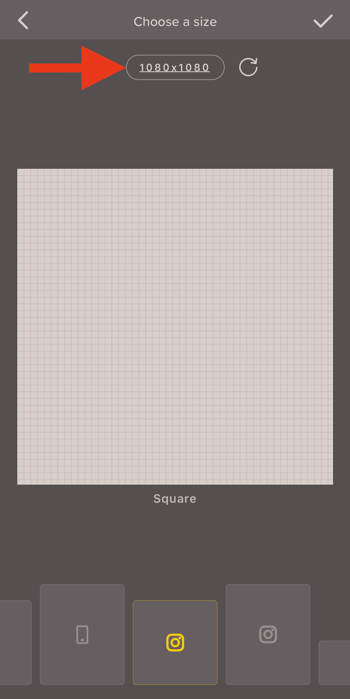
On the next screen, choose a size for your project. At the bottom of the screen, you'll see a variety of social media presets—Instagram, Facebook, Twitter, Snapchat, Pinterest, and YouTube—iPhone backgrounds, and more. To set a custom canvas size, tap the image dimensions box at the top of the screen and enter a custom width and height. Tap the checkmark icon to save your changes as you design your image.
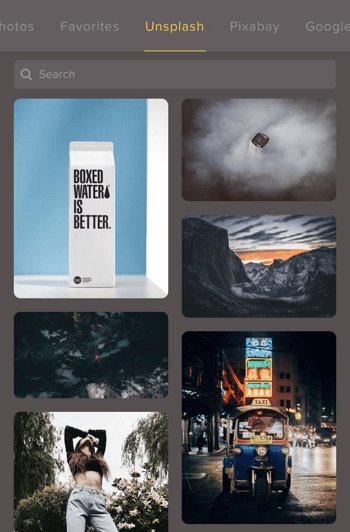
To add an image to your design, tap Image at the bottom of the screen. Then select a photo from your camera roll or a royalty-free image from Unsplash or Pixabay. Use the search box to find a stock image that fits your brand.
After you make your image selection, you'll see editing tools at the bottom of the screen that let you apply a filter to the photo, tweak exposure and contrast, adjust opacity, crop, and more.
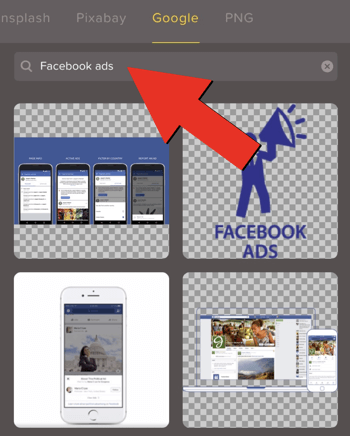
If you're using the paid version of Over, you can automatically search your phone for any PNG files you've saved, making it easy to include a logo or custom image file in your design. If you don't have an image saved to your phone, you can search for images on the Google tab.
Get World-Class Marketing Training — All Year Long!
Are you facing doubt, uncertainty, or overwhelm? The Social Media Marketing Society can help.
Each month, you’ll receive training from trusted marketing experts, covering everything from AI to organic social marketing. When you join, you’ll also get immediate access to:
- A library of 100+ marketing trainings
- A community of like-minded marketers
- Monthly online community meetups
- Relevant news and trends updates
To add text to your design, tap the Text tool at the bottom of the screen and type in your text. Below the text input box, you'll find dozens of fonts to choose from. Tap the chevron icon on the left to access the font library with additional free and paid options.
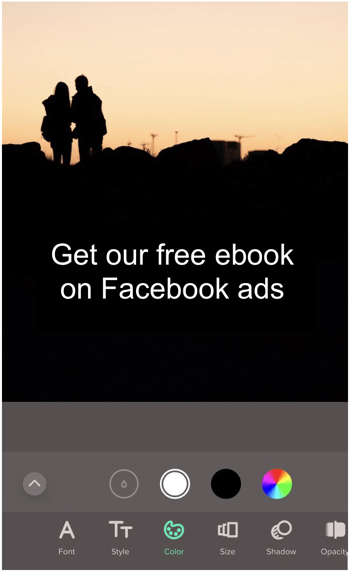
After you save your text, use the tools at the bottom of the screen to tweak the text. Experiment with some of the text functionality. For instance, try applying a shadow to dark text on a light background, or adjust the alignment or opacity to make it stand out.
If you want the text color to match one of your brand colors, select the Color tool. Then tap the color wheel icon and type in the color code you want to use. Over also offers a custom color picker that allows you to match the text color to another shade in the photo to give your graphic a consistent look that's appealing to the eye. Play around with your color options so your photo speaks perfectly to your audience.
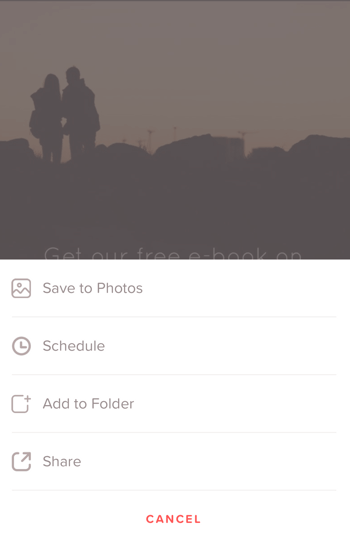
When you're ready to share your photo, tap the arrow button at the top right of the screen and select an option from the pop-up menu. Over lets you save your image directly to your phone with no watermark. If you upgrade to the pro version, you can schedule a post to your social account.
Pro Tip: Over also allows you to customize videos to a degree. You can add graphic overlays like your logo or a call to action directly on top of videos. This functionality is particularly useful for creating Instagram stories.
#2: Remove Backgrounds and Combine Photos
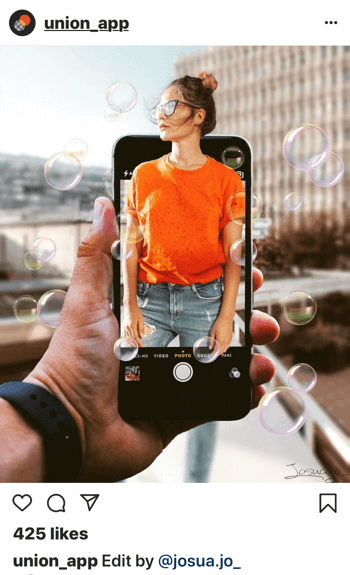
Union (available for iOS for free, with in-app purchases available) lets you remove parts of existing images to merge them. If you've ever wanted to tweak a sunset, blend in a new background, or combine two images, Union is the app for you.
After you launch the app, tap New to create a new project. In the pop-up menu, tap Background.
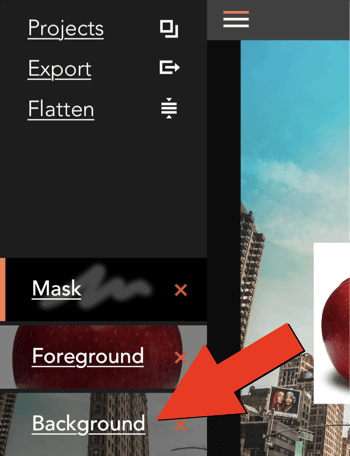
The background you choose will form the bottom layer of your design. Tap Photo and select an image from your camera roll. Then adjust the image dimensions if needed. Alternatively, start with a colored or blank background if you plan to create a PNG. This is a great option for removing the background noise from a logo or headshot to use on top of another image.
After you select your background, tap the menu button in the upper-left corner of the screen.
Next, tap the Foreground option and select an image. The foreground is where you'll be tinkering and editing to create something unique. This layer exists on top of your background so select an image that will create an interesting effect.
You can drag the foreground image to reposition it on the screen, pinch to scale, and use two fingers to rotate it.

Discover Proven Marketing Strategies and Tips
Want to go even deeper with your marketing? Check out the Social Media Marketing Podcast! Publishing weekly since 2012, the Social Media Marketing Podcast helps you navigate the constantly changing marketing jungle, with expert interviews from marketing pros.
But don’t let the name fool you. This show is about a lot more than just social media marketing. With over 600 episodes and millions of downloads each year, this show has been a trusted source for marketers for well over a decade.
After you select the foreground image, tap the menu button again and then tap the Mask option to start making alterations to it.
You can erase parts of your photo manually with the Eraser tool, which has a variety of sizes and options to choose from. Use your finger to brush away parts of the foreground image. Pinch to zoom in for details.
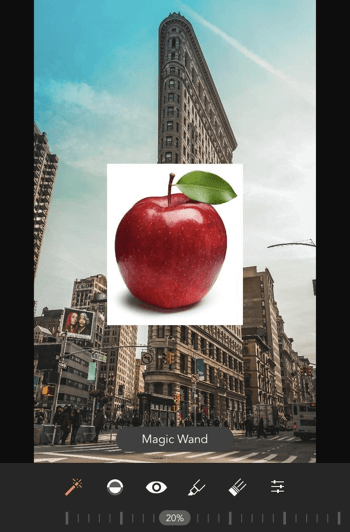
To erase the background noise in one click, select the Magic Wand tool instead. Tap the area you want to remove and then drag the slider to fine-tune your edits. Use the Draw tool if you need to restore portions of the foreground image.
In the photo below, we're erasing the white background of the apple so the image will sit cleanly on the streets of New York City.
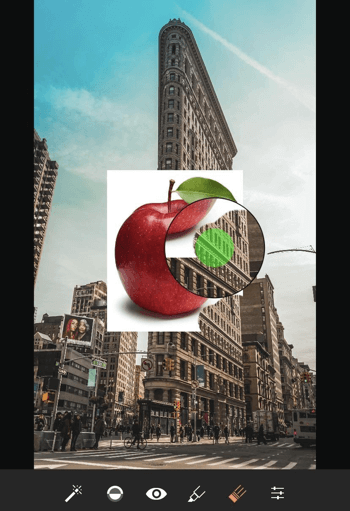
If you're happy with your image, you can flatten all of the layers into a single image. This allows you to add even more layers to your photo and start the process all over again.

When you're ready to share your masterpiece with the world, tap the Export option to save the image to your camera roll, open it in Instagram, or share it.
#3: Produce Quick Graphics
Pablo by Buffer is a free web-based image tool that allows you to create graphics for your social media accounts. Its customization options are somewhat limited, but it's perfect if you need a quick image for a tweet, Facebook post, Pinterest pin, or Instagram post. The main benefits of Pablo are its speed and ease of use.
On the left side of the screen, search through 600,000+ images from Pablo, Unsplash, and Pixabay, and then select an image to add it to your canvas. Or click the Upload Image button to upload your own file for even more customization.
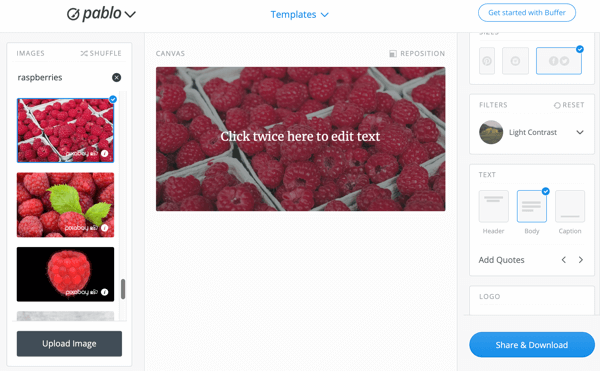
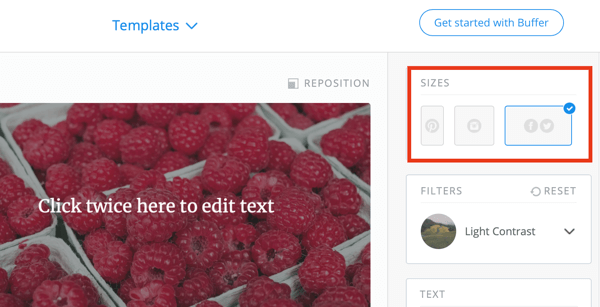
Once you've selected the perfect background, choose an image size on the right side of the screen. Pablo offers three image size presets: Pinterest, Instagram, and Facebook/Twitter.
Pro Tip: For Facebook images, choose the Instagram photo size to maximize your space in the news feed.
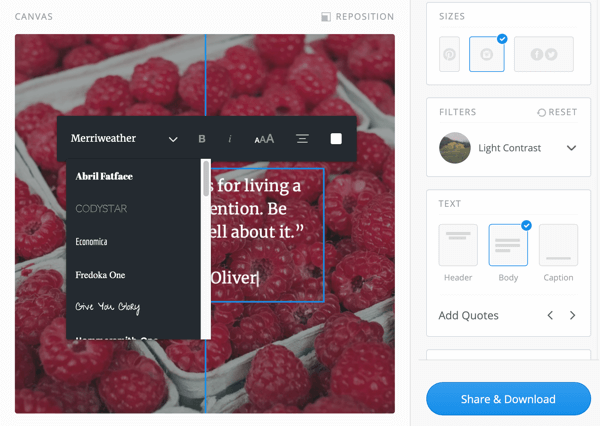
Pablo's text options aren't as extensive as those you'll find with Over, but they'll do the trick for quick designs. You can choose from more than 20 fonts and adjust the size, alignment, and emphasis. Drag the text to reposition it on the image.
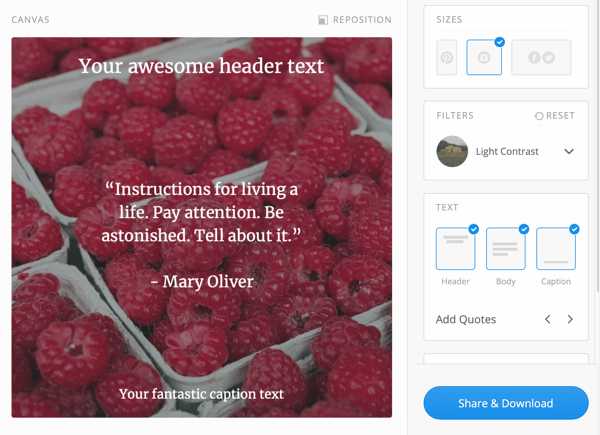
In the Text section on the right side of the screen, you can add a header and caption or choose one of Pablo's many pre-written quotes.
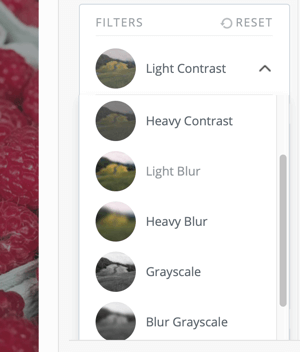
In the Filters section, you'll find options to apply contrast, blur, or other filters to make your text stand out on a noisy background. Play around with the filters to find an overlay that suits your image.
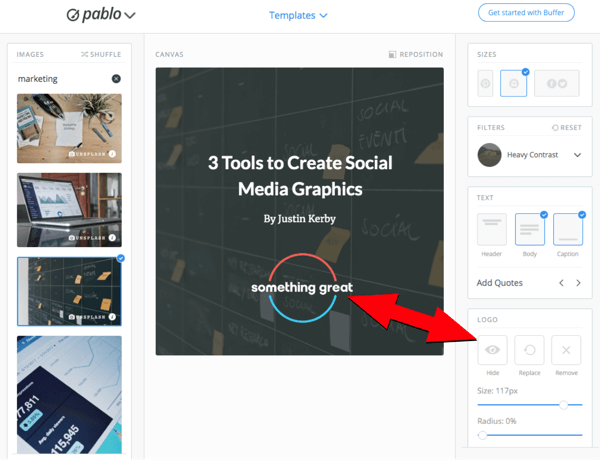
Another handy feature is the ability to add a logo to your image to keep your brand front and center. Note that you can only upload one image to a single graphic.
When your image looks perfect, you can share or download it directly from Pablo. Send it to your Buffer, Facebook, Twitter, Pinterest, or Instagram account, or save it locally and upload it at a later time. Remember that because Pablo is a web-based tool, you'll lose your work if you reload the page.
Pro Tip: Use one of Pablo's templates to get your creative juices flowing. Click Templates at the top of the screen to view templates for quotes, announcements, promotions, and outreach. Simply select a template and start editing. You'll still have access to all of the customizations mentioned above.
Image Tools: 3 Design Tips
Here are a few tips for designing images to share on social media.
Use a Vertical Orientation
Keeping mobile users in mind, vertical images that fill your followers' screens typically get more engagement. On Instagram, for example, the optimal image size is 1080 x 1350 pixels. All of the tools mentioned above allow you to create photos in both horizontal and vertical layouts.
Keep Text to a Minimum
Including too much text in your design can clutter the image and messaging. Keep text to a minimum so users can understand your offering at a glance.
With a short and impactful text overlay, you'll also meet Facebook's advertising standards policy rule of keeping text to less than 20% of your graphic. This allows you to boost your images and reach a wider audience.
Incorporate White Space
Finally, capitalize on white space, which is the empty area in a design that brings balance to your image. White space can help direct the viewer's eye to your call to action and better convey your message.
Conclusion
While new image tools are coming out every day, Over, Union, and Pablo by Buffer are three of the best and most affordable currently.
Over makes it easy to create the perfect-size image for every social network and add custom overlays and logos. Union is a great choice if you need to remove a background from an image or combine two images into one stunning graphic. Pablo by Buffer is undeniably the fastest way to produce a social media image for your posts, especially if you need to add a logo and text.
What do you think? Are you using any of these image tools to design your social media visuals? What tools would you add to this list? Please share your input and tips in the comments.
More articles on social media image tools:
- Discover six Instagram Stories design tools for marketers.
- Learn how to create professional-looking images using Google Drawings.
- Discover seven mobile image tools for creating quality visual content.
Attention Agency Owners, Brand Marketers, and Consultants

Introducing the Marketing Agency Show–our newest podcast designed to explore the struggles of agency marketers.
Join show host and agency owner, Brooke Sellas, as she interviews agency marketers and digs deep into their biggest challenges. Explore topics like navigating rough economic times, leveraging AI, service diversification, client acquisition, and much more.
Just pull up your favorite podcast app, search for Marketing Agency Show and start listening. Or click the button below for more information.

